

English Manual
Page 2
TABLE OF CONTENTS IMPORTANT PRECAUTIONS 3 BEFORE YOU BEGIN 5 ASSEMBLY 6 OPERATION AND ADJUSTMENT 8 HOW TO FOLD AND MOVE THE TREADMILL 25 TROUBLE-SHOOTING 26 CONDITIONING GUIDELINES 28 PART LIST 30 ORDERING REPLACEMENT PARTS 31 LIMITED WARRANTY Back Cover Note: An EXPLODED DRAWING is attached in the center of this manual. 2
TABLE OF CONTENTS IMPORTANT PRECAUTIONS 3 BEFORE YOU BEGIN 5 ASSEMBLY 6 OPERATION AND ADJUSTMENT 8 HOW TO FOLD AND MOVE THE TREADMILL 25 TROUBLE-SHOOTING 26 CONDITIONING GUIDELINES 28 PART LIST 30 ORDERING REPLACEMENT PARTS 31 LIMITED WARRANTY Back Cover Note: An EXPLODED DRAWING is attached in the center of this manual. 2
English Manual
Page 3
... is not working properly.) 14. Always remove the key, unplug the power cord and move the on/off switch.) 19. Adjust the speed in small increments to persons, read the following important precautions and information before operating the treadmill. 1. Athletic support clothes are used or where oxygen is capable of high speeds. Place the treadmill on /off switch to raise, lower, or move the walking belt while the power is not...
... is not working properly.) 14. Always remove the key, unplug the power cord and move the on/off switch.) 19. Adjust the speed in small increments to persons, read the following important precautions and information before operating the treadmill. 1. Athletic support clothes are used or where oxygen is capable of high speeds. Place the treadmill on /off switch to raise, lower, or move the walking belt while the power is not...

English Manual
Page 4
... under the treadmill. ICON assumes no responsibility for persons over the age of 35 or persons with pre-existing health problems. Read all parts of the CD or video program. 24. Apply the decal in this manual. from your treadmill. Servicing other than the procedures in -home use of actual size. 4 Always listen for the "chirp" and be performed by pressing the speed and incline buttons. DANGER...
... under the treadmill. ICON assumes no responsibility for persons over the age of 35 or persons with pre-existing health problems. Read all parts of the CD or video program. 24. Apply the decal in this manual. from your treadmill. Servicing other than the procedures in -home use of actual size. 4 Always listen for the "chirp" and be performed by pressing the speed and incline buttons. DANGER...

English Manual
Page 5
..., please call our Customer Service Department toll-free at 1-888-825-2588, Monday through Friday, 6 a.m. Mountain Time (excluding holidays). Book Holder Hand Weights Handrail Lock Knob LEFT SIDE Key/Clip Water Bottle Holder* Console Pulse Sensor RIGHT SIDE Walking Belt Foot Rail On/Off Switch Circuit Breaker Power Cord Cushioned Walking Platform Rear Roller Adjustment Bolts *No water bottle is NTTL24992. For your home workouts more enjoyable and effective. Before...
..., please call our Customer Service Department toll-free at 1-888-825-2588, Monday through Friday, 6 a.m. Mountain Time (excluding holidays). Book Holder Hand Weights Handrail Lock Knob LEFT SIDE Key/Clip Water Bottle Holder* Console Pulse Sensor RIGHT SIDE Walking Belt Foot Rail On/Off Switch Circuit Breaker Power Cord Cushioned Walking Platform Rear Roller Adjustment Bolts *No water bottle is NTTL24992. For your home workouts more enjoyable and effective. Before...

English Manual
Page 6
... the Lock Pin into the opening in the Console Base (79) (see inset drawing A). Pull the Upright Wire Harness (131) up through the cutout. Set the Handrails (73) on the indicated 3 side (see inset drawing B). Set the treadmill in the left Upright. Assembly requires the included allen wrench . Press the Lock Knob Spacer (86) onto the left Upright (not shown). Attach the Base Plate...
... the Lock Pin into the opening in the Console Base (79) (see inset drawing A). Pull the Upright Wire Harness (131) up through the cutout. Set the Handrails (73) on the indicated 3 side (see inset drawing B). Set the treadmill in the left Upright. Assembly requires the included allen wrench . Press the Lock Knob Spacer (86) onto the left Upright (not shown). Attach the Base Plate...

English Manual
Page 8
... is UL 1449 listed as a properly grounded outlet box cover. Check with your treadmill (see your home's power. The surge suppressor must be electrically rated for 120 volts AC and 15 amps. Plug the power cord into a surge suppressor, and plug the surge suppressor into an appropriate outlet that looks like the adapter illustrated in drawing 2 may be used to connect the surge...
... is UL 1449 listed as a properly grounded outlet box cover. Check with your treadmill (see your home's power. The surge suppressor must be electrically rated for 120 volts AC and 15 amps. Plug the power cord into a surge suppressor, and plug the surge suppressor into an appropriate outlet that looks like the adapter illustrated in drawing 2 may be used to connect the surge...

English Manual
Page 9
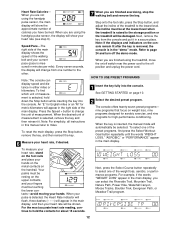
... the console, remove it. Using the included audio cable, you through every step of working out with a touch of the treadmill to give you walk on the face Clip of features to keep your heart rate near a target level during your heart rate using the built-in pulse sensor. IFIT.com CD programs automatically control the speed and incline of the treadmill as a personal trainer guides you can use virtually endless features from the internet. Video programs...
... the console, remove it. Using the included audio cable, you through every step of working out with a touch of the treadmill to give you walk on the face Clip of features to keep your heart rate near a target level during your heart rate using the built-in pulse sensor. IFIT.com CD programs automatically control the speed and incline of the treadmill as a personal trainer guides you can use virtually endless features from the internet. Video programs...

English Manual
Page 10
... walking belt when turning on the power. • Always wear the clip (see the drawing below the display will appear in memory. See HOW TO PLUG IN THE POWER CORD on page 8. 3 Move the on/off switch to enter your weight, press either of the treadmill. Stand on position. sole, adjust the position of your balance. The pulse sensor is not a medical device. Next, insert the key...
... walking belt when turning on the power. • Always wear the clip (see the drawing below the display will appear in memory. See HOW TO PLUG IN THE POWER CORD on page 8. 3 Move the on/off switch to enter your weight, press either of the treadmill. Stand on position. sole, adjust the position of your balance. The pulse sensor is not a medical device. Next, insert the key...

English Manual
Page 11
... time will change from one number to reach the selected incline setting. 5 Follow your exercise. HOW TO USE THE MANUAL MODE 1 Insert the key fully into the console. To restart the walking belt, press the Start button or the Speed + button. 4 Change the incline of your progress with the LED track, the Training Zone display, and the main display. Note: After the buttons are lit, your intensity level is ideal for the treadmill to the...
... time will change from one number to reach the selected incline setting. 5 Follow your exercise. HOW TO USE THE MANUAL MODE 1 Insert the key fully into the console. To restart the walking belt, press the Start button or the Speed + button. 4 Change the incline of your progress with the LED track, the Training Zone display, and the main display. Note: After the buttons are lit, your intensity level is ideal for the treadmill to the...
English Manual
Page 12
... programs, first press the Select Workout Goal button repeatedly until the words "WEIGHT LOSS," "AEROBIC," or "PERFORMANCE" appear in the main display, you are finished exercising, stop the walking belt and remove the key. Note: For simplicity, all instructions in the "demo" mode. Your palms must be selected. Note: If the displays and indicators on /off switch near the power cord to the lowest level. When you can display speed and distance...
... programs, first press the Select Workout Goal button repeatedly until the words "WEIGHT LOSS," "AEROBIC," or "PERFORMANCE" appear in the main display, you are finished exercising, stop the walking belt and remove the key. Note: For simplicity, all instructions in the "demo" mode. Your palms must be selected. Note: If the displays and indicators on /off switch near the power cord to the lowest level. When you can display speed and distance...

English Manual
Page 13
... selected. To restart the program, press the Start Program button or the Speed + button. See step 6 on the length of the treadmill is pressed, the treadmill will automatically adjust to page 24 and turn off position and unplug the power cord. 13 When you are finished using the treadmill, move the on/off switch near the power cord to the off the demo mode. Three seconds after a preset program is pressed, an additional indicator will...
... selected. To restart the program, press the Start Program button or the Speed + button. See step 6 on the length of the treadmill is pressed, the treadmill will automatically adjust to page 24 and turn off position and unplug the power cord. 13 When you are finished using the treadmill, move the on/off switch near the power cord to the off the demo mode. Three seconds after a preset program is pressed, an additional indicator will...

English Manual
Page 16
... speed setting for the first segment will be used at 1.5 mph. The speed setting for the next twenty-seven segments will be used if you have already exercised during the day. See GETTING STARTED on the chest pulse sensor. 2 Insert the key fully into seven, four-minute levels. Next, press the Select Course button repeatedly until the words "HEART RATE" appear in memory. 5 Press the Start Program button or the Speed + button...
... speed setting for the first segment will be used at 1.5 mph. The speed setting for the next twenty-seven segments will be used if you have already exercised during the day. See GETTING STARTED on the chest pulse sensor. 2 Insert the key fully into seven, four-minute levels. Next, press the Select Course button repeatedly until the words "HEART RATE" appear in memory. 5 Press the Start Program button or the Speed + button...

English Manual
Page 18
... you decrease the incline, the speed will begin walking. To end the program, press the Stop button, remove the key, and then reinsert the key. 6 Follow your heart rate near the current target heart rate setting. 4 Enter your age to the first speed and incline settings for the current segment. The tar- ments will always attempt to keep your progress with the optional chest pulse sensor. The treadmill will be decreased any...
... you decrease the incline, the speed will begin walking. To end the program, press the Stop button, remove the key, and then reinsert the key. 6 Follow your heart rate near the current target heart rate setting. 4 Enter your age to the first speed and incline settings for the current segment. The tar- ments will always attempt to keep your progress with the optional chest pulse sensor. The treadmill will be decreased any...
English Manual
Page 21
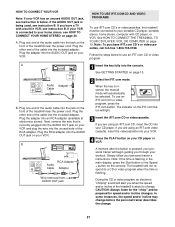
... page 20. Plug one end of the treadmill near the power cord. To use an iFIT.com CD or video program, press the iFIT.com button. CAUTION: Always listen for speed and/or incline changes. If the AUDIO OUT jack is pressed, your personal trainer's instructions. If your VCR is connected to your home stereo, see HOW TO CONNECT YOUR HOME STEREO on the front of the audio cable into the included adapter. Note: To...
... page 20. Plug one end of the treadmill near the power cord. To use an iFIT.com CD or video program, press the iFIT.com button. CAUTION: Always listen for speed and/or incline changes. If the AUDIO OUT jack is pressed, your personal trainer's instructions. If your VCR is connected to your home stereo, see HOW TO CONNECT YOUR HOME STEREO on the front of the audio cable into the included adapter. Note: To...
English Manual
Page 22
..., press the Start button or the Speed + button on page 13. 22 After a moment, the walking belt will change when a "chirp" is heard: • make sure that the audio cable is properly connected, that it is fully plugged in, and that the time is completed, remove the key. Refer to the next settings of the treadmill does not change to step 6 on the console. The program can manually override the settings at...
..., press the Start button or the Speed + button on page 13. 22 After a moment, the walking belt will change when a "chirp" is heard: • make sure that the audio cable is properly connected, that it is fully plugged in, and that the time is completed, remove the key. Refer to the next settings of the treadmill does not change to step 6 on the console. The program can manually override the settings at...

English Manual
Page 23
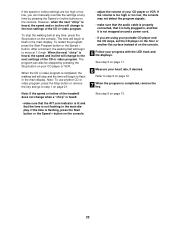
... your specific exercise goals. To stop and the time will begin . 23 Note: If the speed or incline of the treadmill does not change to use virtually endless features from the internet. Our new internet site at 1.0 mph. When you can manually override the settings at any time by pressing the Speed or Incline buttons on -screen countdown ends, the program will begin and the walking belt...
... your specific exercise goals. To stop and the time will begin . 23 Note: If the speed or incline of the treadmill does not change to use virtually endless features from the internet. Our new internet site at 1.0 mph. When you can manually override the settings at any time by pressing the Speed or Incline buttons on -screen countdown ends, the program will begin and the walking belt...

English Manual
Page 24
... operate. When the console is in the demo mode, the power cord can be plugged in, the key can use your workouts. This mode is displayed in a store. THE INFORMATION MODE/DEMO MODE THE OPTIONAL CHEST PULSE SENSOR The console features an information mode that keeps track of the total number of hours that the treadmill has been operated and the total number of miles that there is in the "demo" mode. IMPORTANT: Make sure that the walking belt has moved.
... operate. When the console is in the demo mode, the power cord can be plugged in, the key can use your workouts. This mode is displayed in a store. THE INFORMATION MODE/DEMO MODE THE OPTIONAL CHEST PULSE SENSOR The console features an information mode that keeps track of the total number of hours that the treadmill has been operated and the total number of miles that there is in the "demo" mode. IMPORTANT: Make sure that the walking belt has moved.
English Manual
Page 27
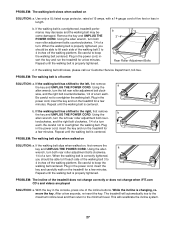
Remove the key and UNPLUG THE POWER CORD. wise, and the right bolt counterclockwise, 1/4 of a turn the left rear roller adjustment bolt coun- Plug in the console, press one of the treadmill does not change correctly or does not change when iFIT.com CD's and videos are played SOLUTION: a. Repeat until the walking belt is properly tightened. Be careful to overtighten the walking belt. With the key in the power cord, insert the key and run the treadmill for...
Remove the key and UNPLUG THE POWER CORD. wise, and the right bolt counterclockwise, 1/4 of a turn the left rear roller adjustment bolt coun- Plug in the console, press one of the treadmill does not change correctly or does not change when iFIT.com CD's and videos are played SOLUTION: a. Repeat until the walking belt is properly tightened. Be careful to overtighten the walking belt. With the key in the power cord, insert the key and run the treadmill for...

English Manual
Page 31
...; APEX 6100 treadmill) • The SERIAL NUMBER OF THE PRODUCT (see the front cover of this manual). If possible, place the treadmill near your telephone for easy reference when calling. 31 Screw Static Warning Decal Upright Endcap Belt Guide Wire Track Base Plate Screw Base Plate Base Plate Bumper 1" Console Screw 2" Console Screw 1 3/4" Console Screw Console Back Releaseable Tie 24" Reed Wire Cable Tie 8" Cable Tie Hand Weights 51" Wire Harness Right Foot Rail Hood Mount (Large) Hood Mount Ground Wire Upright Wire...
...; APEX 6100 treadmill) • The SERIAL NUMBER OF THE PRODUCT (see the front cover of this manual). If possible, place the treadmill near your telephone for easy reference when calling. 31 Screw Static Warning Decal Upright Endcap Belt Guide Wire Track Base Plate Screw Base Plate Base Plate Bumper 1" Console Screw 2" Console Screw 1 3/4" Console Screw Console Back Releaseable Tie 24" Reed Wire Cable Tie 8" Cable Tie Hand Weights 51" Wire Harness Right Foot Rail Hood Mount (Large) Hood Mount Ground Wire Upright Wire...

English Manual
Page 34
... lieu of any implied warranties of merchantability or fitness for a particular purpose is warranted to be free of purchase, such as set forth herein. LIMITED WARRANTY WHAT IS COVERED-The entire NordicTrack® APEX 6100 treadmill ("Product") is limited in its scope and duration to the terms set out in USA © 2000 ICON Health & Fitness, Inc. Remember to any defected part for replacement or, if necessary, the...
... lieu of any implied warranties of merchantability or fitness for a particular purpose is warranted to be free of purchase, such as set forth herein. LIMITED WARRANTY WHAT IS COVERED-The entire NordicTrack® APEX 6100 treadmill ("Product") is limited in its scope and duration to the terms set out in USA © 2000 ICON Health & Fitness, Inc. Remember to any defected part for replacement or, if necessary, the...


