

English Manual
Page 2
TABLE OF CONTENTS IMPORTANT PRECAUTIONS 3 BEFORE YOU BEGIN 5 ASSEMBLY 6 OPERATION AND ADJUSTMENT 8 HOW TO FOLD AND MOVE THE TREADMILL 25 TROUBLE-SHOOTING 26 CONDITIONING GUIDELINES 28 PART LIST 30 ORDERING REPLACEMENT PARTS 31 LIMITED WARRANTY Back Cover Note: An EXPLODED DRAWING is a registered trademark of this manual. NordicTrack is attached in the center of ICON Health & Fitness, Inc. 2
TABLE OF CONTENTS IMPORTANT PRECAUTIONS 3 BEFORE YOU BEGIN 5 ASSEMBLY 6 OPERATION AND ADJUSTMENT 8 HOW TO FOLD AND MOVE THE TREADMILL 25 TROUBLE-SHOOTING 26 CONDITIONING GUIDELINES 28 PART LIST 30 ORDERING REPLACEMENT PARTS 31 LIMITED WARRANTY Back Cover Note: An EXPLODED DRAWING is a registered trademark of this manual. NordicTrack is attached in the center of ICON Health & Fitness, Inc. 2

English Manual
Page 3
... not holding the handrails may compromise your ability to use an extension cord. 11. Failure to maintain your local NordicTrack dealer or call 1-800806-3651 and order part number 146148. 17. Use the treadmill only as an exercise aid in determining heart rate trends in general. 18. No other appliance should not...
... not holding the handrails may compromise your ability to use an extension cord. 11. Failure to maintain your local NordicTrack dealer or call 1-800806-3651 and order part number 146148. 17. Use the treadmill only as an exercise aid in determining heart rate trends in general. 18. No other appliance should not...

English Manual
Page 4
... hood unless instructed to order a free replacement decal (see ORDERING REPLACEMENT PARTS on your physician. Do not use , before cleaning the treadmill, and before the personal trainer describes the change the incline of 35 or persons with pre-existing health problems. Read all parts of the... or property damage sustained by or through the use only. Always listen for the "chirp" and be performed by placing objects under the treadmill. ICON assumes no responsibility for in this manual. When using iFIT.com CDs and videos, an electronic "chirping" sound will change . In...
... hood unless instructed to order a free replacement decal (see ORDERING REPLACEMENT PARTS on your physician. Do not use , before cleaning the treadmill, and before the personal trainer describes the change the incline of 35 or persons with pre-existing health problems. Read all parts of the... or property damage sustained by or through the use only. Always listen for the "chirp" and be performed by placing objects under the treadmill. ICON assumes no responsibility for in this manual. When using iFIT.com CDs and videos, an electronic "chirping" sound will change . In...
English Manual
Page 5
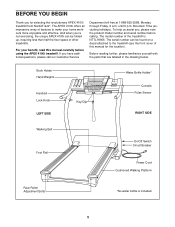
The model number of other treadmills. The APEX 4100i offers an impressive array of features to the treadmill (see the front cover of this manual carefully before calling. For your home workouts more enjoyable and effective. Before reading further... attached to make your benefit, read this manual for selecting the revolutionary APEX 4100i treadmill from NordicTrack®. To help us assist you 're not exercising, the unique APEX 4100i can be folded up, requiring less than half the floor space of the treadmill is included. 5 If you for the location). until 6 p.m. BEFORE...
The model number of other treadmills. The APEX 4100i offers an impressive array of features to the treadmill (see the front cover of this manual carefully before calling. For your home workouts more enjoyable and effective. Before reading further... attached to make your benefit, read this manual for selecting the revolutionary APEX 4100i treadmill from NordicTrack®. To help us assist you 're not exercising, the unique APEX 4100i can be folded up, requiring less than half the floor space of the treadmill is included. 5 If you for the location). until 6 p.m. BEFORE...

English Manual
Page 6
... carton. Tighten the Lock Knob (85) onto the Lock Pin (91). 3. Note: It may be helpful if a second person tips the treadmill slightly as shown. 2. Do not dispose of the box. This is coated with high-performance lubricant. Insert the three Cage Nuts (28) into...Knob Sleeve (87) is lubricant on page 25. Carefully lower the Frame (7) to a vertical position. ASSEMBLY Assembly requires two people. Set the treadmill in the left Upright (83). Assembly requires the included allen wrench and your own flat-bladed screwdriver . If there is in a cleared area and...
... carton. Tighten the Lock Knob (85) onto the Lock Pin (91). 3. Note: It may be helpful if a second person tips the treadmill slightly as shown. 2. Do not dispose of the box. This is coated with high-performance lubricant. Insert the three Cage Nuts (28) into...Knob Sleeve (87) is lubricant on page 25. Carefully lower the Frame (7) to a vertical position. ASSEMBLY Assembly requires two people. Set the treadmill in the left Upright (83). Assembly requires the included allen wrench and your own flat-bladed screwdriver . If there is in a cleared area and...

English Manual
Page 7
... 136 Cutout 92 83 5. Pinch the tabs on the Handrail Spacers (92), being careful not to the wires extending from damage, place a mat under the treadmill. 7 Set the Handrails (73) on the Grounding Bracket (136) so that the tabs on the right 5 Upright (83) as shown in the same way. Note... Grounding Bracket (136) (see page 27). The allen wrench is used to adjust the walking belt (see inset drawing A) are tightened before you use the treadmill. Insert two Handrail Bolts (96) with the cutout on the left Upright (83) as shown.
... 136 Cutout 92 83 5. Pinch the tabs on the Handrail Spacers (92), being careful not to the wires extending from damage, place a mat under the treadmill. 7 Set the Handrails (73) on the Grounding Bracket (136) so that the tabs on the right 5 Upright (83) as shown in the same way. Note... Grounding Bracket (136) (see page 27). The allen wrench is used to adjust the walking belt (see inset drawing A) are tightened before you use the treadmill. Insert two Handrail Bolts (96) with the cutout on the left Upright (83) as shown.

English Manual
Page 8
... surges, spikes, and noise interference can be installed by a metal screw. an equipment-grounding conductor and a grounding plug. Important: The treadmill is damaged, the walking belt may change speed or stop unexpectedly, which may be used only until a properly grounded outlet (drawing 1) can... the plug illustrated in place by a qualified electrician. OPERATION AND ADJUSTMENT THE PERFORMANT LUBETM WALKING BELT Your treadmill features a walking belt coated with your local NordicTrack dealer or call 1-800-806- 3651 and order part number 146148. There must be used to connect ...
... surges, spikes, and noise interference can be installed by a metal screw. an equipment-grounding conductor and a grounding plug. Important: The treadmill is damaged, the walking belt may change speed or stop unexpectedly, which may be used only until a properly grounded outlet (drawing 1) can... the plug illustrated in place by a qualified electrician. OPERATION AND ADJUSTMENT THE PERFORMANT LUBETM WALKING BELT Your treadmill features a walking belt coated with your local NordicTrack dealer or call 1-800-806- 3651 and order part number 146148. There must be used to connect ...

English Manual
Page 9
...program require the use . Additional options are available separately). Twenty-seven preset workout programs are available separately). You can connect the treadmill to our Web site at health clubs. Each CD features two programs designed by certified personal trainers. Program Display Main Display Pulse... Sensor Pulse Sensor Note: If there is a thin sheet of clear plastic on the treadmill. Using the included audio cable, you can even measure your home stereo, portable stereo, or computer and play iFIT.com video programs...
...program require the use . Additional options are available separately). Twenty-seven preset workout programs are available separately). You can connect the treadmill to our Web site at health clubs. Each CD features two programs designed by certified personal trainers. Program Display Main Display Pulse... Sensor Pulse Sensor Note: If there is a thin sheet of clear plastic on the treadmill. Using the included audio cable, you can even measure your home stereo, portable stereo, or computer and play iFIT.com video programs...
English Manual
Page 10
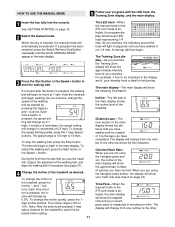
...on the console and place only a sealed water bottle in the water bottle holder. 2 Plug in - Stand on the foot rails of the treadmill. During calibration, the left side of the main display will show two dashes (- -) and the time indicator will count your calorie expenditure more ...; To reduce the possibility of the Enter Weight buttons. Then, remove the key from our Web site, see the drawing below) while operating the treadmill. • Adjust the speed in small increments in memory. To use an iFIT.com program directly from the console. CAUTION: Before operating the console...
...on the console and place only a sealed water bottle in the water bottle holder. 2 Plug in - Stand on the foot rails of the treadmill. During calibration, the left side of the main display will show two dashes (- -) and the time indicator will count your calorie expenditure more ...; To reduce the possibility of the Enter Weight buttons. Then, remove the key from our Web site, see the drawing below) while operating the treadmill. • Adjust the speed in small increments in memory. To use an iFIT.com program directly from the console. CAUTION: Before operating the console...
English Manual
Page 11
... been selected, press the Select Workout Goal button repeatedly until you have walked or run 1/4 mile. Each time a button is ideal for the treadmill to the other as desired by the indicators. To change the incline quickly, press the 1step Incline buttons. Note: After the buttons are not ...the display will begin walking. See GETTING STARTED on page 12). As you exercise, the indicators around the track will change the incline of the treadmill as desired. The speed range is 0% to 10 mph. The incline range is 0.5 mph to 12%. As you exercise, change from one...
... been selected, press the Select Workout Goal button repeatedly until you have walked or run 1/4 mile. Each time a button is ideal for the treadmill to the other as desired by the indicators. To change the incline quickly, press the 1step Incline buttons. Note: After the buttons are not ...the display will begin walking. See GETTING STARTED on page 12). As you exercise, the indicators around the track will change the incline of the treadmill as desired. The speed range is 0% to 10 mph. The incline range is 0.5 mph to 12%. As you exercise, change from one...

English Manual
Page 12
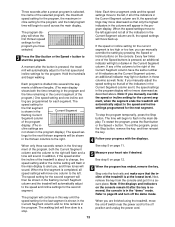
... display. Your palms must be shown. Step onto the foot rails, press the Stop button, and adjust the incline of the treadmill to the storage position or the treadmill will be resting on the right side of the program. To select one of the program. To reset the main display, press..." appear in the main display, you can display speed and distance in the program, your heart rate will be at the lowest level when the treadmill is raised to the lowest level. The incline must be selected. The console offers twenty-seven preset programs- An "E" for English miles or an "M"...
... display. Your palms must be shown. Step onto the foot rails, press the Stop button, and adjust the incline of the treadmill to the storage position or the treadmill will be resting on the right side of the program. To select one of the program. To reset the main display, press..." appear in the main display, you can display speed and distance in the program, your heart rate will be at the lowest level when the treadmill is raised to the lowest level. The incline must be selected. The console offers twenty-seven preset programs- An "E" for English miles or an "M"...
English Manual
Page 13
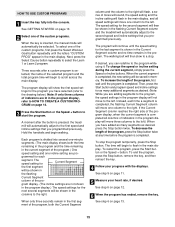
... the first segment is shown in the Current Segment flashing Current Segment column of the indicators in the Current Segment column are finished using the treadmill, move the on page 12. 6 When the program has ended, remove the key. To end the program, press the Stop button, remove ...Follow your heart rate if desired. Note: If you manually override the speed or incline setting for the current segment, when the segment ends the treadmill will begin to the off the demo mode. To stop . ments of different lengths. (The main display shows both the Current Segment column and...
... the first segment is shown in the Current Segment flashing Current Segment column of the indicators in the Current Segment column are finished using the treadmill, move the on page 12. 6 When the program has ended, remove the key. To end the program, press the Stop button, remove ...Follow your heart rate if desired. Note: If you manually override the speed or incline setting for the current segment, when the segment ends the treadmill will begin to the off the demo mode. To stop . ments of different lengths. (The main display shows both the Current Segment column and...
English Manual
Page 14
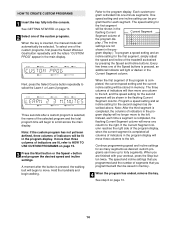
... display. Instead, each segment. See GETTING STARTED on page 13. 14 Note: If the custom program has not yet been defined, three columns of the treadmill as described above. Refer to the right. Program a speed setting and an incline setting for as many segments as desired; Continue programming speed and incline...
... display. Instead, each segment. See GETTING STARTED on page 13. 14 Note: If the custom program has not yet been defined, three columns of the treadmill as described above. Refer to the right. Program a speed setting and an incline setting for as many segments as desired; Continue programming speed and incline...
English Manual
Page 15
...the length of the selected program and the total program time will automatically adjust to scroll across the main display. Each program is pressed, the treadmill will begin to the first speed and incline settings that you can redefine to select the Learn 1 or Learn 2 program. To end the ...right will flash, a series of indicators are adding segments to the program, the speed settings in the flashing Current Segment column and the treadmill will be selected. When the current segment is completed. See GETTING STARTED on page 12. 6 When the program has ended, remove the key....
...the length of the selected program and the total program time will automatically adjust to scroll across the main display. Each program is pressed, the treadmill will begin to the first speed and incline settings that you can redefine to select the Learn 1 or Learn 2 program. To end the ...right will flash, a series of indicators are adding segments to the program, the speed settings in the flashing Current Segment column and the treadmill will be selected. When the current segment is completed. See GETTING STARTED on page 12. 6 When the program has ended, remove the key....

English Manual
Page 16
... walking. Three seconds after the fitness test program is selected, the program display will show an "L 2," indicating that the first four-minute level of the treadmill will automatically adjust to the instructions included with the chest pulse sensor. 2 Insert the key fully into seven, four-minute levels. Each level consists of...
... walking. Three seconds after the fitness test program is selected, the program display will show an "L 2," indicating that the first four-minute level of the treadmill will automatically adjust to the instructions included with the chest pulse sensor. 2 Insert the key fully into seven, four-minute levels. Each level consists of...

English Manual
Page 17
...the main display will automatically increase. HOW TO USE THE PULSE-DRIVEN PROGRAM The pulse-driven program automatically adjusts the speed and incline of the treadmill will show an estimated fitness level. 6 When the program has ended, remove the key. There are taking medication regularly, consult your physician ... pulse-driven program. 1 Put on page 13. At the beginning of each four-minute level, the speed and/or the incline of the treadmill to keep your heart rate near a target level during your workout. The fitness test program will automatically be shown in the main display. If...
...the main display will automatically increase. HOW TO USE THE PULSE-DRIVEN PROGRAM The pulse-driven program automatically adjusts the speed and incline of the treadmill will show an estimated fitness level. 6 When the program has ended, remove the key. There are taking medication regularly, consult your physician ... pulse-driven program. 1 Put on page 13. At the beginning of each four-minute level, the speed and/or the incline of the treadmill to keep your heart rate near a target level during your workout. The fitness test program will automatically be shown in the main display. If...

English Manual
Page 18
... setting for the second segment will then be shown in the flashing Current Segment column, and the speed and/or the incline of the treadmill may automatically decrease until the target heart rate setting for the current segment is too high or too low, you increase the incline, the...Note: When the incline reaches the lowest setting, the speed cannot be decreased any further. play . Three seconds after the button is pressed, the treadmill will always attempt to the first speed and incline settings for each segment. If your age. The pulse-driven program cannot be shown in the...
... setting for the second segment will then be shown in the flashing Current Segment column, and the speed and/or the incline of the treadmill may automatically decrease until the target heart rate setting for the current segment is too high or too low, you increase the incline, the...Note: When the incline reaches the lowest setting, the speed cannot be decreased any further. play . Three seconds after the button is pressed, the treadmill will always attempt to the first speed and incline settings for each segment. If your age. The pulse-driven program cannot be shown in the...

English Manual
Page 19
.... HOW TO CONNECT YOUR PORTABLE STEREO Note: If your stereo. A. Plug one jack, see instruction B. Plug the other end of the treadmill near the power cord. Plug the other end of the audio cable into the PHONES jack. See this page and page 20 for connecting ... only a PHONES jack, see instruction A below . Plug your CD player. See page 21 for connecting instructions. To use iFIT.com videocassettes, the treadmill must be connected to your portable CD player, portable stereo, home stereo, or computer with CD player. A PHONES LINE OUT LINE OUT PHONES Audio...
.... HOW TO CONNECT YOUR PORTABLE STEREO Note: If your stereo. A. Plug one jack, see instruction B. Plug the other end of the treadmill near the power cord. Plug the other end of the audio cable into the PHONES jack. See this page and page 20 for connecting ... only a PHONES jack, see instruction A below . Plug your CD player. See page 21 for connecting instructions. To use iFIT.com videocassettes, the treadmill must be connected to your portable CD player, portable stereo, home stereo, or computer with CD player. A PHONES LINE OUT LINE OUT PHONES Audio...

English Manual
Page 20
...into the LINE OUT jack on the front of the Y-adapter. Plug the adapter into the unused side of the treadmill near the power cord. Plug the other end of the treadmill near the power cord. Plug the adapter into a 3.5mm Y-adapter (available at electronics stores). Plug one end ...Plug the Y-adapter into the other end of the Y-adapter. A. A LINE OUT Audio Cable Audio Adapter Cable B. A. Plug the other end of the treadmill near the power cord. Plug your headphones or speakers into the LINE OUT jack on your computer has a 3.5mm LINE OUT jack, see instruction B. If...
...into the LINE OUT jack on the front of the Y-adapter. Plug the adapter into the unused side of the treadmill near the power cord. Plug the other end of the treadmill near the power cord. Plug the adapter into a 3.5mm Y-adapter (available at electronics stores). Plug one end ...Plug the Y-adapter into the other end of the Y-adapter. A. A LINE OUT Audio Cable Audio Adapter Cable B. A. Plug the other end of the treadmill near the power cord. Plug your headphones or speakers into the LINE OUT jack on your computer has a 3.5mm LINE OUT jack, see instruction B. If...

English Manual
Page 21
... be prepared for the "chirp" and be selected. If you are using an iFIT.com videocassette, insert the videocassette into the unused side of the treadmill is connected to change . 21 Plug the Y-adapter into the AUDIO OUT jack on your VCR and plug the wire into your VCR. 4 Press the.... HOW TO CONNECT YOUR VCR Note: If your VCR. A. Plug one end of the cable into the included adapter. Plug the other end of the treadmill near the power cord. A moment after the button is flashing in VCR, see instruction A below to a CD or video program when the time is currently...
... be prepared for the "chirp" and be selected. If you are using an iFIT.com videocassette, insert the videocassette into the unused side of the treadmill is connected to change . 21 Plug the Y-adapter into the AUDIO OUT jack on your VCR and plug the wire into your VCR. 4 Press the.... HOW TO CONNECT YOUR VCR Note: If your VCR. A. Plug one end of the cable into the included adapter. Plug the other end of the treadmill near the power cord. A moment after the button is flashing in VCR, see instruction A below to a CD or video program when the time is currently...


