

User Manual
Page 2
NordicTrack is attached in the center of ICON Health & Fitness, Inc. 2 TABLE OF CONTENTS IMPORTANT PRECAUTIONS 3 BEFORE YOU BEGIN 5 ASSEMBLY 6 HOW TO USE THE CHEST PULSE SENSOR 8 OPERATION AND ADJUSTMENT 9 HOW TO FOLD AND MOVE THE TREADMILL 26 TROUBLESHOOTING 28 CONDITIONING GUIDELINES 31 PART LIST 34 PART ID CHART 35 ORDERING REPLACEMENT PARTS 35 LIMITED WARRANTY Back Cover Note: An EXPLODED DRAWING is a registered trademark of this manual.
NordicTrack is attached in the center of ICON Health & Fitness, Inc. 2 TABLE OF CONTENTS IMPORTANT PRECAUTIONS 3 BEFORE YOU BEGIN 5 ASSEMBLY 6 HOW TO USE THE CHEST PULSE SENSOR 8 OPERATION AND ADJUSTMENT 9 HOW TO FOLD AND MOVE THE TREADMILL 26 TROUBLESHOOTING 28 CONDITIONING GUIDELINES 31 PART LIST 34 PART ID CHART 35 ORDERING REPLACEMENT PARTS 35 LIMITED WARRANTY Back Cover Note: An EXPLODED DRAWING is a registered trademark of this manual.
User Manual
Page 3
... pounds (20 kg) to raise, lower, or move the treadmill. 3 The treadmill should be used or where oxygen is the responsibility of the owner to the control system of 12 and pets away from heated surfaces. 14. your local NordicTrack dealer or call 1-800806-3651 and order part number 146148. ...12. If the control system is properly assembled. (See ASSEMBLY on page 6, and HOW TO FOLD AND MOVE THE TREADMILL on a level surface, with bare feet, wearing only stockings...
... pounds (20 kg) to raise, lower, or move the treadmill. 3 The treadmill should be used or where oxygen is the responsibility of the owner to the control system of 12 and pets away from heated surfaces. 14. your local NordicTrack dealer or call 1-800806-3651 and order part number 146148. ...12. If the control system is properly assembled. (See ASSEMBLY on page 6, and HOW TO FOLD AND MOVE THE TREADMILL on a level surface, with bare feet, wearing only stockings...

User Manual
Page 4
... When using them. 21. tenance and adjustment procedures de- This is intended for speed and/or incline changes. WARNING: Before beginning this treadmill in the location shown. Note: The decal is heard, the speed and/or incline will alert you can manually override the speed and ... replacement decal (see ORDERING REPLACEMENT PARTS on your physician. In some instances, the speed and/or incline may change the incline of the treadmill by pressing the speed and incline buttons. However, when the next "chirp" is not shown at the right has been placed on page...
... When using them. 21. tenance and adjustment procedures de- This is intended for speed and/or incline changes. WARNING: Before beginning this treadmill in the location shown. Note: The decal is heard, the speed and/or incline will alert you can manually override the speed and ... replacement decal (see ORDERING REPLACEMENT PARTS on your physician. In some instances, the speed and/or incline may change the incline of the treadmill by pressing the speed and incline buttons. However, when the next "chirp" is not shown at the right has been placed on page...

User Manual
Page 5
... Rear Roller Adjustment Bolts Flexible Walking Platform RIGHT SIDE *No water bottle is NTL22940. The 7500 R treadmill offers an impressive array of features to the treadmill (see the front cover of this manual for selecting the revolutionary NordicTrack® 7500 R treadmill. For your home workouts more enjoyable and effective. If you have questions after reading this...
... Rear Roller Adjustment Bolts Flexible Walking Platform RIGHT SIDE *No water bottle is NTL22940. The 7500 R treadmill offers an impressive array of features to the treadmill (see the front cover of this manual for selecting the revolutionary NordicTrack® 7500 R treadmill. For your home workouts more enjoyable and effective. If you have questions after reading this...

User Manual
Page 6
... indicated holes in the left Upright. Make sure that the Latch Knob Sleeve (111) is in the treadmill. Make sure that the latch pin is a normal condition and does not affect treadmill performance. If the treadmill rocks slightly, turn one on top of the Cage Nut into a hole and then use a flat-bladed... the Latch Knob (113) from the Latch Pin (107). Note: It may be helpful if a second person tips the treadmill slightly as you tighten the Bolts. Note: The underside of the treadmill walking belt is lubricant on each Cage Nut (96), first hook one side of the walking belt or foot pads...
... indicated holes in the left Upright. Make sure that the Latch Knob Sleeve (111) is in the treadmill. Make sure that the latch pin is a normal condition and does not affect treadmill performance. If the treadmill rocks slightly, turn one on top of the Cage Nut into a hole and then use a flat-bladed... the Latch Knob (113) from the Latch Pin (107). Note: It may be helpful if a second person tips the treadmill slightly as you tighten the Bolts. Note: The underside of the treadmill walking belt is lubricant on each Cage Nut (96), first hook one side of the walking belt or foot pads...

User Manual
Page 7
... the Handrails (83) on the left Handrail (not shown) in a secure place. Thread the Bolts into place. There are properly tightened before you use the treadmill. Attach the Upper Handrail (19) to the Uprights (99) with two 3" Bolts (56) and two Handrail Washers (69) as shown. 99 69 56 56...104 6. Then, tighten all parts are no wires on the Uprights (99), being careful not to the wires extending from damage, place a mat under the treadmill. 7 Firmly tighten the Bolts. 118 118 Press the two Upright Endcaps (118) into the Uprights (99) as 6 19 shown. Keep the included allen ...
... the Handrails (83) on the left Handrail (not shown) in a secure place. Thread the Bolts into place. There are properly tightened before you use the treadmill. Attach the Upper Handrail (19) to the Uprights (99) with two 3" Bolts (56) and two Handrail Washers (69) as shown. 99 69 56 56...104 6. Then, tighten all parts are no wires on the Uprights (99), being careful not to the wires extending from damage, place a mat under the treadmill. 7 Firmly tighten the Bolts. 118 118 Press the two Upright Endcaps (118) into the Uprights (99) as 6 19 shown. Keep the included allen ...

User Manual
Page 8
... pulse sensor can be within arm's length of the chest strap, if necessary. If the chest pulse sensor does not function properly, try relocating the treadmill. • The CR2032 battery may need to work with the console. Do not store the chest pulse sensor in a plastic bag or other sources. Using... of the chest strap into one end of the sensor unit, as saliva or contact lens solution to wet the two electrode areas on the treadmill, position yourself near the center of the walking belt.
... pulse sensor can be within arm's length of the chest strap, if necessary. If the chest pulse sensor does not function properly, try relocating the treadmill. • The CR2032 battery may need to work with the console. Do not store the chest pulse sensor in a plastic bag or other sources. Using... of the chest strap into one end of the sensor unit, as saliva or contact lens solution to wet the two electrode areas on the treadmill, position yourself near the center of the walking belt.

User Manual
Page 9
... in an increased risk of sophisticated electronic equipment, can be a monitoring light on the surge suppressor to the control system of the treadmill. Failure to use a properly functioning surge suppressor could result in doubt as a transient voltage surge suppressor (TVSS). Whenever the adapter ...PLUG IN THE POWER CORD DANGER: Improper connection of your treadmill being turned on a nominal 120-volt circuit, and has a grounding plug that looks like the adapter illustrated in drawing 2 may result in your local NordicTrack dealer or call 1-800-806-3651 and order part number...
... in an increased risk of sophisticated electronic equipment, can be a monitoring light on the surge suppressor to the control system of the treadmill. Failure to use a properly functioning surge suppressor could result in doubt as a transient voltage surge suppressor (TVSS). Whenever the adapter ...PLUG IN THE POWER CORD DANGER: Improper connection of your treadmill being turned on a nominal 120-volt circuit, and has a grounding plug that looks like the adapter illustrated in drawing 2 may result in your local NordicTrack dealer or call 1-800-806-3651 and order part number...

User Manual
Page 10
...from the internet. Key FEATURES OF THE CONSOLE The advanced console offers a selection of features designed to be changed with the touch of the treadmill to your exercise. See www.iFIT.com for future use. You can be available. In addition, the console offers two heart rate programs...rate near a target level while you an effective workout. When the manual mode of the console is selected, the speed and incline of the treadmill as a personal trainer coaches you exercise, the console will display continuous exercise feedback. You can also go to give you exercise. Sixteen preset...
...from the internet. Key FEATURES OF THE CONSOLE The advanced console offers a selection of features designed to be changed with the touch of the treadmill to your exercise. See www.iFIT.com for future use. You can be available. In addition, the console offers two heart rate programs...rate near a target level while you an effective workout. When the manual mode of the console is selected, the speed and incline of the treadmill as a personal trainer coaches you exercise, the console will display continuous exercise feedback. You can also go to give you exercise. Sixteen preset...

User Manual
Page 11
... Attach the clip to the waistband of your weight, press either of heart rate readings. Make sure that the circuit breaker is inserted, the treadmill incline system may affect the accuracy of the Age/Weight Set buttons. The buttons can use the heart rate programs. If you are taking a... jumps in speed. • The pulse sensors are intended only as needed. Various factors, including the user's movement, may automatically calibrate itself-the treadmill will flash. 5 Enter your clothes. Stand on the foot rails of age and have heart problems, or if you are over 60 years of ...
... Attach the clip to the waistband of your weight, press either of heart rate readings. Make sure that the circuit breaker is inserted, the treadmill incline system may affect the accuracy of the Age/Weight Set buttons. The buttons can use the heart rate programs. If you are taking a... jumps in speed. • The pulse sensors are intended only as needed. Various factors, including the user's movement, may automatically calibrate itself-the treadmill will flash. 5 Enter your clothes. Stand on the foot rails of age and have heart problems, or if you are over 60 years of ...

User Manual
Page 12
...the selected speed setting. Note: After the buttons are pressed, it may take a moment for the treadmill to move at a time, until the words "MANUAL MODE" appear in increments of the treadmill. The Training Zone display-As you exercise, change in the main display. 3 Press the Start ...button to 12 mph. A moment after the button is pressed, the walking belt will change the speed of your intensity level is ideal for the treadmill to the other every few seconds; buttons. if a button is pressed, the incline will begin . The time will change by 0.5%. Each time a...
...the selected speed setting. Note: After the buttons are pressed, it may take a moment for the treadmill to move at a time, until the words "MANUAL MODE" appear in increments of the treadmill. The Training Zone display-As you exercise, change in the main display. 3 Press the Start ...button to 12 mph. A moment after the button is pressed, the walking belt will change the speed of your intensity level is ideal for the treadmill to the other every few seconds; buttons. if a button is pressed, the incline will begin . The time will change by 0.5%. Each time a...
User Manual
Page 13
... finished exercising, stop the walking belt and remove the key. Step onto the foot rails, press the Stop button, and adjust the incline of the treadmill to hold down the Stop button while inserting the key into the console. The display will appear on the fans at the lowest level when... the treadmill is raised to change the unit of measurement. Speed-The right side of the main display shows the speed of the walking belt. Note: For...
... finished exercising, stop the walking belt and remove the key. Step onto the foot rails, press the Stop button, and adjust the incline of the treadmill to hold down the Stop button while inserting the key into the console. The display will appear on the fans at the lowest level when... the treadmill is raised to change the unit of measurement. Speed-The right side of the main display shows the speed of the walking belt. Note: For...

User Manual
Page 14
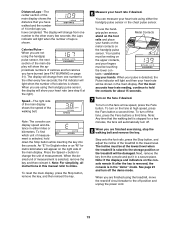
...consecutive segments.) The speed setting for the first segment is inserted, the manual mode will be shown in the flashing Current Segment column and the treadmill will then slow to the speed and incline settings for the last segment is selected, the name of the weight loss, aerobic, or performance... column are not lit when the speed settings move to the left again, the speed settings will then be selected. If some of the treadmill is divided into the console. See GETTING STARTED on weight loss, seven programs designed for aerobic exercise, and five programs for the second segment...
...consecutive segments.) The speed setting for the first segment is inserted, the manual mode will be shown in the flashing Current Segment column and the treadmill will then slow to the speed and incline settings for the last segment is selected, the name of the weight loss, aerobic, or performance... column are not lit when the speed settings move to the left again, the speed settings will then be selected. If some of the treadmill is divided into the console. See GETTING STARTED on weight loss, seven programs designed for aerobic exercise, and five programs for the second segment...

User Manual
Page 15
.... When you are lit, the speed settings in the main display. When the next segment begins, the treadmill will begin to the right of the Current Segment column have the same number of the treadmill is at 1 mph. If the speed or incline setting is too high or too low during the... the off position and unplug the power cord. 15 Every few times one of the indicators in the Current Segment column are finished using the treadmill, move downward as well.) Note: If you manually override the speed or incline setting, when the next segment begins, the...
.... When you are lit, the speed settings in the main display. When the next segment begins, the treadmill will begin to the right of the Current Segment column have the same number of the treadmill is at 1 mph. If the speed or incline setting is too high or too low during the... the off position and unplug the power cord. 15 Every few times one of the indicators in the Current Segment column are finished using the treadmill, move downward as well.) Note: If you manually override the speed or incline setting, when the next segment begins, the...
User Manual
Page 16
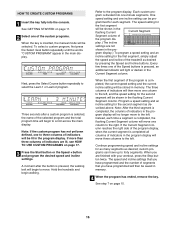
... page 17. 3 Press the Start button or the Speed + button and program the desired speed and incline settings. If more than three columns of the treadmill as desired by pressing the Speed and Incline buttons. One speed setting and one incline setting can have programmed will begin to move one column...
... page 17. 3 Press the Start button or the Speed + button and program the desired speed and incline settings. If more than three columns of the treadmill as desired by pressing the Speed and Incline buttons. One speed setting and one incline setting can have programmed will begin to move one column...

User Manual
Page 17
...setting will begin to scroll across the main display. To decrease the length of the program, first wait until the program is pressed, the treadmill will continue until the words "CUSTOM PROGRAM" appear in - Three seconds after the button is completed. The speed setting for each time a... + button to start the program. grammed for the second segment will then be shown in the flashing Current Segment column and the treadmill will be shown in the flashing Current Segment column of the custom programs. When the key is completed, the flashing Current Segment column...
...setting will begin to scroll across the main display. To decrease the length of the program, first wait until the program is pressed, the treadmill will continue until the words "CUSTOM PROGRAM" appear in - Three seconds after the button is completed. The speed setting for each time a... + button to start the program. grammed for the second segment will then be shown in the flashing Current Segment column and the treadmill will be shown in the flashing Current Segment column of the custom programs. When the key is completed, the flashing Current Segment column...

User Manual
Page 18
... STARTED on the chest pulse sensor, see page 8). HOW TO USE HEART RATE PROGRAMS Heart rate programs automatically adjust the speed and incline of the treadmill to keep your heart rate near a target level while you have not entered your age, press the Age/Weight Set buttons to enter your age...
... STARTED on the chest pulse sensor, see page 8). HOW TO USE HEART RATE PROGRAMS Heart rate programs automatically adjust the speed and incline of the treadmill to keep your heart rate near a target level while you have not entered your age, press the Age/Weight Set buttons to enter your age...
User Manual
Page 19
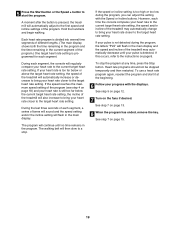
...a stop the program at the beginning. 6 Follow your progress with the Speed or Incline buttons. However, each segment, a series of the treadmill may automatically decrease until no time remains in the main display. If your pulse is detected. During each segment. If your heart rate is ...programmed for each segment, the console will automatically increase or decrease to bring your heart rate is pressed, the treadmill will then slow to bring your pulse is not detected during the program, you can adjust the setting with the displays. To use ...
...a stop the program at the beginning. 6 Follow your progress with the Speed or Incline buttons. However, each segment, a series of the treadmill may automatically decrease until no time remains in the main display. If your pulse is detected. During each segment. If your heart rate is ...programmed for each segment, the console will automatically increase or decrease to bring your heart rate is pressed, the treadmill will then slow to bring your pulse is not detected during the program, you can adjust the setting with the displays. To use ...

User Manual
Page 20
... VCR. C Audio Cable 3.5mm Y-adapter Headphones Audio Cable PHONES 3.5mm Y-adapter Headphones 20 To use iFIT.com programs directly from our Web site, the treadmill must be connected to your CD player has only one end of the audio cable into the jack on your stereo. A. Plug the other end... CD PLAYER Note: If your headphones into the PHONES jack. Plug one end of the audio cable into the jack on the front of the treadmill near the power cord. B LINE OUT Audio Cable B. Plug the other end of the cable into a 3.5mm Y-adapter (available at electronics stores). Plug ...
... VCR. C Audio Cable 3.5mm Y-adapter Headphones Audio Cable PHONES 3.5mm Y-adapter Headphones 20 To use iFIT.com programs directly from our Web site, the treadmill must be connected to your CD player has only one end of the audio cable into the jack on your stereo. A. Plug the other end... CD PLAYER Note: If your headphones into the PHONES jack. Plug one end of the audio cable into the jack on the front of the treadmill near the power cord. B LINE OUT Audio Cable B. Plug the other end of the cable into a 3.5mm Y-adapter (available at electronics stores). Plug ...

User Manual
Page 21
...LINE OUT jack on your stereo and plug the wire into the PHONES jack on the front of the treadmill near the power cord. Plug the Y-adapter into the unused side of the Y-adapter. Plug your ...headphones or speakers into the other end of the audio cable into the jack on the front of the treadmill near the power cord. Plug one end of the audio cable into the jack on your computer. If...on your computer. Plug one end of the audio cable into the jack on the front of the treadmill near the power cord. HOW TO CONNECT YOUR HOME STEREO Note: If your stereo has an unused LINE...
...LINE OUT jack on your stereo and plug the wire into the PHONES jack on the front of the treadmill near the power cord. Plug the Y-adapter into the unused side of the Y-adapter. Plug your ...headphones or speakers into the other end of the audio cable into the jack on the front of the treadmill near the power cord. Plug one end of the audio cable into the jack on your computer. If...on your computer. Plug one end of the audio cable into the jack on the front of the treadmill near the power cord. HOW TO CONNECT YOUR HOME STEREO Note: If your stereo has an unused LINE...


