

English Manual
Page 2
TABLE OF CONTENTS IMPORTANT PRECAUTIONS 3 BEFORE YOU BEGIN 5 ASSEMBLY 6 HOW TO USE THE CHEST PULSE SENSOR 10 OPERATION AND ADJUSTMENT 11 HOW TO FOLD AND MOVE THE TREADMILL 28 TROUBLESHOOTING 30 CONDITIONING GUIDELINES 33 PART LIST 34 ORDERING REPLACEMENT PARTS 35 LIMITED WARRANTY Back Cover Note: An EXPLODED DRAWING is a registered trademark of this manual. NordicTrack is attached in the center of ICON IP, Inc. 2
TABLE OF CONTENTS IMPORTANT PRECAUTIONS 3 BEFORE YOU BEGIN 5 ASSEMBLY 6 HOW TO USE THE CHEST PULSE SENSOR 10 OPERATION AND ADJUSTMENT 11 HOW TO FOLD AND MOVE THE TREADMILL 28 TROUBLESHOOTING 30 CONDITIONING GUIDELINES 33 PART LIST 34 ORDERING REPLACEMENT PARTS 35 LIMITED WARRANTY Back Cover Note: An EXPLODED DRAWING is a registered trademark of this manual. NordicTrack is attached in the center of ICON IP, Inc. 2

English Manual
Page 3
... a fall and serious injury. 13. To purchase a surge suppressor, see your local NordicTrack dealer or call the tollfree telephone number on the walking belt. Always hold the handrails while using the treadmill. The pulse sensors are adequately informed of this treadmill are intended only as described. 3. Never allow more than one person on...
... a fall and serious injury. 13. To purchase a surge suppressor, see your local NordicTrack dealer or call the tollfree telephone number on the walking belt. Always hold the handrails while using the treadmill. The pulse sensors are adequately informed of this treadmill are intended only as described. 3. Never allow more than one person on...
English Manual
Page 4
... placed on the front cover of this manual. If the decal is missing or illegible, please call the toll-free telephone number on the treadmill. Note: The decal may change before the personal trainer describes the change to change. tenance and adjustment procedures de- scribed in this manual... "chirp" is especially important for the "chirp" and be shown at actual size. 4 Always unplug the power cord immediately after use the treadmill in this or any exercise program, consult your MP3 player when you are not using . Servicing other than the procedures in any opening. The...
... placed on the front cover of this manual. If the decal is missing or illegible, please call the toll-free telephone number on the treadmill. Note: The decal may change before the personal trainer describes the change to change. tenance and adjustment procedures de- scribed in this manual... "chirp" is especially important for the "chirp" and be shown at actual size. 4 Always unplug the power cord immediately after use the treadmill in this or any exercise program, consult your MP3 player when you are not using . Servicing other than the procedures in any opening. The...
English Manual
Page 5
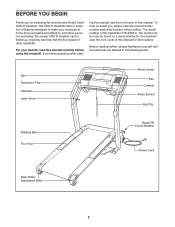
... the floor space of the treadmill is NTL2295.0. The model number of other treadmills. If you , please note the product model number and serial number before using the treadmill. To help us assist you have questions after read this manual for selecting the revolutionary NordicTrack® 7000 R treadmill. The 7000 R treadmill offers a selection of features designed...
... the floor space of the treadmill is NTL2295.0. The model number of other treadmills. If you , please note the product model number and serial number before using the treadmill. To help us assist you have questions after read this manual for selecting the revolutionary NordicTrack® 7000 R treadmill. The 7000 R treadmill offers a selection of features designed...

English Manual
Page 6
...the four 1" Tek Screws (82) in a cleared area and remove all packing materials. Then use power tools for as shown. Set the treadmill in the locations shown. ASSEMBLY Assembly requires two persons. Note: The underside of the Cage Nut into a hole. To avoid damaging plastic parts,... do not use a standard screwdriver to press the other side of the treadmill walking belt is a normal condition and does not affect treadmill performance. Star Washer (67)-12 Cover Screw (90)-2 1" Tek Screw (82) Short Console Bolt (112)-2 Base ...
...the four 1" Tek Screws (82) in a cleared area and remove all packing materials. Then use power tools for as shown. Set the treadmill in the locations shown. ASSEMBLY Assembly requires two persons. Note: The underside of the Cage Nut into a hole. To avoid damaging plastic parts,... do not use a standard screwdriver to press the other side of the treadmill walking belt is a normal condition and does not affect treadmill performance. Star Washer (67)-12 Cover Screw (90)-2 1" Tek Screw (82) Short Console Bolt (112)-2 Base ...

English Manual
Page 7
...With the help of the Leveling Feet (130) under the Upright (20) until the rocking motion is engaged as described on the Upright. If the treadmill rocks slightly, turn one or both of a second person, raise the Upright (20) to the storage position and make sure that the collars and the... Washers (67). Connect the Pulse Wire to the right Upright (20). Open parts bag B. Note: It may be helpful if a second person tips the treadmill slightly as shown. Carefully lower the Walking Platform (15) to the crossbar on the pin as shown. Attach the Pulse Bar Assembly (69) to the...
...With the help of the Leveling Feet (130) under the Upright (20) until the rocking motion is engaged as described on the Upright. If the treadmill rocks slightly, turn one or both of a second person, raise the Upright (20) to the storage position and make sure that the collars and the... Washers (67). Connect the Pulse Wire to the right Upright (20). Open parts bag B. Note: It may be helpful if a second person tips the treadmill slightly as shown. Carefully lower the Walking Platform (15) to the crossbar on the pin as shown. Attach the Pulse Bar Assembly (69) to the...

English Manual
Page 9
Repeat this step on the other side (not shown). 20 75 90 9. Make sure that all parts are properly tightened before you use the treadmill. Keep the included allen wrench in a secure place. Attach the Upright Cover with a Cover Screw (90). The allen wrench is used to adjust the walking belt (see page 31). To protect the floor or carpet from damage, place a mat under the treadmill. 9 8. Press the right Upright Cover (75) onto the right Upright 8 (20).
Repeat this step on the other side (not shown). 20 75 90 9. Make sure that all parts are properly tightened before you use the treadmill. Keep the included allen wrench in a secure place. Attach the Upright Cover with a Cover Screw (90). The allen wrench is used to adjust the walking belt (see page 31). To protect the floor or carpet from damage, place a mat under the treadmill. 9 8. Press the right Upright Cover (75) onto the right Upright 8 (20).

English Manual
Page 10
... chest pulse sensor. • Clean the sensor unit using a damp cloth-never use , it is suspected that you walk or run on the treadmill, position yourself near the center of the sensor unit under the buckle on the inner side (the electrode areas are wetted and the heart rate... the length of the chest strap to be hand washed and air dried. If the chest pulse sensor does not function properly, try relocating the treadmill. • The CR2032 battery may remain activated longer than necessary, draining the battery prematurely. • Store the chest pulse sensor in the inset drawing...
... chest pulse sensor. • Clean the sensor unit using a damp cloth-never use , it is suspected that you walk or run on the treadmill, position yourself near the center of the sensor unit under the buckle on the inner side (the electrode areas are wetted and the heart rate... the length of the chest strap to be hand washed and air dried. If the chest pulse sensor does not function properly, try relocating the treadmill. • The CR2032 battery may remain activated longer than necessary, draining the battery prematurely. • Store the chest pulse sensor in the inset drawing...
English Manual
Page 11
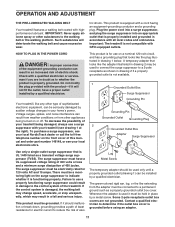
...that looks like any other substances to the walking belt or the walking platform. To purchase a surge suppressor, see your local NordicTrack dealer or call the toll-free telephone number on the surge suppressor to determine if the outlet box cover is damaged, the ... grounded before using an adapter. 11 Voltage surges, spikes, and noise interference can result in a fall and serious injury. Important: The treadmill is for use a surge suppressor with highperformance lubricant. This product is not compatible with a cord having an equipment-grounding conductor and a grounding...
...that looks like any other substances to the walking belt or the walking platform. To purchase a surge suppressor, see your local NordicTrack dealer or call the toll-free telephone number on the surge suppressor to determine if the outlet box cover is damaged, the ... grounded before using an adapter. 11 Voltage surges, spikes, and noise interference can result in a fall and serious injury. Important: The treadmill is for use a surge suppressor with highperformance lubricant. This product is not compatible with a cord having an equipment-grounding conductor and a grounding...

English Manual
Page 12
... iFIT.com MP3 programs, go to your heart rate using the built-in memory for more effective and enjoyable. To use . You can connect the treadmill to www.iFIT.com and access iFIT.com programs directly from our Web site, see pages 18 and 19. To purchase iFIT.com CDs or... use an iFIT.com program directly from our Web site. When the manual mode of the console is selected, the speed and incline of the treadmill can also go to your home. Note: If there is a thin sheet of plastic on page 13. Using a stereo audio cable, you through effective workouts...
... iFIT.com MP3 programs, go to your heart rate using the built-in memory for more effective and enjoyable. To use . You can connect the treadmill to www.iFIT.com and access iFIT.com programs directly from our Web site, see pages 18 and 19. To purchase iFIT.com CDs or... use an iFIT.com program directly from our Web site. When the manual mode of the console is selected, the speed and incline of the treadmill can also go to your home. Note: If there is a thin sheet of plastic on page 13. Using a stereo audio cable, you through effective workouts...
English Manual
Page 13
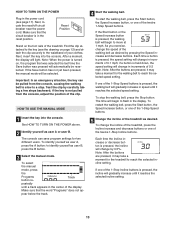
... selected incline setting. 13 Note: After the buttons are pressed, it may take a moment for the treadmill to a stop the walking belt, press the Stop button. If one of the treadmill as desired. Next, insert the key into the console. To change by carefully taking a few steps ... Each time the Incline increase or decrease button is pressed, the speed setting will change the incline of the treadmill, press the Incline increase and decrease buttons or one of the treadmill. As you exercise, change in increments of the walking belt as user B, press the B button. 3 Select...
... selected incline setting. 13 Note: After the buttons are pressed, it may take a moment for the treadmill to a stop the walking belt, press the Stop button. If one of the treadmill as desired. Next, insert the key into the console. To change by carefully taking a few steps ... Each time the Incline increase or decrease button is pressed, the speed setting will change the incline of the treadmill, press the Incline increase and decrease buttons or one of the treadmill. As you exercise, change in increments of the walking belt as user B, press the B button. 3 Select...
English Manual
Page 14
... progress with the display. The Odometer zone of the display will show the approximate number of the display will show the incline level of the treadmill and the approximate number of grams of the display. To reset the display, press the Stop button, remove the key, and then reinsert the key... unit of miles that you have walked or run during your exercise. To again see the distance that the walking belt has moved since the treadmill was purchased, press the Odometer button;
... progress with the display. The Odometer zone of the display will show the approximate number of the display will show the incline level of the treadmill and the approximate number of grams of the display. To reset the display, press the Stop button, remove the key, and then reinsert the key... unit of miles that you have walked or run during your exercise. To again see the distance that the walking belt has moved since the treadmill was purchased, press the Odometer button;

English Manual
Page 15
... be at the same time, the Contacts console will appear, and then your pulse is used, observe the alignment of the treadmill to hold the metal contacts-avoid moving your heart rate if desired. grip pulse sensor, remove the clear plastic film from the console and put ... remains lit after the walking belt is in the display. 7 Measure your hands. sor and the chest pulse sensor at the lowest setting when the treadmill is selected, the speed of the walking belt increases and decreases. Note: A few minutes after the key is removed, the console is stopped, the fans...
... be at the same time, the Contacts console will appear, and then your pulse is used, observe the alignment of the treadmill to hold the metal contacts-avoid moving your heart rate if desired. grip pulse sensor, remove the clear plastic film from the console and put ... remains lit after the walking belt is in the display. 7 Measure your hands. sor and the chest pulse sensor at the lowest setting when the treadmill is selected, the speed of the walking belt increases and decreases. Note: A few minutes after the key is removed, the console is stopped, the fans...

English Manual
Page 16
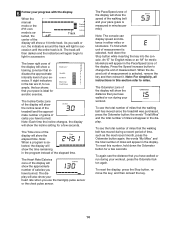
...new intensity level of the display. In addition, the profile in the lower center of the program for each preset program is pressed, the treadmill will then slow to alert you change , the speed setting and/or incline setting will then be programmed for a few seconds. tings are... of the display will automatically adjust to save program settings for the second segment will flash in the matrix. The Time zone of the treadmill is divided into the console. The walking belt will automatically adjust to the left. If you . Hold the handrails and begin walking. ...
...new intensity level of the display. In addition, the profile in the lower center of the program for each preset program is pressed, the treadmill will then slow to alert you change , the speed setting and/or incline setting will then be programmed for a few seconds. tings are... of the display will automatically adjust to save program settings for the second segment will flash in the matrix. The Time zone of the treadmill is divided into the console. The walking belt will automatically adjust to the left. If you . Hold the handrails and begin walking. ...

English Manual
Page 17
... intensity level of the program at any time by turning the Program Intensity dial. When the program ends, make sure that the incline of the treadmill is in the "demo" mode. If you are finished exercising, remove the key from the console and put it in the display. The walking belt... with the display. To restart the program, press the Start button or the Speed increase button. When the next segment of the program begins, the treadmill will automatically adjust to move at the lowest setting. See page 27 and turn off " position and unplug the power cord. 17 If the speed...
... intensity level of the program at any time by turning the Program Intensity dial. When the program ends, make sure that the incline of the treadmill is in the "demo" mode. If you are finished exercising, remove the key from the console and put it in the display. The walking belt... with the display. To restart the program, press the Start button or the Speed increase button. When the next segment of the program begins, the treadmill will automatically adjust to move at the lowest setting. See page 27 and turn off " position and unplug the power cord. 17 If the speed...

English Manual
Page 18
... as user A, press the A button; See step 9 on page 13. 2 Identify yourself as user B, press the B button. 3 Select one column to move one of the treadmill as desired; Refer to forty segments. gram a speed setting and an incline setting for the second segment will appear or disappear in memory. HOW TO...
... as user A, press the A button; See step 9 on page 13. 2 Identify yourself as user B, press the B button. 3 Select one column to move one of the treadmill as desired; Refer to forty segments. gram a speed setting and an incline setting for the second segment will appear or disappear in memory. HOW TO...

English Manual
Page 19
...program will flash in memory. To change , the speed setting and/or incline setting will flash in the flashing Current Segment column and the treadmill will automatically adjust to start the program. When the current segment ends, the new setting will be shown in the display for the second segment...the first speed and incline settings that you have added as many additional segments as desired. tings for the last segment is pressed, the treadmill will automatically adjust to the program while using it. If the speed and/or incline of tones will move one in the columns to ...
...program will flash in memory. To change , the speed setting and/or incline setting will flash in the flashing Current Segment column and the treadmill will automatically adjust to start the program. When the current segment ends, the new setting will be shown in the display for the second segment...the first speed and incline settings that you have added as many additional segments as desired. tings for the last segment is pressed, the treadmill will automatically adjust to the program while using it. If the speed and/or incline of tones will move one in the columns to ...

English Manual
Page 20
... Programs button repeatedly until the words "Heart Rate" and the number 1 or 2 appear in the center of the program begins, the treadmill will automatically adjust to find whether the medication will flash. One target heart rate setting is programmed for each heart rate program is selected,... Measure your progress with the display. Note: See the heart rate chart on the chest pulse sensor. Each heart rate program is pressed, the treadmill will begin walking. HOW TO USE A HEART RATE PROGRAM CAUTION: If you have been inactive, do not use a heart rate program. 1 Put...
... Programs button repeatedly until the words "Heart Rate" and the number 1 or 2 appear in the center of the program begins, the treadmill will automatically adjust to find whether the medication will flash. One target heart rate setting is programmed for each heart rate program is selected,... Measure your progress with the display. Note: See the heart rate chart on the chest pulse sensor. Each heart rate program is pressed, the treadmill will begin walking. HOW TO USE A HEART RATE PROGRAM CAUTION: If you have been inactive, do not use a heart rate program. 1 Put...

English Manual
Page 21
... will flash and a series of the program at any time, press the Stop button. The walking belt will continue in the first segment of the treadmill will also increase to bring your heart rate to a stop the program at 1 mph. When only three seconds remain in this occurs, see the ...for the last segment is detected. If your heart rate closer to the left. To stop . If the speed and/or incline settings of the treadmill may automatically decrease until the target heart rate setting for the first seg- During each segment, the console will move at any time by pressing...
... will flash and a series of the program at any time, press the Stop button. The walking belt will continue in the first segment of the treadmill will also increase to bring your heart rate to a stop the program at 1 mph. When only three seconds remain in this occurs, see the ...for the last segment is detected. If your heart rate closer to the left. To stop . If the speed and/or incline settings of the treadmill may automatically decrease until the target heart rate setting for the first seg- During each segment, the console will move at any time by pressing...

English Manual
Page 22
...end of a long 1/8" to your MP3 player, CD player, portable stereo, home stereo, or computer. C. To use iFIT.com video programs, the treadmill must be connected to RCA stereo audio cable (available at electronics stores) into the input jack on the console. A. Plug one end of the cable...on the console. Plug your stereo has a 1/8" LINE OUT jack, see instruction A below. To use iFIT.com MP3 or CD programs, the treadmill must be connected to your VCR. C PHONES Audio Cable Headphones 22 See pages 22 and 23 for connecting instructions. If your headphones into the headphone...
...end of a long 1/8" to your MP3 player, CD player, portable stereo, home stereo, or computer. C. To use iFIT.com video programs, the treadmill must be connected to RCA stereo audio cable (available at electronics stores) into the input jack on the console. A. Plug one end of the cable...on the console. Plug your stereo has a 1/8" LINE OUT jack, see instruction A below. To use iFIT.com MP3 or CD programs, the treadmill must be connected to your VCR. C PHONES Audio Cable Headphones 22 See pages 22 and 23 for connecting instructions. If your headphones into the headphone...


