

English Manual
Page 3
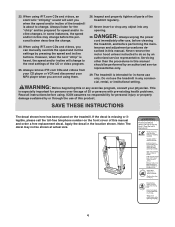
..., lower, or move the walking belt while the power is fully closed. 3 Adjust the speed in small increments to avoid sudden jumps in the treadmill. Never start the treadmill while you are not medical devices. Do not change speed, accelerate, or stop procedure before operating the treadmill. 1. Do not wear loose clothes that the storage latch is turned off circuit breaker.) 20. When connecting the power cord (see page 11), plug...
..., lower, or move the walking belt while the power is fully closed. 3 Adjust the speed in small increments to avoid sudden jumps in the treadmill. Never start the treadmill while you are not medical devices. Do not change speed, accelerate, or stop procedure before operating the treadmill. 1. Do not wear loose clothes that the storage latch is turned off circuit breaker.) 20. When connecting the power cord (see page 11), plug...
English Manual
Page 4
... shown at actual size. 4 Never insert or drop any object into any opening. Always listen for speed and/or incline changes. Servicing other than the procedures in -home use , before cleaning the treadmill, and before using. When using iFIT.com CDs and videos, you are not using iFIT.com CDs and videos, an electronic "chirping" sound will change to the next settings of this manual and order a free replacement decal. This...
... shown at actual size. 4 Never insert or drop any object into any opening. Always listen for speed and/or incline changes. Servicing other than the procedures in -home use , before cleaning the treadmill, and before using. When using iFIT.com CDs and videos, you are not using iFIT.com CDs and videos, an electronic "chirping" sound will change to the next settings of this manual and order a free replacement decal. This...
English Manual
Page 5
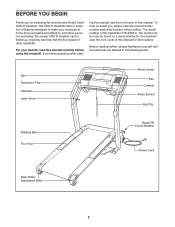
... not exercising, the unique 7000 R treadmill can be folded up, requiring less than half the floor space of this manual carefully before calling. The serial number can be found on a decal attached to make your benefit, read - The model number of this manual. Fan Accessory Tray Handrail Latch Knob Book Holder Fan Console Pulse Sensor Key/Clip Walking Belt Foot Pad Reset/Off Circuit Breaker Power Cord Rear Roller Adjustment Bolts 5 ing this manual, see the front cover...
... not exercising, the unique 7000 R treadmill can be folded up, requiring less than half the floor space of this manual carefully before calling. The serial number can be found on a decal attached to make your benefit, read - The model number of this manual. Fan Accessory Tray Handrail Latch Knob Book Holder Fan Console Pulse Sensor Key/Clip Walking Belt Foot Pad Reset/Off Circuit Breaker Power Cord Rear Roller Adjustment Bolts 5 ing this manual, see the front cover...

English Manual
Page 6
... phillips screwdriver , standard screwdriver and wire cutters . To avoid damaging plastic parts, do not use a standard screwdriver to press the other side of the packing materials until assembly is coated with high-performance lubricant. Star Washer (67)-12 Cover Screw (90)-2 1" Tek Screw (82) Short Console Bolt (112)-2 Base Plate Bolt (125)-3 Handrail Bolt (66)-4 Console Bolt (72)-2 Pulse Bar Bolt (13)-4 1. sembly. Attach the four Base Pads (81...
... phillips screwdriver , standard screwdriver and wire cutters . To avoid damaging plastic parts, do not use a standard screwdriver to press the other side of the packing materials until assembly is coated with high-performance lubricant. Star Washer (67)-12 Cover Screw (90)-2 1" Tek Screw (82) Short Console Bolt (112)-2 Base Plate Bolt (125)-3 Handrail Bolt (66)-4 Console Bolt (72)-2 Pulse Bar Bolt (13)-4 1. sembly. Attach the four Base Pads (81...

English Manual
Page 7
... lower the Walking Platform (15) to the wire in the Pulse Bar Assembly. Press the Latch Insert (77) into the crossbar. Tighten the knob back onto the pin. 2 Knob 20 77 Spring Pin Collar 3. Connect the Pulse Wire to the floor as you tighten the Bolts. Start all four Pulse Bar Bolts before tightening them. Position the Base Plate (126) on the Upright. The connectors should slide together easily and snap into the Latch Insert. Attach...
... lower the Walking Platform (15) to the wire in the Pulse Bar Assembly. Press the Latch Insert (77) into the crossbar. Tighten the knob back onto the pin. 2 Knob 20 77 Spring Pin Collar 3. Connect the Pulse Wire to the floor as you tighten the Bolts. Start all four Pulse Bar Bolts before tightening them. Position the Base Plate (126) on the Upright. The connectors should slide together easily and snap into the Latch Insert. Attach...

English Manual
Page 8
... the wires extending from the console assembly. Repeat on the other side. Have a second person hold the console assembly near the 5 Uprights. Connect the Upright Wire Harness (73) and the Console Pulse Wire (74) to drop the Short Console Bolts into the console assembly. If they do not, turn one side is shown). Make sure that the 73 wires are fully inserted into the lower hole in the lower ends...
... the wires extending from the console assembly. Repeat on the other side. Have a second person hold the console assembly near the 5 Uprights. Connect the Upright Wire Harness (73) and the Console Pulse Wire (74) to drop the Short Console Bolts into the console assembly. If they do not, turn one side is shown). Make sure that the 73 wires are fully inserted into the lower hole in the lower ends...

English Manual
Page 10
... attach the other end of the chest strap to a position against your chest. Pull the sensor unit away from your chest. • Use saline solution such as shown in a warm, dry place. For the console to display heart rate readings, the user must be within arm's length of the console. • The chest pulse sensor is comfortable. The chest pulse sensor is activated when the electrode areas are covered by high power...
... attach the other end of the chest strap to a position against your chest. Pull the sensor unit away from your chest. • Use saline solution such as shown in a warm, dry place. For the console to display heart rate readings, the user must be within arm's length of the console. • The chest pulse sensor is comfortable. The chest pulse sensor is activated when the electrode areas are covered by high power...
English Manual
Page 11
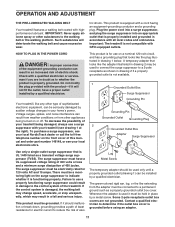
... the adapter is used it should be used to connect the surge suppressor to the walking belt or the walking platform. Important: The treadmill is equipped with GFCI-equipped outlets. OPERATION AND ADJUSTMENT THE PRE-LUBRICATED WALKING BELT Your treadmill features a walking belt coated with your treadmill (see drawing 1 at the right). Voltage surges, spikes, and noise interference can result in your home's power. Do not modify the plug...
... the adapter is used it should be used to connect the surge suppressor to the walking belt or the walking platform. Important: The treadmill is equipped with GFCI-equipped outlets. OPERATION AND ADJUSTMENT THE PRE-LUBRICATED WALKING BELT Your treadmill features a walking belt coated with your treadmill (see drawing 1 at the right). Voltage surges, spikes, and noise interference can result in your home's power. Do not modify the plug...

English Manual
Page 12
... the toll-free telephone number on the front cover of the console, remove it. To use an iFIT.com MP3, CD, or video program, see page 26. 12 Key Clip FEATURES OF THE CONSOLE The treadmill console offers an impressive array of your workouts more information. iFIT.com programs automatically control the speed and incline of the console is like having a personal trainer in handgrip pulse sensor or the chest pulse sensor. To create and use a heart rate program, see pages...
... the toll-free telephone number on the front cover of the console, remove it. To use an iFIT.com MP3, CD, or video program, see page 26. 12 Key Clip FEATURES OF THE CONSOLE The treadmill console offers an impressive array of your workouts more information. iFIT.com programs automatically control the speed and incline of the console is like having a personal trainer in handgrip pulse sensor or the chest pulse sensor. To create and use a heart rate program, see pages...
English Manual
Page 13
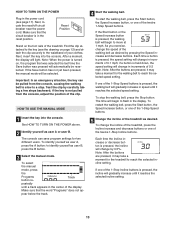
... POWER Plug in the display. Next, insert the key into the console. If the Start button or the Speed increase button is pressed, the incline will begin to reach the selected speed setting. The time will change the speed of the twelve 1-Step Incline buttons. Each time the Incline increase or decrease button is pressed, the walking belt will change in speed until it may take a moment for the treadmill to move at 1 mph. HOW TO USE THE MANUAL MODE...
... POWER Plug in the display. Next, insert the key into the console. If the Start button or the Speed increase button is pressed, the incline will begin to reach the selected speed setting. The time will change the speed of the twelve 1-Step Incline buttons. Each time the Incline increase or decrease button is pressed, the walking belt will change in speed until it may take a moment for the treadmill to move at 1 mph. HOW TO USE THE MANUAL MODE...
English Manual
Page 14
... "Total Miles" and the total number of miles will appear in the display. To reset this section refer to light in the bar are lit, for example, the bar shows that the walking belt has moved since the treadmill was purchased, press the Odometer button; cession until the entire track is selected, remove the key and then reinsert it. Note: The console can display speed and distance in this number, hold...
... "Total Miles" and the total number of miles will appear in the display. To reset this section refer to light in the bar are lit, for example, the bar shows that the walking belt has moved since the treadmill was purchased, press the Odometer button; cession until the entire track is selected, remove the key and then reinsert it. Note: The console can display speed and distance in this number, hold...

English Manual
Page 15
... the display. The incline must be at high speed, press the button a third time; When you are finished using the hand- sor and the chest pulse sensor at low speed, press the AutoBreeze Fans button; 7 Measure your heart rate will be damaged. To measure your pulse is folded to hold the metal contacts-avoid moving your hands. the number 3 will appear. See page 27 and turn off the demo mode. Note...
... the display. The incline must be at high speed, press the button a third time; When you are finished using the hand- sor and the chest pulse sensor at low speed, press the AutoBreeze Fans button; 7 Measure your heart rate will be damaged. To measure your pulse is folded to hold the metal contacts-avoid moving your hands. the number 3 will appear. See page 27 and turn off the demo mode. Note...

English Manual
Page 17
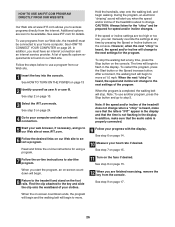
To stop the program at the lowest setting. The walking belt will begin to flash in the display. See step 7 on page 15. 8 Turn on page 15. 9 When you are finished exercising, remove the key from the console and put it in the "demo" mode. When the next segment of the program begins, the treadmill will begin to the speed and incline settings for future workouts, press the Save button. When the program ends...
To stop the program at the lowest setting. The walking belt will begin to flash in the display. See step 7 on page 15. 8 Turn on page 15. 9 When you are finished exercising, remove the key from the console and put it in the "demo" mode. When the next segment of the program begins, the treadmill will begin to the speed and incline settings for future workouts, press the Save button. When the program ends...

English Manual
Page 20
... the button is pressed, the treadmill will automatically adjust to the first speed and incline settings of the program will begin to start the program. To stop the program at 1 mph. The walking belt will flash. See step 9 on page 13. 3 Identify yourself as user A or user B. You must wear the chest pulse sensor (see page 10) to use a heart rate program. 2 Insert the key into 20 oneminute segments. When a heart rate program is divided into the console. See step...
... the button is pressed, the treadmill will automatically adjust to the first speed and incline settings of the program will begin to start the program. To stop the program at 1 mph. The walking belt will flash. See step 9 on page 13. 3 Identify yourself as user A or user B. You must wear the chest pulse sensor (see page 10) to use a heart rate program. 2 Insert the key into 20 oneminute segments. When a heart rate program is divided into the console. See step...

English Manual
Page 21
... program are finished exercising, remove the key. If this way until your pulse is still too far below or above the target heart rate setting, the speed of the walking belt will then be shown in the flashing Current Segment column of the treadmill will also increase to bring your heart rate closer to change the maximum target heart rate setting. When the console compares your heart rate to the target heart rate...
... program are finished exercising, remove the key. If this way until your pulse is still too far below or above the target heart rate setting, the speed of the walking belt will then be shown in the flashing Current Segment column of the treadmill will also increase to bring your heart rate closer to change the maximum target heart rate setting. When the console compares your heart rate to the target heart rate...

English Manual
Page 24
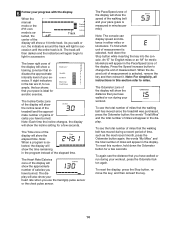
... step 8 on the console. • Adjust the volume of your personal trainer describes the change to move at any time by pressing the Speed or Incline buttons on page 14. 6 Measure your progress with the display. The time will stop the walking belt at 1 mph. To stop . When the next "chirp" is completed, the walking belt will begin to the next settings of the treadmill does not change . Note: To use...
... step 8 on the console. • Adjust the volume of your personal trainer describes the change to move at any time by pressing the Speed or Incline buttons on page 14. 6 Measure your progress with the display. The time will stop the walking belt at 1 mph. To stop . When the next "chirp" is completed, the walking belt will begin to the next settings of the treadmill does not change . Note: To use...
English Manual
Page 26
... display and that the audio cable is completed, the walking belt will stop the walking belt at any time by pressing the Speed or Incline buttons on the console. When you to access programs directly from our Web site, the treadmill must have an internet connection and an internet service provider. Note: If the speed and/or incline of the program. See step 7 on page 15. 11 Turn on page 23. During the program...
... display and that the audio cable is completed, the walking belt will stop the walking belt at any time by pressing the Speed or Incline buttons on the console. When you to access programs directly from our Web site, the treadmill must have an internet connection and an internet service provider. Note: If the speed and/or incline of the program. See step 7 on page 15. 11 Turn on page 23. During the program...

English Manual
Page 33
... highest number in your training zone. This will increase the flexibility of the chart (ages are not medical devices. ergy. For aerobic exercise, adjust the speed and incline of the treadmill until your heart rate is near the bottom of your muscles and will help prevent post-exercise problems. EXERCISE FREQUENCY To maintain or improve your age. Next, find your body begin to use the pulse sensor...
... highest number in your training zone. This will increase the flexibility of the chart (ages are not medical devices. ergy. For aerobic exercise, adjust the speed and incline of the treadmill until your heart rate is near the bottom of your muscles and will help prevent post-exercise problems. EXERCISE FREQUENCY To maintain or improve your age. Next, find your body begin to use the pulse sensor...
English Manual
Page 34
... Endcap Washer Latch Warning Decal Screw Latch Plate Endcap Nut Front Right Endcap Endcap Spring Belt Guide Pulse Bar Bolt Frame Pivot Bolt Walking Platform Walking Belt Front Roller Magnet Frame Spacer Upright Reed Switch Clip Reed Switch 1/2" Screw Grommet Drive Motor 1" Screw Bolt Left Rear Endcap Left Roller Guard Lift Frame Washer Motor Bolt Nut Motor Hood Control Knob Right Roller Guard Right Rear Endcap Plastic Washer Front Roller Adjustment Bolt 2" Screw Incline Motor Lower Pin Transformer Controller Foot Pad (Left) Belly Pan Power Cord Grommet Power Cord Off/Reset Circuit Breaker...
... Endcap Washer Latch Warning Decal Screw Latch Plate Endcap Nut Front Right Endcap Endcap Spring Belt Guide Pulse Bar Bolt Frame Pivot Bolt Walking Platform Walking Belt Front Roller Magnet Frame Spacer Upright Reed Switch Clip Reed Switch 1/2" Screw Grommet Drive Motor 1" Screw Bolt Left Rear Endcap Left Roller Guard Lift Frame Washer Motor Bolt Nut Motor Hood Control Knob Right Roller Guard Right Rear Endcap Plastic Washer Front Roller Adjustment Bolt 2" Screw Incline Motor Lower Pin Transformer Controller Foot Pad (Left) Belly Pan Power Cord Grommet Power Cord Off/Reset Circuit Breaker...
English Manual
Page 35
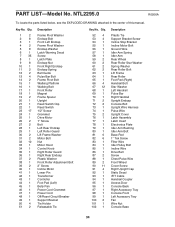
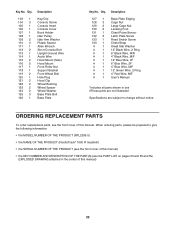
... 3 126 1 Key/Clip Console Screw Console Insert Console Cover Book Holder Idler Pulley Idler Arm Washer Plastic Spacer Allen Wrench Short Console Bolt Upright Ground Wire Audio Wire Hood Mount (Side) Hood Mount Front Roller Nut Support Bracket Front Wheel Bolt Hole Plug Hood Clip Wheel Bushing Wheel Spacer Wheel Washer Base Plate Bolt Base Plate Key No. Qty. When ordering parts, please be prepared to change without notice. ORDERING REPLACEMENT PARTS To order replacement parts, see the PART LIST on...
... 3 126 1 Key/Clip Console Screw Console Insert Console Cover Book Holder Idler Pulley Idler Arm Washer Plastic Spacer Allen Wrench Short Console Bolt Upright Ground Wire Audio Wire Hood Mount (Side) Hood Mount Front Roller Nut Support Bracket Front Wheel Bolt Hole Plug Hood Clip Wheel Bushing Wheel Spacer Wheel Washer Base Plate Bolt Base Plate Key No. Qty. When ordering parts, please be prepared to change without notice. ORDERING REPLACEMENT PARTS To order replacement parts, see the PART LIST on...


