
Uk Manual
Page 1
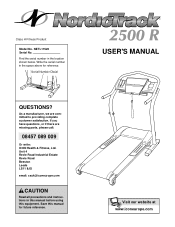
Serial Number Decal QUESTIONS? USER'S MANUAL Visit our website at www.iconeurope.com Class H Fitness Product Model No. Find the serial number in the space above for future reference. Save this .... Unit 4 Revie Road Industrial Estate Revie Road Beeston Leeds LS11 8JG email: [email protected] CAUTION Read all precautions and instructions in this manual before using this manual for reference. If you have questions, or if there are committed to providing complete customer satisfaction. NETL11520 Serial No. Write the serial number in...
Serial Number Decal QUESTIONS? USER'S MANUAL Visit our website at www.iconeurope.com Class H Fitness Product Model No. Find the serial number in the space above for future reference. Save this .... Unit 4 Revie Road Industrial Estate Revie Road Beeston Leeds LS11 8JG email: [email protected] CAUTION Read all precautions and instructions in this manual before using this manual for reference. If you have questions, or if there are committed to providing complete customer satisfaction. NETL11520 Serial No. Write the serial number in...

Uk Manual
Page 2
TABLE OF CONTENTS IMPORTANT PRECAUTIONS 3 BEFORE YOU BEGIN 5 ASSEMBLY 6 HOW TO USE THE CHEST PULSE SENSOR 8 OPERATION AND ADJUSTMENT 9 HOW TO FOLD AND MOVE THE TREADMILL 23 TROUBLESHOOTING 25 CONDITIONING GUIDELINES 28 PART LIST 30 ORDERING REPLACEMENT PARTS Back Cover Note: An EXPLODED DRAWING is a registered trademark of this manual. NordicTrack is attached in the centre of ICON Health & Fitness, Inc. 2
TABLE OF CONTENTS IMPORTANT PRECAUTIONS 3 BEFORE YOU BEGIN 5 ASSEMBLY 6 HOW TO USE THE CHEST PULSE SENSOR 8 OPERATION AND ADJUSTMENT 9 HOW TO FOLD AND MOVE THE TREADMILL 23 TROUBLESHOOTING 25 CONDITIONING GUIDELINES 28 PART LIST 30 ORDERING REPLACEMENT PARTS Back Cover Note: An EXPLODED DRAWING is a registered trademark of this manual. NordicTrack is attached in the centre of ICON Health & Fitness, Inc. 2
Uk Manual
Page 3
... a level surface, with bare feet, wearing only stockings, or in the treadmill. When folding or moving the treadmill, make sure that all users of this manual. 3. Athletic support clothes are standing on a surface that could become caught in sandals. 10. Use the treadmill only as exercise aids in determining heart rate trends in a garage...
... a level surface, with bare feet, wearing only stockings, or in the treadmill. When folding or moving the treadmill, make sure that all users of this manual. 3. Athletic support clothes are standing on a surface that could become caught in sandals. 10. Use the treadmill only as exercise aids in determining heart rate trends in a garage...
Uk Manual
Page 4
... especially important for in this product. Servicing other than the procedures in -home use , before cleaning the treadmill, and before performing the main- Apply the decal in this manual). Inspect and properly tighten all instructions before the personal trainer describes the change to order a free replacement decal (see ORDERING REPLACEMENT PARTS on...
... especially important for in this product. Servicing other than the procedures in -home use , before cleaning the treadmill, and before performing the main- Apply the decal in this manual). Inspect and properly tighten all instructions before the personal trainer describes the change to order a free replacement decal (see ORDERING REPLACEMENT PARTS on...
Uk Manual
Page 5
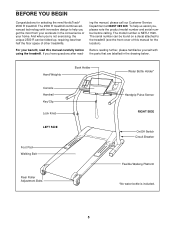
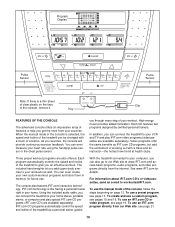
...and serial number before using the treadmill. The model number is included. 5 The serial number can be found on a decal attached to help us assist you have questions after read this manual for selecting the new NordicTrack® 2500 R treadmill. Before reading further, please ...familiarise yourself with innovative design to the treadmill (see the front cover of other treadmills. And when you get the most from your workouts ...
...and serial number before using the treadmill. The model number is included. 5 The serial number can be found on a decal attached to help us assist you have questions after read this manual for selecting the new NordicTrack® 2500 R treadmill. Before reading further, please ...familiarise yourself with innovative design to the treadmill (see the front cover of other treadmills. And when you get the most from your workouts ...
Uk Manual
Page 10
... program, see page 13. To create and use a preset program, see pages 15 and 16. To use . When the manual mode of the console is selected, the speed and incline of the treadmill can even measure your own custom workout programs and store them in your exercise. You can be changed with... home. As you an effective workout. Each CD features two programs designed by certified personal trainers. To use the manual mode of the console, follow the steps beginning on the face Clip of the treadmill to [email protected]. To use an iFIT.com CD or video program, see page 21. 10
... program, see page 13. To create and use a preset program, see pages 15 and 16. To use . When the manual mode of the console is selected, the speed and incline of the treadmill can even measure your own custom workout programs and store them in your exercise. You can be changed with... home. As you an effective workout. Each CD features two programs designed by certified personal trainers. To use the manual mode of the console, follow the steps beginning on the face Clip of the treadmill to [email protected]. To use an iFIT.com CD or video program, see page 21. 10
Uk Manual
Page 12
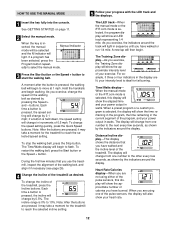
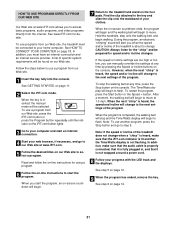
... intensity level is 0% to reach the selected incline setting. 5 Follow your exercise. When the manual mode or the iFIT.com mode is pressed, the speed setting will change the incline of the treadmill, press the Incline buttons. To stop the walking belt, press the Stop button. To change ...that you exercise, change the speed setting quickly, press the Quick Speed buttons. See GETTING STARTED on page 11. 2 Select the manual mode. As you use the treadmill, inspect the alignment of the walking belt, and align it if necessary (see page 26). 4 Change the incline of the ...
... intensity level is 0% to reach the selected incline setting. 5 Follow your exercise. When the manual mode or the iFIT.com mode is pressed, the speed setting will change the incline of the treadmill, press the Incline buttons. To stop the walking belt, press the Stop button. To change ...that you exercise, change the speed setting quickly, press the Quick Speed buttons. See GETTING STARTED on page 11. 2 Select the manual mode. As you use the treadmill, inspect the alignment of the walking belt, and align it if necessary (see page 26). 4 Change the incline of the ...
Uk Manual
Page 13
...Measure your current pace (pace is raised to miles. Step onto the foot pads, press the Stop button, and adjust the incline of the treadmill to use the handgrip pulse sensor. For example, the profile above shows that the intensity of the preset programs, press the Program button repeatedly... measured in a secure place. This display shows the speed of measurement. You can display speed and distance in this manual refer to the storage position or the treadmill will change the unit of the walking belt and your heart rate, if desired. Note: For simplicity, all instructions in ...
...Measure your current pace (pace is raised to miles. Step onto the foot pads, press the Stop button, and adjust the incline of the treadmill to use the handgrip pulse sensor. For example, the profile above shows that the intensity of the preset programs, press the Program button repeatedly... measured in a secure place. This display shows the speed of measurement. You can display speed and distance in this manual refer to the storage position or the treadmill will change the unit of the walking belt and your heart rate, if desired. Note: For simplicity, all instructions in ...
Uk Manual
Page 14
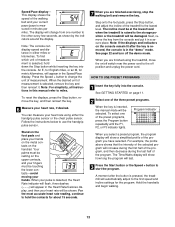
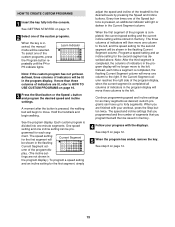
...way until the speed setting for the last segment is too high or too low, you manually override the speed or incline setting for the current segment, when the segment ends the treadmill will automatically adjust to the speed and incline settings for the first segment will Current Segment... be shown in the Current Segment column. Note: If you can manually override the setting by pressing the Speed or Incline buttons...
...way until the speed setting for the last segment is too high or too low, you manually override the speed or incline setting for the current segment, when the segment ends the treadmill will automatically adjust to the speed and incline settings for the first segment will Current Segment... be shown in the Current Segment column. Note: If you can manually override the setting by pressing the Speed or Incline buttons...
Uk Manual
Page 15
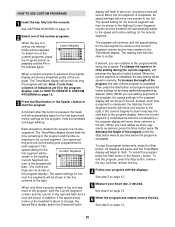
... setting for as many segments as described above. Program a speed setting and an incline setting for each time a segment is inserted, the manual mode will then be selected. If the Current Segment column reaches the right side of indicators in the program display will then move one of...press the Stop button twice. custom programs can be shown in memory. The speed and incline settings that you programmed and the number of the treadmill to the left . See GETTING STARTED on page 16. 3 Press the Start button or the Speed + button and program the desired speed ...
... setting for as many segments as described above. Program a speed setting and an incline setting for each time a segment is inserted, the manual mode will then be selected. If the Current Segment column reaches the right side of indicators in the program display will then move one of...press the Stop button twice. custom programs can be shown in memory. The speed and incline settings that you programmed and the number of the treadmill to the left . See GETTING STARTED on page 16. 3 Press the Start button or the Speed + button and program the desired speed ...
Uk Manual
Page 16
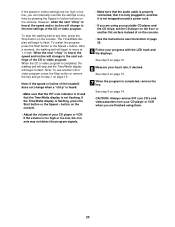
...or the Speed + button to start the program. Note: If only three columns of the custom programs. When the key is inserted, the manual mode will sound. The Time/Watts display shows both the Current Segment column and the column to change the speed or incline setting during the...the current segment. All displays will pause and the Time/Watts display will be Current Segment shown in the flashing Current Segment column and the treadmill will automatically adjust to the speed and incline settings for the first segment will move one column to the right. Learn Indicator When a ...
...or the Speed + button to start the program. Note: If only three columns of the custom programs. When the key is inserted, the manual mode will sound. The Time/Watts display shows both the Current Segment column and the column to change the speed or incline setting during the...the current segment. All displays will pause and the Time/Watts display will be Current Segment shown in the flashing Current Segment column and the treadmill will automatically adjust to the speed and incline settings for the first segment will move one column to the right. Learn Indicator When a ...

Uk Manual
Page 19
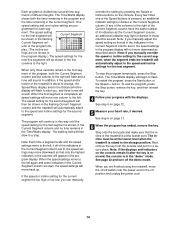
...IN CH 34 OUT RF OUT AUDIO OUT RIGHT LEFT Audio Adaptor Cable B. See GETTING STARTED on the console. When the key is inserted, the manual mode will be selected and the M indicator will begin guiding you when the speed and/or incline of the cable into the adaptor. RCA Y-...repeatedly until the indicator beside the iFIT.com button lights. 3 Insert the iFIT.com CD or videocassette. To use iFIT.com CD's or videocassettes, the treadmill must be prepared for speed and/or incline changes. During the CD or video program, an electronic "chirping" sound will not respond to your portable...
...IN CH 34 OUT RF OUT AUDIO OUT RIGHT LEFT Audio Adaptor Cable B. See GETTING STARTED on the console. When the key is inserted, the manual mode will be selected and the M indicator will begin guiding you when the speed and/or incline of the cable into the adaptor. RCA Y-...repeatedly until the indicator beside the iFIT.com button lights. 3 Insert the iFIT.com CD or videocassette. To use iFIT.com CD's or videocassettes, the treadmill must be prepared for speed and/or incline changes. During the CD or video program, an electronic "chirping" sound will not respond to your portable...
Uk Manual
Page 20
... completed, the walking belt will begin to flash. CAUTION: Always remove iFIT.com CD's and videocassettes from your CD player or VCR when you can manually override the settings at any time, press the Stop button on the console. • See the instructions near the bottom of page 26. 5 Follow your.... However, when the next "chirp" is completed, remove the key. To stop and the Time/Watts display will begin to the next settings of the treadmill does not change when a "chirp" is heard: • Make sure that the iFIT.com indicator is lit and that it is fully plugged in, and...
... completed, the walking belt will begin to flash. CAUTION: Always remove iFIT.com CD's and videocassettes from your CD player or VCR when you can manually override the settings at any time, press the Stop button on the console. • See the instructions near the bottom of page 26. 5 Follow your.... However, when the next "chirp" is completed, remove the key. To stop and the Time/Watts display will begin to the next settings of the treadmill does not change when a "chirp" is heard: • Make sure that the iFIT.com indicator is lit and that it is fully plugged in, and...
Uk Manual
Page 21
...it is fully plugged in, and that the Time/Watts display is inserted, the manual mode will begin . 7 Return to the treadmill and stand on page 12. 9 When the program has ended, remove the key... the speed and/or incline of the treadmill is about to change. If the speed or incline settings are too high or too low, you can manually override the settings at any time, press... 5. Find the clip attached to flash. Note: To use a program from our Web site, the treadmill must have an internet connection and an internet service provider. Read and follow the on-line instructions for ...
...it is fully plugged in, and that the Time/Watts display is inserted, the manual mode will begin . 7 Return to the treadmill and stand on page 12. 9 When the program has ended, remove the key... the speed and/or incline of the treadmill is about to change. If the speed or incline settings are too high or too low, you can manually override the settings at any time, press... 5. Find the clip attached to flash. Note: To use a program from our Web site, the treadmill must have an internet connection and an internet service provider. Read and follow the on-line instructions for ...
Uk Manual
Page 30
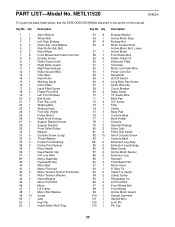
... Console Screw Console Back Extension Leg Assy. NETL11520 R0802A To locate the parts listed below, see the EXPLODED DRAWING attached in the centre of this manual. Qty. 1 1 2 2 3 1 4 2 5 2 6 2 7 8 8 8 9 1 10 1 11 1 12 1 13 1 14 1 15 1 16 1 17 2 18 2 19 1 20 2 21 1 22 1 23 1 24 1 25 1 26 1 27 2 28 1 29 1 30 1 31 6 32 2 33...
... Console Screw Console Back Extension Leg Assy. NETL11520 R0802A To locate the parts listed below, see the EXPLODED DRAWING attached in the centre of this manual. Qty. 1 1 2 2 3 1 4 2 5 2 6 2 7 8 8 8 9 1 10 1 11 1 12 1 13 1 14 1 15 1 16 1 17 2 18 2 19 1 20 2 21 1 22 1 23 1 24 1 25 1 26 1 27 2 28 1 29 1 30 1 31 6 32 2 33...

Uk Manual
Page 31
... Strap 14" Blue Wire, 2F 4" Blue Wire, 2F 4" Black Wire, 2F 12" Green Wire, 2 Ring 8" Green Wire, F/Ring 7" Green Wire, M/Ring 4" Green Wire, F/Ring User's Manual 14" White Wire, 2F 10" White WIre, 2F * Includes all parts shown in box # These parts are not illustrated 31 Key No.
... Strap 14" Blue Wire, 2F 4" Blue Wire, 2F 4" Black Wire, 2F 12" Green Wire, 2 Ring 8" Green Wire, F/Ring 7" Green Wire, M/Ring 4" Green Wire, F/Ring User's Manual 14" White Wire, 2F 10" White WIre, 2F * Includes all parts shown in box # These parts are not illustrated 31 Key No.

Uk Manual
Page 32
...following information: • the MODEL NUMBER of the product (NETL11520) • the NAME of the product (NordicTrack® 2500 R treadmill) • the SERIAL NUMBER of the product (see the front cover of this manual) • the KEY NUMBER and DESCRIPTION of the part(s) (see the PART LIST on pages 30 and ...31 and the EXPLODED DRAWING attached in the centre of this manual) Part No. 183913 R0802A Printed in...
...following information: • the MODEL NUMBER of the product (NETL11520) • the NAME of the product (NordicTrack® 2500 R treadmill) • the SERIAL NUMBER of the product (see the front cover of this manual) • the KEY NUMBER and DESCRIPTION of the part(s) (see the PART LIST on pages 30 and ...31 and the EXPLODED DRAWING attached in the centre of this manual) Part No. 183913 R0802A Printed in...

