
Uk Manual
Page 2
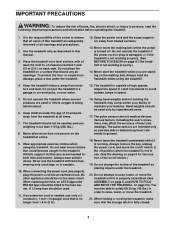
TABLE OF CONTENTS IMPORTANT PRECAUTIONS 3 BEFORE YOU BEGIN 5 ASSEMBLY 6 HOW TO USE THE CHEST PULSE SENSOR 8 OPERATION AND ADJUSTMENT 9 HOW TO FOLD AND MOVE THE TREADMILL 23 TROUBLESHOOTING 25 CONDITIONING GUIDELINES 28 PART LIST 30 ORDERING REPLACEMENT PARTS Back Cover Note: An EXPLODED DRAWING is a registered trademark of this manual. NordicTrack is attached in the centre of ICON Health & Fitness, Inc. 2
TABLE OF CONTENTS IMPORTANT PRECAUTIONS 3 BEFORE YOU BEGIN 5 ASSEMBLY 6 HOW TO USE THE CHEST PULSE SENSOR 8 OPERATION AND ADJUSTMENT 9 HOW TO FOLD AND MOVE THE TREADMILL 23 TROUBLESHOOTING 25 CONDITIONING GUIDELINES 28 PART LIST 30 ORDERING REPLACEMENT PARTS Back Cover Note: An EXPLODED DRAWING is a registered trademark of this manual. NordicTrack is attached in the centre of ICON Health & Fitness, Inc. 2
Uk Manual
Page 3
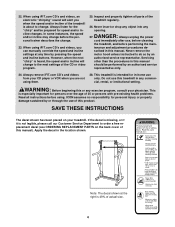
... and women. If an extension cord is needed, use only a 3conductor, 1 mm2 (14-gauge) cord that blocks any air openings. Never start the treadmill whilst you are adequately informed of the owner to the off . The treadmill should be on the walking belt. When connecting the power cord (see page 9), plug the power cord into an earthed circuit. Always remove the key, unplug the power cord, and move the treadmill. 21. It is no...
... and women. If an extension cord is needed, use only a 3conductor, 1 mm2 (14-gauge) cord that blocks any air openings. Never start the treadmill whilst you are adequately informed of the owner to the off . The treadmill should be on the walking belt. When connecting the power cord (see page 9), plug the power cord into an earthed circuit. Always remove the key, unplug the power cord, and move the treadmill. 21. It is no...
Uk Manual
Page 4
... properly tighten all instructions before using them. 28. Never remove the motor hood unless instructed to change. Apply the decal in this manual should be prepared for in-home use , before cleaning the treadmill, and before the personal trainer describes the change to order a free replacement decal (see ORDERING REPLACEMENT PARTS on your CD player or VCR when you when the speed and/or incline of the CD or video program. 25...
... properly tighten all instructions before using them. 28. Never remove the motor hood unless instructed to change. Apply the decal in this manual should be prepared for in-home use , before cleaning the treadmill, and before the personal trainer describes the change to order a free replacement decal (see ORDERING REPLACEMENT PARTS on your CD player or VCR when you when the speed and/or incline of the CD or video program. 25...
Uk Manual
Page 5
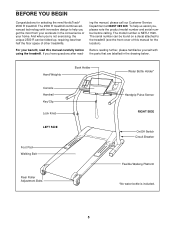
... after read this manual for selecting the new NordicTrack® 2500 R treadmill. ing the manual, please call our Customer Service Department at 08457 089 009. BEFORE YOU BEGIN Congratulations for the location). Hand Weights Book Holder Water Bottle Holder* Console Handrail Key/Clip Lock Knob Handgrip Pulse Sensor RIGHT SIDE LEFT SIDE Foot Pad Walking Belt Rear Roller Adjustment Bolts On/Off Switch Circuit Breaker Flexible Walking Platform *No water...
... after read this manual for selecting the new NordicTrack® 2500 R treadmill. ing the manual, please call our Customer Service Department at 08457 089 009. BEFORE YOU BEGIN Congratulations for the location). Hand Weights Book Holder Water Bottle Holder* Console Handrail Key/Clip Lock Knob Handgrip Pulse Sensor RIGHT SIDE LEFT SIDE Foot Pad Walking Belt Rear Roller Adjustment Bolts On/Off Switch Circuit Breaker Flexible Walking Platform *No water...
Uk Manual
Page 7
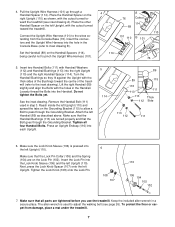
...Upright (110). Do not tighten the Bolts yet. Attach the left Upright (110). Tighten all parts are tightened before you use the treadmill. Make sure the Lock Knob Sleeve (106) is used in a secure place. The allen wrench is pressed into the hole in the Handrail. To protect the floor or carpet from the Console Base (76). Pull the Upright Wire... 6. Connect the Upright Wire Harness (101) to adjust the walking belt (see inset drawing A). Insert the connectors and the Upright Wire Harness into the left Upright, with the thick sides of the Bushings toward the treadmill (see...
...Upright (110). Do not tighten the Bolts yet. Attach the left Upright (110). Tighten all parts are tightened before you use the treadmill. Make sure the Lock Knob Sleeve (106) is used in a secure place. The allen wrench is pressed into the hole in the Handrail. To protect the floor or carpet from the Console Base (76). Pull the Upright Wire... 6. Connect the Upright Wire Harness (101) to adjust the walking belt (see inset drawing A). Insert the connectors and the Upright Wire Harness into the left Upright, with the thick sides of the Bushings toward the treadmill (see...
Uk Manual
Page 8
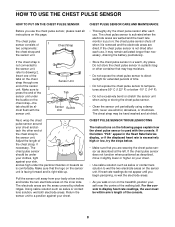
... place. never use , it is not connected to the sensor unit, refer to press the end of the walking belt. The chest pulse sensor should be within arm's length of the chest strap to wet the two electrode areas on the inner side. The electrode areas are wearing the chest pulse sensor as high under the buckle on this page. CHEST PULSE SENSOR TROUBLESHOOTING The instructions on the treadmill, position yourself...
... place. never use , it is not connected to the sensor unit, refer to press the end of the walking belt. The chest pulse sensor should be within arm's length of the chest strap to wet the two electrode areas on the inner side. The electrode areas are wearing the chest pulse sensor as high under the buckle on this page. CHEST PULSE SENSOR TROUBLESHOOTING The instructions on the treadmill, position yourself...
Uk Manual
Page 9
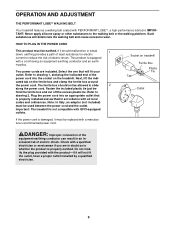
... the product-if it must be - Such substances will fit your outlet. Two power cords are in doubt as to drawing 1, and plug the indicated end of electric shock. ing plug. hind the ferrite box and cut off the excess plastic tie. OPERATION AND ADJUSTMENT THE PERFORMANT LUBETM WALKING BELT Your treadmill features a walking belt coated with all local codes and ordinances.
... the product-if it must be - Such substances will fit your outlet. Two power cords are in doubt as to drawing 1, and plug the indicated end of electric shock. ing plug. hind the ferrite box and cut off the excess plastic tie. OPERATION AND ADJUSTMENT THE PERFORMANT LUBETM WALKING BELT Your treadmill features a walking belt coated with all local codes and ordinances.
Uk Manual
Page 10
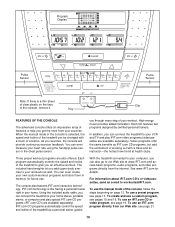
... trainer guides With the treadmill connected to help you exercise, the console will provide continuous exercise feedback. Three preset workout programs are available separately). The included hand weights let you through every step of your heart rate using the handgrip pulse sensor or the chest pulse sensor. The console also features iFIT.com interactive technology. IFIT.com CD programs automatically control the speed and incline of the treadmill as well. To create and use an iFIT.com CD or video program...
... trainer guides With the treadmill connected to help you exercise, the console will provide continuous exercise feedback. Three preset workout programs are available separately). The included hand weights let you through every step of your heart rate using the handgrip pulse sensor or the chest pulse sensor. The console also features iFIT.com interactive technology. IFIT.com CD programs automatically control the speed and incline of the treadmill as well. To create and use an iFIT.com CD or video program...

Uk Manual
Page 11
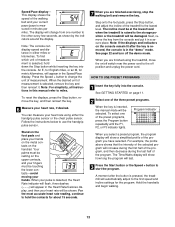
... of the clip as an exercise aid in determining heart rate trends in speed. • The pulse sensor is securely attached to the waistband of your weight. Move the on/off switch to enter your clothes. Next, insert the key into the console. Press the Weight buttons again to the on position. Next, in the Speed/Pace display. Locate the on/off switch to avoid sudden jumps in general...
... of the clip as an exercise aid in determining heart rate trends in speed. • The pulse sensor is securely attached to the waistband of your weight. Move the on/off switch to enter your clothes. Next, insert the key into the console. Press the Weight buttons again to the on position. Next, in the Speed/Pace display. Locate the on/off switch to avoid sudden jumps in general...
Uk Manual
Page 12
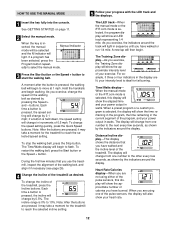
... in watts. Time/Watts display- To change the incline of the pulse sensors, the display will show an LED track representing 1/4 mile. To stop the walking belt, press the Stop button. Distance/Incline display-This display shows the distance that you exercise, change by the indicators around the display. A moment after the button is held down, the speed setting will begin walking. The display will light. When the key is 0% to start the walking belt. As you use the treadmill, inspect the alignment...
... in watts. Time/Watts display- To change the incline of the pulse sensors, the display will show an LED track representing 1/4 mile. To stop the walking belt, press the Stop button. Distance/Incline display-This display shows the distance that you exercise, change by the indicators around the display. A moment after the button is held down, the speed setting will begin walking. The display will light. When the key is 0% to start the walking belt. As you use the treadmill, inspect the alignment...
Uk Manual
Page 13
..., all instructions in either the handgrip pulse sensor or the chest pulse sensor. You can display speed and distance in this manual refer to use the handgrip pulse sensor. For the most accurate heart rate reading, continue to start the program. Step onto the foot pads, press the Stop button, and adjust the incline of the program you are finished using either miles or kilometres. The incline must be at the lowest level when the treadmill is selected...
..., all instructions in either the handgrip pulse sensor or the chest pulse sensor. You can display speed and distance in this manual refer to use the handgrip pulse sensor. For the most accurate heart rate reading, continue to start the program. Step onto the foot pads, press the Stop button, and adjust the incline of the program you are finished using either miles or kilometres. The incline must be at the lowest level when the treadmill is selected...
Uk Manual
Page 14
..., remove the key from the console and put it in the "demo" mode. See page 22 and turn off position and unplug the power cord. 14 umn of the indicators in the Current Segment column are lit, the speed settings may light or darken in the columns will sound. The walking belt will automatically adjust to the off the demo mode. To restart the program, press the Start button...
..., remove the key from the console and put it in the "demo" mode. See page 22 and turn off position and unplug the power cord. 14 umn of the indicators in the Current Segment column are lit, the speed settings may light or darken in the columns will sound. The walking belt will automatically adjust to the off the demo mode. To restart the program, press the Start button...

Uk Manual
Page 19
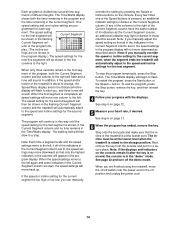
... power cord. RCA Y-adaptor Audio Cable Adaptor Wire removed from AUDIO OUT jack A moment after the button is currently plugged into the AUDIO OUT jack on the front of the Y-adaptor. Plug the adaptor into the console. In some instances, the speed and/or incline may change before the personal trainer describes the change . Next, remove the wire that is pressed, your VCR. For information about to use an iFIT.com CD or video program, press...
... power cord. RCA Y-adaptor Audio Cable Adaptor Wire removed from AUDIO OUT jack A moment after the button is currently plugged into the AUDIO OUT jack on the front of the Y-adaptor. Plug the adaptor into the console. In some instances, the speed and/or incline may change before the personal trainer describes the change . Next, remove the wire that is pressed, your VCR. For information about to use an iFIT.com CD or video program, press...
Uk Manual
Page 20
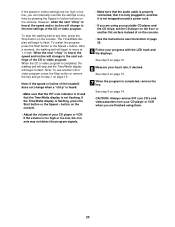
... the LED track and the displays. If the volume is too high or too low, the console may not detect the program signals. • Make sure that the audio cable is properly connected, that it is flashing, press the Start button or the Speed + button on the console. • Adjust the volume of the CD or video program. See step 6 on page 14. CAUTION: Always remove iFIT.com CD...
... the LED track and the displays. If the volume is too high or too low, the console may not detect the program signals. • Make sure that the audio cable is properly connected, that it is flashing, press the Start button or the Speed + button on the console. • Adjust the volume of the CD or video program. See step 6 on page 14. CAUTION: Always remove iFIT.com CD...
Uk Manual
Page 21
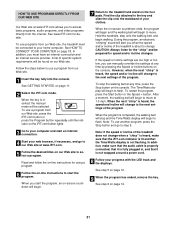
... USE PROGRAMS DIRECTLY FROM OUR WEB SITE Our Web site at 1.0 mph. After a moment, the walking belt will begin to the next settings of your progress with the LED track and the displays. When the next "chirp" is not wrapped around a power cord. 8 Follow your clothes. See www.iFIT.com for speed and/or incline changes. A list of the program. Note: If the speed or incline of the treadmill...
... USE PROGRAMS DIRECTLY FROM OUR WEB SITE Our Web site at 1.0 mph. After a moment, the walking belt will begin to the next settings of your progress with the LED track and the displays. When the next "chirp" is not wrapped around a power cord. 8 Follow your clothes. See www.iFIT.com for speed and/or incline changes. A list of the program. Note: If the speed or incline of the treadmill...
Uk Manual
Page 25
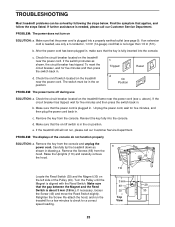
.... d. After the power cord has been plugged in, make sure that the power cord is needed , use SOLUTION: a. c. To reset the circuit breaker, wait for five minutes and then press the switch back in. Make sure that the key is aligned with the Reed Switch. Reinsert the key fully into the console. Turn the Pulley until the 3 mm Magnet is fully inserted into the console. TROUBLESHOOTING Most treadmill problems can be...
.... d. After the power cord has been plugged in, make sure that the power cord is needed , use SOLUTION: a. c. To reset the circuit breaker, wait for five minutes and then press the switch back in. Make sure that the key is aligned with the Reed Switch. Reinsert the key fully into the console. Turn the Pulley until the 3 mm Magnet is fully inserted into the console. TROUBLESHOOTING Most treadmill problems can be...
Uk Manual
Page 26
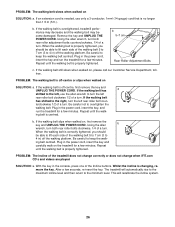
... the walking belt slips when walked on , please call our Customer Service Department, tollfree. Remove the key and UNPLUG THE POWER CORD. PROBLEM: The walking belt is no longer than 1.5 m (5 ft.). Be careful not to lift each side of the treadmill does not change correctly or does not change when iFIT.com CD's and videos are played SOLUTION: a. Using the allen b wrench, turn both rear roller adjustment bolts counterclockwise, 1/4 of a turn the left rear roller bolt coun...
... the walking belt slips when walked on , please call our Customer Service Department, tollfree. Remove the key and UNPLUG THE POWER CORD. PROBLEM: The walking belt is no longer than 1.5 m (5 ft.). Be careful not to lift each side of the treadmill does not change correctly or does not change when iFIT.com CD's and videos are played SOLUTION: a. Using the allen b wrench, turn both rear roller adjustment bolts counterclockwise, 1/4 of a turn the left rear roller bolt coun...

Uk Manual
Page 28
... your training zone for energy. This will help prevent post-exercise problems. EXERCISE FREQUENCY To maintain or improve your body temperature, heart rate and circulation in preparation for prolonged periods of your heart rate as exercise aids in determining heart rate trends in your body begin to 10 minutes of the treadmill until your heart rate is to five workouts each workout with 5 to use the handgrip pulse sensor or the chest pulse sensor...
... your training zone for energy. This will help prevent post-exercise problems. EXERCISE FREQUENCY To maintain or improve your body temperature, heart rate and circulation in preparation for prolonged periods of your heart rate as exercise aids in determining heart rate trends in your body begin to 10 minutes of the treadmill until your heart rate is to five workouts each workout with 5 to use the handgrip pulse sensor or the chest pulse sensor...
Uk Manual
Page 30
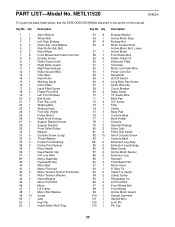
... Endcap Washer Incline Motor Stop Endcap Nut Motor Tension Bolt/ Incline Motor Bolt, Lower Incline Motor Front Roller Bolt Plastic Stand-off Electronic Plate Controller Motor Controller Wire Power Cord Set Receptical On/Off Switch Long Belly Pan Screw Audio Wire Nut Circuit Breaker Static Decal 12" Audio Wire Belly Pan 3/4" Screw Filter Choke Base Pad Console Base Book Holder Console Handrail Endcap Pulse Grip Pulse Grip Screw Short Console Screw Console Back Extension Leg Assy. Bolt Rear Wheel Front Wheel Nut/Frame Pivot Nut Endcap Screw Roller Guard (Left...
... Endcap Washer Incline Motor Stop Endcap Nut Motor Tension Bolt/ Incline Motor Bolt, Lower Incline Motor Front Roller Bolt Plastic Stand-off Electronic Plate Controller Motor Controller Wire Power Cord Set Receptical On/Off Switch Long Belly Pan Screw Audio Wire Nut Circuit Breaker Static Decal 12" Audio Wire Belly Pan 3/4" Screw Filter Choke Base Pad Console Base Book Holder Console Handrail Endcap Pulse Grip Pulse Grip Screw Short Console Screw Console Back Extension Leg Assy. Bolt Rear Wheel Front Wheel Nut/Frame Pivot Nut Endcap Screw Roller Guard (Left...
Uk Manual
Page 32
... of the product (NordicTrack® 2500 R treadmill) • the SERIAL NUMBER of the product (see the front cover of this manual) • the KEY NUMBER and DESCRIPTION of the part(s) (see the PART LIST on pages 30 and 31 and the EXPLODED DRAWING attached in the centre of this manual) Part No. 183913 R0802A Printed in USA © 2002 ICON Health & Fitness, Inc. office, or write: ICON Health & Fitness, Ltd.
... of the product (NordicTrack® 2500 R treadmill) • the SERIAL NUMBER of the product (see the front cover of this manual) • the KEY NUMBER and DESCRIPTION of the part(s) (see the PART LIST on pages 30 and 31 and the EXPLODED DRAWING attached in the centre of this manual) Part No. 183913 R0802A Printed in USA © 2002 ICON Health & Fitness, Inc. office, or write: ICON Health & Fitness, Ltd.


