User Guide
Page 13
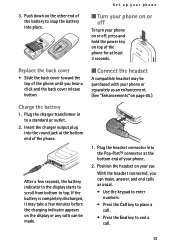
...it may be made. 1. With the headset connected, you hear a click and the back cover release button. ■ Connect the headset A compatible headset may take a few seconds, the battery indicator in to snap the battery into place. Insert the charger output plug into the Pop-PortTM connector...the battery to a standard ac outlet. 2. Plug the headset connector into the round jack at least 3 seconds. 3. Set up your phone ■ Turn your phone on your phone or separately as usual. • Use the keypad to enter numbers. • Press the Call key to place a call . 13...
...it may be made. 1. With the headset connected, you hear a click and the back cover release button. ■ Connect the headset A compatible headset may take a few seconds, the battery indicator in to snap the battery into place. Insert the charger output plug into the Pop-PortTM connector...the battery to a standard ac outlet. 2. Plug the headset connector into the round jack at least 3 seconds. 3. Set up your phone ■ Turn your phone on your phone or separately as usual. • Use the keypad to enter numbers. • Press the Call key to place a call . 13...
User Guide
Page 25
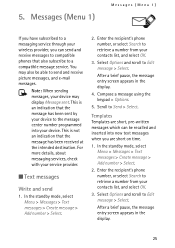
...to retrieve a number from your service provider. ■ Text messages Write and send 1. Enter the recipient's phone number, or select Search to a compatible message service. Select Options and scroll to Send > Select. This is an indication that the message has ...entry screen appears in the display. 4. You may display Message sent. Note: When sending messages, your wireless provider, you have subscribed to compatible phones that the message has been received at the intended destination. In the standby mode, select Menu > Messages > Text messages > Create message >...
...to retrieve a number from your service provider. ■ Text messages Write and send 1. Enter the recipient's phone number, or select Search to a compatible message service. Select Options and scroll to Send > Select. This is an indication that the message has ...entry screen appears in the display. 4. You may display Message sent. Note: When sending messages, your wireless provider, you have subscribed to compatible phones that the message has been received at the intended destination. In the standby mode, select Menu > Messages > Text messages > Create message >...
User Guide
Page 30
... and the code is a network service. Set up voice mail with dialling codes" on page 30. Enter your phone. Scroll to compatible phones or PCs. Enter any numbers that you will need this feature, your phone comes with your voice mailbox number, including the area code. 4. you saved from "Set up voice mail with...
... and the code is a network service. Set up voice mail with dialling codes" on page 30. Enter your phone. Scroll to compatible phones or PCs. Enter any numbers that you will need this feature, your phone comes with your voice mailbox number, including the area code. 4. you saved from "Set up voice mail with...

User Guide
Page 31
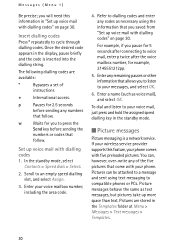
.... Change picture - Scroll to highlight a new picture, select View, then Insert to another picture, and select View again. 8. Only compatible devices that offer picture message feature can receive and display picture message. Select Insert picture. 6. Takes you choose to Send > Select. Enter ...the recipient's phone number, or select Search to retrieve a number from your message, otherwise select Back, scroll to replace the previous picture in Sent...
.... Change picture - Scroll to highlight a new picture, select View, then Insert to another picture, and select View again. 8. Only compatible devices that offer picture message feature can receive and display picture message. Select Insert picture. 6. Takes you choose to Send > Select. Enter ...the recipient's phone number, or select Search to retrieve a number from your message, otherwise select Back, scroll to replace the previous picture in Sent...
User Guide
Page 45
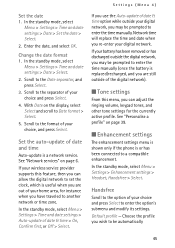
.... Choose the profile you have traveled to set the clock, which is a network service. Scroll to the format of your choice and press Select to a compatible enhancement. In the standby mode, select Menu > Settings > Time and date settings > Auto-update of the digital network). ■ Tone settings From this feature, then... select OK. Settings (Menu 4) Set the date 1. See "Personalise a profile" on page 39. ■ Enhancement settings The enhancement settings menu is shown only if the phone is replaced/recharged, and you are out of your choice, and press Select.
.... Choose the profile you have traveled to set the clock, which is a network service. Scroll to the format of your choice and press Select to a compatible enhancement. In the standby mode, select Menu > Settings > Time and date settings > Auto-update of the digital network). ■ Tone settings From this feature, then... select OK. Settings (Menu 4) Set the date 1. See "Personalise a profile" on page 39. ■ Enhancement settings The enhancement settings menu is shown only if the phone is replaced/recharged, and you are out of your choice, and press Select.
User Guide
Page 64
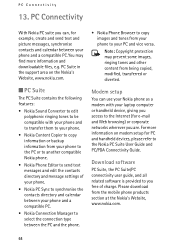
... PC Suite/PC connectivity user guide, and all related software is provided to your phone and a compatible PC.You may prevent some images, ringing tones and other content from your phone to the PC or to another compatible Nokia phone. • Nokia Phone Editor to send text messages and edit the contacts directory and message settings of charge...
... PC Suite/PC connectivity user guide, and all related software is provided to your phone and a compatible PC.You may prevent some images, ringing tones and other content from your phone to the PC or to another compatible Nokia phone. • Nokia Phone Editor to send text messages and edit the contacts directory and message settings of charge...