

User Guide
Page 4
... 1. Contents FOR YOUR SAFETY 12 General information 15 Stickers in the sales package ...15 Access codes ...15 Overview of the functions in standby mode 24 Headset...26 Putting on the wrist strap...27 Copyright ‹ 2003...
... 1. Contents FOR YOUR SAFETY 12 General information 15 Stickers in the sales package ...15 Access codes ...15 Overview of the functions in standby mode 24 Headset...26 Putting on the wrist strap...27 Copyright ‹ 2003...

User Guide
Page 19
...page 95. ■ Over the Air (OTA) settings service In order to use your phone. Copyright ‹ 2003 Nokia. You may receive the settings directly as an OTA message and you need to save the settings on page 40. ■...to the radio. You can also download new applications and games to your network operator, service provider or nearest authorised Nokia dealer. For more information on page 105. ■ Stereo radio Your phone has an integrated stereo radio. All... been specially designed for mobile phones. You can listen to the radio using a headset or via the loudspeaker.
...page 95. ■ Over the Air (OTA) settings service In order to use your phone. Copyright ‹ 2003 Nokia. You may receive the settings directly as an OTA message and you need to save the settings on page 40. ■...to the radio. You can also download new applications and games to your network operator, service provider or nearest authorised Nokia dealer. For more information on page 105. ■ Stereo radio Your phone has an integrated stereo radio. All... been specially designed for mobile phones. You can listen to the radio using a headset or via the loudspeaker.

User Guide
Page 21
1. Power key Switches the phone on for approximately 15 seconds. 2. All rights reserved. 21 Volume keys Keys to adjust the volume of the earpiece, the headset and the loudspeaker. 3. 4-way scroll keys , , and Enables scrolling through names, phone numbers, menus or settings. Copyright ‹ 2003 Nokia. For example, when the keypad is locked, pressing the power key briefly turns the phone's display lights on and off. Your phone ■ Keys and connectors 1.
1. Power key Switches the phone on for approximately 15 seconds. 2. All rights reserved. 21 Volume keys Keys to adjust the volume of the earpiece, the headset and the loudspeaker. 3. 4-way scroll keys , , and Enables scrolling through names, phone numbers, menus or settings. Copyright ‹ 2003 Nokia. For example, when the keypad is locked, pressing the power key briefly turns the phone's display lights on and off. Your phone ■ Keys and connectors 1.

User Guide
Page 22
... the most recently called number. 6. ends an active call . Exits from any function. 7. - Pop-PortTM connector for headsets and the data cable, for various purposes in standby mode. 5. Infrared (IR) port Copyright ‹ 2003 Nokia. dials a phone number, and answers a call . enter numbers and characters. Charger connector 2. Selection keys and The function...
... the most recently called number. 6. ends an active call . Exits from any function. 7. - Pop-PortTM connector for headsets and the data cable, for various purposes in standby mode. 5. Infrared (IR) port Copyright ‹ 2003 Nokia. dials a phone number, and answers a call . enter numbers and characters. Charger connector 2. Selection keys and The function...

User Guide
Page 25
...for example if there is an incoming or outgoing call during a GPRS dial-up connection. See Profiles (Menu 3) on page 82. , or Headset, handsfree or loopset accessory is connected to another number, Divert all voice calls. The timed profile is selected. The GPRS connection is suspended (on... settings on page 112. To enable the phone to GPRS on page 113 and Browsing the pages of the display. Copyright ‹ 2003 Nokia. All rights reserved. 25 Infrared connection indicator, see Infrared on page 93. See Call divert on page 40. The loudspeaker has been activated...
...for example if there is an incoming or outgoing call during a GPRS dial-up connection. See Profiles (Menu 3) on page 82. , or Headset, handsfree or loopset accessory is connected to another number, Divert all voice calls. The timed profile is selected. The GPRS connection is suspended (on... settings on page 112. To enable the phone to GPRS on page 113 and Browsing the pages of the display. Copyright ‹ 2003 Nokia. All rights reserved. 25 Infrared connection indicator, see Infrared on page 93. See Call divert on page 40. The loudspeaker has been activated...

User Guide
Page 26
■ Headset Connect the headset HDS-3 and HDB-4 to the Pop-Port connector of your phone as shown in the picture. Copyright ‹ 2003 Nokia. You can carry the stereo headset HDS-3 as shown in the picture, for example. All rights reserved. 26
■ Headset Connect the headset HDS-3 and HDB-4 to the Pop-Port connector of your phone as shown in the picture. Copyright ‹ 2003 Nokia. You can carry the stereo headset HDS-3 as shown in the picture, for example. All rights reserved. 26

User Guide
Page 38
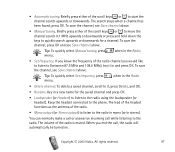
...you , the phone shows the caller's name, phone number or the text Private number or Call. If the headset HDB-4 or HDS-3 is found in step 4. 7. If more than one of the participants: Press Options and select Private and...be displayed, if this is activated to divert the calls, for example to the call by pressing the headset key. To have a private conversation with the same phone number as described in the phone book with one... and press to reject the incoming call . Copyright ‹ 2003 Nokia. 5. Press to end the call . Tip: If the Divert if busy function is available.
...you , the phone shows the caller's name, phone number or the text Private number or Call. If the headset HDB-4 or HDS-3 is found in step 4. 7. If more than one of the participants: Press Options and select Private and...be displayed, if this is activated to divert the calls, for example to the call by pressing the headset key. To have a private conversation with the same phone number as described in the phone book with one... and press to reject the incoming call . Copyright ‹ 2003 Nokia. 5. Press to end the call . Tip: If the Divert if busy function is available.

User Guide
Page 40
Loudspeaker You can use your ear during loudspeaker operation. • To activate the loudspeaker, press Options and select Loudspeaker, or...Handsfr. If you end the call or call attempt or connect the handsfree unit or headset to the phone, Handset in the options list is automatically deactivated when you have connected the handsfree unit ...CARK126 or the headset to the phone. or Headset, respectively. The loudspeaker is replaced with Handsfree or Headset and the selection key Handset with the radio, see Using the radio...
Loudspeaker You can use your ear during loudspeaker operation. • To activate the loudspeaker, press Options and select Loudspeaker, or...Handsfr. If you end the call or call attempt or connect the handsfree unit or headset to the phone, Handset in the options list is automatically deactivated when you have connected the handsfree unit ...CARK126 or the headset to the phone. or Headset, respectively. The loudspeaker is replaced with Handsfree or Headset and the selection key Handset with the radio, see Using the radio...

User Guide
Page 59
... for the phone. Handsfree 3. PIN code request 2. Fixed dialling 4. 2. Display brightness 5. This menu is shown only if the phone is or has been connected to a headset, handsfree unit or loopset available for 6. Colour schemes 3. Tone settings 1. Call barring service 3. Security settings 1. Loopset 7. Operator logo 4. Message alert tone 6. Security level 6. Ringing tone...
... for the phone. Handsfree 3. PIN code request 2. Fixed dialling 4. 2. Display brightness 5. This menu is shown only if the phone is or has been connected to a headset, handsfree unit or loopset available for 6. Colour schemes 3. Tone settings 1. Call barring service 3. Security settings 1. Loopset 7. Operator logo 4. Message alert tone 6. Security level 6. Ringing tone...

User Guide
Page 92
...calls and press Mark. Press Menu, and select Settings and Accessory settings. If the Incoming call automatically after a keypress. You can select Headset, Handsfree or Loopset if the corresponding accessory is set to Beep once or Off, automatic answer will not be automatically activated when you ...connect the selected accessory. Copyright ‹ 2003 Nokia. Select Alert for 15 seconds after five seconds. The Lights option is available only when Handsfree is or has been connected to one...
...calls and press Mark. Press Menu, and select Settings and Accessory settings. If the Incoming call automatically after a keypress. You can select Headset, Handsfree or Loopset if the corresponding accessory is set to Beep once or Off, automatic answer will not be automatically activated when you ...connect the selected accessory. Copyright ‹ 2003 Nokia. Select Alert for 15 seconds after five seconds. The Lights option is available only when Handsfree is or has been connected to one...

User Guide
Page 95
... of the radio, so let it hang freely. To listen to the radio on your phone connect the headset HDS-3 (stereo) or HDB-4 (mono) to stop the alarm. All rights reserved. 95 If you press ... or press Snooze, the alarm stops for calls, Switch the phone on?. Press Stop to the headset connector on the bottom of the phone. Note that the quality of the radio broadcast depends on ...the radio, press Menu and select Radio. Copyright ‹ 2003 Nokia. The lead of the headset functions as the antenna of the radio channel. Note: Do not press Yes when wireless...
... of the radio, so let it hang freely. To listen to the radio on your phone connect the headset HDS-3 (stereo) or HDB-4 (mono) to stop the alarm. All rights reserved. 95 If you press ... or press Snooze, the alarm stops for calls, Switch the phone on?. Press Stop to the headset connector on the bottom of the phone. Note that the quality of the radio broadcast depends on ...the radio, press Menu and select Radio. Copyright ‹ 2003 Nokia. The lead of the headset functions as the antenna of the radio channel. Note: Do not press Yes when wireless...

User Guide
Page 96
When using the headset HDB-4 and HDS-3, press the headset key to scroll to start the channel search. Tuning a radio channel When the radio is found , refer to save the channel, press Options, and select ..., or select a radio channel location 1 to turn off the radio. All rights reserved. 96 If you have found . To save the channel. Copyright ‹ 2003 Nokia. Using the radio When the radio is on, press Options and select Switch off to 9 by pressing the corresponding number key. When the radio is...
When using the headset HDB-4 and HDS-3, press the headset key to scroll to start the channel search. Tuning a radio channel When the radio is found , refer to save the channel, press Options, and select ..., or select a radio channel location 1 to turn off the radio. All rights reserved. 96 If you have found . To save the channel. Copyright ‹ 2003 Nokia. Using the radio When the radio is on, press Options and select Switch off to 9 by pressing the corresponding number key. When the radio is...
User Guide
Page 97
...listen to the radio in mono (or in a new name for a channel. Copyright ‹ 2003 Nokia. If you know the frequency of the scroll keys or to the radio using the loudspeaker (or headset). Keep the headset connected to (between 87.5 MHz and 108.0 MHz), key it , press Delete, and OK. ...or downwards or press and hold down the keys to quickly search upwards or downwards for the saved channel and press OK. • Loudspeaker (or Headset) to listen to start the channel search upwards or downwards. To save the channel, see Save channel above. • Manual tuning. All rights...
...listen to the radio in mono (or in a new name for a channel. Copyright ‹ 2003 Nokia. If you know the frequency of the scroll keys or to the radio using the loudspeaker (or headset). Keep the headset connected to (between 87.5 MHz and 108.0 MHz), key it , press Delete, and OK. ...or downwards or press and hold down the keys to quickly search upwards or downwards for the saved channel and press OK. • Loudspeaker (or Headset) to listen to start the channel search upwards or downwards. To save the channel, see Save channel above. • Manual tuning. All rights...


