User Guide
Page 1
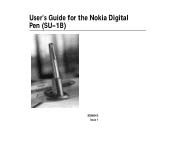
User's Guide for the Nokia Digital Pen (SU-1B) 9356642 Issue 1
User's Guide for the Nokia Digital Pen (SU-1B) 9356642 Issue 1
User Guide
Page 2
... in using Bluetooth devices. Check with the Nokia dealer nearest to any of this document. Copyright © 2003 Nokia. Nokia reserves the right to make changes and improvements to you. All rights reserved. Please check with your local authorities. Except as is a registered trademark of Conformity can be restrictions in relation to the accuracy, reliability or contents of data or income or...
... in using Bluetooth devices. Check with the Nokia dealer nearest to any of this document. Copyright © 2003 Nokia. Nokia reserves the right to make changes and improvements to you. All rights reserved. Please check with your local authorities. Except as is a registered trademark of Conformity can be restrictions in relation to the accuracy, reliability or contents of data or income or...
User Guide
Page 3
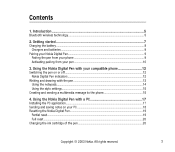
... phone 15 4. Using the Nokia Digital Pen with your compatible phone 12 Switching the pen on or off ...12 Nokia Digital Pen indicators ...12 Writing and drawing with a PC 17 Installing the PC application...17 Sending and saving notes on your pen ...10 3. Contents 1. Getting started 7 Charging the battery ...8 Chargers and batteries ...9 Pairing your Nokia Digital Pen...9 Pairing the pen from your phone ...9 Activating pairing from your PC 18 Resetting the Nokia Digital Pen ...19 Partial reset...19 Full reset ...20 Changing...
... phone 15 4. Using the Nokia Digital Pen with your compatible phone 12 Switching the pen on or off ...12 Nokia Digital Pen indicators ...12 Writing and drawing with a PC 17 Installing the PC application...17 Sending and saving notes on your pen ...10 3. Contents 1. Getting started 7 Charging the battery ...8 Chargers and batteries ...9 Pairing your Nokia Digital Pen...9 Pairing the pen from your phone ...9 Activating pairing from your PC 18 Resetting the Nokia Digital Pen ...19 Partial reset...19 Full reset ...20 Changing...
User Guide
Page 5
... for details about phone features, check the user's guide of your phone. ■ Bluetooth wireless technology The Nokia Digital Pen is specially designed for compatible phones that support Bluetooth wireless technology and Object Push Profile, Dial-up to 100 A5 pages, all of which is a set of Bluetooth commands that your PC. 1. The Nokia Digital Pen can connect compatible devices without cables to an e-mail address. Introduction The Nokia Digital Pen allows you can save them in the...
... for details about phone features, check the user's guide of your phone. ■ Bluetooth wireless technology The Nokia Digital Pen is specially designed for compatible phones that support Bluetooth wireless technology and Object Push Profile, Dial-up to 100 A5 pages, all of which is a set of Bluetooth commands that your PC. 1. The Nokia Digital Pen can connect compatible devices without cables to an e-mail address. Introduction The Nokia Digital Pen allows you can save them in the...
User Guide
Page 6
... Nokia. For more information on compatibility. However, interoperability between the Nokia Digital Pen and other electronic devices. All rights reserved. 6 be in line of sight, but both devices should be within 10 metres of each other, although the connection can be subject to interference from obstructions, such as walls, or other products with Bluetooth wireless technology, check with and adopts Bluetooth Specification...
... Nokia. For more information on compatibility. However, interoperability between the Nokia Digital Pen and other electronic devices. All rights reserved. 6 be in line of sight, but both devices should be within 10 metres of each other, although the connection can be subject to interference from obstructions, such as walls, or other products with Bluetooth wireless technology, check with and adopts Bluetooth Specification...
User Guide
Page 7
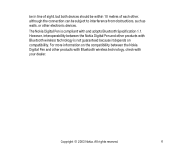
Ink cartridge removal tool 4- All rights reserved. 7 Getting started Note: The use of wireless devices may be restricted in some features are network dependent. 1- Cap 5- 2. Power on/off indicator 6- Reset hole 3- Battery level indicator 8- Note that operations and some situations. Ink cartridge 2- Charging connector Copyright © 2003 Nokia. Observe any restrictions and obey all signs and instructions concerning use of wireless devices. Figure 1 shows the main parts of the Nokia Digital Pen. Data status indicator 7-
Ink cartridge removal tool 4- All rights reserved. 7 Getting started Note: The use of wireless devices may be restricted in some features are network dependent. 1- Cap 5- 2. Power on/off indicator 6- Reset hole 3- Battery level indicator 8- Note that operations and some situations. Ink cartridge 2- Charging connector Copyright © 2003 Nokia. Observe any restrictions and obey all signs and instructions concerning use of wireless devices. Figure 1 shows the main parts of the Nokia Digital Pen. Data status indicator 7-
User Guide
Page 8
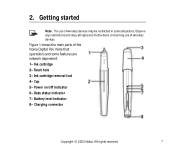
... the Connectivity Stand, and place the pen in a secure place. • To use it to the charging connector on the pen, see Pairing your Bluetooth passcode to pair the Nokia Digital Pen. Copyright © 2003 Nokia. Keep the card in the stand. Charging the battery fully takes up to your computer that the pen need your Nokia Digital Pen on page 9. Before you must: • Charge the battery. • Pair a compatible phone...
... the Connectivity Stand, and place the pen in a secure place. • To use it to the charging connector on the pen, see Pairing your Bluetooth passcode to pair the Nokia Digital Pen. Copyright © 2003 Nokia. Keep the card in the stand. Charging the battery fully takes up to your computer that the pen need your Nokia Digital Pen on page 9. Before you must: • Charge the battery. • Pair a compatible phone...
User Guide
Page 9
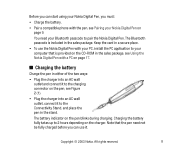
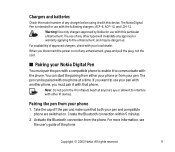
... chargers, check with the phone. Chargers and batteries Check the model number of any charger before using it with that both your pen and compatible phone are switched on. If you disconnect the power cord of the phone. Create the Bluetooth connection within 5 minutes. 2. For more information, see the user's guide of any enhancement, grasp and pull the plug, not the cord. ■ Pairing your Nokia Digital Pen You...
... chargers, check with the phone. Chargers and batteries Check the model number of any charger before using it with that both your pen and compatible phone are switched on. If you disconnect the power cord of the phone. Create the Bluetooth connection within 5 minutes. 2. For more information, see the user's guide of any enhancement, grasp and pull the plug, not the cord. ■ Pairing your Nokia Digital Pen You...
User Guide
Page 10
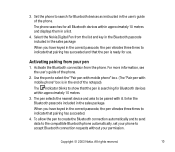
... Bluetooth devices as instructed in the end of the notepad). Select the Nokia Digital Pen from the list and key in the Bluetooth passcode included in the sales package When you have keyed in the correct passcode, the pen vibrates three times to accept Bluetooth connection requests without your pen 1. Activating pairing from the phone. To allow the pen to create the Bluetooth connection automatically and to send data to the compatible Bluetooth phone automatically, set...
... Bluetooth devices as instructed in the end of the notepad). Select the Nokia Digital Pen from the list and key in the Bluetooth passcode included in the sales package When you have keyed in the correct passcode, the pen vibrates three times to accept Bluetooth connection requests without your pen 1. Activating pairing from the phone. To allow the pen to create the Bluetooth connection automatically and to send data to the compatible Bluetooth phone automatically, set...
User Guide
Page 11
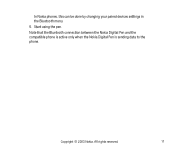
Start using the pen. Copyright © 2003 Nokia. All rights reserved. 11 Note that the Bluetooth connection between the Nokia Digital Pen and the compatible phone is active only when the Nokia Digital Pen is sending data to the phone. In Nokia phones, this can be done by changing your paired devices settings in the Bluetooth menu. 5.
Start using the pen. Copyright © 2003 Nokia. All rights reserved. 11 Note that the Bluetooth connection between the Nokia Digital Pen and the compatible phone is active only when the Nokia Digital Pen is sending data to the phone. In Nokia phones, this can be done by changing your paired devices settings in the Bluetooth menu. 5.
User Guide
Page 12
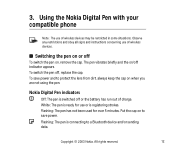
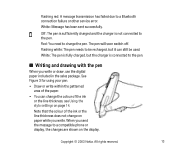
... to save power and to a Bluetooth device and/or sending data. White: The pen is registering strokes. Flashing: The pen is switched off To switch the pen on /off , replace the cap. All rights reserved. 12 To save power. Copyright © 2003 Nokia. Flashing: The pen has not been used for use or is ready for over 5 minutes. The pen vibrates briefly and the on , remove the cap. Nokia Digital Pen indicators Off: The pen is connecting to...
... to save power and to a Bluetooth device and/or sending data. White: The pen is registering strokes. Flashing: The pen is switched off To switch the pen on /off , replace the cap. All rights reserved. 12 To save power. Copyright © 2003 Nokia. Flashing: The pen has not been used for use or is ready for over 5 minutes. The pen vibrates briefly and the on , remove the cap. Nokia Digital Pen indicators Off: The pen is connecting to...
User Guide
Page 13
... not change on paper while you write or draw, use the digital paper included in the sales package. White: Message has been sent successfully. The pen will soon switch off. Note that the colour of the ink or the line thickness, see Using the stylo settings on the display. All rights reserved. 13 Red: You need to a Bluetooth connection failure or other service error.
... not change on paper while you write or draw, use the digital paper included in the sales package. White: Message has been sent successfully. The pen will soon switch off. Note that the colour of the ink or the line thickness, see Using the stylo settings on the display. All rights reserved. 13 Red: You need to a Bluetooth connection failure or other service error.
User Guide
Page 14
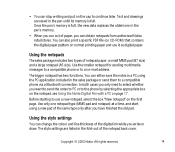
... starting to an e-mail address. Copyright © 2003 Nokia. The stylo settings are saved in the pen until its memory is full, the new data replaces the oldest one notepad type (MMS pad and notepad) at a time, and start using the PC application included in the fold-out of the notepad back cover. Text and drawings are listed in the sales package or send them to a compatible phone via a Bluetooth connection. Using the...
... starting to an e-mail address. Copyright © 2003 Nokia. The stylo settings are saved in the pen until its memory is full, the new data replaces the oldest one notepad type (MMS pad and notepad) at a time, and start using the PC application included in the fold-out of the notepad back cover. Text and drawings are listed in the sales package or send them to a compatible phone via a Bluetooth connection. Using the...
User Guide
Page 15
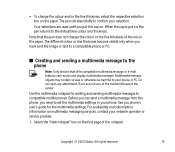
... to set the multimedia settings in your network operator or service provider. 1. Do not open any attachment if you put on, the pen returns to compatible mobile phones. All rights reserved. 15 When the cap is put the cap on. Note that offer compatible multimedia message or e-mail features can send a multimedia message from the phone, you phone's user's guide for writing and sending multimedia messages to the default...
... to set the multimedia settings in your network operator or service provider. 1. Do not open any attachment if you put on, the pen returns to compatible mobile phones. All rights reserved. 15 When the cap is put the cap on. Note that offer compatible multimedia message or e-mail features can send a multimedia message from the phone, you phone's user's guide for writing and sending multimedia messages to the default...
User Guide
Page 16
.... 5. The indicator blinks while the message is connected (paired) to your phone, select . Write a message or draw a picture. 4. To send a picture to the phone. All rights reserved. 16 To select the size of each other. 3. Copyright © 2003 Nokia. Make sure that the pen is being sent and stops when the message has been sent to an e-mail address, or you can save it in the...
.... 5. The indicator blinks while the message is connected (paired) to your phone, select . Write a message or draw a picture. 4. To send a picture to the phone. All rights reserved. 16 To select the size of each other. 3. Copyright © 2003 Nokia. Make sure that the pen is being sent and stops when the message has been sent to an e-mail address, or you can save it in the...
User Guide
Page 17
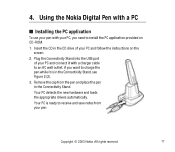
... want to charge the pen while it is ready to install the PC application provided on the screen. 2. Your PC is in the Connectivity Stand. Using the Nokia Digital Pen with a PC ■ Installing the PC application To use your pen. Remove the cap from your pen with a charger cable to an AC wall outlet, if you need to receive and save notes from the pen and place...
... want to charge the pen while it is ready to install the PC application provided on the screen. 2. Your PC is in the Connectivity Stand. Using the Nokia Digital Pen with a PC ■ Installing the PC application To use your pen. Remove the cap from your pen with a charger cable to an AC wall outlet, if you need to receive and save notes from the pen and place...
User Guide
Page 18
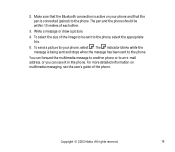
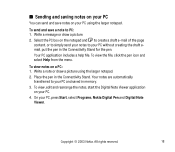
... a message or draw a picture. 2. Place the pen in the Connectivity Stand. ■ Sending and saving notes on your PC You can send and save a note to PC: 1. Your PC application includes a help file. To view the file, click the pen icon and select Help from the menu. On your PC without creating the draft email, put the pen in memory. 3. To send and save notes on a PC: 1. Write a note or draw a picture using...
... a message or draw a picture. 2. Place the pen in the Connectivity Stand. ■ Sending and saving notes on your PC You can send and save a note to PC: 1. Your PC application includes a help file. To view the file, click the pen icon and select Help from the menu. On your PC without creating the draft email, put the pen in memory. 3. To send and save notes on a PC: 1. Write a note or draw a picture using...
User Guide
Page 19
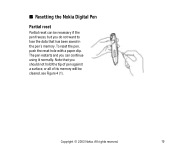
To reset the pen, push the reset hole with a paper clip. Note that has been saved in the pen's memory. The pen restarts and you do not want to lose the data that you should not hold the tip of pen against a surface, or all of its memory will be necessary if the pen freezes, but you can be cleared, see Figure 4 (1). Copyright © 2003 Nokia. All rights reserved. 19 ■ Resetting the Nokia Digital Pen Partial reset Partial reset can continue using it normally.
To reset the pen, push the reset hole with a paper clip. Note that has been saved in the pen's memory. The pen restarts and you do not want to lose the data that you should not hold the tip of pen against a surface, or all of its memory will be necessary if the pen freezes, but you can be cleared, see Figure 4 (1). Copyright © 2003 Nokia. All rights reserved. 19 ■ Resetting the Nokia Digital Pen Partial reset Partial reset can continue using it normally.
User Guide
Page 23
Do not leave the battery connected to buy a new battery. Use the battery only for longer than normal, it will discharge itself over time. Digital Pen with a hot or cold battery may shorten its intended purpose. Batteries' performance is fully charged. Copyright © 2003 Nokia. Temperature extremes can be charged and discharged hundreds of times but it is damaged. Unplug the charger when not in summer...
Do not leave the battery connected to buy a new battery. Use the battery only for longer than normal, it will discharge itself over time. Digital Pen with a hot or cold battery may shorten its intended purpose. Batteries' performance is fully charged. Copyright © 2003 Nokia. Temperature extremes can be charged and discharged hundreds of times but it is damaged. Unplug the charger when not in summer...
User Guide
Page 24
... product for service. The personnel there will help you and, if necessary, arrange for many years. • Keep the device and all types of superior design and craftsmanship and should be damaged. • Do not store the device in dusty, dirty areas. CARE AND MAINTENANCE Your device is not working properly, take it to your device, battery, charger or...
... product for service. The personnel there will help you and, if necessary, arrange for many years. • Keep the device and all types of superior design and craftsmanship and should be damaged. • Do not store the device in dusty, dirty areas. CARE AND MAINTENANCE Your device is not working properly, take it to your device, battery, charger or...


