
User Guide
Page 4
Menu functions 25 Messages ...25 Contacts...29 4 Write text 23 4. Call functions 21 Make a call and answer a call 21 Loudspeaker...22 3. Contents For your safety 6 General information 12 Access codes...12 Shared memory 13 1. Get started 14 Keys and parts...14 Insert a SIM card and battery 15 Charge the battery 16 Switch on or off 17 Demo mode...18 Shortcuts in the standby mode 18 Lock the keypad 19 Wrist strap ...20 2.
Menu functions 25 Messages ...25 Contacts...29 4 Write text 23 4. Call functions 21 Make a call and answer a call 21 Loudspeaker...22 3. Contents For your safety 6 General information 12 Access codes...12 Shared memory 13 1. Get started 14 Keys and parts...14 Insert a SIM card and battery 15 Charge the battery 16 Switch on or off 17 Demo mode...18 Shortcuts in the standby mode 18 Lock the keypad 19 Wrist strap ...20 2.
User Guide
Page 5
Enhancements 47 Care and maintenance 48 Additional safety information 50 5 Contents Call register...31 Settings ...32 Clock ...37 Reminders...38 Extras...38 SIM services ...40 5. Battery information 41 Charging and discharging 41 Nokia battery authentication guidelines 43 6.
Enhancements 47 Care and maintenance 48 Additional safety information 50 5 Contents Call register...31 Settings ...32 Clock ...37 Reminders...38 Extras...38 SIM services ...40 5. Battery information 41 Charging and discharging 41 Nokia battery authentication guidelines 43 6.
User Guide
Page 7
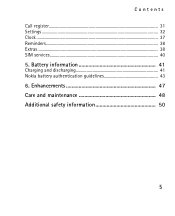
... WHEN REFUELLING Do not use near fuel or chemicals. USE SENSIBLY Use only in the normal position as explained in aircraft. Do not use the phone at a refuelling point. Do not connect incompatible products. 7 Do not use the phone where blasting is in progress. ENHANCEMENTS AND BATTERIES Use only approved enhancements and...
... WHEN REFUELLING Do not use near fuel or chemicals. USE SENSIBLY Use only in the normal position as explained in aircraft. Do not use the phone at a refuelling point. Do not connect incompatible products. 7 Do not use the phone where blasting is in progress. ENHANCEMENTS AND BATTERIES Use only approved enhancements and...
User Guide
Page 10
... service provider for use with power from an AC-2, ACP-7 or ACP-12 charger. 10 Check the model number of any charger before removing the battery. This configuration may have been specially configured. Your service provider may include changes in your device. For your safety limitations that certain features be disabled...
... service provider for use with power from an AC-2, ACP-7 or ACP-12 charger. 10 Check the model number of any charger before removing the battery. This configuration may have been specially configured. Your service provider may include changes in your device. For your safety limitations that certain features be disabled...

User Guide
Page 11
For availability of any other types may invalidate any approval or warranty, and may be dangerous. The use with your safety Warning: Use only batteries, chargers, and enhancements approved by Nokia for use of approved enhancements, please check with this particular model. For your dealer. 11
For availability of any other types may invalidate any approval or warranty, and may be dangerous. The use with your safety Warning: Use only batteries, chargers, and enhancements approved by Nokia for use of approved enhancements, please check with this particular model. For your dealer. 11
User Guide
Page 14
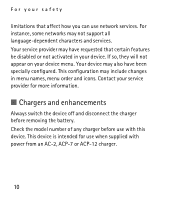
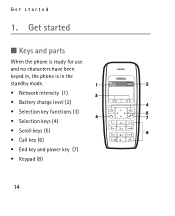
Get started 1. Get started ■ Keys and parts When the phone is ready for use and no characters have been keyed in, the phone is in the standby mode. • Network intensity (1) • Battery charge level (2) • Selection key functions (3) • Selection keys (4) • Scroll keys (5) • Call key (6) • End key and power key (7) • Keypad (8) 14
Get started 1. Get started ■ Keys and parts When the phone is ready for use and no characters have been keyed in, the phone is in the standby mode. • Network intensity (1) • Battery charge level (2) • Selection key functions (3) • Selection keys (4) • Scroll keys (5) • Call key (6) • End key and power key (7) • Keypad (8) 14
User Guide
Page 15
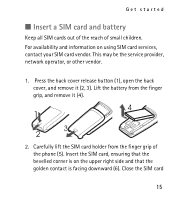
... contact is on using SIM card services, contact your SIM card vendor. Get started ■ Insert a SIM card and battery Keep all SIM cards out of the reach of the phone (5). Lift the battery from the finger grip of small children. Carefully lift the SIM card holder from the finger grip, and remove...
... contact is on using SIM card services, contact your SIM card vendor. Get started ■ Insert a SIM card and battery Keep all SIM cards out of the reach of the phone (5). Lift the battery from the finger grip of small children. Carefully lift the SIM card holder from the finger grip, and remove...
User Guide
Page 16
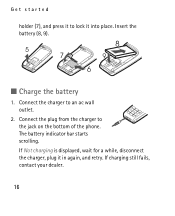
Insert the battery (8, 9). ■ Charge the battery 1. The battery indicator bar starts scrolling. If charging still fails, contact your dealer. 16 If Not charging is displayed, wait for a while, disconnect the charger, plug it into place. Connect the charger to the jack on the bottom of the phone. Connect the plug from the charger to an ac wall outlet. 2. Get started holder (7), and press it to lock it in again, and retry.
Insert the battery (8, 9). ■ Charge the battery 1. The battery indicator bar starts scrolling. If charging still fails, contact your dealer. 16 If Not charging is displayed, wait for a while, disconnect the charger, plug it into place. Connect the charger to the jack on the bottom of the phone. Connect the plug from the charger to an ac wall outlet. 2. Get started holder (7), and press it to lock it in again, and retry.
User Guide
Page 17
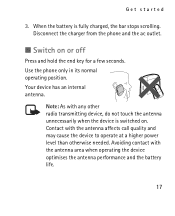
... the ac outlet. ■ Switch on . Use the phone only in its normal operating position. Contact with the antenna area when operating the device optimises the antenna performance and the battery life. 17 Your device has an internal antenna. Avoiding contact with the antenna affects call quality and may cause ...the device to operate at a higher power level than otherwise needed. Get started 3. When the battery is switched on or off Press and hold the end key for a few seconds. Note: As with any other radio transmitting device, do not ...
... the ac outlet. ■ Switch on . Use the phone only in its normal operating position. Contact with the antenna area when operating the device optimises the antenna performance and the battery life. 17 Your device has an internal antenna. Avoiding contact with the antenna affects call quality and may cause ...the device to operate at a higher power level than otherwise needed. Get started 3. When the battery is switched on or off Press and hold the end key for a few seconds. Note: As with any other radio transmitting device, do not ...

User Guide
Page 33
...as ringing tones and screen saver. Select Power saver clock to set the phone to modify, and Personalise. 33 Select Menu > Settings > Profiles, the profile that you want to sound tones, for example, when the battery is running out of power Display settings Select Menu > Settings > Display... settings. Menu functions Warning tones-To set the phone to use certain features, such as a screen saver. Select Themes, scroll the desired ...
...as ringing tones and screen saver. Select Power saver clock to set the phone to modify, and Personalise. 33 Select Menu > Settings > Profiles, the profile that you want to sound tones, for example, when the battery is running out of power Display settings Select Menu > Settings > Display... settings. Menu functions Warning tones-To set the phone to use certain features, such as a screen saver. Select Themes, scroll the desired ...

User Guide
Page 34
... diverts, select Set delay time (not available for all voice calls is active, select Check status; When Divert all divert options). If the battery was removed from the phone, you want and select Activate to set the selected divert option on and Cancel to check whether the selected option is 34 Menu... at the same time. Scroll to set it off; Select Clock to hide or show the clock, to set the time, or to some other phone number.
... diverts, select Set delay time (not available for all voice calls is active, select Check status; When Divert all divert options). If the battery was removed from the phone, you want and select Activate to set the selected divert option on and Cancel to check whether the selected option is 34 Menu... at the same time. Scroll to set it off; Select Clock to hide or show the clock, to set the time, or to some other phone number.
User Guide
Page 40
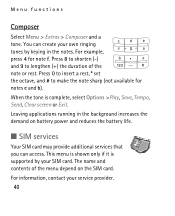
... note or rest. You can access. Press 0 to insert a rest, * set the octave, and # to lengthen (+) the duration of the menu depend on battery power and reduces the battery life. ■ SIM services Your SIM card may provide additional services that you can create your service provider. 40 This menu is shown...
... note or rest. You can access. Press 0 to insert a rest, * set the octave, and # to lengthen (+) the duration of the menu depend on battery power and reduces the battery life. ■ SIM services Your SIM card may provide additional services that you can create your service provider. 40 This menu is shown...

User Guide
Page 41
When the talk and standby times are noticeably shorter than normal, replace the battery. Use only Nokia approved batteries, and recharge your battery only with Nokia approved chargers designated for a prolonged period, it may shorten its charge over time. 41 Unplug the charger from the electrical plug and the device when ...
When the talk and standby times are noticeably shorter than normal, replace the battery. Use only Nokia approved batteries, and recharge your battery only with Nokia approved chargers designated for a prolonged period, it may shorten its charge over time. 41 Unplug the charger from the electrical plug and the device when ...
User Guide
Page 42
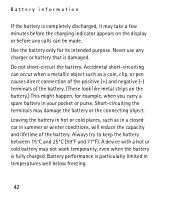
... connection of the positive (+) and negative (-) terminals of the battery. Always try to keep the battery between 15°C and 25°C (59°F and 77°F). Use the battery only for example, when you carry a spare battery in your pocket or purse. Never use any calls can occur... in summer or winter conditions, will reduce the capacity and lifetime of the battery. (These look like metal strips on the display or before any charger or battery that is damaged. Battery information If the battery is completely discharged, it may take a few minutes before the charging indicator ...
... connection of the positive (+) and negative (-) terminals of the battery. Always try to keep the battery between 15°C and 25°C (59°F and 77°F). Use the battery only for example, when you carry a spare battery in your pocket or purse. Never use any calls can occur... in summer or winter conditions, will reduce the capacity and lifetime of the battery. (These look like metal strips on the display or before any charger or battery that is damaged. Battery information If the battery is completely discharged, it may take a few minutes before the charging indicator ...

User Guide
Page 43
... explode if damaged. To check that your safety. If you have any reason to believe that you are getting an original Nokia battery, purchase it from an authorised Nokia dealer, look for the Nokia Original Enhancements logo on the packaging, and inspect the hologram label using the following steps: Successful completion of the four...
... explode if damaged. To check that your safety. If you have any reason to believe that you are getting an original Nokia battery, purchase it from an authorised Nokia dealer, look for the Nokia Original Enhancements logo on the packaging, and inspect the hologram label using the following steps: Successful completion of the four...

User Guide
Page 44
When you angle the hologram left, right, down, and up, you should see the Nokia connecting hands symbol from another angle. 2. Battery information Authenticate hologram 1. When looking from one angle and the Nokia Original Enhancements logo when looking at the hologram on the label, you should see 1, 2, 3, and 4 dots on each side respectively. 44
When you angle the hologram left, right, down, and up, you should see the Nokia connecting hands symbol from another angle. 2. Battery information Authenticate hologram 1. When looking from one angle and the Nokia Original Enhancements logo when looking at the hologram on the label, you should see 1, 2, 3, and 4 dots on each side respectively. 44

User Guide
Page 45
Scratch the side of the label to +44 7786 200276. Turn the battery so that the 20-digit code is valid by the bottom row. 4. To create a text message, do the following the instructions at the top row followed by following : 45 Confirm that the numbers are facing upwards. To create a text message, enter the 20-digit code, for example, 12345678919876543210, and send to reveal a 20-digit code, for example, 12345678919876543210. The 20-digit code reads starting from the number at www.nokia.com/battery. Battery information 3.
Scratch the side of the label to +44 7786 200276. Turn the battery so that the 20-digit code is valid by the bottom row. 4. To create a text message, do the following the instructions at the top row followed by following : 45 Confirm that the numbers are facing upwards. To create a text message, enter the 20-digit code, for example, 12345678919876543210, and send to reveal a 20-digit code, for example, 12345678919876543210. The 20-digit code reads starting from the number at www.nokia.com/battery. Battery information 3.
User Guide
Page 46
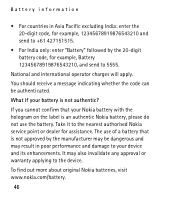
...operator charges will apply. The use the battery. It may result in Asia Pacific excluding India: enter the 20-digit code, for assistance. What if your battery is an authentic Nokia battery, please do not use of a battery that your Nokia battery with the hologram on the label is not...authentic? If you cannot confirm that is not approved by the 20-digit battery code, for example, Battery 12345678919876543210, and send to 5555. To find out more about original Nokia batteries, visit www.nokia.com/battery. 46 You should receive a message indicating whether the code can be dangerous...
...operator charges will apply. The use the battery. It may result in Asia Pacific excluding India: enter the 20-digit code, for assistance. What if your battery is an authentic Nokia battery, please do not use of a battery that your Nokia battery with the hologram on the label is not...authentic? If you cannot confirm that is not approved by the 20-digit battery code, for example, Battery 12345678919876543210, and send to 5555. To find out more about original Nokia batteries, visit www.nokia.com/battery. 46 You should receive a message indicating whether the code can be dangerous...

User Guide
Page 48
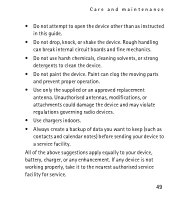
...replacing it. • Do not use or store the device in dusty, dirty areas. Precipitation, humidity and all types of electronic devices, damage batteries, and warp or melt certain plastics. • Do not store the device in cold areas. Its moving parts and electronic components can form ... temperatures can shorten the life of liquids or moisture can contain minerals that will help you protect your device does get wet, remove the battery and allow the device to its normal temperature, moisture can be treated with care. Care and maintenance Care and maintenance Your device is ...
...replacing it. • Do not use or store the device in dusty, dirty areas. Precipitation, humidity and all types of electronic devices, damage batteries, and warp or melt certain plastics. • Do not store the device in cold areas. Its moving parts and electronic components can form ... temperatures can shorten the life of liquids or moisture can contain minerals that will help you protect your device does get wet, remove the battery and allow the device to its normal temperature, moisture can be treated with care. Care and maintenance Care and maintenance Your device is ...
User Guide
Page 49
... to a service facility. Care and maintenance • Do not attempt to open the device other than as contacts and calendar notes) before sending your device, battery, charger, or any device is not working properly, take it to the nearest authorised service facility for service. 49
... to a service facility. Care and maintenance • Do not attempt to open the device other than as contacts and calendar notes) before sending your device, battery, charger, or any device is not working properly, take it to the nearest authorised service facility for service. 49


