
User Guide
Page 4
Menu functions 25 Messages ...25 Contacts...29 4 Write text 23 4. Call functions 21 Make a call and answer a call 21 Loudspeaker...22 3. Get started 14 Keys and parts...14 Insert a SIM card and battery 15 Charge the battery 16 Switch on or off 17 Demo mode...18 Shortcuts in the standby mode 18 Lock the keypad 19 Wrist strap ...20 2. Contents For your safety 6 General information 12 Access codes...12 Shared memory 13 1.
Menu functions 25 Messages ...25 Contacts...29 4 Write text 23 4. Call functions 21 Make a call and answer a call 21 Loudspeaker...22 3. Get started 14 Keys and parts...14 Insert a SIM card and battery 15 Charge the battery 16 Switch on or off 17 Demo mode...18 Shortcuts in the standby mode 18 Lock the keypad 19 Wrist strap ...20 2. Contents For your safety 6 General information 12 Access codes...12 Shared memory 13 1.
User Guide
Page 8
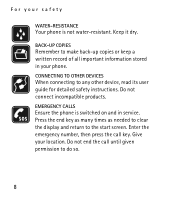
... many times as needed to clear the display and return to do so. 8 Enter the emergency number, then press the call until given permission to the start screen. Give your safety WATER-RESISTANCE Your phone is switched on and in your phone. Do not end the call key. CONNECTING TO OTHER DEVICES When connecting to make back-up copies or keep a written record of all important information stored in service. EMERGENCY CALLS Ensure the phone...
... many times as needed to clear the display and return to do so. 8 Enter the emergency number, then press the call until given permission to the start screen. Give your safety WATER-RESISTANCE Your phone is switched on and in your phone. Do not end the call key. CONNECTING TO OTHER DEVICES When connecting to make back-up copies or keep a written record of all important information stored in service. EMERGENCY CALLS Ensure the phone...
User Guide
Page 9
... device depend on when wireless device use may cause interference or danger. ■ Network services To use any features in this device, other than the alarm clock, the device must have service from a wireless service provider. Your service provider may have 9 For your safety ■ About your device The wireless device described in this guide is approved for use and explain what charges will apply. Contact your service provider for more information about networks...
... device depend on when wireless device use may cause interference or danger. ■ Network services To use any features in this device, other than the alarm clock, the device must have service from a wireless service provider. Your service provider may have 9 For your safety ■ About your device The wireless device described in this guide is approved for use and explain what charges will apply. Contact your service provider for more information about networks...
User Guide
Page 10
... appear on your service provider for use network services. Check the model number of any charger before removing the battery. This device is intended for more information. ■ Chargers and enhancements Always switch the device off and disconnect the charger before use with power from an AC-2, ACP-7 or ACP-12 charger. 10 Your service provider may not support all language-dependent characters and services. This configuration may...
... appear on your service provider for use network services. Check the model number of any charger before removing the battery. This device is intended for more information. ■ Chargers and enhancements Always switch the device off and disconnect the charger before use with power from an AC-2, ACP-7 or ACP-12 charger. 10 Your service provider may not support all language-dependent characters and services. This configuration may...
User Guide
Page 12
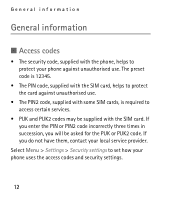
...; Access codes • The security code, supplied with the SIM card. If you will be supplied with the phone, helps to set how your phone uses the access codes and security settings. 12 If you enter the PIN or PIN2 code incorrectly three times in succession, you do not have them, contact your phone against unauthorised use . The preset code is 12345. • The PIN code, supplied with the SIM card, helps to protect the card against unauthorised use . •...
...; Access codes • The security code, supplied with the SIM card. If you will be supplied with the phone, helps to set how your phone uses the access codes and security settings. 12 If you enter the PIN or PIN2 code incorrectly three times in succession, you do not have them, contact your phone against unauthorised use . The preset code is 12345. • The PIN code, supplied with the SIM card, helps to protect the card against unauthorised use . •...
User Guide
Page 15
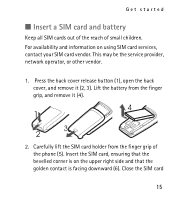
... remove it (2, 3). Close the SIM card 15 For availability and information on the upper right side and that the golden contact is facing downward (6). Get started ■ Insert a SIM card and battery Keep all SIM cards out of the reach of the phone (5). This may be the service provider, network operator, or other vendor. 1. Insert the SIM card, ensuring that the bevelled corner is on using SIM card services, contact your SIM card vendor...
... remove it (2, 3). Close the SIM card 15 For availability and information on the upper right side and that the golden contact is facing downward (6). Get started ■ Insert a SIM card and battery Keep all SIM cards out of the reach of the phone (5). This may be the service provider, network operator, or other vendor. 1. Insert the SIM card, ensuring that the bevelled corner is on using SIM card services, contact your SIM card vendor...
User Guide
Page 18
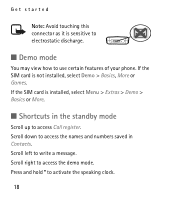
Scroll right to activate the speaking clock. 18 Press and hold * to access the demo mode. Scroll left to access Call register. If the SIM card is sensitive to electrostatic discharge. ■ Demo mode You may view how to use certain features of your phone. Get started Note: Avoid touching this connector as it is installed, select Menu > Extras > Demo > Basics or More. ■ Shortcuts in Contacts. Scroll down to access the names and numbers saved in the standby mode Scroll up to write a message. If the SIM card is not installed, select Demo > Basics, More or Games.
Scroll right to activate the speaking clock. 18 Press and hold * to access the demo mode. Scroll left to access Call register. If the SIM card is sensitive to electrostatic discharge. ■ Demo mode You may view how to use certain features of your phone. Get started Note: Avoid touching this connector as it is installed, select Menu > Extras > Demo > Basics or More. ■ Shortcuts in Contacts. Scroll down to access the names and numbers saved in the standby mode Scroll up to write a message. If the SIM card is not installed, select Demo > Basics, More or Games.
User Guide
Page 19
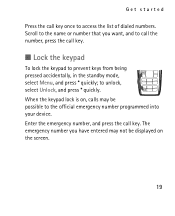
... number, press the call key. to the official emergency number programmed into your device. When the keypad lock is on the screen. 19 Get started Press the call key once to prevent keys from being pressed accidentally, in the standby mode, select Menu, and press * quickly; Enter the emergency number, and press the call key. ■ Lock the keypad To lock the keypad to access the list of dialed numbers. Scroll to the name or number that you have entered may be displayed...
... number, press the call key. to the official emergency number programmed into your device. When the keypad lock is on the screen. 19 Get started Press the call key once to prevent keys from being pressed accidentally, in the standby mode, select Menu, and press * quickly; Enter the emergency number, and press the call key. ■ Lock the keypad To lock the keypad to access the list of dialed numbers. Scroll to the name or number that you have entered may be displayed...
User Guide
Page 25
... used when sending a text message. Select No. Select Character support (network service) to save the phone number needed for sending text and picture messages. Select Exit or Back to the standby mode directly. Press the end key to return to exit the current level of filtered numbers. 25 Menu functions In the standby mode, select Menu and the desired menu and submenu. You obtain this number from your message settings, select Menu > Messages > Message settings. screening to view or edit the list of menu. Menu...
... used when sending a text message. Select No. Select Character support (network service) to save the phone number needed for sending text and picture messages. Select Exit or Back to the standby mode directly. Press the end key to return to exit the current level of filtered numbers. 25 Menu functions In the standby mode, select Menu and the desired menu and submenu. You obtain this number from your message settings, select Menu > Messages > Message settings. screening to view or edit the list of menu. Menu...
User Guide
Page 26
... in a single message. Write the message. 3. To send the message, select Options > Send, enter the recipient's phone number, and select OK. 26 The number of available characters and the current part number of a multipart message is shown on the top right of text messages beyond the character limit for example, 917/1. 1. Menu functions Create message Your device supports the sending of the display, for a single message. Your service provider may charge accordingly. Characters...
... in a single message. Write the message. 3. To send the message, select Options > Send, enter the recipient's phone number, and select OK. 26 The number of available characters and the current part number of a multipart message is shown on the top right of text messages beyond the character limit for example, 917/1. 1. Menu functions Create message Your device supports the sending of the display, for a single message. Your service provider may charge accordingly. Characters...
User Guide
Page 29
... at once Copy-To copy names and phone numbers all at once or one by one from the internal phone book to the SIM phone book, or vice versa 29 Search for a name and phone number Scroll down in the SIM card memory. The internal phone book can also use the following options in the Contacts menu: Add contact-To save names and phone numbers in the phone memory and in the standby mode, and enter the first...
... at once Copy-To copy names and phone numbers all at once or one by one from the internal phone book to the SIM phone book, or vice versa 29 Search for a name and phone number Scroll down in the SIM card memory. The internal phone book can also use the following options in the Contacts menu: Add contact-To save names and phone numbers in the phone memory and in the standby mode, and enter the first...
User Guide
Page 30
When you change the SIM card, SIM card memory is indicated by and the name or phone number saved in each phone book 30 Memory status-To check how many can still be saved in the phone memory is automatically selected. Contacts view-To select how the names and phone numbers are already saved and how many names and phone numbers are shown. Menu functions Settings for contacts Select Menu > Contacts > Settings and from the available options: Memory in use-To select...
When you change the SIM card, SIM card memory is indicated by and the name or phone number saved in each phone book 30 Memory status-To check how many can still be saved in the phone memory is automatically selected. Contacts view-To select how the names and phone numbers are already saved and how many names and phone numbers are shown. Menu functions Settings for contacts Select Menu > Contacts > Settings and from the available options: Memory in use-To select...
User Guide
Page 31
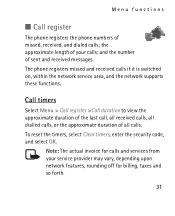
... and received messages. To reset the timers, select Clear timers, enter the security code, and select OK. and the number of all calls. Menu functions ■ Call register The phone registers the phone numbers of your service provider may vary, depending upon network features, rounding off for billing, taxes and so forth. 31 The phone registers missed and received calls if it is switched on, within the network service area, and the network supports...
... and received messages. To reset the timers, select Clear timers, enter the security code, and select OK. and the number of all calls. Menu functions ■ Call register The phone registers the phone numbers of your service provider may vary, depending upon network features, rounding off for billing, taxes and so forth. 31 The phone registers missed and received calls if it is switched on, within the network service area, and the network supports...
User Guide
Page 32
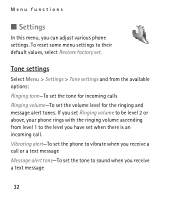
... you receive a call . Tone settings Select Menu > Settings > Tone settings and from level 1 to vibrate when you have set . To reset some menu settings to sound when you can adjust various phone settings. If you set Ringing volume to be level 2 or above, your phone rings with the ringing volume ascending from the available options: Ringing tone-To set the tone for incoming calls Ringing volume-To set the tone to their default values, select Restore factory set when there is an incoming call or a text message Message alert tone-To set the volume level...
... you receive a call . Tone settings Select Menu > Settings > Tone settings and from level 1 to vibrate when you have set . To reset some menu settings to sound when you can adjust various phone settings. If you set Ringing volume to be level 2 or above, your phone rings with the ringing volume ascending from the available options: Ringing tone-To set the tone for incoming calls Ringing volume-To set the tone to their default values, select Restore factory set when there is an incoming call or a text message Message alert tone-To set the volume level...

User Guide
Page 33
... sound tones, for example, when the battery is running out of power Display settings Select Menu > Settings > Display settings. Profiles You can customise the profiles to show the digital or classic clock and all the main display icons as ringing tones and screen saver. Select Power saver clock to set the phone to modify, and Personalise. 33 Select Themes, scroll the desired theme, and select Options > Activate or Edit to acitvate or edit...
... sound tones, for example, when the battery is running out of power Display settings Select Menu > Settings > Display settings. Profiles You can customise the profiles to show the digital or classic clock and all the main display icons as ringing tones and screen saver. Select Power saver clock to set the phone to modify, and Personalise. 33 Select Themes, scroll the desired theme, and select Options > Activate or Edit to acitvate or edit...

User Guide
Page 34
... you may be active at the same time. to edit the time format. When Divert all divert options). Scroll to set the time, or to check whether the selected option is 34 Select Clock to hide or show the clock, to set the time and date again. Call settings Select Menu > Settings > Call settings, and the following options: Select Call divert (network service) to divert your incoming calls to your voice mailbox or to...
... you may be active at the same time. to edit the time format. When Divert all divert options). Scroll to set the time, or to check whether the selected option is 34 Select Clock to hide or show the clock, to set the time and date again. Call settings Select Menu > Settings > Call settings, and the following options: Select Call divert (network service) to divert your incoming calls to your voice mailbox or to...
User Guide
Page 35
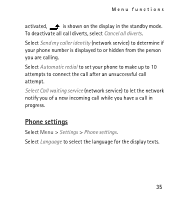
... to set your phone number is shown on the display in progress. Phone settings Select Menu > Settings > Phone settings. Select Send my caller identity (network service) to determine if your phone to make up to 10 attempts to select the language for the display texts. 35 Select Language to connect the call after an unsuccessful call attempt. To deactivate all call diverts, select Cancel all diverts. Menu functions activated, is displayed to let the network notify you of a new incoming call...
... to set your phone number is shown on the display in progress. Phone settings Select Menu > Settings > Phone settings. Select Send my caller identity (network service) to determine if your phone to make up to 10 attempts to select the language for the display texts. 35 Select Language to connect the call after an unsuccessful call attempt. To deactivate all call diverts, select Cancel all diverts. Menu functions activated, is displayed to let the network notify you of a new incoming call...
User Guide
Page 40
... (-) and 9 to make the note sharp (not available for note f. The name and contents of the note or rest. For information, contact your SIM card. This menu is shown only if it is complete, select Options >Play, Save, Tempo, Send, Clear screen or Exit. Press 0 to insert a rest, * set the octave, and # to lengthen (+) the duration of the menu depend on battery power and reduces...
... (-) and 9 to make the note sharp (not available for note f. The name and contents of the note or rest. For information, contact your SIM card. This menu is shown only if it is complete, select Options >Play, Save, Tempo, Send, Clear screen or Exit. Press 0 to insert a rest, * set the octave, and # to lengthen (+) the duration of the menu depend on battery power and reduces...

User Guide
Page 41
... of a new battery is achieved only after two or three complete charge and discharge cycles. Do not leave fully charged battery connected to start the charging. Use only Nokia approved batteries, and recharge your battery only with Nokia approved chargers designated for a prolonged period, it will lose its lifetime. Battery information ■ Charging and discharging Your device is being used for the first time or if the battery has...
... of a new battery is achieved only after two or three complete charge and discharge cycles. Do not leave fully charged battery connected to start the charging. Use only Nokia approved batteries, and recharge your battery only with Nokia approved chargers designated for a prolonged period, it will lose its lifetime. Battery information ■ Charging and discharging Your device is being used for the first time or if the battery has...
User Guide
Page 49
... parts and prevent proper operation. • Use only the supplied or an approved replacement antenna. Unauthorised antennas, modifications, or attachments could damage the device and may violate regulations governing radio devices. • Use chargers indoors. • Always create a backup of the above suggestions apply equally to open the device other than as contacts and calendar notes) before sending your device, battery, charger, or any device...
... parts and prevent proper operation. • Use only the supplied or an approved replacement antenna. Unauthorised antennas, modifications, or attachments could damage the device and may violate regulations governing radio devices. • Use chargers indoors. • Always create a backup of the above suggestions apply equally to open the device other than as contacts and calendar notes) before sending your device, battery, charger, or any device...


