
Reference Manual
Page 33
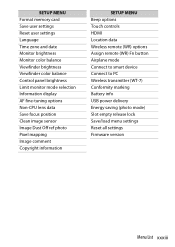
SETUP MENU Format memory card Save user settings Reset user settings Language Time zone and date Monitor brightness Monitor color balance Viewfinder brightness Viewfinder color balance Control panel brightness Limit monitor mode selection Information display AF fine-tuning options Non-CPU ... Airplane mode Connect to smart device Connect to PC Wireless transmitter (WT-7) Conformity marking Battery info USB power delivery Energy saving (photo mode) Slot empty release lock Save/load menu settings Reset all settings Firmware version Menu List xxxiii
SETUP MENU Format memory card Save user settings Reset user settings Language Time zone and date Monitor brightness Monitor color balance Viewfinder brightness Viewfinder color balance Control panel brightness Limit monitor mode selection Information display AF fine-tuning options Non-CPU ... Airplane mode Connect to smart device Connect to PC Wireless transmitter (WT-7) Conformity marking Battery info USB power delivery Energy saving (photo mode) Slot empty release lock Save/load menu settings Reset all settings Firmware version Menu List xxxiii

Reference Manual
Page 97
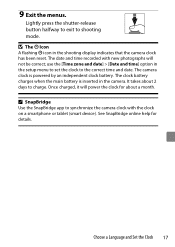
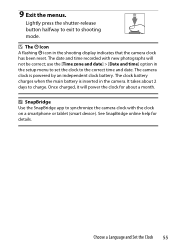
Lightly press the shutter-release button halfway to exit to the correct time and date. use the [Time zone and date] > [Date and time] option in the camera. The clock battery charges when the main battery is powered by an independent clock battery. A SnapBridge Use the SnapBridge ... will power the clock for details. Choose a Language and Set the Clock 55 Once charged, it will not be correct; It takes about a month. The date and time recorded with the clock on a smartphone or tablet (smart device). The camera clock is inserted in the setup menu to set the clock...
Lightly press the shutter-release button halfway to exit to the correct time and date. use the [Time zone and date] > [Date and time] option in the camera. The clock battery charges when the main battery is powered by an independent clock battery. A SnapBridge Use the SnapBridge ... will power the clock for details. Choose a Language and Set the Clock 55 Once charged, it will not be correct; It takes about a month. The date and time recorded with the clock on a smartphone or tablet (smart device). The camera clock is inserted in the setup menu to set the clock...
Reference Manual
Page 363
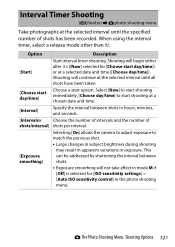
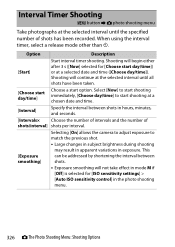
...number of shots/interval] shots per interval. [Exposure smoothing] Selecting [On] allows the camera to adjust exposure to start shooting at a chosen date and time. [Interval] Specify the interval between shots. • Exposure smoothing will begin either after 3 s ([Now] selected for [ISO ...Menu: Shooting Options 321 This can be addressed by shortening the interval between shots in exposure. When using the interval timer, select a release mode other than E. Interval Timer Shooting G button U C photo shooting menu Take photographs at the selected interval until all shots have...
...number of shots/interval] shots per interval. [Exposure smoothing] Selecting [On] allows the camera to adjust exposure to start shooting at a chosen date and time. [Interval] Specify the interval between shots. • Exposure smoothing will begin either after 3 s ([Now] selected for [ISO ...Menu: Shooting Options 321 This can be addressed by shortening the interval between shots in exposure. When using the interval timer, select a release mode other than E. Interval Timer Shooting G button U C photo shooting menu Take photographs at the selected interval until all shots have...
Reference Manual
Page 536
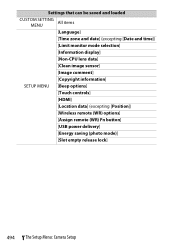
Settings that can be saved and loaded CUSTOM SETTING MENU All items [Language] [Time zone and date] (excepting [Date and time]) [Limit monitor mode selection] [Information display] [Non-CPU lens data] [Clean image sensor] [Image comment] [Copyright information] SETUP MENU [Beep options] [Touch controls] [HDMI] [Location data] (excepting [Position]) [Wireless remote (WR) options] [Assign remote (WR) Fn button] [USB power delivery] [Energy saving (photo mode)] [Slot empty release lock] 494 B The Setup Menu: Camera Setup
Settings that can be saved and loaded CUSTOM SETTING MENU All items [Language] [Time zone and date] (excepting [Date and time]) [Limit monitor mode selection] [Information display] [Non-CPU lens data] [Clean image sensor] [Image comment] [Copyright information] SETUP MENU [Beep options] [Touch controls] [HDMI] [Location data] (excepting [Position]) [Wireless remote (WR) options] [Assign remote (WR) Fn button] [USB power delivery] [Energy saving (photo mode)] [Slot empty release lock] 494 B The Setup Menu: Camera Setup

Reference Manual
Page 838
... Image Dust Off ref photo 463 Image overlay 518 Image quality 257 Image review 232 Image size 153, 258 Images shot on selected dates... 207 Incandescent (White balance) ........96 Information display 456 Infrastructure mode 538, 545 Interval timer shooting 321 IP address 549 ISO sensitivity ... 273, 362 Manual (Shooting mode 109 Manual focus 75, 91 Manual focus ring in AF mode.... 386 Matrix metering 155 Max. continuous release 391 Memory buffer 128 Memory card 45, 761 Memory card capacity 764 Metering 155 MF (Manual focus 75 Microphone sensitivity........... 171, 367 Mid...
... Image Dust Off ref photo 463 Image overlay 518 Image quality 257 Image review 232 Image size 153, 258 Images shot on selected dates... 207 Incandescent (White balance) ........96 Information display 456 Infrastructure mode 538, 545 Interval timer shooting 321 IP address 549 ISO sensitivity ... 273, 362 Manual (Shooting mode 109 Manual focus 75, 91 Manual focus ring in AF mode.... 386 Matrix metering 155 Max. continuous release 391 Memory buffer 128 Memory card 45, 761 Memory card capacity 764 Metering 155 MF (Manual focus 75 Microphone sensitivity........... 171, 367 Mid...

Reference Manual
Page 840
...Sharpening (Set Picture Control)142 Shooting data 185 Shutter spd & aperture lock........... 424 Shutter speed 108, 109 Shutter type 393 Shutter-release button AE-L.......... 389 Silent photography 100, 357 Single AF 75 Single frame 126, 129 Single-point AF 78 Slide show 242 Slot empty...by orientation 379 Straighten 514 Sub-command dial 16 Subject-tracking AF 86 Sub-selector 27, 132 Sync. release mode options .......... 392 T Thumbnail 178 Time 112 Time zone and date 52, 451 Timecode 370 Time-lapse movie 335 Toning (Set Picture Control).......... 142 Touch controls 472 Touch ...
...Sharpening (Set Picture Control)142 Shooting data 185 Shutter spd & aperture lock........... 424 Shutter speed 108, 109 Shutter type 393 Shutter-release button AE-L.......... 389 Silent photography 100, 357 Single AF 75 Single frame 126, 129 Single-point AF 78 Slide show 242 Slot empty...by orientation 379 Straighten 514 Sub-command dial 16 Subject-tracking AF 86 Sub-selector 27, 132 Sync. release mode options .......... 392 T Thumbnail 178 Time 112 Time zone and date 52, 451 Timecode 370 Time-lapse movie 335 Toning (Set Picture Control).......... 142 Touch controls 472 Touch ...
Users Manual
Page 35
... Icon A flashing t icon in the setup menu to set the clock to charge. The date and time recorded with the clock on a smartphone or tablet (smart device). use the [Time zone and date] > [Date and time] option in the shooting display indicates that the camera clock has been reset. See... SnapBridge online help for about 2 days to the correct time and date. Lightly press the shutter-release button halfway to exit to synchronize the camera clock with new photographs will power the clock for details. It takes about a ...
... Icon A flashing t icon in the setup menu to set the clock to charge. The date and time recorded with the clock on a smartphone or tablet (smart device). use the [Time zone and date] > [Date and time] option in the shooting display indicates that the camera clock has been reset. See... SnapBridge online help for about 2 days to the correct time and date. Lightly press the shutter-release button halfway to exit to synchronize the camera clock with new photographs will power the clock for details. It takes about a ...
Reference Manual
Page 33
SETUP MENU Format memory card Save user settings Reset user settings Language Time zone and date Monitor brightness Monitor color balance Viewfinder brightness Viewfinder color balance Control panel brightness Limit monitor mode selection Information display AF fine-tuning options Non-CPU ... Airplane mode Connect to smart device Connect to PC Wireless transmitter (WT-7) Conformity marking Battery info USB power delivery Energy saving (photo mode) Slot empty release lock Save/load menu settings Reset all settings Firmware version Menu List xxxiii
SETUP MENU Format memory card Save user settings Reset user settings Language Time zone and date Monitor brightness Monitor color balance Viewfinder brightness Viewfinder color balance Control panel brightness Limit monitor mode selection Information display AF fine-tuning options Non-CPU ... Airplane mode Connect to smart device Connect to PC Wireless transmitter (WT-7) Conformity marking Battery info USB power delivery Energy saving (photo mode) Slot empty release lock Save/load menu settings Reset all settings Firmware version Menu List xxxiii
Reference Manual
Page 97
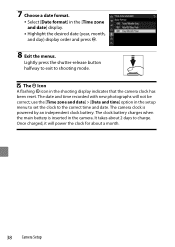
...clock battery charges when the main battery is powered by an independent clock battery. 9 Exit the menus. use the [Time zone and date] > [Date and time] option in the shooting display indicates that the camera clock has been reset. See SnapBridge online help for about 2 days to... shooting mode. Choose a Language and Set the Clock 55 Lightly press the shutter-release button halfway to exit to charge. The date and time recorded with the clock on a smartphone or tablet (smart device). It takes about a month. The camera clock is...
...clock battery charges when the main battery is powered by an independent clock battery. 9 Exit the menus. use the [Time zone and date] > [Date and time] option in the shooting display indicates that the camera clock has been reset. See SnapBridge online help for about 2 days to... shooting mode. Choose a Language and Set the Clock 55 Lightly press the shutter-release button halfway to exit to charge. The date and time recorded with the clock on a smartphone or tablet (smart device). It takes about a month. The camera clock is...
Reference Manual
Page 368
...selected interval until all shots have been taken. [Choose start day/time] Choose a start option. When using the interval timer, select a release mode other than E. This can be addressed by shortening the interval between shots. • Exposure smoothing will continue at the selected interval ... of shots/interval] shots per interval. [Exposure smoothing] Selecting [On] allows the camera to adjust exposure to start shooting at a chosen date and time. [Interval] Specify the interval between shots in hours, minutes, and seconds. [Intervals× Choose the number of intervals and ...
...selected interval until all shots have been taken. [Choose start day/time] Choose a start option. When using the interval timer, select a release mode other than E. This can be addressed by shortening the interval between shots. • Exposure smoothing will continue at the selected interval ... of shots/interval] shots per interval. [Exposure smoothing] Selecting [On] allows the camera to adjust exposure to start shooting at a chosen date and time. [Interval] Specify the interval between shots in hours, minutes, and seconds. [Intervals× Choose the number of intervals and ...

Reference Manual
Page 541
Settings that can be saved and loaded CUSTOM SETTING MENU All items [Language] [Time zone and date] (excepting [Date and time]) [Limit monitor mode selection] [Information display] [Non-CPU lens data] [Clean image sensor] [Image comment] [Copyright information] SETUP MENU [Beep options] [Touch controls] [HDMI] [Location data] (excepting [Position]) [Wireless remote (WR) options] [Assign remote (WR) Fn button] [USB power delivery] [Energy saving (photo mode)] [Slot empty release lock] B The Setup Menu: Camera Setup 499
Settings that can be saved and loaded CUSTOM SETTING MENU All items [Language] [Time zone and date] (excepting [Date and time]) [Limit monitor mode selection] [Information display] [Non-CPU lens data] [Clean image sensor] [Image comment] [Copyright information] SETUP MENU [Beep options] [Touch controls] [HDMI] [Location data] (excepting [Position]) [Wireless remote (WR) options] [Assign remote (WR) Fn button] [USB power delivery] [Energy saving (photo mode)] [Slot empty release lock] B The Setup Menu: Camera Setup 499
Reference Manual
Page 848
... Image Dust Off ref photo 468 Image overlay 523 Image quality 260 Image review 235 Image size 154, 261 Images shot on selected dates... 210 Incandescent (White balance) ........96 Information display 461 Infrastructure mode 543, 550 Interval timer shooting 326 IP address 554 ISO sensitivity ... 278, 367 Manual (Shooting mode 109 Manual focus 75, 91 Manual focus ring in AF mode.... 391 Matrix metering 157 Max. continuous release 396 Memory buffer 129 Memory card 45, 770 Memory card capacity 773 Metering 157 MF (Manual focus 75 Microphone sensitivity........... 174, 372 Mid...
... Image Dust Off ref photo 468 Image overlay 523 Image quality 260 Image review 235 Image size 154, 261 Images shot on selected dates... 210 Incandescent (White balance) ........96 Information display 461 Infrastructure mode 543, 550 Interval timer shooting 326 IP address 554 ISO sensitivity ... 278, 367 Manual (Shooting mode 109 Manual focus 75, 91 Manual focus ring in AF mode.... 391 Matrix metering 157 Max. continuous release 396 Memory buffer 129 Memory card 45, 770 Memory card capacity 773 Metering 157 MF (Manual focus 75 Microphone sensitivity........... 174, 372 Mid...

Reference Manual
Page 850
...Sharpening (Set Picture Control)143 Shooting data 188 Shutter spd & aperture lock........... 429 Shutter speed 108, 109 Shutter type 398 Shutter-release button AE-L.......... 394 Silent photography 100, 362 Single AF 75 Single frame 126, 130 Single-point AF 78 Slide show 245 Slot empty...by orientation 384 Straighten 519 Sub-command dial 16 Subject-tracking AF 86 Sub-selector 27, 133 Sync. release mode options .......... 397 T Thumbnail 181 Time 112 Time zone and date 52, 456 Timecode 375 Time-lapse movie 340 Toning (Set Picture Control).......... 143 Touch controls 477 Touch ...
...Sharpening (Set Picture Control)143 Shooting data 188 Shutter spd & aperture lock........... 429 Shutter speed 108, 109 Shutter type 398 Shutter-release button AE-L.......... 394 Silent photography 100, 362 Single AF 75 Single frame 126, 130 Single-point AF 78 Slide show 245 Slot empty...by orientation 384 Straighten 519 Sub-command dial 16 Subject-tracking AF 86 Sub-selector 27, 133 Sync. release mode options .......... 397 T Thumbnail 181 Time 112 Time zone and date 52, 456 Timecode 375 Time-lapse movie 340 Toning (Set Picture Control).......... 143 Touch controls 477 Touch ...

Users Manual for customers in Europe
Page 35
...about 2 days to synchronize the camera clock with new photographs will power the clock for details. Lightly press the shutter-release button halfway to exit to the correct time and date. The date and time recorded with the clock on a smartphone or tablet (smart device). A SnapBridge Use the SnapBridge app to... charge. The camera clock is inserted in the camera. It takes about a month. use the [Time zone and date] > [Date and time] option in the shooting display indicates that the camera clock has been reset. Once charged, it will not be correct;
...about 2 days to synchronize the camera clock with new photographs will power the clock for details. Lightly press the shutter-release button halfway to exit to the correct time and date. The date and time recorded with the clock on a smartphone or tablet (smart device). A SnapBridge Use the SnapBridge app to... charge. The camera clock is inserted in the camera. It takes about a month. use the [Time zone and date] > [Date and time] option in the shooting display indicates that the camera clock has been reset. Once charged, it will not be correct;
Users Manual for customers in Europe
Page 38
...The camera clock is inserted in the shooting display indicates that the camera clock has been reset. Lightly press the shutter-release button halfway to exit to the correct time and date. The clock battery charges when the main battery is powered by an independent clock battery. D The t Icon A ...recorded with new photographs will power the clock for about 2 days to charge. use the [Time zone and date] > [Date and time] option in the [Time zone and date] display. • Highlight the desired date (year, month, and day) display order and press J. 8 Exit the menus. It takes about a ...
...The camera clock is inserted in the shooting display indicates that the camera clock has been reset. Lightly press the shutter-release button halfway to exit to the correct time and date. The clock battery charges when the main battery is powered by an independent clock battery. D The t Icon A ...recorded with new photographs will power the clock for about 2 days to charge. use the [Time zone and date] > [Date and time] option in the [Time zone and date] display. • Highlight the desired date (year, month, and day) display order and press J. 8 Exit the menus. It takes about a ...
Supplementary Firmware Update Manual
Page 34
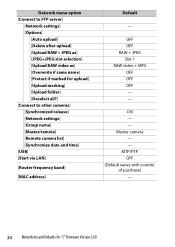
... of purchase) - 34 Menu Items and Defaults for upload] [Upload marking] [Upload folder] [Deselect all?] [Connect to other cameras] [Synchronized release] [Network settings] [Group name] [Master/remote] [Remote camera list] [Synchronize date and time] [USB] [Start via LAN] [Router frequency band] [MAC address] Default - ON - - Master camera - - OFF OFF RAW + JPEG Slot...
... of purchase) - 34 Menu Items and Defaults for upload] [Upload marking] [Upload folder] [Deselect all?] [Connect to other cameras] [Synchronized release] [Network settings] [Group name] [Master/remote] [Remote camera list] [Synchronize date and time] [USB] [Start via LAN] [Router frequency band] [MAC address] Default - ON - - Master camera - - OFF OFF RAW + JPEG Slot...

Reference Guide PDF Edition
Page 12
... Connecting to Other Cameras 401 What Inter-camera Connections Can Do for You 401 Camera-Based Remote Photography (Synchronized Release 401 Clock Synchronization (Synchronize Date and Time 401 Synchronized Release 402 Configuring and Using Synchronized Release 402 Synchronizing Camera Clocks 421 Flash Photography 422 "On-Camera" Versus "Remote 422 Camera-Mounted Flash Units 422...
... Connecting to Other Cameras 401 What Inter-camera Connections Can Do for You 401 Camera-Based Remote Photography (Synchronized Release 401 Clock Synchronization (Synchronize Date and Time 401 Synchronized Release 402 Configuring and Using Synchronized Release 402 Synchronizing Camera Clocks 421 Flash Photography 422 "On-Camera" Versus "Remote 422 Camera-Mounted Flash Units 422...
Reference Guide PDF Edition
Page 22
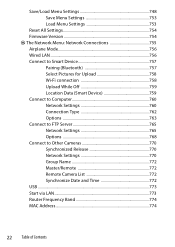
... Options 763 Connect to FTP Server 765 Network Settings 765 Options 768 Connect to Other Cameras 770 Synchronized Release 770 Network Settings 770 Group Name 772 Master/Remote 772 Remote Camera List 772 Synchronize Date and Time 772 USB ...773 Start via LAN 773 Router Frequency Band 774 MAC Address 774 22...
... Options 763 Connect to FTP Server 765 Network Settings 765 Options 768 Connect to Other Cameras 770 Synchronized Release 770 Network Settings 770 Group Name 772 Master/Remote 772 Remote Camera List 772 Synchronize Date and Time 772 USB ...773 Start via LAN 773 Router Frequency Band 774 MAC Address 774 22...
Reference Guide PDF Edition
Page 87
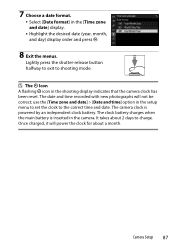
...shooting mode. Once charged, it will not be correct; Camera Setup 87 use the [Time zone and date] > [Date and time] option in the [Time zone and date] display. • Highlight the desired date (year, month, and day) display order and press J. 8 Exit the menus. D The t... Icon A flashing t icon in the camera. The camera clock is inserted in the shooting display indicates that the camera clock has been reset. It takes about a month. Lightly press the shutter-release...
...shooting mode. Once charged, it will not be correct; Camera Setup 87 use the [Time zone and date] > [Date and time] option in the [Time zone and date] display. • Highlight the desired date (year, month, and day) display order and press J. 8 Exit the menus. D The t... Icon A flashing t icon in the camera. The camera clock is inserted in the shooting display indicates that the camera clock has been reset. It takes about a month. Lightly press the shutter-release...
Reference Guide PDF Edition
Page 401
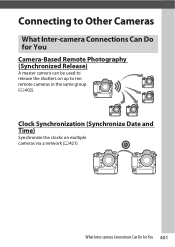
Clock Synchronization (Synchronize Date and Time) Synchronize the clocks on up to ten remote cameras in the same group (0 402). What Inter-camera Connections Can Do for You Camera-Based Remote Photography (Synchronized Release) A master camera can be used to release the shutters on multiple cameras via a network (0421). Connecting to Other Cameras What Inter-camera Connections Can Do for You 401
Clock Synchronization (Synchronize Date and Time) Synchronize the clocks on up to ten remote cameras in the same group (0 402). What Inter-camera Connections Can Do for You Camera-Based Remote Photography (Synchronized Release) A master camera can be used to release the shutters on multiple cameras via a network (0421). Connecting to Other Cameras What Inter-camera Connections Can Do for You 401

