User Manual
Page 1
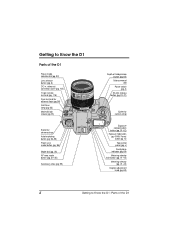
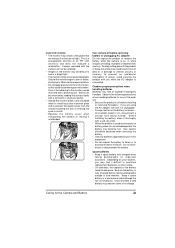
...) Mode dial lock release (pg. 26) Eyelet for camera strap Auto bracketing button (pg. 53-55) Flash sync mode button (pg. 96) Mode dial (pg. 26) AF area mode button (pg. 34-35) Accessory shoe (pg. 95) Depth-of the D1 Getting to Know the D1: Parts of -field preview button (pg. 64...) Sub-command dial Power switch (pg. 4) Shutter-release button (pg. 20-21) Eyelet for camera strap Exposure compensation button (pg. 51-52) Exposure mode button (pg. 43-48...
...) Mode dial lock release (pg. 26) Eyelet for camera strap Auto bracketing button (pg. 53-55) Flash sync mode button (pg. 96) Mode dial (pg. 26) AF area mode button (pg. 34-35) Accessory shoe (pg. 95) Depth-of the D1 Getting to Know the D1: Parts of -field preview button (pg. 64...) Sub-command dial Power switch (pg. 4) Shutter-release button (pg. 20-21) Eyelet for camera strap Exposure compensation button (pg. 51-52) Exposure mode button (pg. 43-48...
User Manual
Page 3
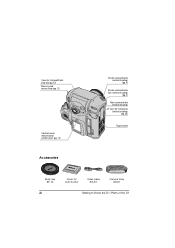
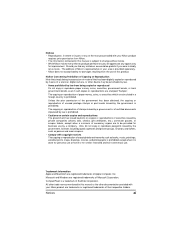
Cover for CompactFlash card slot (pg. 12) Memory card access lamp (pg. 12) Card slot cover release button (under cover) (pg. 12) Accessories Shutter-release button (vertical shooting) (pg. 4) Shutter-release button lock (vertical shooting) (pg. 4) Main command dial (vertical shooting) AF start (AF ON) button (vertical shooting) (pg. 33) Tripod socket Body cap BF-1A iv Cover for LCD monitor Video cable EG-D1 Camera strap AN-D1 Getting to Know the D1: Parts of the D1
Cover for CompactFlash card slot (pg. 12) Memory card access lamp (pg. 12) Card slot cover release button (under cover) (pg. 12) Accessories Shutter-release button (vertical shooting) (pg. 4) Shutter-release button lock (vertical shooting) (pg. 4) Main command dial (vertical shooting) AF start (AF ON) button (vertical shooting) (pg. 33) Tripod socket Body cap BF-1A iv Cover for LCD monitor Video cable EG-D1 Camera strap AN-D1 Getting to Know the D1: Parts of the D1
User Manual
Page 7
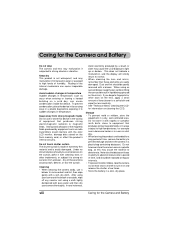
... affect the product's internal circuitry. Note also that these actions could interfere with a soft, dry cloth. Caring for the Camera and Battery Do not drop The camera and lens may cause the LCD displays to light up or darken. To prevent condensation, place the device in its ability ...equipment that produces strong magnetic fields, or in the vicinity of time, and should be gently removed with pure water and then dry your camera thoroughly. In rare instances, static electricity produced by equipment such as this device in areas subject to strong shocks or vibration. Dust and...
... affect the product's internal circuitry. Note also that these actions could interfere with a soft, dry cloth. Caring for the Camera and Battery Do not drop The camera and lens may cause the LCD displays to light up or darken. To prevent condensation, place the device in its ability ...equipment that produces strong magnetic fields, or in the vicinity of time, and should be gently removed with pure water and then dry your camera thoroughly. In rare instances, static electricity produced by equipment such as this device in areas subject to strong shocks or vibration. Dust and...
User Manual
Page 8
...a warm place and exchange the two as this could result in loss of power, avoid carrying the product with a blower brush. Depending on your Nikon service representative. • Do not apply pressure to the LCD monitor, as necessary. Once warmed, a cold battery may recover some of the battery...recorded or deleted from the monitor touching the skin or entering the eyes or mouth. • Replace the monitor cover when transporting the camera or leaving it difficult to purchase replacement batteries on important occasions. If you may become hot. Caring for use in damage to all TFT...
...a warm place and exchange the two as this could result in loss of power, avoid carrying the product with a blower brush. Depending on your Nikon service representative. • Do not apply pressure to the LCD monitor, as necessary. Once warmed, a cold battery may recover some of the battery...recorded or deleted from the monitor touching the skin or entering the eyes or mouth. • Replace the monitor cover when transporting the camera or leaving it difficult to purchase replacement batteries on important occasions. If you may become hot. Caring for use in damage to all TFT...
User Manual
Page 10
...part, of any opportunity for improvement. Notices xi Should you find any mistakes, we appreciate any of the manuals provided with your Nikon product are to be grateful if you were to produce perfect manuals, we would be provided for similar restricted and non-commercial ... kindly let us know. Notice Concerning Prohibition of Copying or Reproduction Note that has been digitally copied or reproduced by means of a scanner, digital camera, or other documentation provided with your Nikon product requires prior permission from the use of this manual is done for personal use at...
...part, of any opportunity for improvement. Notices xi Should you find any mistakes, we appreciate any of the manuals provided with your Nikon product are to be grateful if you were to produce perfect manuals, we would be provided for similar restricted and non-commercial ... kindly let us know. Notice Concerning Prohibition of Copying or Reproduction Note that has been digitally copied or reproduced by means of a scanner, digital camera, or other documentation provided with your Nikon product requires prior permission from the use of this manual is done for personal use at...
User Manual
Page 11
Contents Getting to Know the D1 ii Caring for the Camera and Battery viii About This Manual 1 First Steps ...3 1 Insert the Battery 4 2 Attach the Lens ...focus area 17 6.8 Select matrix metering 17 6.9 Set the exposure mode to programmed auto 18 6.10 Ready the camera 19 6.11 Half-press the shutter release button 20 6.12 Check the indicators in the viewfinder 20 6.13 ...Take a photograph 21 7 Play the Photograph Back 23 Camera Settings 25 The Mode Dial 26 Image Quality 28 Sensitivity (ISO Equivalency 30 White Balance 31 Autofocus 33...
Contents Getting to Know the D1 ii Caring for the Camera and Battery viii About This Manual 1 First Steps ...3 1 Insert the Battery 4 2 Attach the Lens ...focus area 17 6.8 Select matrix metering 17 6.9 Set the exposure mode to programmed auto 18 6.10 Ready the camera 19 6.11 Half-press the shutter release button 20 6.12 Check the indicators in the viewfinder 20 6.13 ...Take a photograph 21 7 Play the Photograph Back 23 Camera Settings 25 The Mode Dial 26 Image Quality 28 Sensitivity (ISO Equivalency 30 White Balance 31 Autofocus 33...
User Manual
Page 14
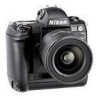
This chapter describes the basic layout of a Nikon D1 digital camera. ABOUT THIS MANUAL Thank you for your purchase of this manual. 1
This chapter describes the basic layout of a Nikon D1 digital camera. ABOUT THIS MANUAL Thank you for your purchase of this manual. 1
User Manual
Page 15
..., from installing the batteries to taking photographs on important occasions, take a few trial shots to care for your camera, describes how to confirm that the camera is divided into seven main chapters: First Steps Outlines the steps you can take when using your... camera for the D1. Custom Settings Describes the options available in the camera's LCD monitor. 2 About This Manual Technical Notes Lists the accessories available for the camera's CCD, and provides troubleshooting tips. Tip When taking photographs at ...
..., from installing the batteries to taking photographs on important occasions, take a few trial shots to care for your camera, describes how to confirm that the camera is divided into seven main chapters: First Steps Outlines the steps you can take when using your... camera for the D1. Custom Settings Describes the options available in the camera's LCD monitor. 2 About This Manual Technical Notes Lists the accessories available for the camera's CCD, and provides troubleshooting tips. Tip When taking photographs at ...
User Manual
Page 16
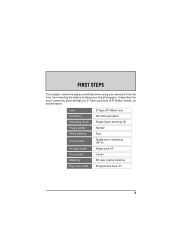
It describes the most commonly used settings for the first time, from inserting the battery to taking your camera for D-Type autofocus (AF) Nikkor lenses, as shown below. FIRST STEPS This chapter covers the steps you will take when using your first photograph. Lens Sensitivity Operating mode Image quality White balance Focus mode AF area mode Focus area Metering Exposure mode D-Type AF Nikkor lens ISO 200 equivalent Single-frame shooting (S) Normal Auto Single-servo autofocus (AF-S) Single area AF Center 3D color matrix metering Programmed auto (P) 3
It describes the most commonly used settings for the first time, from inserting the battery to taking your camera for D-Type autofocus (AF) Nikkor lenses, as shown below. FIRST STEPS This chapter covers the steps you will take when using your first photograph. Lens Sensitivity Operating mode Image quality White balance Focus mode AF area mode Focus area Metering Exposure mode D-Type AF Nikkor lens ISO 200 equivalent Single-frame shooting (S) Normal Auto Single-servo autofocus (AF-S) Single area AF Center 3D color matrix metering Programmed auto (P) 3
User Manual
Page 17
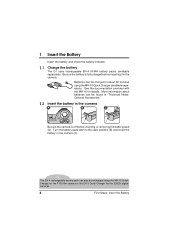
... the MH-15 Quick Charger for the F100 film camera or the EH-3 Quick Charger for details. Be sure the battery is off before inserting it in the camera (C). See the documentation provided with the MH-16 for the E3/E3s digital cameras. 4 First Steps: Insert the Battery Turn the...position (B) and insert the battery in the camera. Tip The EN-4 rechargeable battery pack can be recharged using the MH-16 Quick Charger (available separately). 1 Insert the Battery Insert the battery and check the battery indicator. 1.1 Charge the battery The D1 uses rechargeable EN-4 Ni-MH battery packs ...
... the MH-15 Quick Charger for the F100 film camera or the EH-3 Quick Charger for details. Be sure the battery is off before inserting it in the camera (C). See the documentation provided with the MH-16 for the E3/E3s digital cameras. 4 First Steps: Insert the Battery Turn the...position (B) and insert the battery in the camera. Tip The EN-4 rechargeable battery pack can be recharged using the MH-16 Quick Charger (available separately). 1 Insert the Battery Insert the battery and check the battery indicator. 1.1 Charge the battery The D1 uses rechargeable EN-4 Ni-MH battery packs ...
User Manual
Page 18
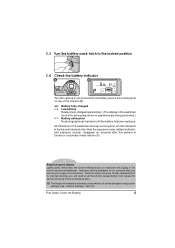
... display in the control panel and viewfinder. Note that when using custom settings (see "Custom Settings," item 15). The length of the camera (B). First Steps: Insert the Battery 5 Tip Reactivating the display Lightly press (half-press) the shutter-release button to reactivate the display ... shooting to the unlocked position. 1.3 Turn the battery pack latch to the locked position 1.4 Check the battery indicator A B Turn the camera on (A) and confirm the battery level in the top control panel other than the exposure mode, battery indicator, and exposure counter, disappear ...
... display in the control panel and viewfinder. Note that when using custom settings (see "Custom Settings," item 15). The length of the camera (B). First Steps: Insert the Battery 5 Tip Reactivating the display Lightly press (half-press) the shutter-release button to reactivate the display ... shooting to the unlocked position. 1.3 Turn the battery pack latch to the locked position 1.4 Check the battery indicator A B Turn the camera on (A) and confirm the battery level in the top control panel other than the exposure mode, battery indicator, and exposure counter, disappear ...
User Manual
Page 19
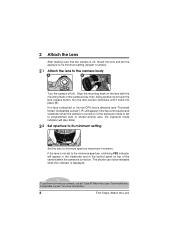
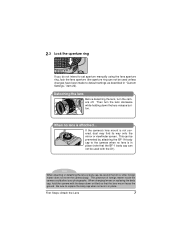
... lens and set to programmed auto or shutter-priority auto, the exposure mode indicator will appear in the control panel on top of the camera when the camera is set the aperture to its minimum setting Set the lens to touch the lens-release button, turn the lens counter-clockwise until it... to the minimum aperture, a blinking FEE indicator will appear in the viewfinder and in the top control panel and viewfinder when the camera is turned on (if the exposure mode is turned on the camera body, then, being careful not to minimum aperture (maximum f-number). Tip To get the most from your...
... lens and set to programmed auto or shutter-priority auto, the exposure mode indicator will appear in the control panel on top of the camera when the camera is set the aperture to its minimum setting Set the lens to touch the lens-release button, turn the lens counter-clockwise until it... to the minimum aperture, a blinking FEE indicator will appear in the viewfinder and in the top control panel and viewfinder when the camera is turned on (if the exposure mode is turned on the camera body, then, being careful not to minimum aperture (maximum f-number). Tip To get the most from your...
User Manual
Page 20
...lens, turn the lens clockwise while holding down or tilted so that the lens mount faces the ground. Then turn the camera off. This can not be used unless changes have been made to default settings as described in place (note that ...dirt or other foreign matter does not enter the camera body. Note When attaching or detaching the lens or body cap, be careful that the BF-1 body cap can be... screen. First Steps: Attach the Lens 7 When changing lenses or replacing the body cap, hold the camera with the D1).
...lens, turn the lens clockwise while holding down or tilted so that the lens mount faces the ground. Then turn the camera off. This can not be used unless changes have been made to default settings as described in place (note that ...dirt or other foreign matter does not enter the camera body. Note When attaching or detaching the lens or body cap, be careful that the BF-1 body cap can be... screen. First Steps: Attach the Lens 7 When changing lenses or replacing the body cap, hold the camera with the D1).
User Manual
Page 21
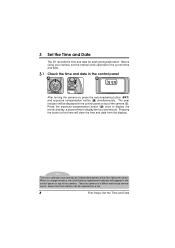
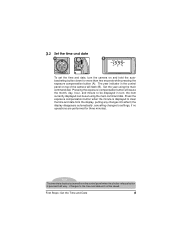
...internal clock-calendar to the current time and date. 3.1 Check the time and date in the control panel on top of the camera (B). 3 Set the Time and Date The D1 records the time and date for a fee. 8 First Steps: Set the Time and Date Pressing the button a third time will... the exposure-compensation button ( ) once to display the month and day, a second time to a Nikon-authorized service center, where the clock battery can be displayed in the control panel A B After turning the camera on top of about ten years. Note The clock-calendar is powered by an independent battery with...
...internal clock-calendar to the current time and date. 3.1 Check the time and date in the control panel on top of the camera (B). 3 Set the Time and Date The D1 records the time and date for a fee. 8 First Steps: Set the Time and Date Pressing the button a third time will... the exposure-compensation button ( ) once to display the month and day, a second time to a Nikon-authorized service center, where the clock battery can be displayed in the control panel A B After turning the camera on top of about ten years. Note The clock-calendar is powered by an independent battery with...
User Manual
Page 22
The year indicator in turn the camera on top of the camera will cause the month, day, hour, and minute to settings, if no operations are performed for more than two seconds while pressing the exposure compensation ...
The year indicator in turn the camera on top of the camera will cause the month, day, hour, and minute to settings, if no operations are performed for more than two seconds while pressing the exposure compensation ...
User Manual
Page 23
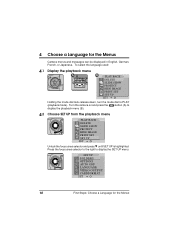
...Unlock the focus-area selector and press w until SET UP is highlighted. SET UP D1 FOLDERS OPTIONS 20S AUTO OFF E LANGUAGE N VIDEO OUTPUT CARDFORMAT SET 10 First Steps: Choose a Language for the Menus Camera menus and messages can be displayed in English, German, French, or Japanese. Turn the... camera on and press the button (A) to display the SET UP menu. 4 Choose a Language for the ...
...Unlock the focus-area selector and press w until SET UP is highlighted. SET UP D1 FOLDERS OPTIONS 20S AUTO OFF E LANGUAGE N VIDEO OUTPUT CARDFORMAT SET 10 First Steps: Choose a Language for the Menus Camera menus and messages can be displayed in English, German, French, or Japanese. Turn the... camera on and press the button (A) to display the SET UP menu. 4 Choose a Language for the ...
User Manual
Page 25
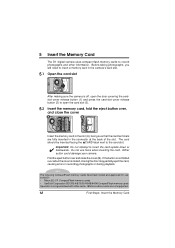
...slot. 5.1 Open the card slot After making sure the camera is off, open the card slot (3). 5.2 Insert the memory card, fold the eject button over, and close the cover (B). Do not use in the D1: • Nikon EC-CF CompactFlash memory cards • SanDisk Corporation SDCFB-4/8/... action could damage your camera. IBM microdrive cards are fully inserted in recording photographs or during playback. Note The following CompactFlash memory cards have been tested and approved for use force when inserting the card. 5 Insert the Memory Card The D1 digital camera uses compact flash-memory cards...
...slot. 5.1 Open the card slot After making sure the camera is off, open the card slot (3). 5.2 Insert the memory card, fold the eject button over, and close the cover (B). Do not use in the D1: • Nikon EC-CF CompactFlash memory cards • SanDisk Corporation SDCFB-4/8/... action could damage your camera. IBM microdrive cards are fully inserted in recording photographs or during playback. Note The following CompactFlash memory cards have been tested and approved for use force when inserting the card. 5 Insert the Memory Card The D1 digital camera uses compact flash-memory cards...
User Manual
Page 26
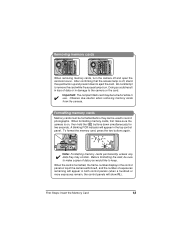
... remain, the control panels will appear in the top control panel. When formatting memory cards, first make copies of data you would like to the camera or the card. ✔ Important: The compact flash card may contain. Observe due caution when removing memory cards from the... down simultaneously for two seconds. After confirming that the access lamp is formatted, the frame-number display in the control panel on top of the camera will show 1, and the number of data or in damage to keep. Doing so could result in loss of exposures remaining will appear in use...
... remain, the control panels will appear in the top control panel. When formatting memory cards, first make copies of data you would like to the camera or the card. ✔ Important: The compact flash card may contain. Observe due caution when removing memory cards from the... down simultaneously for two seconds. After confirming that the access lamp is formatted, the frame-number display in the control panel on top of the camera will show 1, and the number of data or in damage to keep. Doing so could result in loss of exposures remaining will appear in use...
User Manual
Page 27
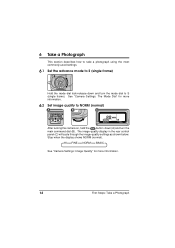
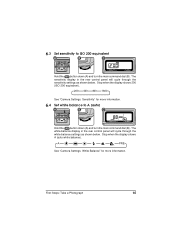
...-quality display in the rear control panel (C) will cycle through the image-quality settings as shown below. Stop when the display shows NORM (normal). See "Camera Settings: The Mode Dial" for more information. 6.2 Set image quality to S (single frame). 6 Take a Photograph This section describes how to take a photograph using the most.... 6.1 Set the advance mode to S (single frame) Hold the mode dial lock-release down (A) and turn the mode dial to NORM (normal) A B C After turning the camera on, hold the button down and turn the main command dial (B).
...-quality display in the rear control panel (C) will cycle through the image-quality settings as shown below. Stop when the display shows NORM (normal). See "Camera Settings: The Mode Dial" for more information. 6.2 Set image quality to S (single frame). 6 Take a Photograph This section describes how to take a photograph using the most.... 6.1 Set the advance mode to S (single frame) Hold the mode dial lock-release down (A) and turn the mode dial to NORM (normal) A B C After turning the camera on, hold the button down and turn the main command dial (B).
User Manual
Page 28
...: Sensitivity" for more information. 6.4 Set white balance to ISO 200 equivalent A B C Hold the button down (A) and turn the main command dial (B). A PRE See "Camera Settings: White Balance" for more information. First Steps: Take a Photograph 15 The sensitivity display in the rear control panel will cycle through the white-balance ...
...: Sensitivity" for more information. 6.4 Set white balance to ISO 200 equivalent A B C Hold the button down (A) and turn the main command dial (B). A PRE See "Camera Settings: White Balance" for more information. First Steps: Take a Photograph 15 The sensitivity display in the rear control panel will cycle through the white-balance ...


