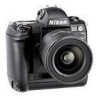
User Manual
Page 1
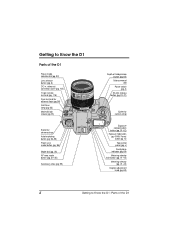
... Know the D1 Parts of the D1 Focus mode selector dial (pg. 33) Lens release button (pg. 6) DC in, video out connector cover (pg. 102) 10-pin remote terminal (pg. 116) Sync terminal for external flash (pg. 95) Self-timer lamp (pg. 63) Mode dial lock release (pg. 26) Eyelet for camera strap Exposure compensation button (pg. 51-52) Exposure mode button (pg. 43-48)/ Format button (pg. 13) Top control panel (pg...
... Know the D1 Parts of the D1 Focus mode selector dial (pg. 33) Lens release button (pg. 6) DC in, video out connector cover (pg. 102) 10-pin remote terminal (pg. 116) Sync terminal for external flash (pg. 95) Self-timer lamp (pg. 63) Mode dial lock release (pg. 26) Eyelet for camera strap Exposure compensation button (pg. 51-52) Exposure mode button (pg. 43-48)/ Format button (pg. 13) Top control panel (pg...
User Manual
Page 11
... D1 ii Caring for the Camera and Battery viii About This Manual 1 First Steps ...3 1 Insert the Battery 4 2 Attach the Lens 6 3 Set the Time and Date 8 4 Choose a Language for the Menus 10 5 Insert the Memory Card 12 6 Take a Photograph 14 6.1 Set the advance mode to S (single frame 14 6.2 Set image quality to NORM (normal 14 6.3 Set sensitivity to ISO 200 equivalent 15 6.4 Set white balance to A (auto 15 6.5 Set the focus mode to S (single servo AF 16 6.6 Set...
... D1 ii Caring for the Camera and Battery viii About This Manual 1 First Steps ...3 1 Insert the Battery 4 2 Attach the Lens 6 3 Set the Time and Date 8 4 Choose a Language for the Menus 10 5 Insert the Memory Card 12 6 Take a Photograph 14 6.1 Set the advance mode to S (single frame 14 6.2 Set image quality to NORM (normal 14 6.3 Set sensitivity to ISO 200 equivalent 15 6.4 Set white balance to A (auto 15 6.5 Set the focus mode to S (single servo AF 16 6.6 Set...
User Manual
Page 22
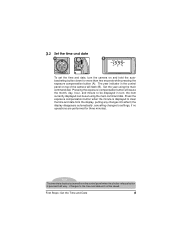
.... Changes to the time and date will flash (B). The year indicator in turn the camera on top of the camera will not be saved. Pressing the exposure-compensation button will cause the month, day, hour, and minute to settings, if no operations are performed for more than two seconds while pressing the exposure compensation button (A). Note The time/date display is cleared from the control panel when the shutter-release button...
.... Changes to the time and date will flash (B). The year indicator in turn the camera on top of the camera will not be saved. Pressing the exposure-compensation button will cause the month, day, hour, and minute to settings, if no operations are performed for more than two seconds while pressing the exposure compensation button (A). Note The time/date display is cleared from the control panel when the shutter-release button...
User Manual
Page 23
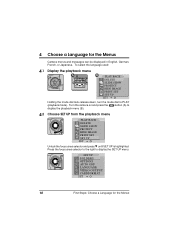
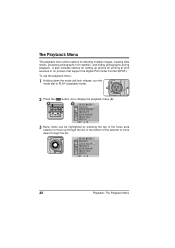
... playback menu PLAY BACK DELETE SLIDE SHOW PROTECT HIDE IMAGE PRINT SET SET UP SET Unlock the focus-area selector and press w until SET UP is highlighted. Turn the camera on and press the button (A) to display the SET UP menu. To select the language used: 4.1 Display the playback menu A B PLAY BACK DELETE SLIDE SHOW PROTECT HIDE IMAGE PRINT SET SET UP SET Holding the mode dial lock-release down, turn the mode dial to PLAY (playback mode). 4 Choose a Language for the Menus SET UP D1 FOLDERS OPTIONS 20S AUTO OFF E LANGUAGE N VIDEO OUTPUT CARDFORMAT SET...
... playback menu PLAY BACK DELETE SLIDE SHOW PROTECT HIDE IMAGE PRINT SET SET UP SET Unlock the focus-area selector and press w until SET UP is highlighted. Turn the camera on and press the button (A) to display the SET UP menu. To select the language used: 4.1 Display the playback menu A B PLAY BACK DELETE SLIDE SHOW PROTECT HIDE IMAGE PRINT SET SET UP SET Holding the mode dial lock-release down, turn the mode dial to PLAY (playback mode). 4 Choose a Language for the Menus SET UP D1 FOLDERS OPTIONS 20S AUTO OFF E LANGUAGE N VIDEO OUTPUT CARDFORMAT SET...
User Manual
Page 31
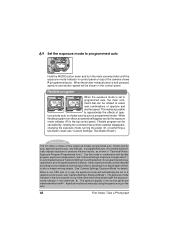
... and shooting conditions, allowing you to adjust depth of aperture and shutter speed. Other exposure modes can be set manually using the aperture ring on top of four exposure modes: programmed auto, shutter-priority auto, aperture-priority auto, and manual. See "Camera Settings: Exposure Mode" for programmed photography that is in effect, an asterisk will appear next to the exposure mode indicator (P) in the control panel. Aperture must be shown in the top control panel. In programmed auto, the camera automatically adjusts exposure...
... and shooting conditions, allowing you to adjust depth of aperture and shutter speed. Other exposure modes can be set manually using the aperture ring on top of four exposure modes: programmed auto, shutter-priority auto, aperture-priority auto, and manual. See "Camera Settings: Exposure Mode" for programmed photography that is in effect, an asterisk will appear next to the exposure mode indicator (P) in the control panel. Aperture must be shown in the top control panel. In programmed auto, the camera automatically adjusts exposure...
User Manual
Page 33
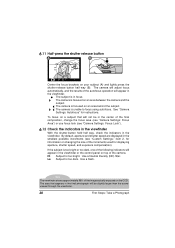
... that will appear in focus. To focus on your subject (A) and lightly press the shutter-release button half way (B). HI Subject is too dark. Lo Subject is too bright. The camera is in the viewfinder. Use a flash. See "Camera Settings: Autofocus" for displaying aperture, shutter speed, and exposure compensation). Use a Neutral Density (ND) filter. The subject is unable to focus using autofocus. The camera will adjust focus automatically, and the results...
... that will appear in focus. To focus on your subject (A) and lightly press the shutter-release button half way (B). HI Subject is too dark. Lo Subject is too bright. The camera is in the viewfinder. Use a flash. See "Camera Settings: Autofocus" for displaying aperture, shutter speed, and exposure compensation). Use a Neutral Density (ND) filter. The subject is unable to focus using autofocus. The camera will adjust focus automatically, and the results...
User Manual
Page 34
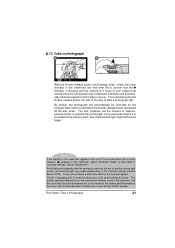
... equipped with a combined electronic (CCD) and mechanical shutter. See "Camera Settings: Capture Preview Mode." This shutter operates differently from the mechanical shutters found in film cameras, with the camera focused on the compact flash-memory card when the shutter-release button is pressed all the way down , check the focus indicator in the camera's charge-coupled device (CCD). By default, the photograph will not decrease past a certain point, even at...
... equipped with a combined electronic (CCD) and mechanical shutter. See "Camera Settings: Capture Preview Mode." This shutter operates differently from the mechanical shutters found in film cameras, with the camera focused on the compact flash-memory card when the shutter-release button is pressed all the way down , check the focus indicator in the camera's charge-coupled device (CCD). By default, the photograph will not decrease past a certain point, even at...
User Manual
Page 39
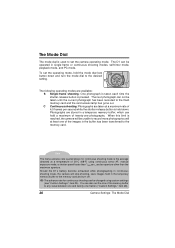
... stop shooting, save images held down and turn off. The D1 can hold the mode dial lock button down . Note The frame advance rate quoted above for continuous shooting can also set the size of 20°C (68°F) using custom settings (see "Custom Settings," item 25). Should the D1's battery become exhausted while photographing in continuous shooting mode, the camera will be changed using continuous servo AF, manual exposure mode, a shutter speed faster than 1/250 sec., and an aperture...
... stop shooting, save images held down and turn off. The D1 can hold the mode dial lock button down . Note The frame advance rate quoted above for continuous shooting can also set the size of 20°C (68°F) using custom settings (see "Custom Settings," item 25). Should the D1's battery become exhausted while photographing in continuous shooting mode, the camera will be changed using continuous servo AF, manual exposure mode, a shutter speed faster than 1/250 sec., and an aperture...
User Manual
Page 40
... shutter-release button is displayed in continuous shooting mode, do not remove the memory card or battery from the camera or disconnect the AC Adapter while images are being transferred from the buffer to the memory card, you will vary depending on the LCD monitor (see "Playback"). PC mode: This mode is used when the camera is about twice that can be played back on the card speed and content of 12, and saved in each recording mode...
... shutter-release button is displayed in continuous shooting mode, do not remove the memory card or battery from the camera or disconnect the AC Adapter while images are being transferred from the buffer to the memory card, you will vary depending on the LCD monitor (see "Playback"). PC mode: This mode is used when the camera is about twice that can be played back on the card speed and content of 12, and saved in each recording mode...
User Manual
Page 41
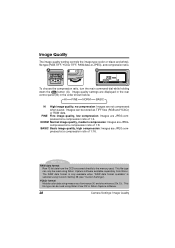
..., Cr). YCbCr format Models color data using Custom Setting 28 (see "Custom Settings"). HI FINE NORM BASIC HI High image quality, no compression: Images are displayed in the rear control panel (B) in the order shown below. Images can be read using Nikon View DX or Nikon Capture software. 28 Camera Settings: Image Quality BASIC Basic image quality, high compression: Images are saved directly to the memory card. This file type can be read using Nikon Capture software available separately from...
..., Cr). YCbCr format Models color data using Custom Setting 28 (see "Custom Settings"). HI FINE NORM BASIC HI High image quality, no compression: Images are displayed in the rear control panel (B) in the order shown below. Images can be read using Nikon View DX or Nikon Capture software. 28 Camera Settings: Image Quality BASIC Basic image quality, high compression: Images are saved directly to the memory card. This file type can be read using Nikon Capture software available separately from...
User Manual
Page 44
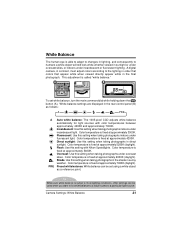
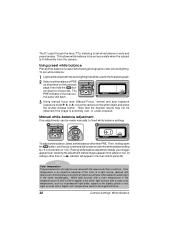
... Nikon Speedlights. Direct sunlight: Use this setting when taking photographs in direct sunlight. Color temperature is fixed at approximately 7000K (daylight). Color temperature is fixed at approximately 3000K. Tip While auto white balance is suited to most lighting conditions, other settings can be used when you want to fix white balance to a value suited to a particular light source. Fluorescent: Use this setting when taking photographs indoors under incandescent or fluorescent lighting. A digital camera, in contrast, must adjust colors...
... Nikon Speedlights. Direct sunlight: Use this setting when taking photographs in direct sunlight. Color temperature is fixed at approximately 7000K (daylight). Color temperature is fixed at approximately 3000K. Tip While auto white balance is suited to most lighting conditions, other settings can be used when you want to fix white balance to a value suited to a particular light source. Fluorescent: Use this setting when taking photographs indoors under incandescent or fluorescent lighting. A digital camera, in contrast, must adjust colors...
User Manual
Page 45
... yellow or red. A B To adjust white balance, select a white balance other than 0, a indicator will flash. 3 Using manual focus (see "Manual Focus," below) and auto exposure (exposure mode P, S, or A), focus the camera on the previous page, then hold the button down the button, turn the sub-command dial to set accurately when the subject is extremely over- Raising white balance adjustment makes your images appear bluer; lowering the adjustment makes images appear more yellow or red. At settings other conditions. Light sources with a higher color temperature...
... yellow or red. A B To adjust white balance, select a white balance other than 0, a indicator will flash. 3 Using manual focus (see "Manual Focus," below) and auto exposure (exposure mode P, S, or A), focus the camera on the previous page, then hold the button down the button, turn the sub-command dial to set accurately when the subject is extremely over- Raising white balance adjustment makes your images appear bluer; lowering the adjustment makes images appear more yellow or red. At settings other conditions. Light sources with a higher color temperature...
User Manual
Page 69
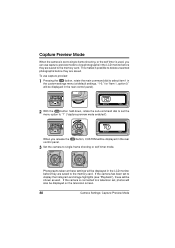
... camera is set to single-frame shooting, or the self timer is connected to delete unwanted photographs before they are saved. This makes it possible to a television set to display the histogram and image highlights (see "Playback"), these settings will be displayed in the rear 3 Set the camera to single-frame shooting or self-timer mode. If the camera has been set , photos will be displayed on the television screen. 56 Camera Settings: Capture Preview Mode If the camera is used...
... camera is set to single-frame shooting, or the self timer is connected to delete unwanted photographs before they are saved. This makes it possible to a television set to display the histogram and image highlights (see "Playback"), these settings will be displayed in the rear 3 Set the camera to single-frame shooting or self-timer mode. If the camera has been set , photos will be displayed on the television screen. 56 Camera Settings: Capture Preview Mode If the camera is used...
User Manual
Page 89
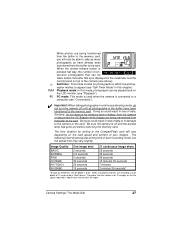
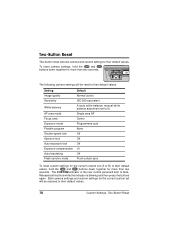
... both buttons while the indicator is blinking and then press the buttons again. Both camera settings and custom settings for more than two seconds. The CUSTOM indicator in the rear control panel will be restored to their default values: Setting Image quality Sensitivity White balance AF area mode Focus area Exposure mode Flexible program Shutter-speed lock Aperture lock Auto-exposure lock Exposure compensation Auto bracketing Flash synchro mode Default Normal (color) ISO 200 equivalent A (auto white balance; Two-Button Reset Two-button reset restores camera and custom settings to...
... both buttons while the indicator is blinking and then press the buttons again. Both camera settings and custom settings for more than two seconds. The CUSTOM indicator in the rear control panel will be restored to their default values: Setting Image quality Sensitivity White balance AF area mode Focus area Exposure mode Flexible program Shutter-speed lock Aperture lock Auto-exposure lock Exposure compensation Auto bracketing Flash synchro mode Default Normal (color) ISO 200 equivalent A (auto white balance; Two-Button Reset Two-button reset restores camera and custom settings to...
User Manual
Page 92
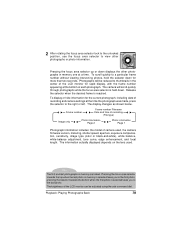
... lens used , the camera firmware version, metering, shutter speed, aperture, exposure compensation, sensitivity, image type (color or black-and-white), white balance, white-balance adjustment, tone curve, edge enhancement, and focal length. Pressing the focus-area selector towards the bottom when the first photo is selected takes you to the first photo; pressing the selector towards the top when the last photo in memory one at a time. To scroll quickly to a particular frame number without viewing intervening photos...
... lens used , the camera firmware version, metering, shutter speed, aperture, exposure compensation, sensitivity, image type (color or black-and-white), white balance, white-balance adjustment, tone curve, edge enhancement, and focal length. Pressing the focus-area selector towards the bottom when the first photo is selected takes you to the first photo; pressing the selector towards the top when the last photo in memory one at a time. To scroll quickly to a particular frame number without viewing intervening photos...
User Manual
Page 95
... focus area selector to display the playback menu (B). The Playback Menu The playback menu offers options for printing at print services or on printers that support the Digital Print Order Format (DPOF). B PLAY BACK DELETE SLIDE SHOW PROTECT HIDE IMAGE PRINT SET SET UP SET 3 Menu items can be highlighted by pressing the top of the selector to move down the mode dial lock release, turn the mode dial to PLAY (playback mode). 2 Press the A button (A) to move up photos for deleting multiple images, creating slide shows, protecting...
... focus area selector to display the playback menu (B). The Playback Menu The playback menu offers options for printing at print services or on printers that support the Digital Print Order Format (DPOF). B PLAY BACK DELETE SLIDE SHOW PROTECT HIDE IMAGE PRINT SET SET UP SET 3 Menu items can be highlighted by pressing the top of the selector to move down the mode dial lock release, turn the mode dial to PLAY (playback mode). 2 Press the A button (A) to move up photos for deleting multiple images, creating slide shows, protecting...
User Manual
Page 100
... button to save changes and return to the PRINT SET 1 COPIES menu, or press the button to cancel the operation and exit SET from the COPIES menu (shown at right) using a printer or print service that will be printed when the card is inserted in a DPOF-compatible device. Images selected for printing using the COPIES focus area selector. The item can be selected from the COPIES menu. Playback: The Playback Menu 87 The requested images and information can then be displayed...
... button to save changes and return to the PRINT SET 1 COPIES menu, or press the button to cancel the operation and exit SET from the COPIES menu (shown at right) using a printer or print service that will be printed when the card is inserted in a DPOF-compatible device. Images selected for printing using the COPIES focus area selector. The item can be selected from the COPIES menu. Playback: The Playback Menu 87 The requested images and information can then be displayed...
User Manual
Page 117
... Nikon View DX. 3 Turn the camera on the monitor in capture-preview mode, record-and-review mode, or in single-image playback. 4 Before disconnecting the IEEE 1394 cable from the camera, turn the camera off or disconnect the camera when data transfer is exhausted may shorten battery life. Refer to flash while the camera and computer are not displayed on . If the camera is properly connected and Nikon Capture is running on your software manual for data transfer...
... Nikon View DX. 3 Turn the camera on the monitor in capture-preview mode, record-and-review mode, or in single-image playback. 4 Before disconnecting the IEEE 1394 cable from the camera, turn the camera off or disconnect the camera when data transfer is exhausted may shorten battery life. Refer to flash while the camera and computer are not displayed on . If the camera is properly connected and Nikon Capture is running on your software manual for data transfer...
User Manual
Page 136
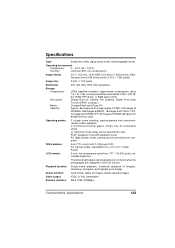
... MB memory card) Operating modes: S (single frame shooting, capture-preview and record-andreview modes available) C (continuous shooting, approx. 4.5 fps, max. 21 consecutive shots) (self-timer mode; delay can be specified by user) PLAY (playback mode with playback menu) PC (data transfer mode; camera can be controlled from computer) White balance: Auto (TTL control with 2.7 million pixels, effective pixel count 2.66 million pixels (2,012 × 1,324 pixels) Image size: 2,000 × 1,312 pixels Sensitivity: 200, 400, 800, 1600 (ISO equivalent) Storage Compression: File...
... MB memory card) Operating modes: S (single frame shooting, capture-preview and record-andreview modes available) C (continuous shooting, approx. 4.5 fps, max. 21 consecutive shots) (self-timer mode; delay can be specified by user) PLAY (playback mode with playback menu) PC (data transfer mode; camera can be controlled from computer) White balance: Auto (TTL control with 2.7 million pixels, effective pixel count 2.66 million pixels (2,012 × 1,324 pixels) Image size: 2,000 × 1,312 pixels Sensitivity: 200, 400, 800, 1600 (ISO equivalent) Storage Compression: File...
User Manual
Page 139
...: Lens aperture can be stopped down by pressing CSM and ISO buttons simultaneously (some settings not restored) Dimensions: Approx. 157 (W) × 153 (H) × 86 (D) mm (6.2 × 6.1 × 3.4 in . (JIS standard) 32 settings from 0-31 available (see "Custom Settings") Two-button reset: Settings restored to defaults by pressing depth-of-field preview button Top control panel: Display includes shutter-speed lock indicator, shutter speed, exposure compensation, date, aperture lock indicator, aperture, operating mode, clock-battery indicator, exposure compensation indicator, auto...
...: Lens aperture can be stopped down by pressing CSM and ISO buttons simultaneously (some settings not restored) Dimensions: Approx. 157 (W) × 153 (H) × 86 (D) mm (6.2 × 6.1 × 3.4 in . (JIS standard) 32 settings from 0-31 available (see "Custom Settings") Two-button reset: Settings restored to defaults by pressing depth-of-field preview button Top control panel: Display includes shutter-speed lock indicator, shutter speed, exposure compensation, date, aperture lock indicator, aperture, operating mode, clock-battery indicator, exposure compensation indicator, auto...

