
Users Manual
Page 1
En DIGITAL CAMERA User's Manual Nikon Manual Viewer 2 Use the Nikon Manual Viewer 2 app to view manuals anytime, anywhere on your smartphone or tablet.
En DIGITAL CAMERA User's Manual Nikon Manual Viewer 2 Use the Nikon Manual Viewer 2 app to view manuals anytime, anywhere on your smartphone or tablet.
Users Manual
Page 2
...App Store and Google Play. information that should be read by your camera, please be sure to read before use the product. information that default settings are used : D This icon marks cautions; Nikon Manual Viewer 2 can be downloaded free of the app and any ...product manuals requires an Internet connection, for your purchase of a Nikon single-lens reflex (SLR) digital camera. Camera Settings The explanations in "For Your Safety" (0 x-xii). Nikon Manual Viewer 2 Install the Nikon Manual Viewer 2 app on menu items and other pages in bold. Thank you ...
...App Store and Google Play. information that should be read by your camera, please be sure to read before use the product. information that default settings are used : D This icon marks cautions; Nikon Manual Viewer 2 can be downloaded free of the app and any ...product manuals requires an Internet connection, for your purchase of a Nikon single-lens reflex (SLR) digital camera. Camera Settings The explanations in "For Your Safety" (0 x-xii). Nikon Manual Viewer 2 Install the Nikon Manual Viewer 2 app on menu items and other pages in bold. Thank you ...

Users Manual
Page 3
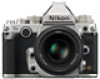
other languages are sold separately (0 363). Cameras purchased in Japan display menus and messages in countries or regions where required; i shape depends on country of sale.) DK-26 eyepiece cap (0 23) AN-... for any inconvenience this manual) Warranty Purchasers of the lens kit option should confirm that the package contains the following items: BS-1 accessory shoe cover Df camera BF-1B body cap EN-EL14a rechargeable Li-ion battery (with terminal cover) MH-24 battery charger (plug adapter supplied in English and Japanese only...
other languages are sold separately (0 363). Cameras purchased in Japan display menus and messages in countries or regions where required; i shape depends on country of sale.) DK-26 eyepiece cap (0 23) AN-... for any inconvenience this manual) Warranty Purchasers of the lens kit option should confirm that the package contains the following items: BS-1 accessory shoe cover Df camera BF-1B body cap EN-EL14a rechargeable Li-ion battery (with terminal cover) MH-24 battery charger (plug adapter supplied in English and Japanese only...

Users Manual
Page 4
Table of Contents For Your Safety x Notices...xiii Introduction 1 Getting to Know the Camera 1 Camera Menus 15 First Steps 18 Basic Photography and Playback 29 Taking Photographs 29 Basic Playback 34 Deleting Unwanted Photographs 35 Exposure Mode 36 P: Programmed Auto 38 S: Shutter-Priority Auto 39 1/3 STEP (Exposure Modes S and M 40 A: Aperture-Priority Auto 41 M: Manual 42 Long Time-Exposures (M Mode Only 44 Release Mode 46 Choosing a Release Mode 46 Self-Timer Mode 48 Mirror up Mode 50 ii
Table of Contents For Your Safety x Notices...xiii Introduction 1 Getting to Know the Camera 1 Camera Menus 15 First Steps 18 Basic Photography and Playback 29 Taking Photographs 29 Basic Playback 34 Deleting Unwanted Photographs 35 Exposure Mode 36 P: Programmed Auto 38 S: Shutter-Priority Auto 39 1/3 STEP (Exposure Modes S and M 40 A: Aperture-Priority Auto 41 M: Manual 42 Long Time-Exposures (M Mode Only 44 Release Mode 46 Choosing a Release Mode 46 Self-Timer Mode 48 Mirror up Mode 50 ii

Users Manual
Page 8
... Space 240 Vignette Control 241 Auto Distortion Control 241 Long Exposure NR (Long Exposure Noise Reduction 242 High ISO NR 242 A Custom Settings: Fine-Tuning Camera Settings 243 Custom Settings Bank 245 a: Autofocus 246 a1: AF-C Priority Selection 246 a2: AF-S Priority Selection 246 a3: Focus Tracking with Lock-On 247...
... Space 240 Vignette Control 241 Auto Distortion Control 241 Long Exposure NR (Long Exposure Noise Reduction 242 High ISO NR 242 A Custom Settings: Fine-Tuning Camera Settings 243 Custom Settings Bank 245 a: Autofocus 246 a1: AF-C Priority Selection 246 a2: AF-S Priority Selection 246 a3: Focus Tracking with Lock-On 247...

Users Manual
Page 9
...: Release Button to Use Dial 269 f9: Slot Empty Release Lock 269 f10: Reverse Indicators 269 f11: Easy Shutter-Speed Shift 270 B The Setup Menu: Camera Setup 271 Format Memory Card 272 Monitor Brightness 273 Auto Info Display 273 Image Dust Off Ref Photo 274 Flicker Reduction 276 Time Zone and...
...: Release Button to Use Dial 269 f9: Slot Empty Release Lock 269 f10: Reverse Indicators 269 f11: Easy Shutter-Speed Shift 270 B The Setup Menu: Camera Setup 271 Format Memory Card 272 Monitor Brightness 273 Auto Info Display 273 Image Dust Off Ref Photo 274 Flicker Reduction 276 Time Zone and...

Users Manual
Page 11
... Storage 328 Cleaning 328 The Low-Pass Filter 329 "Clean Now 329 "Clean at Startup/Shutdown 330 Manual Cleaning 331 Caring for the Camera and Battery: Cautions 335 Exposure Program (Mode P 339 Troubleshooting 340 Battery/Display 340 Shooting 341 Playback 343 Miscellaneous 345 Error Messages 346 Specifications 352 AF-S ...
... Storage 328 Cleaning 328 The Low-Pass Filter 329 "Clean Now 329 "Clean at Startup/Shutdown 330 Manual Cleaning 331 Caring for the Camera and Battery: Cautions 335 Exposure Program (Mode P 339 Troubleshooting 340 Battery/Display 340 Shooting 341 Playback 343 Miscellaneous 345 Error Messages 346 Specifications 352 AF-S ...

Users Manual
Page 12
...gas, and then take the equipment to a Nikonauthorized service center for inspection. Should you notice smoke or an Sunlight focused into the camera unusual smell coming from failure to observe the precautions listed in this section are indicated by a qualified technician. A Do not use in... remove Do not use the product will read the following symbol: A This icon marks warnings. Continued operation could result in explosion or Nikon-authorized service center fire. After removing the battery, take the product to a as the result gas of flammable A Do not disassemble Touching...
...gas, and then take the equipment to a Nikonauthorized service center for inspection. Should you notice smoke or an Sunlight focused into the camera unusual smell coming from failure to observe the precautions listed in this section are indicated by a qualified technician. A Do not use in... remove Do not use the product will read the following symbol: A This icon marks warnings. Continued operation could result in explosion or Nikon-authorized service center fire. After removing the battery, take the product to a as the result gas of flammable A Do not disassemble Touching...

Users Manual
Page 13
...off before replacing the battery. A Observe proper precautions when handling batteries Batteries may result in lowtemperature burns. Before removing the battery turn the camera off and allow the battery to cool. • Discontinue use immediately should you are using an AC adapter, be hot immediately after ...extremely high temperatures, such as discoloration or deformation. A Do not place the strap around the neck of an infant or child Placing the camera strap around the neck of an infant or child could result in injury. If you notice any part of this equipment. • ...
...off before replacing the battery. A Observe proper precautions when handling batteries Batteries may result in lowtemperature burns. Before removing the battery turn the camera off and allow the battery to cool. • Discontinue use immediately should you are using an AC adapter, be hot immediately after ...extremely high temperatures, such as discoloration or deformation. A Do not place the strap around the neck of an infant or child Placing the camera strap around the neck of an infant or child could result in injury. If you notice any part of this equipment. • ...

Users Manual
Page 14
... to fire or electric shock. • Dust on an audio CD and turn the camera off and landing. follow staff instructions regarding the use only the cables provided or sold by Nikon for the purpose to maintain compliance with medical equipment or aircraft A CD-ROMs navigation. xii... A Do not carry tripods with the skin or other objects could cause burns. • Using optional flash units close contact with a lens or camera attached You could cause temporary visual impairment. Failure to -AC inverters. A Observe proper precautions when A Do not aim a flash at the operator ...
... to fire or electric shock. • Dust on an audio CD and turn the camera off and landing. follow staff instructions regarding the use only the cables provided or sold by Nikon for the purpose to maintain compliance with medical equipment or aircraft A CD-ROMs navigation. xii... A Do not carry tripods with the skin or other objects could cause burns. • Using optional flash units close contact with a lens or camera attached You could cause temporary visual impairment. Failure to -AC inverters. A Observe proper precautions when A Do not aim a flash at the operator ...
Users Manual
Page 18
...gift certificates, etc.), commuter passes, or coupon tickets, except when a minimum of necessary copies are stamped "Sample." Use Only Nikon Brand Electronic Accessories Nikon cameras are circulated in a foreign country is prohibited. Also, do not copy or reproduce passports issued by the government, licenses issued by... of this product for business use of third-party rechargeable Li-ion batteries not bearing the Nikon holographic seal shown at right could damage the camera and may be provided for the purpose of making illegal copies or to infringe copyright laws....
...gift certificates, etc.), commuter passes, or coupon tickets, except when a minimum of necessary copies are stamped "Sample." Use Only Nikon Brand Electronic Accessories Nikon cameras are circulated in a foreign country is prohibited. Also, do not copy or reproduce passports issued by the government, licenses issued by... of this product for business use of third-party rechargeable Li-ion batteries not bearing the Nikon holographic seal shown at right could damage the camera and may be provided for the purpose of making illegal copies or to infringe copyright laws....
Users Manual
Page 19
... the U.S.A.: http://www.nikonusa.com/ • For users in Europe and Africa: http://www.europe-nikon.com/support/ • For users in your Nikon digital camera are particularly recommended if the camera is used with the latest product information, tips, answers to frequently-asked questions (FAQs), and general ...on important occasions (such as lenses or optional flash units, should be held liable for use with your area. Nikon recommends that the camera be inspected by Nikon specifically for damages or lost profits that fees apply to these sites to keep up-to two years, and that ...
... the U.S.A.: http://www.nikonusa.com/ • For users in Europe and Africa: http://www.europe-nikon.com/support/ • For users in your Nikon digital camera are particularly recommended if the camera is used with the latest product information, tips, answers to frequently-asked questions (FAQs), and general ...on important occasions (such as lenses or optional flash units, should be held liable for use with your area. Nikon recommends that the camera be inspected by Nikon specifically for damages or lost profits that fees apply to these sites to keep up-to two years, and that ...

Users Manual
Page 21
... a few moments to it helpful to bookmark this section and refer to familiarize yourself with camera controls and displays. The Camera Body X 9 10 11 1 1 2 12 3 4 5 6 7 8 13 14 15 16 17 1 Eyelet for camera strap 10 Power switch 5 2 Exposure compensation dial .......79 11 Shutter-release button 31 3 Exposure compensation dial lock 12 Release socket...
... a few moments to it helpful to bookmark this section and refer to familiarize yourself with camera controls and displays. The Camera Body X 9 10 11 1 1 2 12 3 4 5 6 7 8 13 14 15 16 17 1 Eyelet for camera strap 10 Power switch 5 2 Exposure compensation dial .......79 11 Shutter-release button 31 3 Exposure compensation dial lock 12 Release socket...

Users Manual
Page 22
The Camera Body (Continued) 4 5 6 13 X 1 2 3 14 7 8 15 9 16 10 11 12 1 Mirror 50 9 Cover for accessory terminal .....325 2 Metering coupling lever 167 10 Lens release button 25 3 Lens mounting mark 24 11 AF-mode button.... 60, 63, 175, 176 4 D button 12 Focus-mode selector ..... 59, 68, 175 Bracketing 137, 141, 145 13 Flash sync terminal 117 5 Self-timer lamp 48 14 USB connector 211, 214 6 Flash sync terminal cap 15 HDMI mini-pin connector ..........222 7 USB connector cover 16 Accessory terminal 325 8 HDMI connector cover 2
The Camera Body (Continued) 4 5 6 13 X 1 2 3 14 7 8 15 9 16 10 11 12 1 Mirror 50 9 Cover for accessory terminal .....325 2 Metering coupling lever 167 10 Lens release button 25 3 Lens mounting mark 24 11 AF-mode button.... 60, 63, 175, 176 4 D button 12 Focus-mode selector ..... 59, 68, 175 Bracketing 137, 141, 145 13 Flash sync terminal 117 5 Self-timer lamp 48 14 USB connector 211, 214 6 Flash sync terminal cap 15 HDMI mini-pin connector ..........222 7 USB connector cover 16 Accessory terminal 325 8 HDMI connector cover 2

Users Manual
Page 24
The Camera Body (Continued) 10 11 9 12 1 13 2 14 3 15 4 16 X 5 6 17 18 7 8 19 20 21 1 O button 7 W/M button Delete 35, 203 Playback zoom out/ 2 K button thumbnails 196, ...
The Camera Body (Continued) 10 11 9 12 1 13 2 14 3 15 4 16 X 5 6 17 18 7 8 19 20 21 1 O button 7 W/M button Delete 35, 203 Playback zoom out/ 2 K button thumbnails 196, ...

Users Manual
Page 25
... the dark. D button 5 The backlight will remain lit for about 6 seconds or until the shutter is released or the D button is on . to turn the camera on activates the control panel backlight (LCD illuminator), allowing the display to turn the...
... the dark. D button 5 The backlight will remain lit for about 6 seconds or until the shutter is released or the D button is on . to turn the camera on activates the control panel backlight (LCD illuminator), allowing the display to turn the...

Users Manual
Page 27
...pressed. J Quiet shutter- E Self-timer Take pictures with the selftimer. The camera takes CL Continuous low photographs at a fast rate while the shutter-release button is reduced. The camera takes CH Continuous high speed photographs at a slow rate speed while the shutter-release... button is pressed. As for single-frame, except release that camera noise is pressed. MUP Mirror up Raise the mirror ...
...pressed. J Quiet shutter- E Self-timer Take pictures with the selftimer. The camera takes CL Continuous low photographs at a fast rate while the shutter-release button is reduced. The camera takes CH Continuous high speed photographs at a slow rate speed while the shutter-release... button is pressed. As for single-frame, except release that camera noise is pressed. MUP Mirror up Raise the mirror ...

Users Manual
Page 33
... 241 Exposure compensation value ....80 46 Metering 75 33 ADL bracketing amount 111 47 Exposure and flash bracketing 34 Copyright information 279 indicator 137 35 Camera battery indicator 29 WB bracketing indicator 141 36 Image comment indicator......... 278 ADL bracketing indicator........... 145 37 ISO sensitivity indicator 70 ISO sensitivity 70 Auto...
... 241 Exposure compensation value ....80 46 Metering 75 33 ADL bracketing amount 111 47 Exposure and flash bracketing 34 Copyright information 279 indicator 137 35 Camera battery indicator 29 WB bracketing indicator 141 36 Image comment indicator......... 278 ADL bracketing indicator........... 145 37 ISO sensitivity indicator 70 ISO sensitivity 70 Auto...

Users Manual
Page 35
... Press 1 or 3 to MY MENU; 0 313) Slider shows position in current menu. Current settings are shown by pressing the L (U) button. G button Tabs Choose from the camera menus. Camera Menus Most shooting, playback, and setup options can be displayed while the button is pressed. To view the menus, press the G button.
... Press 1 or 3 to MY MENU; 0 313) Slider shows position in current menu. Current settings are shown by pressing the L (U) button. G button Tabs Choose from the camera menus. Camera Menus Most shooting, playback, and setup options can be displayed while the button is pressed. To view the menus, press the G button.
Users Manual
Page 36
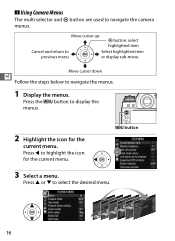
G button 3 Select a menu. Press 1 or 3 to display the menus. 2 Highlight the icon for the current menu. Press the G button to select the desired menu. 16 Move cursor up J button: select highlighted item Cancel and return to Select highlighted item previous menu or display sub-menu Move cursor down X Follow the steps below to highlight the icon for the current menu. Press 4 to navigate the menus. 1 Display the menus. ❚❚ Using Camera Menus The multi selector and J button are used to navigate the camera menus.
G button 3 Select a menu. Press 1 or 3 to display the menus. 2 Highlight the icon for the current menu. Press the G button to select the desired menu. 16 Move cursor up J button: select highlighted item Cancel and return to Select highlighted item previous menu or display sub-menu Move cursor down X Follow the steps below to highlight the icon for the current menu. Press 4 to navigate the menus. 1 Display the menus. ❚❚ Using Camera Menus The multi selector and J button are used to navigate the camera menus.


