User Manual
Page 3
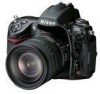
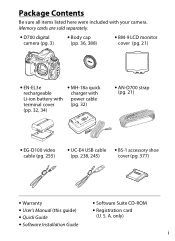
Package Contents Be sure all items listed here were included with power cable terminal cover (pg. 32) (pp. 32, 34) • AN-D700 strap (pg. 21) • EG-D100 video cable (pg. 255) • UC-E4 USB cable • BS-1 accessory shoe (pp. ... Installation Guide • Software Suite CD-ROM • Registration card (U. Memory cards are sold separately. • D700 digital camera (pg. 3) • Body cap (pp. 36, 388) • BM-9 LCD monitor cover (pg. 21) • EN-EL3e • MH-18a quick rechargeable charger with Li-ion battery with your camera. A. only) i S.
Package Contents Be sure all items listed here were included with power cable terminal cover (pg. 32) (pp. 32, 34) • AN-D700 strap (pg. 21) • EG-D100 video cable (pg. 255) • UC-E4 USB cable • BS-1 accessory shoe (pp. ... Installation Guide • Software Suite CD-ROM • Registration card (U. Memory cards are sold separately. • D700 digital camera (pg. 3) • Body cap (pp. 36, 388) • BM-9 LCD monitor cover (pg. 21) • EN-EL3e • MH-18a quick rechargeable charger with Li-ion battery with your camera. A. only) i S.

User Manual
Page 8
... the memory card? Cleaning the camera See page 8, 10, 12 409 46 340 300 391 Taking Photographs Question How many more information about the battery? Can I change the frame advance rate? How do I take with this warning mean ? How do I clean the camera or lens? Error messages and... displays How much charge does the battery have left? Can I take a lot of exposures remaining Image quality and size Autofocus Focus point Release mode Shooting ...
... the memory card? Cleaning the camera See page 8, 10, 12 409 46 340 300 391 Taking Photographs Question How many more information about the battery? Can I change the frame advance rate? How do I take with this warning mean ? How do I clean the camera or lens? Error messages and... displays How much charge does the battery have left? Can I take a lot of exposures remaining Image quality and size Autofocus Focus point Release mode Shooting ...
User Manual
Page 11
...(Speedlights) can I use? Approved memory cards What software is available for my camera? Printing via USB Can I print the date on TV? Compatible lenses What AC adapters, battery packs, remote cords, and viewfinder Other accessories accessories are available for my camera? HDMI How do I copy photos to make a single image? Key phrase Color... Question Key phrase Can I view my photos on my photographs? Optional flash units What lenses can I print photos without a computer? Question Can I use the camera to a computer How do I order professional prints?
...(Speedlights) can I use? Approved memory cards What software is available for my camera? Printing via USB Can I print the date on TV? Compatible lenses What AC adapters, battery packs, remote cords, and viewfinder Other accessories accessories are available for my camera? HDMI How do I copy photos to make a single image? Key phrase Color... Question Key phrase Can I view my photos on my photographs? Optional flash units What lenses can I print photos without a computer? Question Can I use the camera to a computer How do I order professional prints?
User Manual
Page 12
Table of Contents Q&A Index iv For Your Safety xviii Notices...xxi Introduction 1 Overview...2 Getting to Know the Camera 3 Camera Body 3 The Control Panel 8 The Viewfinder Display 10 The Shooting Information Display 12 The Command Dials 16 Quick Start Guide 22 Tutorial 25 Camera Menus 26 Using Camera Menus 28 Help ...31 First Steps 32 Charge the Battery 32 Insert the Battery 34 Attach a Lens 36 Basic Setup 38 Insert a Memory Card 41 Formatting Memory Cards 43 Adjust Viewfinder Focus 45 Basic Photography and Playback 46 Deleting Unwanted Photographs 56 x
Table of Contents Q&A Index iv For Your Safety xviii Notices...xxi Introduction 1 Overview...2 Getting to Know the Camera 3 Camera Body 3 The Control Panel 8 The Viewfinder Display 10 The Shooting Information Display 12 The Command Dials 16 Quick Start Guide 22 Tutorial 25 Camera Menus 26 Using Camera Menus 28 Help ...31 First Steps 32 Charge the Battery 32 Insert the Battery 34 Attach a Lens 36 Basic Setup 38 Insert a Memory Card 41 Formatting Memory Cards 43 Adjust Viewfinder Focus 45 Basic Photography and Playback 46 Deleting Unwanted Photographs 56 x
User Manual
Page 17
... 299 d6: File Number Sequence 300 d7: Shooting Info Display 301 d8: LCD Illumination 302 d9: Exposure Delay Mode 302 d10: MB-D10 Battery Type 302 d11: Battery Order 304 e: Bracketing/Flash 305 e1: Flash Sync Speed 305 e2: Flash Shutter Speed 308 e3: Flash Cntrl for Built-in Flash 309 e4...
... 299 d6: File Number Sequence 300 d7: Shooting Info Display 301 d8: LCD Illumination 302 d9: Exposure Delay Mode 302 d10: MB-D10 Battery Type 302 d11: Battery Order 304 e: Bracketing/Flash 305 e1: Flash Sync Speed 305 e2: Flash Shutter Speed 308 e3: Flash Cntrl for Built-in Flash 309 e4...

User Manual
Page 18
... 330 B The Setup Menu: Camera Setup 331 Format Memory Card 332 LCD Brightness 332 Clean Image Sensor 332 Lock Mirror up for Cleaning 332 Video Mode 333 HDMI 333 World Time 334 Language 334 Image Comment 335 Auto Image Rotation 336 Dust off Ref Photo 337 Battery Info 340 Wireless Transmitter 341...
... 330 B The Setup Menu: Camera Setup 331 Format Memory Card 332 LCD Brightness 332 Clean Image Sensor 332 Lock Mirror up for Cleaning 332 Video Mode 333 HDMI 333 World Time 334 Language 334 Image Comment 335 Auto Image Rotation 336 Dust off Ref Photo 337 Battery Info 340 Wireless Transmitter 341...

User Manual
Page 19
Technical Notes 369 Compatible Lenses 370 Optional Flash Units (Speedlights 377 Other Accessories 385 Caring for the Camera 391 Storage 391 Cleaning 391 The Low-Pass Filter 392 "Clean Now 392 "Clean at Startup/Shutdown 393 Manual Cleaning 395 Caring for the Camera and Battery: Cautions 398 Troubleshooting 402 Error Messages 409 Appendix 417 Specifications 428 Index...438 xvii
Technical Notes 369 Compatible Lenses 370 Optional Flash Units (Speedlights 377 Other Accessories 385 Caring for the Camera 391 Storage 391 Cleaning 391 The Low-Pass Filter 392 "Clean Now 392 "Clean at Startup/Shutdown 393 Manual Cleaning 395 Caring for the Camera and Battery: Cautions 398 Troubleshooting 402 Error Messages 409 Appendix 417 Specifications 428 Index...438 xvii

User Manual
Page 20
After removing the battery, take the product to a Nikon-authorized service center for inspection. A Do not disassemble Touching the product's internal parts could result in injury. Keep these safety instructions where all warnings before using this Nikon product. ❚❚ WARNINGS A Keep the sun out of the ...frame A Turn off immediately in the event of Keep the sun well out of the frame malfunction when shooting backlit subjects. Should you notice smoke or an Sunlight focused into the camera ...
After removing the battery, take the product to a Nikon-authorized service center for inspection. A Do not disassemble Touching the product's internal parts could result in injury. Keep these safety instructions where all warnings before using this Nikon product. ❚❚ WARNINGS A Keep the sun out of the ...frame A Turn off immediately in the event of Keep the sun well out of the frame malfunction when shooting backlit subjects. Should you notice smoke or an Sunlight focused into the camera ...

User Manual
Page 21
... fully discharged. If you notice any changes in the battery, such as necklaces or hairpins. • Batteries are using an AC adapter, be sure to water. • Replace the terminal cover when transporting the battery. Before removing the battery turn the camera off before replacing the battery. To avoid damage to the product, be sure it...
... fully discharged. If you notice any changes in the battery, such as necklaces or hairpins. • Batteries are using an AC adapter, be sure to water. • Replace the terminal cover when transporting the battery. Before removing the battery turn the camera off before replacing the battery. To avoid damage to the product, be sure it...
User Manual
Page 25
... storage devices. The use of third-party rechargeable Li-ion batteries not bearing the Nikon holographic seal shown at right could damage the camera and may void your Nikon warranty. The use of Data Storage Devices Please note that ...batteries overheating, igniting, rupturing, or leaking. Care should be recovered from discarded storage devices using commercial deletion software, or format the device and then completely refill it with normal operation of the camera or result in the malicious use with this electronic circuitry. Ensuring the privacy of this Nikon digital camera...
... storage devices. The use of third-party rechargeable Li-ion batteries not bearing the Nikon holographic seal shown at right could damage the camera and may void your Nikon warranty. The use of Data Storage Devices Please note that ...batteries overheating, igniting, rupturing, or leaking. Care should be recovered from discarded storage devices using commercial deletion software, or format the device and then completely refill it with normal operation of the camera or result in the malicious use with this electronic circuitry. Ensuring the privacy of this Nikon digital camera...

User Manual
Page 31
8 9 X 1 10 2 3 4 5 11 6 7 12 1 AF-assist illuminator 290 Self-timer lamp 103 Red-eye reduction lamp........ 188 2 Sub-command dial 16 3 Depth-of-field preview button 115, 324 4 Fn button .........131, 135, 193, 320 5 Battery-chamber cover 34 6 Battery-chamber cover latch 34 7 Contact cover for optional MB-D10 battery pack 385 8 CPU contacts 9 Mounting index 36 10 Lens mount 82 11 Tripod socket 12 Body cap 388 5
8 9 X 1 10 2 3 4 5 11 6 7 12 1 AF-assist illuminator 290 Self-timer lamp 103 Red-eye reduction lamp........ 188 2 Sub-command dial 16 3 Depth-of-field preview button 115, 324 4 Fn button .........131, 135, 193, 320 5 Battery-chamber cover 34 6 Battery-chamber cover latch 34 7 Contact cover for optional MB-D10 battery pack 385 8 CPU contacts 9 Mounting index 36 10 Lens mount 82 11 Tripod socket 12 Body cap 388 5

User Manual
Page 35
... sync indicator 305 18 ISO sensitivity indicator 106 Auto ISO sensitivity indicator 108 19 "Clock not set" indicator .... 40, 410 20 MB-D10 battery indicator ......... 304 21 Battery indicator 46 22 Interval timer indicator 206 23 Electronic analog exposure display 123 Exposure compensation 128 Exposure and flash bracketing progress indicator 131 WB...
... sync indicator 305 18 ISO sensitivity indicator 106 Auto ISO sensitivity indicator 108 19 "Clock not set" indicator .... 40, 410 20 MB-D10 battery indicator ......... 304 21 Battery indicator 46 22 Interval timer indicator 206 23 Electronic analog exposure display 123 Exposure compensation 128 Exposure and flash bracketing progress indicator 131 WB...

User Manual
Page 37
... sync indicator 305 20 Aperture stop indicator .......... 120 21 Electronic analog exposure display 123 Exposure compensation display 128 Tilt indicator 322 22 Battery indicator 46 23 Auto ISO sensitivity indicator 108 24 "K" (appears when memory remains for over 1000 exposures 47 D No... normal and does not indicate a malfunction. 11 This is inserted, the display in the viewfinder will return to normal when a fullycharged battery is selected for Custom remaining 47 Setting d2; The viewfinder display will dim. not displayed when Number of shots remaining DX format (24 &#...
... sync indicator 305 20 Aperture stop indicator .......... 120 21 Electronic analog exposure display 123 Exposure compensation display 128 Tilt indicator 322 22 Battery indicator 46 23 Auto ISO sensitivity indicator 108 24 "K" (appears when memory remains for over 1000 exposures 47 D No... normal and does not indicate a malfunction. 11 This is inserted, the display in the viewfinder will return to normal when a fullycharged battery is selected for Custom remaining 47 Setting d2; The viewfinder display will dim. not displayed when Number of shots remaining DX format (24 &#...

User Manual
Page 39
... Maximum aperture (non-CPU lenses 212 9 Electronic analog exposure display 123 Exposure compensation 128 Bracketing progress indicator 131, 135 10 Camera battery indicator......... 46 11 MB-D10 battery type display 304 MB-D10 battery indicator......303 12 "K" (appears when memory remains for over 1000 exposures 47 13 Number of exposures remaining 87 Manual lens...
... Maximum aperture (non-CPU lenses 212 9 Electronic analog exposure display 123 Exposure compensation 128 Bracketing progress indicator 131, 135 10 Camera battery indicator......... 46 11 MB-D10 battery type display 304 MB-D10 battery indicator......303 12 "K" (appears when memory remains for over 1000 exposures 47 13 Number of exposures remaining 87 Manual lens...
User Manual
Page 48
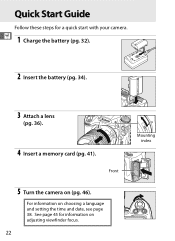
Quick Start Guide Follow these steps for information on adjusting viewfinder focus. 22 Mounting index Front 5 Turn the camera on choosing a language and setting the time and date, see page 38. For information on (pg. 46). See page 45 for a quick start with your camera. X 1 Charge the battery (pg. 32). 2 Insert the battery (pg. 34). 3 Attach a lens (pg. 36). 4 Insert a memory card (pg. 41).
Quick Start Guide Follow these steps for information on adjusting viewfinder focus. 22 Mounting index Front 5 Turn the camera on choosing a language and setting the time and date, see page 38. For information on (pg. 46). See page 45 for a quick start with your camera. X 1 Charge the battery (pg. 32). 2 Insert the battery (pg. 34). 3 Attach a lens (pg. 36). 4 Insert a memory card (pg. 41).

User Manual
Page 49
... to take the photograph. Rotate the focus-mode selector to S (single-servo autofocus). 8 Focus and shoot (pp. 53, 54). Exposure mode Image size Image quality Battery level Number of the way down to delete the current photograph. K button 10 Delete unwanted photos (pg. 56). Focus indicator 9 View the photograph (pg. 55...
... to take the photograph. Rotate the focus-mode selector to S (single-servo autofocus). 8 Focus and shoot (pp. 53, 54). Exposure mode Image size Image quality Battery level Number of the way down to delete the current photograph. K button 10 Delete unwanted photos (pg. 56). Focus indicator 9 View the photograph (pg. 55...
User Manual
Page 51
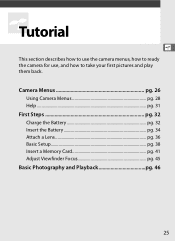
Camera Menus pg. 26 Using Camera Menus pg. 28 Help ...pg. 31 First Steps pg. 32 Charge the Battery pg. 32 Insert the Battery pg. 34 Attach a Lens pg. 36 Basic Setup pg. 38 Insert a Memory Card pg. 41 Adjust Viewfinder Focus pg. 45 Basic Photography and Playback pg. 46 25 sTutorial s This section describes how to use the camera menus, how to ready the camera for use, and how to take your first pictures and play them back.
Camera Menus pg. 26 Using Camera Menus pg. 28 Help ...pg. 31 First Steps pg. 32 Charge the Battery pg. 32 Insert the Battery pg. 34 Attach a Lens pg. 36 Basic Setup pg. 38 Insert a Memory Card pg. 41 Adjust Viewfinder Focus pg. 45 Basic Photography and Playback pg. 46 25 sTutorial s This section describes how to use the camera menus, how to ready the camera for use, and how to take your first pictures and play them back.

User Manual
Page 58
About two and a quarter hours are required to fully recharge the battery when no charge remains. 1 Plug the charger in the supplied MH-18a quick charger before use. Insert the AC adapter plug into the battery charger and plug the power cable into an electrical outlet. 2 Remove the terminal cover. Li-ion BATTERY PACK 32 The EN-EL3e is powered by an EN-EL3e rechargeable Li-ion battery s (supplied). To maximize shooting time, charge the battery in . First Steps Charge the Battery The camera is not fully charged at shipment. Remove the terminal cover from the battery.
About two and a quarter hours are required to fully recharge the battery when no charge remains. 1 Plug the charger in the supplied MH-18a quick charger before use. Insert the AC adapter plug into the battery charger and plug the power cable into an electrical outlet. 2 Remove the terminal cover. Li-ion BATTERY PACK 32 The EN-EL3e is powered by an EN-EL3e rechargeable Li-ion battery s (supplied). To maximize shooting time, charge the battery in . First Steps Charge the Battery The camera is not fully charged at shipment. Remove the terminal cover from the battery.

User Manual
Page 59
3 Insert the battery. Charging is complete. The CHARGE lamp will blink while the battery charges. s 4 Remove the battery when charging is complete when the CHARGE lamp stops blinking. Remove the battery and unplug the charger. 33 Insert the battery into the charger.
3 Insert the battery. Charging is complete. The CHARGE lamp will blink while the battery charges. s 4 Remove the battery when charging is complete when the CHARGE lamp stops blinking. Remove the battery and unplug the charger. 33 Insert the battery into the charger.

User Manual
Page 60
Open the battery-chamber cover on the bottom of the camera. 3 Insert the battery. Insert the Battery 1 Turn the camera off before inserting or removing s batteries. Always turn the camera off. Insert the battery as shown at right. 4 Close the battery-chamber cover. ❚❚ Removing the Battery Before removing the battery, turn the camera off . Power switch 2 Open the battery-chamber cover. To prevent short-circuits, replace the terminal cover when the battery is not in use. 34
Open the battery-chamber cover on the bottom of the camera. 3 Insert the battery. Insert the Battery 1 Turn the camera off before inserting or removing s batteries. Always turn the camera off. Insert the battery as shown at right. 4 Close the battery-chamber cover. ❚❚ Removing the Battery Before removing the battery, turn the camera off . Power switch 2 Open the battery-chamber cover. To prevent short-circuits, replace the terminal cover when the battery is not in use. 34


