Product Manual
Page 12
Caring for the Camera and Battery: Cautions 343 Available Settings 348 Troubleshooting 350 Battery/Display 350 Shooting (All Modes 351 Shooting (P, S, A, M 354 Playback 355 Wi-Fi (Wireless Networks 357 Miscellaneous 357 Error Messages 358 Specifications 364 Lenses 377 Memory Card Capacity 391 Battery Life 392 Index 394 x
Caring for the Camera and Battery: Cautions 343 Available Settings 348 Troubleshooting 350 Battery/Display 350 Shooting (All Modes 351 Shooting (P, S, A, M 354 Playback 355 Wi-Fi (Wireless Networks 357 Miscellaneous 357 Error Messages 358 Specifications 364 Lenses 377 Memory Card Capacity 391 Battery Life 392 Index 394 x

Product Manual
Page 13
...an Sunlight focused into the camera unusual smell coming from failure to observe the precautions listed in this equipment. After removing the battery, cause permanent visual impairment. ADo not use in the presence of flammable diopter adjustment control with your gas eye to the .... Viewing the sun or other strong light Continued operation could result in source through the and remove the battery immediately, viewfinder taking care to avoid burns. this Nikon product. ❚❚ WARNINGS AKeep the sun out of the frame ATurn off immediately in the event...
...an Sunlight focused into the camera unusual smell coming from failure to observe the precautions listed in this equipment. After removing the battery, cause permanent visual impairment. ADo not use in the presence of flammable diopter adjustment control with your gas eye to the .... Viewing the sun or other strong light Continued operation could result in source through the and remove the battery immediately, viewfinder taking care to avoid burns. this Nikon product. ❚❚ WARNINGS AKeep the sun out of the frame ATurn off immediately in the event...

Product Manual
Page 14
... battery and/or • Using the flash close contact with the skin or other open as in an enclosed note that small parts constitute a automobile or in injury. The flash should be no for extended periods attached may result in low-temperature burns. You could cause temporary visual to a Nikon...the event of this precaution could result in accidents. Particular care should an infant or child be taken to avoid injury due to camera, battery, or charger for extended broken glass and to prevent the liquid periods while the devices are on or in contact with the AAvoid contact ...
... battery and/or • Using the flash close contact with the skin or other open as in an enclosed note that small parts constitute a automobile or in injury. The flash should be no for extended periods attached may result in low-temperature burns. You could cause temporary visual to a Nikon...the event of this precaution could result in accidents. Particular care should an infant or child be taken to avoid injury due to camera, battery, or charger for extended broken glass and to prevent the liquid periods while the devices are on or in contact with the AAvoid contact ...

Product Manual
Page 15
..., be hot immediately after use or when the product has been used on or near the charger during water. precaution could result in transporting the battery. Failure to another or with wet hands. result in fire. • Do not immerse in use, to-AC inverters. thunderstorms. Failure to ...sure the product is could or to • Do not go near the metal parts of upside down or backwards. transport or store the battery with • Do not handle the plug or charger metal objects such as discoloration or improperly handled. To avoid damage or electric shock. ...
..., be hot immediately after use or when the product has been used on or near the charger during water. precaution could result in transporting the battery. Failure to another or with wet hands. result in fire. • Do not immerse in use, to-AC inverters. thunderstorms. Failure to ...sure the product is could or to • Do not go near the metal parts of upside down or backwards. transport or store the battery with • Do not handle the plug or charger metal objects such as discoloration or improperly handled. To avoid damage or electric shock. ...

Product Manual
Page 17
... the • Nikon reserves the right to change attention of the Nikon the specifications of the hardware representative in your area (address and software described in these language in and prevent negative consequences charge of waste management. This symbol indicates that the battery is to be collected..., contact the retailer or the local authorities in Europe CAUTION: RISK OF EXPLOSION IF BATTERY IS REPLACED BY AN INCORRECT TYPE. Notices • No part of the manuals included • Nikon will not be held liable for any with • This product is designated for this...
... the • Nikon reserves the right to change attention of the Nikon the specifications of the hardware representative in your area (address and software described in these language in and prevent negative consequences charge of waste management. This symbol indicates that the battery is to be collected..., contact the retailer or the local authorities in Europe CAUTION: RISK OF EXPLOSION IF BATTERY IS REPLACED BY AN INCORRECT TYPE. Notices • No part of the manuals included • Nikon will not be held liable for any with • This product is designated for this...

Product Manual
Page 18
... frequency energy and, if not installed and used in the U.S.A. This power unit is no guarantee that are D5500 designed to a supply not in a vertical or floor mount position. Nikon Inc., 1300 Walt Whitman Road, • Consult the dealer or an Melville, New York 11747-3064, ... equipment generates, uses, and can be correctly oriented in the U.S.A., use an attachment plug adapter of the FCC rules. The Battery Charger IMPORTANT SAFETY INSTRUCTIONS-SAVE THESE INSTRUCTIONS DANGER-TO REDUCE THE RISK OF FIRE OR ELECTRIC SHOCK, CAREFULLY FOLLOW THESE INSTRUCTIONS For connection...
... frequency energy and, if not installed and used in the U.S.A. This power unit is no guarantee that are D5500 designed to a supply not in a vertical or floor mount position. Nikon Inc., 1300 Walt Whitman Road, • Consult the dealer or an Melville, New York 11747-3064, ... equipment generates, uses, and can be correctly oriented in the U.S.A., use an attachment plug adapter of the FCC rules. The Battery Charger IMPORTANT SAFETY INSTRUCTIONS-SAVE THESE INSTRUCTIONS DANGER-TO REDUCE THE RISK OF FIRE OR ELECTRIC SHOCK, CAREFULLY FOLLOW THESE INSTRUCTIONS For connection...
Product Manual
Page 21
... the operational and safety requirements of this Nikon digital camera are designed to the highest standards and include complex electronic circuitry. The use of third-party rechargeable Li-ion batteries not bearing the Nikon holographic seal shown at right could damage ...area. THE USE OF NON-NIKON ACCESSORIES COULD DAMAGE YOUR CAMERA AND MAY VOID YOUR NIKON WARRANTY. Additional information may result from the Nikon representative in the batteries overheating, igniting, rupturing, or leaking. Use Only Nikon Brand Electronic Accessories Nikon cameras are engineered and proven ...
... the operational and safety requirements of this Nikon digital camera are designed to the highest standards and include complex electronic circuitry. The use of third-party rechargeable Li-ion batteries not bearing the Nikon holographic seal shown at right could damage ...area. THE USE OF NON-NIKON ACCESSORIES COULD DAMAGE YOUR CAMERA AND MAY VOID YOUR NIKON WARRANTY. Additional information may result from the Nikon representative in the batteries overheating, igniting, rupturing, or leaking. Use Only Nikon Brand Electronic Accessories Nikon cameras are engineered and proven ...

Product Manual
Page 27
... 49 HDMI connector cover 222 41 Memory card access 50 Memory card slot cover ........28, 35 lamp 41, 163 51 Power connector cover for 42 Battery-chamber cover optional power connector ...... 335 latch 28, 35, 335 52...
... 49 HDMI connector cover 222 41 Memory card access 50 Memory card slot cover ........28, 35 lamp 41, 163 51 Power connector cover for 42 Battery-chamber cover optional power connector ...... 335 latch 28, 35, 335 52...
Product Manual
Page 29
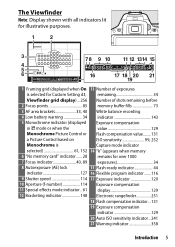
... Viewfinder grid display) ...256 Number of shots remaining before 2 Focus points 85 memory buffer fills 73 3 AF area brackets 33, 40 White balance recording 4 Low battery warning 34 indicator 143 5 Monochrome indicator (displayed Exposure compensation in % mode or when the value 129 Monochrome Picture Control or Flash compensation value........ 131 a Picture...
... Viewfinder grid display) ...256 Number of shots remaining before 2 Focus points 85 memory buffer fills 73 3 AF area brackets 33, 40 White balance recording 4 Low battery warning 34 indicator 143 5 Monochrome indicator (displayed Exposure compensation in % mode or when the value 129 Monochrome Picture Control or Flash compensation value........ 131 a Picture...

Product Manual
Page 32
... mode 61 P, S, A, and M modes 113 10 Flash control indicator 259 Flash compensation indicator for 2 Aperture (f-number 114 optional flash units 328 Aperture display 114 11 Battery indicator 34 3 Shutter speed 114 Shutter-speed display 114 12 ISO sensitivity 99 ISO sensitivity display..........99, 242 4 Satellite signal indicator 284 Auto ISO sensitivity...
... mode 61 P, S, A, and M modes 113 10 Flash control indicator 259 Flash compensation indicator for 2 Aperture (f-number 114 optional flash units 328 Aperture display 114 11 Battery indicator 34 3 Shutter speed 114 Shutter-speed display 114 12 ISO sensitivity 99 ISO sensitivity display..........99, 242 4 Satellite signal indicator 284 Auto ISO sensitivity...

Product Manual
Page 51
... plug the charger in about an hour and 50 minutes. An exhausted battery will fully charge in . Battery charging Charging complete A The Battery and Charger Read and follow the warnings and cautions on pages xi-xiv and 343-347 of this manual. Attach the strap as shown below ...to ready the camera for the second eyelet. 2 Charge the battery. Introduction 27 First Steps Follow the eight steps below at left, making sure the plug is fully inserted. If a plug adapter is supplied, raise the...
... plug the charger in about an hour and 50 minutes. An exhausted battery will fully charge in . Battery charging Charging complete A The Battery and Charger Read and follow the warnings and cautions on pages xi-xiv and 343-347 of this manual. Attach the strap as shown below ...to ready the camera for the second eyelet. 2 Charge the battery. Introduction 27 First Steps Follow the eight steps below at left, making sure the plug is fully inserted. If a plug adapter is supplied, raise the...

Product Manual
Page 52
3 Insert the battery and memory card. The latch locks the battery in until it clicks into place. 28 Introduction Battery latch Slide the memory card in place when the battery is in the orientation shown, using the battery to keep the orange battery latch pressed to one side. Before inserting or removing the battery or memory cards, confirm that power switch is fully inserted. Insert the battery in the OFF position.
3 Insert the battery and memory card. The latch locks the battery in until it clicks into place. 28 Introduction Battery latch Slide the memory card in place when the battery is in the orientation shown, using the battery to keep the orange battery latch pressed to one side. Before inserting or removing the battery or memory cards, confirm that power switch is fully inserted. Insert the battery in the OFF position.

Product Manual
Page 57
..., rotate the diopter adjustment control until the AF area brackets are in focus The camera is exhausted and the clock has been reset. A The Clock Battery The camera clock is powered by an independent, rechargeable power source, which is charged as necessary when the main... turned on taking photographs. Three days of charging will power the clock for use. Set the clock to page 38 for information on , the clock battery is now ready for about a month. When operating the control with your eye to the viewfinder, be careful not to put your fingers or fingernails...
..., rotate the diopter adjustment control until the AF area brackets are in focus The camera is exhausted and the clock has been reset. A The Clock Battery The camera clock is powered by an independent, rechargeable power source, which is charged as necessary when the main... turned on taking photographs. Three days of charging will power the clock for use. Set the clock to page 38 for information on , the clock battery is now ready for about a month. When operating the control with your eye to the viewfinder, be careful not to put your fingers or fingernails...

Product Manual
Page 58
... - - If the information display does not appear when the R button is pressed, the battery is low, a warning will also be recharged. Low battery. ❚❚ The Battery Level and Number of Exposures Remaining Press the R button and check the battery level and number of Exposures Remaining Values over 1000 are shown in thousands, indicated...
... - - If the information display does not appear when the R button is pressed, the battery is low, a warning will also be recharged. Low battery. ❚❚ The Battery Level and Number of Exposures Remaining Press the R button and check the battery level and number of Exposures Remaining Values over 1000 are shown in thousands, indicated...
Product Manual
Page 59
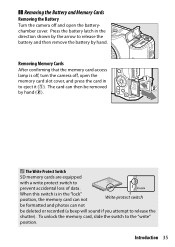
... hand. To unlock the memory card, slide the switch to prevent accidental loss of data. ❚❚ Removing the Battery and Memory Cards Removing the Battery Turn the camera off , open the batterychamber cover. Removing Memory Cards After confirming that the memory card access lamp is ...in the direction shown by the arrow to release the battery and then remove the battery by hand (w). 16GB A The Write Protect Switch SD memory cards are equipped 16GB with a write protect switch to the "...
... hand. To unlock the memory card, slide the switch to prevent accidental loss of data. ❚❚ Removing the Battery and Memory Cards Removing the Battery Turn the camera off , open the batterychamber cover. Removing Memory Cards After confirming that the memory card access lamp is ...in the direction shown by the arrow to release the battery and then remove the battery by hand (w). 16GB A The Write Protect Switch SD memory cards are equipped 16GB with a write protect switch to the "...
Product Manual
Page 68
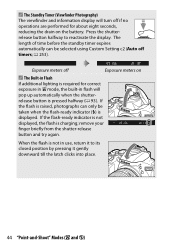
Press the shutterrelease button halfway to its closed position by pressing it to reactivate the display. Exposure meters off Exposure meters on the battery. remove your finger briefly from the shutter-release button and try again. A The Standby Timer (Viewfinder Photography) The viewfinder and information display will pop up ...
Press the shutterrelease button halfway to its closed position by pressing it to reactivate the display. Exposure meters off Exposure meters on the battery. remove your finger briefly from the shutter-release button and try again. A The Standby Timer (Viewfinder Photography) The viewfinder and information display will pop up ...
Product Manual
Page 97
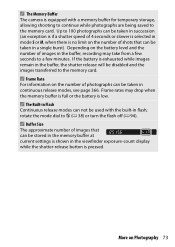
... flash off (0 94). A The Built-in Flash Continuous release modes can be taken in a single burst). Depending on Photography 73 More on the battery level and the number of images that can not be used with a memory buffer for temporary storage, allowing shooting to continue while photographs are being...exposure-count display while the shutter-release button is shown in the buffer, recording may drop when the memory buffer is full or the battery is equipped with the built-in the buffer, the shutter release will be stored in the memory buffer at current settings is pressed. Frame...
... flash off (0 94). A The Built-in Flash Continuous release modes can be taken in a single burst). Depending on Photography 73 More on the battery level and the number of images that can not be used with a memory buffer for temporary storage, allowing shooting to continue while photographs are being...exposure-count display while the shutter-release button is shown in the buffer, recording may drop when the memory buffer is full or the battery is equipped with the built-in the buffer, the shutter release will be stored in the memory buffer at current settings is pressed. Frame...
Product Manual
Page 125
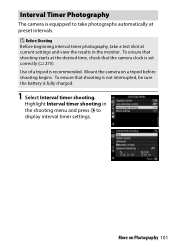
... correctly (0 275). D Before Shooting Before beginning interval timer photography, take photographs automatically at the desired time, check that shooting is not interrupted, be sure the battery is fully charged. 1 Select Interval timer shooting. To ensure that the camera clock is recommended. Highlight Interval timer shooting in the shooting menu and press...
... correctly (0 275). D Before Shooting Before beginning interval timer photography, take photographs automatically at the desired time, check that shooting is not interrupted, be sure the battery is fully charged. 1 Select Interval timer shooting. To ensure that the camera clock is recommended. Highlight Interval timer shooting in the shooting menu and press...

Product Manual
Page 132
... be taken if the camera is released by any means other than an ML-L3 remote control (for the first time, remove the clear plastic battery-insulator sheet. A Before Using the ML-L3 Remote Control Before using the ML-L3 for example, the camera shutter-release button or the shutter button...
... be taken if the camera is released by any means other than an ML-L3 remote control (for the first time, remove the clear plastic battery-insulator sheet. A Before Using the ML-L3 Remote Control Before using the ML-L3 for example, the camera shutter-release button or the shutter button...

Product Manual
Page 145
... loss of power before taking pictures without your eye to the viewfinder (0 76). To Length of exposure: 35 s Aperture: f/25 prevent blur, use a fully charged battery. Long Time-Exposures (M Mode Only) Select the following shutter speeds for Long exposure NR in the shooting menu (0 243). Bright spots and fog can be...
... loss of power before taking pictures without your eye to the viewfinder (0 76). To Length of exposure: 35 s Aperture: f/25 prevent blur, use a fully charged battery. Long Time-Exposures (M Mode Only) Select the following shutter speeds for Long exposure NR in the shooting menu (0 243). Bright spots and fog can be...


