User Manual
Page 2
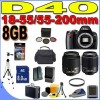
Find it from : The Table of "watch and learn" manuals in the viewfinder or monitor, find the solution here. Help Use the camera's on-board help on menu items and other topics. Digitutor Digitutor, a series of Contents Find items by key word. Where to do but don't know ... Find what you're looking for from the "question and answer" index. The Index Search by function or menu name. Troubleshooting See pages 108-110 Camera behaving unexpectedly?
Find it from : The Table of "watch and learn" manuals in the viewfinder or monitor, find the solution here. Help Use the camera's on-board help on menu items and other topics. Digitutor Digitutor, a series of Contents Find items by key word. Where to do but don't know ... Find what you're looking for from the "question and answer" index. The Index Search by function or menu name. Troubleshooting See pages 108-110 Camera behaving unexpectedly?
User Manual
Page 4
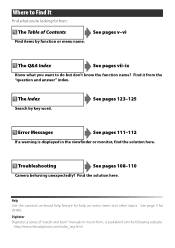
...necklaces or hairpins. • Batteries are prone to observe this equipment. Failure to a Nikon-authorized service center for an extended period. Failure to leakage when fully discharged. Using the viewfinder diopter control When operating the viewfinder diopter control with metal objects such as the.... Do not transport or store the battery with your finger in or expose to a Nikon-authorized service representative for inspection. Before removing the battery turn the camera off before using an AC adapter, be taken not to put your eye to observe the precautions listed...
...necklaces or hairpins. • Batteries are prone to observe this equipment. Failure to a Nikon-authorized service center for an extended period. Failure to leakage when fully discharged. Using the viewfinder diopter control When operating the viewfinder diopter control with metal objects such as the.... Do not transport or store the battery with your finger in or expose to a Nikon-authorized service representative for inspection. Before removing the battery turn the camera off before using an AC adapter, be taken not to put your eye to observe the precautions listed...

User Manual
Page 5
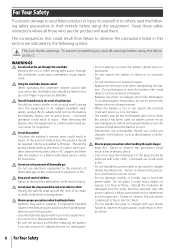
... made to this equipment does cause harmful interfer- Use the interface cables sold by Nikon for your time and without Nikon's prior written permission. hardware and software described in...This class B digital apparatus meets all requirements of the Cet appareil numérique de la classe B respecte toutes les Canadian Interference Causing Equipment Regulations. Using the flash ...is ity to radio communications. Avoid contact with product regulations. D40 ate radio frequency energy and, if not installed and used in the U.S.A. Wash hands after handling. limits of Class ...
... made to this equipment does cause harmful interfer- Use the interface cables sold by Nikon for your time and without Nikon's prior written permission. hardware and software described in...This class B digital apparatus meets all requirements of the Cet appareil numérique de la classe B respecte toutes les Canadian Interference Causing Equipment Regulations. Using the flash ...is ity to radio communications. Avoid contact with product regulations. D40 ate radio frequency energy and, if not installed and used in the U.S.A. Wash hands after handling. limits of Class ...
User Manual
Page 6
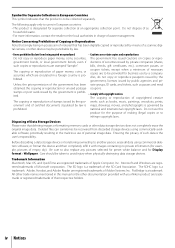
...information, contact the retailer or the local authorities in charge of Microsoft corporation. Do not use this product for Display format>Wallpaper. Trademark Information Macintosh, Mac OS, and QuickTime are ..., ernment and of necessary copies are to be collected separately. Disposing of a scanner, digital camera, or other device may be taken to avoid injury when physically destroying data storage devices... or post cards issued by the government is prohibited. • Comply with your Nikon product are registered trademarks of the SD Card Association. The SD logo is designated ...
...information, contact the retailer or the local authorities in charge of Microsoft corporation. Do not use this product for Display format>Wallpaper. Trademark Information Macintosh, Mac OS, and QuickTime are ..., ernment and of necessary copies are to be collected separately. Disposing of a scanner, digital camera, or other device may be taken to avoid injury when physically destroying data storage devices... or post cards issued by the government is prohibited. • Comply with your Nikon product are registered trademarks of the SD Card Association. The SD logo is designated ...

User Manual
Page 7
... vii Introduction 1 Getting to Know the Camera 2 First Steps 8 Attaching a Lens 8 Charging and Inserting the Battery 9 Basic Setup 11 Inserting Memory Cards 12 Adjusting Viewfinder Focus 14 Tutorial 15 "Point-and-Shoot" Photography ( Mode 15 Creative Photography (Digital Vari-Programs).........18 Basic Playback 20 Reference ...the USB Cable 55 Printing Photographs 57 Printing Via Direct USB Connection 57 Viewing Photographs on TV 62 Menu Guide 63 Using Camera Menus 63 Playback Options: The Playback Menu 65 Delete...65 Playback Folder 66 Rotate Tall 66 Slide Show 67 Print ...
... vii Introduction 1 Getting to Know the Camera 2 First Steps 8 Attaching a Lens 8 Charging and Inserting the Battery 9 Basic Setup 11 Inserting Memory Cards 12 Adjusting Viewfinder Focus 14 Tutorial 15 "Point-and-Shoot" Photography ( Mode 15 Creative Photography (Digital Vari-Programs).........18 Basic Playback 20 Reference ...the USB Cable 55 Printing Photographs 57 Printing Via Direct USB Connection 57 Viewing Photographs on TV 62 Menu Guide 63 Using Camera Menus 63 Playback Options: The Playback Menu 65 Delete...65 Playback Folder 66 Rotate Tall 66 Slide Show 67 Print ...

User Manual
Page 9
... Self timer, remote control 33 Optional flash units 99 Lenses 97 Accessories for the D40 96 Approved memory cards 102 Accessories for the D40 103 Servicing the camera x Cleaning the camera 104 Camera Setup Question Key phrase How do I use ? Key phrase Page # Using the menus 63-64 Help 3 Monitor, viewfinder 5-6, 81-82 Error messages and displays...
... Self timer, remote control 33 Optional flash units 99 Lenses 97 Accessories for the D40 96 Approved memory cards 102 Accessories for the D40 103 Servicing the camera x Cleaning the camera 104 Camera Setup Question Key phrase How do I use ? Key phrase Page # Using the menus 63-64 Help 3 Monitor, viewfinder 5-6, 81-82 Error messages and displays...
User Manual
Page 10
... firing? Exposure; Long time-exposures How do I bring out a portrait subject? Flash photography, flash mode How do I change camera information display? Focus area Can I use the flash? Focus lock How do I take a lot of small objects? Page # 15 18 19 22 32 33 33... photography is prohibited? Can the flash fire automatically when needed? Auto mode Is there an easy way to take close ups of photographs quickly? Digital Vari-Program modes What do I do I improve image quality? Mode A (aperture-priority auto) Can I adjust exposure? Focus mode How do...
... firing? Exposure; Long time-exposures How do I bring out a portrait subject? Flash photography, flash mode How do I change camera information display? Focus area Can I use the flash? Focus lock How do I take a lot of small objects? Page # 15 18 19 22 32 33 33... photography is prohibited? Can the flash fire automatically when needed? Auto mode Is there an easy way to take close ups of photographs quickly? Digital Vari-Program modes What do I do I improve image quality? Mode A (aperture-priority auto) Can I adjust exposure? Focus mode How do...
User Manual
Page 13
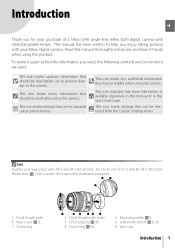
... º¶ ²´ ¿ 2. CPU contacts: 45 8. This icon marks notes, information that may be adjusted using the camera. Focal length scale 4. Rear cover: 8 7. Lens cap Introduction 1 This icon marks settings that more information is supported with ...before use to prevent damage to help you for illustrative purposes. · » ᕡ 1. Introduction Thank you enjoy taking pictures with your purchase of a Nikon D40 single-lens reflex (SLR) digital camera with AF-S and AF-I lenses only. Read this manual for your Nikon digital camera. This...
... º¶ ²´ ¿ 2. CPU contacts: 45 8. This icon marks notes, information that may be adjusted using the camera. Focal length scale 4. Rear cover: 8 7. Lens cap Introduction 1 This icon marks settings that more information is supported with ...before use to prevent damage to help you for illustrative purposes. · » ᕡ 1. Introduction Thank you enjoy taking pictures with your purchase of a Nikon D40 single-lens reflex (SLR) digital camera with AF-S and AF-I lenses only. Read this manual for your Nikon digital camera. This...

User Manual
Page 15
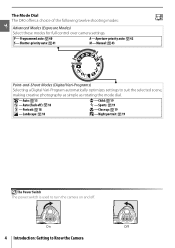
A blinking icon indicates that help on an error or other problem can be viewed in the monitor while the button is used for optional AC adapter connector 103 12 Battery-chamber cover latch 10 13 Battery-chamber cover 10, 103 14 Tripod socket 15 ...viewfinder eyepiece cup 7 2 Viewfinder eyepiece 5, 14 3 Diopter adjustment control 14 4 (AE-L/AF-L) button 46, 77 (protect) button 54 5 Command dial 115 6 Eyelet for camera strap 7 7 Multi selector * 8 Memory card slot cover 12 9 (delete) button 20, 54 10 Memory card access lamp 12 11 Power connector cover for menu navigation...
A blinking icon indicates that help on an error or other problem can be viewed in the monitor while the button is used for optional AC adapter connector 103 12 Battery-chamber cover latch 10 13 Battery-chamber cover 10, 103 14 Tripod socket 15 ...viewfinder eyepiece cup 7 2 Viewfinder eyepiece 5, 14 3 Diopter adjustment control 14 4 (AE-L/AF-L) button 46, 77 (protect) button 54 5 Command dial 115 6 Eyelet for camera strap 7 7 Multi selector * 8 Memory card slot cover 12 9 (delete) button 20, 54 10 Memory card access lamp 12 11 Power connector cover for menu navigation...
User Manual
Page 16
... for full control over camera settings. P-Programmed auto: 40 S-Shutter-priority auto: 41 A -Aperture-priority auto: 42 M-Manual: 43 Point-and-Shoot Modes (Digital Vari-Programs) Selecting a Digital Vari-Program automatically optimizes settings to Know the Camera Night portrait: 19 The Power Switch The power switch is used to turn the camera on and off ): 18...
... for full control over camera settings. P-Programmed auto: 40 S-Shutter-priority auto: 41 A -Aperture-priority auto: 42 M-Manual: 43 Point-and-Shoot Modes (Digital Vari-Programs) Selecting a Digital Vari-Program automatically optimizes settings to Know the Camera Night portrait: 19 The Power Switch The power switch is used to turn the camera on and off ): 18...
User Manual
Page 19
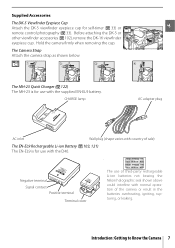
The MH-23 Quick Charger ( 122) The MH-23 is for use of third-party rechargeable Li-ion batteries not bearing the Nikon holographic seal shown above could interfere with normal operation of sale) The EN-EL9 Rechargeable Li-ion Battery ( 103, 121) The EN-...Eyepiece Cap Attach the DK-5 viewfinder eyepiece cap for use with the D40. . CHARGE lamp AC adapter plug AC inlet Wall plug (shape varies with country of the camera or result in the batteries overheating, igniting, rupturing, or leaking. Introduction: Getting to Know the Camera 7 Before attaching the DK-5 or other viewfinder ...
The MH-23 Quick Charger ( 122) The MH-23 is for use of third-party rechargeable Li-ion batteries not bearing the Nikon holographic seal shown above could interfere with normal operation of sale) The EN-EL9 Rechargeable Li-ion Battery ( 103, 121) The EN-...Eyepiece Cap Attach the DK-5 viewfinder eyepiece cap for use with the D40. . CHARGE lamp AC adapter plug AC inlet Wall plug (shape varies with country of the camera or result in the batteries overheating, igniting, rupturing, or leaking. Introduction: Getting to Know the Camera 7 Before attaching the DK-5 or other viewfinder ...

User Manual
Page 21
... charge. 1.4 Charging is complete when the CHARGE lamp stops blinking. Charging and Inserting the Battery The supplied EN-EL9 battery is charged or used at lower temperatures. Do not use the battery at ambient temperatures below . 1 Charge the battery. 1.1 Remove the terminal cover from the charger and unplug the charger. During charging... and follow the warnings and cautions on pages ii-iii and 106-107 of 5-35°C (41-95°F). Introduction: First Steps 9 Charge the battery using the supplied MH-23 battery charger as the battery charges.
... charge. 1.4 Charging is complete when the CHARGE lamp stops blinking. Charging and Inserting the Battery The supplied EN-EL9 battery is charged or used at lower temperatures. Do not use the battery at ambient temperatures below . 1 Charge the battery. 1.1 Remove the terminal cover from the charger and unplug the charger. During charging... and follow the warnings and cautions on pages ii-iii and 106-107 of 5-35°C (41-95°F). Introduction: First Steps 9 Charge the battery using the supplied MH-23 battery charger as the battery charges.
User Manual
Page 22
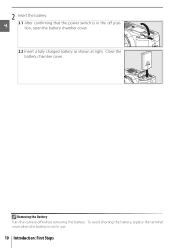
To avoid shorting the battery, replace the terminal cover when the battery is in use. 10 Introduction: First Steps 2 Insert the battery. 2.1 After confirming that the power switch is not in the off before removing the battery. Close the battery chamber cover. Removing the Battery Turn the camera off position, open the battery chamber cover. 2.2 Insert a fully charged battery as shown at right.
To avoid shorting the battery, replace the terminal cover when the battery is in use. 10 Introduction: First Steps 2 Insert the battery. 2.1 After confirming that the power switch is not in the off before removing the battery. Close the battery chamber cover. Removing the Battery Turn the camera off position, open the battery chamber cover. 2.2 Insert a fully charged battery as shown at right.
User Manual
Page 23
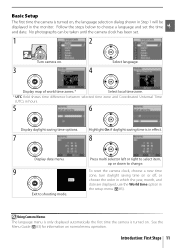
...set the time and date. Introduction: First Steps 11 To reset the camera clock, choose a new time zone, turn daylight saving time on or off, or choose the order in which the year, month, and date are displayed, use the World time option in the monitor. Press multi selector left or right... to select item, up or down to choose a language and set . 1 2 Turn camera on. 3 Select language. 4 Display map of world time zones.* Select local time...
...set the time and date. Introduction: First Steps 11 To reset the camera clock, choose a new time zone, turn daylight saving time on or off, or choose the order in which the year, month, and date are displayed, use the World time option in the monitor. Press multi selector left or right... to select item, up or down to choose a language and set . 1 2 Turn camera on. 3 Select language. 4 Display map of world time zones.* Select local time...

User Manual
Page 25
...If menu item is highlighted, press multi selector left to another storage device before first use. Highlight Yes. The Write Protect Switch SD cards are formatted in the "lock" position, the camera will display a message to warn that formatting memory cards permanently deletes all data you ...complete and setup menu is in a computer. Performance may contain. Write-protect switch Introduction: First Steps 13 Formatting Memory Cards Use the camera Format memory card option to prevent accidental loss of data. Be sure all photographs and other data they may drop if cards...
...If menu item is highlighted, press multi selector left to another storage device before first use. Highlight Yes. The Write Protect Switch SD cards are formatted in the "lock" position, the camera will display a message to warn that formatting memory cards permanently deletes all data you ...complete and setup menu is in a computer. Performance may contain. Write-protect switch Introduction: First Steps 13 Formatting Memory Cards Use the camera Format memory card option to prevent accidental loss of data. Be sure all photographs and other data they may drop if cards...

User Manual
Page 26
Press the shutter-release button halfway to the viewfinder, be adjusted using Custom Setting 15 (Auto off if no operations are framed in the viewfinder. Adjusting Viewfinder Focus Photographs are performed for about eight seconds (auto meter ... the display in the viewfinder. 8s Exposure meters on Exposure meters off Exposure meters on The length of time before the exposure meters turn the camera on the battery. When operating the diopter adjustment control with your eye.
Press the shutter-release button halfway to the viewfinder, be adjusted using Custom Setting 15 (Auto off if no operations are framed in the viewfinder. Adjusting Viewfinder Focus Photographs are performed for about eight seconds (auto meter ... the display in the viewfinder. 8s Exposure meters on Exposure meters off Exposure meters on The length of time before the exposure meters turn the camera on the battery. When operating the diopter adjustment control with your eye.
User Manual
Page 28
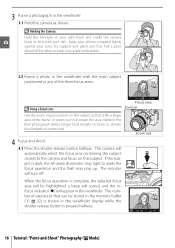
..., a beep will sound, and the infocus indicator (z) will appear in any of the three focus areas. Keep your elbows propped lightly against your left. The camera will turn off. The number of exposures that it fills a larger area of the frame, or zoom out to increase the area visible in the... final photograph (select longer focal lengths to zoom out). Using a Zoom Lens Focus area Zoom in Use the zoom ring to zoom in , shorter focal lengths to zoom in on this subject. Zoom out 4 Focus and shoot. 4.1 Press the...
..., a beep will sound, and the infocus indicator (z) will appear in any of the three focus areas. Keep your elbows propped lightly against your left. The camera will turn off. The number of exposures that it fills a larger area of the frame, or zoom out to increase the area visible in the... final photograph (select longer focal lengths to zoom out). Using a Zoom Lens Focus area Zoom in Use the zoom ring to zoom in , shorter focal lengths to zoom in on this subject. Zoom out 4 Focus and shoot. 4.1 Press the...
User Manual
Page 29
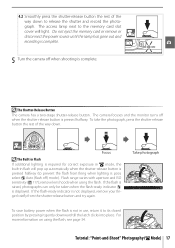
... a two-stage shutter-release button. remove lens hoods when using the flash, see page 34. If the flash-ready indicator is displayed. The camera focuses and the monitor turns off when shooting is complete. If the flash is raised, photographs can only be taken when the flash-ready indicator ( )... Do not eject the memory card or remove or disconnect the power source until the lamp has gone out and recording is complete. 5 Turn the camera off when the shutter-release button is pressed halfway. Flash range varies with aperture and ISO sensitivity ( 117); To take the photograph, press the ...
... a two-stage shutter-release button. remove lens hoods when using the flash, see page 34. If the flash-ready indicator is displayed. The camera focuses and the monitor turns off when shooting is complete. If the flash is raised, photographs can only be taken when the flash-ready indicator ( )... Do not eject the memory card or remove or disconnect the power source until the lamp has gone out and recording is complete. 5 Turn the camera off when the shutter-release button is pressed halfway. Flash range varies with aperture and ISO sensitivity ( 117); To take the photograph, press the ...
User Manual
Page 30
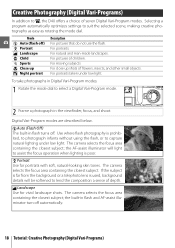
Creative Photography (Digital Vari-Programs) In addition to , the D40 offers a choice of flowers, insects, and other small objects. For moving subjects For close up Night portrait Description For pictures that do not use the flash. Use where flash photography is poor. The camera selects the... is prohibited, to photograph infants without using the flash, or to select a Digital Vari-Program mode. 2 Frame a photograph in flash turns off ) Portrait Landscape Child Sports Close up shots of seven Digital Vari-Program modes. The camera selects the focus area containing the closest...
Creative Photography (Digital Vari-Programs) In addition to , the D40 offers a choice of flowers, insects, and other small objects. For moving subjects For close up Night portrait Description For pictures that do not use the flash. Use where flash photography is poor. The camera selects the... is prohibited, to photograph infants without using the flash, or to select a Digital Vari-Program mode. 2 Frame a photograph in flash turns off ) Portrait Landscape Child Sports Close up shots of seven Digital Vari-Program modes. The camera selects the focus area containing the closest...

User Manual
Page 31
...light. Night Portrait Use for dynamic sports shots in Flash" for information on information from the other focus areas can be selected using the multi selector. See "Using the Built-in... which the main subject stands out clearly. If the subject leaves the center focus area, the camera will pop ...in the center focus area. Child Use for snapshots of a tripod is recommended to prevent blur. The camera selects the focus area containing the closest subject. The camera selects the focus area containing the ...
...light. Night Portrait Use for dynamic sports shots in Flash" for information on information from the other focus areas can be selected using the multi selector. See "Using the Built-in... which the main subject stands out clearly. If the subject leaves the center focus area, the camera will pop ...in the center focus area. Child Use for snapshots of a tripod is recommended to prevent blur. The camera selects the focus area containing the closest subject. The camera selects the focus area containing the ...


