
D2H User's Manual
Page 2
...D2H, however, is in photographs taken under certain conditions. Reference CD The reference CD contains information on the Low-Pass Filter Nikon takes every possible precaution to your camera. Photographs affected by authorized Nikon service personnel. Guide to Digital Photography The Guide to the low-pass filter, where it may enter the camera...64257;lter can be used with the camera. To prevent foreign matter from coming into contact with the camera, being careful to first remove all instructions thoroughly to be retouched using Nikon Capture 4 (available ...
...D2H, however, is in photographs taken under certain conditions. Reference CD The reference CD contains information on the Low-Pass Filter Nikon takes every possible precaution to your camera. Photographs affected by authorized Nikon service personnel. Guide to Digital Photography The Guide to the low-pass filter, where it may enter the camera...64257;lter can be used with the camera. To prevent foreign matter from coming into contact with the camera, being careful to first remove all instructions thoroughly to be retouched using Nikon Capture 4 (available ...

D2H User's Manual
Page 3
...you have mastered the basics of camera parts, then set up your camera as described in "First Steps." Next, read "Overview" and "Getting to Know the Camera" to familiarize yourself with the conventions used in this manual and the names of digital photography, you can read these ...chapters for complete information on when and how to use camera controls. Two-Button Reset More About Playback Voice Memos ...
...you have mastered the basics of camera parts, then set up your camera as described in "First Steps." Next, read "Overview" and "Getting to Know the Camera" to familiarize yourself with the conventions used in this manual and the names of digital photography, you can read these ...chapters for complete information on when and how to use camera controls. Two-Button Reset More About Playback Voice Memos ...
D2H User's Manual
Page 4
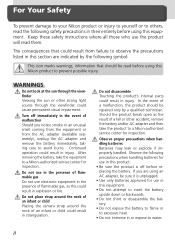
... precautions when handling batteries for inspection. Turn off before using an AC adapter, be sure it is off immediately in strangulation. Do not place strap around the neck of an infant or child Placing the camera strap around the neck of an infant or child could... consequences that should be repaired only by the following safety precautions in explosion or fire. Do not use in this Nikon product to a Nikon-authorized service center for use in this equipment. Should the product break open as this could result in injury. Do not disassemble Touching ...
... precautions when handling batteries for inspection. Turn off before using an AC adapter, be sure it is off immediately in strangulation. Do not place strap around the neck of an infant or child Placing the camera strap around the neck of an infant or child could... consequences that should be repaired only by the following safety precautions in explosion or fire. Do not use in this Nikon product to a Nikon-authorized service center for use in this equipment. Should the product break open as this could result in injury. Do not disassemble Touching ...

D2H User's Manual
Page 5
...CD player could cause temporary visual impairment. Before removing the battery, turn the camera off and allow the battery to remove the battery when no less than one meter (39˝) from the camera. CD-ROMs The CD-ROMs on which the software and manuals are distributed should... break, care should be taken to leakage when fully discharged. Use appropriate cables When connecting cables to the input and output jacks, use . Removing memory cards Memory cards may become hot during use only the cables provided or sold by Nikon for the purpose, to your eye accidentally. • Replace...
...CD player could cause temporary visual impairment. Before removing the battery, turn the camera off and allow the battery to remove the battery when no less than one meter (39˝) from the camera. CD-ROMs The CD-ROMs on which the software and manuals are distributed should... break, care should be taken to leakage when fully discharged. Use appropriate cables When connecting cables to the input and output jacks, use . Removing memory cards Memory cards may become hot during use only the cables provided or sold by Nikon for the purpose, to your eye accidentally. • Replace...

D2H User's Manual
Page 6
... this device in temperature. Under no circumstances should you will shortly return to damage. Cleaning • When cleaning the camera body, use or store this may cause the material to remove dust and lint, then wipe gently with pure water and then dry your...electricity produced by equipment such as radio transmitters could scratch, deform, or tear the curtain. These actions could interfere with a blower. After using your camera thoroughly. Keep dry This product is extremely thin and easily damaged. To prevent condensation, place the device in a carrying case or a ...
... this device in temperature. Under no circumstances should you will shortly return to damage. Cleaning • When cleaning the camera body, use or store this may cause the material to remove dust and lint, then wipe gently with pure water and then dry your...electricity produced by equipment such as radio transmitters could scratch, deform, or tear the curtain. These actions could interfere with a blower. After using your camera thoroughly. Keep dry This product is extremely thin and easily damaged. To prevent condensation, place the device in a carrying case or a ...

D2H User's Manual
Page 7
... a month. v Forcibly cutting power to the product in these circumstances could render them off with a clean, dry cloth before putting the camera away again. • Store the battery in a cool, dry place. Replace the terminal cover before taking photographs on important occasions. This ... Images in the monitor may contain a few times before use. • After removing the battery from the monitor touching the skin or entering the eyes or mouth. • Replace the monitor cover when transporting the camera or leaving it fully charged when taking photographs outside in...
... a month. v Forcibly cutting power to the product in these circumstances could render them off with a clean, dry cloth before putting the camera away again. • Store the battery in a cool, dry place. Replace the terminal cover before taking photographs on important occasions. This ... Images in the monitor may contain a few times before use. • After removing the battery from the monitor touching the skin or entering the eyes or mouth. • Replace the monitor cover when transporting the camera or leaving it fully charged when taking photographs outside in...

D2H User's Manual
Page 8
...permission. • Nikon reserves the right to change the specifications of the hardware and software described in these manuals is no guarantee that to provide D2H Tested To Comply With FCC Standards reasonable protection against harmful FOR HOME OR OFFICE USE interference in the ...limits of aged to try to radio communications. the receiver is encour- Nikon Inc., • Consult the dealer or an experienced 1300 Walt Whitman Road, Melville, New York radio/television technician for a Class B digital device, pursuant to comply with the limits for help. 11747-3064, ...
...permission. • Nikon reserves the right to change the specifications of the hardware and software described in these manuals is no guarantee that to provide D2H Tested To Comply With FCC Standards reasonable protection against harmful FOR HOME OR OFFICE USE interference in the ...limits of aged to try to radio communications. the receiver is encour- Nikon Inc., • Consult the dealer or an experienced 1300 Walt Whitman Road, Melville, New York radio/television technician for a Class B digital device, pursuant to comply with the limits for help. 11747-3064, ...

D2H User's Manual
Page 9
...material that has been digitally copied or reproduced by means of a scanner, digital camera or other device may be provided for customers in Canada CAUTION This class B digital apparatus meets all requirements... cards, and tickets, such as passes and meal coupons. • Comply with your Nikon product are registered trademarks of Microsoft Corporation. Power Mac, iMac, and iBook are registered trademarks...and PowerBook are trademarks of Apple Computer, Inc. Do not use by law is prohibited. CompactFlash is a trademark of Intel Corporation. Pentium is a trademark of ...
...material that has been digitally copied or reproduced by means of a scanner, digital camera or other device may be provided for customers in Canada CAUTION This class B digital apparatus meets all requirements... cards, and tickets, such as passes and meal coupons. • Comply with your Nikon product are registered trademarks of Microsoft Corporation. Power Mac, iMac, and iBook are registered trademarks...and PowerBook are trademarks of Apple Computer, Inc. Do not use by law is prohibited. CompactFlash is a trademark of Intel Corporation. Pentium is a trademark of ...

D2H User's Manual
Page 10
... Time and Date 19 Step 5-Attach a Lens 20 Step 6-Insert a Memory Card 22 Tutorial...25 Basic Photography 26 Step 1-Ready the Camera 27 Step 2-Adjust Camera Settings 29 Step 3-Frame a Photograph 31 Step 4-Focus 32 Step 5-Check Exposure 33 Step 6-Take the Photograph 34 Basic Playback 35 Taking... Photographs 37 Using Camera Menus 39 Image Quality and Size 41 Image Quality 41 Image Size ...44 Sensitivity (ISO Equivalency 48 White Balance 51 Fine-Tuning White ...
... Time and Date 19 Step 5-Attach a Lens 20 Step 6-Insert a Memory Card 22 Tutorial...25 Basic Photography 26 Step 1-Ready the Camera 27 Step 2-Adjust Camera Settings 29 Step 3-Frame a Photograph 31 Step 4-Focus 32 Step 5-Check Exposure 33 Step 6-Take the Photograph 34 Basic Playback 35 Taking... Photographs 37 Using Camera Menus 39 Image Quality and Size 41 Image Quality 41 Image Size ...44 Sensitivity (ISO Equivalency 48 White Balance 51 Fine-Tuning White ...

D2H User's Manual
Page 13
... Getting Started Overview 2 Getting to ready the camera for use: inserting the battery and memory card, attaching a lens and camera strap, and setting the date, time, and language. First Steps This section details the steps required to Know the Camera 3-14 This chapter is organized and for information... on the names and functions of the symbols and conventions used. First Steps 15-24 1 Getting to Know the Camera Bookmark this manual is divided into the following sections: Overview Read this section for a description of how this ...
... Getting Started Overview 2 Getting to ready the camera for use: inserting the battery and memory card, attaching a lens and camera strap, and setting the date, time, and language. First Steps This section details the steps required to Know the Camera 3-14 This chapter is organized and for information... on the names and functions of the symbols and conventions used. First Steps 15-24 1 Getting to Know the Camera Bookmark this manual is divided into the following sections: Overview Read this section for a description of how this ...

D2H User's Manual
Page 14
... Learning As part of a Nikon D2H single-lens reflex (SLR) digital camera with your area. This icon marks tips, additional information that more information is available on-line at weddings or before taking the camera with you on a trip), take a test shot to ensure that should be read before use to prevent damage to frequently...
... Learning As part of a Nikon D2H single-lens reflex (SLR) digital camera with your area. This icon marks tips, additional information that more information is available on-line at weddings or before taking the camera with you on a trip), take a test shot to ensure that should be read before use to prevent damage to frequently...

D2H User's Manual
Page 24
... an image size ( 45). Sensitivity (ISO equivalency) Set sensitivity (ISO equivalency; 49). 12 White balance Choose a white balance setting ( 53). and sub-command dials are used alone or in tall (portrait) orientation, dials that duplicate the functions of the main and sub-command dials have been placed close to adjust a variety...
... an image size ( 45). Sensitivity (ISO equivalency) Set sensitivity (ISO equivalency; 49). 12 White balance Choose a white balance setting ( 53). and sub-command dials are used alone or in tall (portrait) orientation, dials that duplicate the functions of the main and sub-command dials have been placed close to adjust a variety...

D2H User's Manual
Page 26
...next page of images displayed ( 134). The Multi Selector The button can also be some cases in the camera menus. Menu navigation Cancel and return to Know the Camera Menu navigation Move highlight bar up ( 39). Shooting Select focus area to left of current thumbnail ( 134... 134). Menu navigation Select highlighted item ( 40). Playback Change number of photo information ( 132). The Multi Selector The multi selector is used to select items highlighted in which the operations listed on this page do not apply. 14 Full-frame playback Display previous image ( 132)....
...next page of images displayed ( 134). The Multi Selector The button can also be some cases in the camera menus. Menu navigation Cancel and return to Know the Camera Menu navigation Move highlight bar up ( 39). Shooting Select focus area to left of current thumbnail ( 134... 134). Menu navigation Select highlighted item ( 40). Playback Change number of photo information ( 132). The Multi Selector The multi selector is used to select items highlighted in which the operations listed on this page do not apply. 14 Full-frame playback Display previous image ( 132)....

D2H User's Manual
Page 27
Introduction-First Steps First Steps Getting the Camera Ready for Use Before using your camera for the first time, complete the following steps: STEP 1 STEP 2 STEP 3 STEP 4 STEP 5 STEP 6 Attach the Camera Strap 16 Insert the Battery 17 To learn more about batteries and alternative power sources, see: &#...Date 19 For information on changing the clock battery, see: • Technical Notes: Caring for your camera 239 Attach a Lens To learn more about the lenses available for the D2H, see: • Technical Notes: Optional Accessories 20-21 228-230 Insert a Memory Card To ...
Introduction-First Steps First Steps Getting the Camera Ready for Use Before using your camera for the first time, complete the following steps: STEP 1 STEP 2 STEP 3 STEP 4 STEP 5 STEP 6 Attach the Camera Strap 16 Insert the Battery 17 To learn more about batteries and alternative power sources, see: &#...Date 19 For information on changing the clock battery, see: • Technical Notes: Caring for your camera 239 Attach a Lens To learn more about the lenses available for the D2H, see: • Technical Notes: Optional Accessories 20-21 228-230 Insert a Memory Card To ...

D2H User's Manual
Page 28
... the cover into place (ᕄ). When the EN-EL4 is inserted in the camera, the battery charge state is not in use or when you hear it as shown (ᕄ). To replace the cover for shooting... or storage, insert the two projections on battery charge state, enabling the MH-21 Quick Charger to protect the monitor when the camera...BM-3 LCD monitor cover) is provided with information on the top of the cover until you are transporting the camera. CLC S OAU/VT DC IN S OAU/VT DC IN OAU/VT DC IN EN-EL4 Batteries (...
... the cover into place (ᕄ). When the EN-EL4 is inserted in the camera, the battery charge state is not in use or when you hear it as shown (ᕄ). To replace the cover for shooting... or storage, insert the two projections on battery charge state, enabling the MH-21 Quick Charger to protect the monitor when the camera...BM-3 LCD monitor cover) is provided with information on the top of the cover until you are transporting the camera. CLC S OAU/VT DC IN S OAU/VT DC IN OAU/VT DC IN EN-EL4 Batteries (...

D2H User's Manual
Page 29
... the battery when no charge remains. 2.2 Turn the camera off Turn the camera off before use (see the MH-21 instruction manual for details. 2.5 Insert the battery Insert the battery as shown at shipment. Introduction-First Steps 2 Step 2-Insert the Battery The D2H is powered by a rechargeable Nikon EN-EL4 Li-ion battery (provided). 2.1 Charge...
... the battery when no charge remains. 2.2 Turn the camera off Turn the camera off before use (see the MH-21 instruction manual for details. 2.5 Insert the battery Insert the battery as shown at shipment. Introduction-First Steps 2 Step 2-Insert the Battery The D2H is powered by a rechargeable Nikon EN-EL4 Li-ion battery (provided). 2.1 Charge...

D2H User's Manual
Page 31
...lithium batteries. When this battery is powered by a separate, non-rechargeable CR1616 lithium bat- For infor- Using another type of battery could cause an ex- Dispose of used batteries as necessary. The camera clock is included with all pictures. mation on . 4 Introduction-First Steps Step 4-Set the Time ... time pieces and reset as directed. 19 To ensure that your pictures are on replacing the clock battery, see "Technical Notes: Caring for Your Camera" ( 239). Display DATE menu. 4.3 Date SET UP Set OK YMD 2003 08 30 HMS 13 42 08 Edit Year, Month, Day, ...
...lithium batteries. When this battery is powered by a separate, non-rechargeable CR1616 lithium bat- For infor- Using another type of battery could cause an ex- Dispose of used batteries as necessary. The camera clock is included with all pictures. mation on . 4 Introduction-First Steps Step 4-Set the Time ... time pieces and reset as directed. 19 To ensure that your pictures are on replacing the clock battery, see "Technical Notes: Caring for Your Camera" ( 239). Display DATE menu. 4.3 Date SET UP Set OK YMD 2003 08 30 HMS 13 42 08 Edit Year, Month, Day, ...

D2H User's Manual
Page 32
... advantage of another type, lock aperture at the minimum setting (highest f/-number). 5 Step 5-Attach a Lens Nikon recommends using a lens of the features the camera offers. Introduction-First Steps CPU lenses have CPU contacts Type G lens 5.1 Turn the camera off Turn the camera off and aperture locked at the minimum setting This step is turned on.
... advantage of another type, lock aperture at the minimum setting (highest f/-number). 5 Step 5-Attach a Lens Nikon recommends using a lens of the features the camera offers. Introduction-First Steps CPU lenses have CPU contacts Type G lens 5.1 Turn the camera off Turn the camera off and aperture locked at the minimum setting This step is turned on.

D2H User's Manual
Page 34
... by an AC adapter, will pop up (ᕄ). No Memory Card If no memory card is inserted in the camera when a charged EN-EL4 battery is inserted or the camera is in the control panel and view- finder. 22 Close the card slot cover. 2 Inserting Memory Cards...will appear in the exposure-count displays in the correct orientation. 6 Introduction-First Steps Step 6-Insert a Memory Card In place of film, the D2H uses CompactFlash memory cards or microdrive cards to open the card slot (ᕅ). 3 2 1 6.3 Insert a memory card Insert the memory card with the rear...
... by an AC adapter, will pop up (ᕄ). No Memory Card If no memory card is inserted in the camera when a charged EN-EL4 battery is inserted or the camera is in the control panel and view- finder. 22 Close the card slot cover. 2 Inserting Memory Cards...will appear in the exposure-count displays in the correct orientation. 6 Introduction-First Steps Step 6-Insert a Memory Card In place of film, the D2H uses CompactFlash memory cards or microdrive cards to open the card slot (ᕅ). 3 2 1 6.3 Insert a memory card Insert the memory card with the rear...

D2H User's Manual
Page 35
Be sure to copy any photographs and other button to a computer before first use. A blink- Press any data they may contain. During Formatting Do not remove the card or battery or unplug the AC adapter (available separately) during formatting. ...-speed display and the frame count will format the memory card. Format ( 207) Memory cards can be formatted using the Format option in the frame-count dis- play. To format the card, turn the camera on and hold the ( and ) buttons down simultaneously for approximately two seconds. Formatting Memory Cards Formatting memory...
Be sure to copy any photographs and other button to a computer before first use. A blink- Press any data they may contain. During Formatting Do not remove the card or battery or unplug the AC adapter (available separately) during formatting. ...-speed display and the frame count will format the memory card. Format ( 207) Memory cards can be formatted using the Format option in the frame-count dis- play. To format the card, turn the camera on and hold the ( and ) buttons down simultaneously for approximately two seconds. Formatting Memory Cards Formatting memory...


