

L20/19 User's Manual
Page 12
Table of Contents Basic Camera Setup: The Setup Menu 82 Displaying the Setup Menu...83 a Menus ...84 c Welcome Screen...85 d Date...86 e Monitor Settings ...89 f Date Imprint...91 U Motion detection...92 h AF Assist ...92 i Sound Settings ...93 k Auto Off ...94 l Format Memory/m Format Card......
Table of Contents Basic Camera Setup: The Setup Menu 82 Displaying the Setup Menu...83 a Menus ...84 c Welcome Screen...85 d Date...86 e Monitor Settings ...89 f Date Imprint...91 U Motion detection...92 h AF Assist ...92 i Sound Settings ...93 k Auto Off ...94 l Format Memory/m Format Card......
L20/19 User's Manual
Page 13
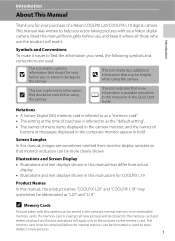
... and Screen Display • Illustrations and text displays shown in this manual may differ from monitor display samples so that monitor indicators can be more A information is available elsewhere in this manual or in this manual are for your Nikon digital ...display. • Illustrations and text displays shown in the Quick Start Guide. Symbols and Conventions To make it . This manual was written to the camera. C Memory Cards Pictures taken with this manual, images are used to as a "memory card". • The setting at the time of a Nikon COOLPIX L20/COOLPIX...
... and Screen Display • Illustrations and text displays shown in this manual may differ from monitor display samples so that monitor indicators can be more A information is available elsewhere in this manual or in this manual are for your Nikon digital ...display. • Illustrations and text displays shown in the Quick Start Guide. Symbols and Conventions To make it . This manual was written to the camera. C Memory Cards Pictures taken with this manual, images are used to as a "memory card". • The setting at the time of a Nikon COOLPIX L20/COOLPIX...

L20/19 User's Manual
Page 21
..., select menu options and to the next screen). Select the item to the right/go to the previous screen. Introduction Basic Operations The Multi Selector This section describes standard uses of the multi selector. 9 Flash mode For Playback Display the previous picture. 15/05/2009 15...:30 0004.JPG Display the next picture. 44 For the Menu Screen Select the item above . Apply selection. Apply selection (Go to apply selection. ...
..., select menu options and to the next screen). Select the item to the right/go to the previous screen. Introduction Basic Operations The Multi Selector This section describes standard uses of the multi selector. 9 Flash mode For Playback Display the previous picture. 15/05/2009 15...:30 0004.JPG Display the next picture. 44 For the Menu Screen Select the item above . Apply selection. Apply selection (Go to apply selection. ...

L20/19 User's Manual
Page 22
...9). • Select the tab on the left to display the setup menu. • To exit the menu display, press d again. Displayed when the menu contains two or more menu items to follow. Set up Menus Welcome screen Date Monitor settings Date imprint Exit Press the multi selector... next set of options. Shooting menu Image mode White balance Continuous Color options Exit The selected option. Displayed when there are more previous menu items. Displayed when there are displayed. Press the multi selector HI to apply selection. Basic Operations Introduction d button Press d to...
...9). • Select the tab on the left to display the setup menu. • To exit the menu display, press d again. Displayed when the menu contains two or more menu items to follow. Set up Menus Welcome screen Date Monitor settings Date imprint Exit Press the multi selector... next set of options. Shooting menu Image mode White balance Continuous Color options Exit The selected option. Displayed when there are more previous menu items. Displayed when there are displayed. Press the multi selector HI to apply selection. Basic Operations Introduction d button Press d to...
L20/19 User's Manual
Page 23
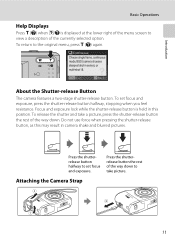
..., press the shutter-release button halfway, stopping when you feel resistance. Press the shutterrelease button the rest of the way down . Introduction Basic Operations Help Displays Press g (j) when M/j is held in this may result in series), or multi-shot 16. Focus and exposure lock while the shutter-release button is...
..., press the shutter-release button halfway, stopping when you feel resistance. Press the shutterrelease button the rest of the way down . Introduction Basic Operations Help Displays Press g (j) when M/j is held in this may result in series), or multi-shot 16. Focus and exposure lock while the shutter-release button is...

L20/19 User's Manual
Page 27
... 27), "Using the Scene Mode" (A 33), "Using the Smile Mode" (A 44), or "Recording Movies" (A 53) for shooting-mode selection menu. 8 When Easy auto mode is displayed, press k. • The camera enters the shooting mode and you can take pictures in Easy auto mode (A 18). • Press the multi selector H or I to... edit the highlighted item. • Press K to move the cursor in which the day, month and year are displayed and press k or K. • The settings are applied. 7 Press the shooting mode button to another shooting mode. First Steps Setting...
... 27), "Using the Scene Mode" (A 33), "Using the Smile Mode" (A 44), or "Recording Movies" (A 53) for shooting-mode selection menu. 8 When Easy auto mode is displayed, press k. • The camera enters the shooting mode and you can take pictures in Easy auto mode (A 18). • Press the multi selector H or I to... edit the highlighted item. • Press K to move the cursor in which the day, month and year are displayed and press k or K. • The settings are applied. 7 Press the shooting mode button to another shooting mode. First Steps Setting...

L20/19 User's Manual
Page 33
Zoom indicator is displayed on the subject. optical zoom magnification of optical zoom. C Digital Zoom and Interpolation Unlike optical zoom, digital zoom uses a digital imaging process known as image ... is possible at maximum magnification, holding down g triggers digital zooming. Step 2 Frame a Picture Zoom out Zoom in on the top of the screen. The focus area is not displayed when digital zoom is increased beyond V. Maximum magnification of 4×. When zoom is in effect, and focus will be in the center of...
Zoom indicator is displayed on the subject. optical zoom magnification of optical zoom. C Digital Zoom and Interpolation Unlike optical zoom, digital zoom uses a digital imaging process known as image ... is possible at maximum magnification, holding down g triggers digital zooming. Step 2 Frame a Picture Zoom out Zoom in on the top of the screen. The focus area is not displayed when digital zoom is increased beyond V. Maximum magnification of 4×. When zoom is in effect, and focus will be in the center of...

L20/19 User's Manual
Page 35
...If the subject is still not in focus, select auto mode and use focus lock (A 27) to refocus, several times if necessary. screen is displayed shortly after the picture is taken in the Face Priority, someone blink? B Autofocus performance Autofocus may not perform as the desired subject. ...the memory card or the battery during the shot. when the subject is very dark • Objects of sharply differing brightness are included in deep shadow) • No contrast between the subject and surroundings (e.g. Did someone blink? Exit • Human subjects with eyes closed during recording ...
...If the subject is still not in focus, select auto mode and use focus lock (A 27) to refocus, several times if necessary. screen is displayed shortly after the picture is taken in the Face Priority, someone blink? B Autofocus performance Autofocus may not perform as the desired subject. ...the memory card or the battery during the shot. when the subject is very dark • Objects of sharply differing brightness are included in deep shadow) • No contrast between the subject and surroundings (e.g. Did someone blink? Exit • Human subjects with eyes closed during recording ...

L20/19 User's Manual
Page 56
...Automatically C Shooting in the Smile Mode When using Smile mode, auto off if no operations are recognized, the face nearest the center of the screen will be framed by a double border in the focus area and the other faces will be recognized. 3 The shutter is automatically released. ...Shots Automatically Using the Smile Mode The camera detects a smiling face to shoot the face automatically. 1 Press the shooting mode button in shooting mode to display the shooting-mode selection menu and use the multi selector H or I Smile to choose a and press k. 2 Frame the picture. • Point...
...Automatically C Shooting in the Smile Mode When using Smile mode, auto off if no operations are recognized, the face nearest the center of the screen will be framed by a double border in the focus area and the other faces will be recognized. 3 The shutter is automatically released. ...Shots Automatically Using the Smile Mode The camera detects a smiling face to shoot the face automatically. 1 Press the shooting mode button in shooting mode to display the shooting-mode selection menu and use the multi selector H or I Smile to choose a and press k. 2 Frame the picture. • Point...

L20/19 User's Manual
Page 63
... separate files. 1 Press g (i) in full-frame playback mode to zoom in on the image. • Cropping can be done by enlarging the portrait image displayed until only the portion you want to copy is 320 × 240 or 160 × 120, a small picture icon l or m will be seen, ...the monitor with playback zoom (A 48) enabled. Press g (i) or f (h) to adjust the zoom ratio. More on the left black bands on the screen cannot be displayed on Playback 4 Use the multi selector to select Yes and press k. Editing Pictures Creating a Cropped Copy: Crop This function is only available when u is...
... separate files. 1 Press g (i) in full-frame playback mode to zoom in on the image. • Cropping can be done by enlarging the portrait image displayed until only the portion you want to copy is 320 × 240 or 160 × 120, a small picture icon l or m will be seen, ...the monitor with playback zoom (A 48) enabled. Press g (i) or f (h) to adjust the zoom ratio. More on the left black bands on the screen cannot be displayed on Playback 4 Use the multi selector to select Yes and press k. Editing Pictures Creating a Cropped Copy: Crop This function is only available when u is...
L20/19 User's Manual
Page 65
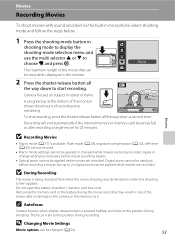
Camera focuses on subject in shooting mode to display the shooting-mode selection menu and use the multi selector H or I to this position during shooting. Flash mode (A 28), exposure compensation (A 32), self-timer (A 30) ... change settings as necessary before recording a movie, but up to start recording. B Recording Movies • Macro mode (A 31) is displayed in loss of the movie data or damage to when the shooting screen appears. C Autofocus Camera focuses when shutter-release button is being recorded. Digital zoom cannot be used . • Macro mode...
Camera focuses on subject in shooting mode to display the shooting-mode selection menu and use the multi selector H or I to this position during shooting. Flash mode (A 28), exposure compensation (A 32), self-timer (A 30) ... change settings as necessary before recording a movie, but up to start recording. B Recording Movies • Macro mode (A 31) is displayed in loss of the movie data or damage to when the shooting screen appears. C Autofocus Camera focuses when shutter-release button is being recorded. Digital zoom cannot be used . • Macro mode...

L20/19 User's Manual
Page 74
... 3 Connect the camera to a Printer Connecting the Camera and Printer 1 Turn off the camera. 2 Turn on the camera. • When connected correctly, the PictBridge startup screen 1 will be displayed 2. 1 2 Print selection 2009 05/15 NO.12 [ 12] B Connecting the Audio Video/USB Cable When connecting the audio video/USB cable, be... displayed in the camera monitor. When disconnecting the audio video/ 62 USB cable, do not pull the connector at an angle. Do not use force ...
... 3 Connect the camera to a Printer Connecting the Camera and Printer 1 Turn off the camera. 2 Turn on the camera. • When connected correctly, the PictBridge startup screen 1 will be displayed 2. 1 2 Print selection 2009 05/15 NO.12 [ 12] B Connecting the Audio Video/USB Cable When connecting the audio video/USB cable, be... displayed in the camera monitor. When disconnecting the audio video/ 62 USB cable, do not pull the connector at an angle. Do not use force ...

L20/19 User's Manual
Page 76
... correctly (A 62), print pictures by following the procedure below. 1 When the print selection screen is displayed. 2 Use the multi selector to a Printer 6 Choose Start print and press k. The print menu is displayed, press d. To specify paper size using printer settings, choose Default in the paper size menu.... 64 Print menu Print selection Print all copies have been printed, press k. Monitor display returns to exit the print menu. 3 Choose the desired Paper size and press k. Press d to that shown in . Letter A3 ...
... correctly (A 62), print pictures by following the procedure below. 1 When the print selection screen is displayed. 2 Use the multi selector to a Printer 6 Choose Start print and press k. The print menu is displayed, press d. To specify paper size using printer settings, choose Default in the paper size menu.... 64 Print menu Print selection Print all copies have been printed, press k. Monitor display returns to exit the print menu. 3 Choose the desired Paper size and press k. Press d to that shown in . Letter A3 ...

L20/19 User's Manual
Page 80
... for printing are recorded. Creating a DPOF Print Order: Print Set 5 Choose whether or not to complete the print order and exit. Print set is displayed. Only the Date imprint date and time on Printing Shooting Date and Photo Information • When the Date and Info options are enabled in the... are those recorded with the date and time imprinted on pictures. Date and time printed using the Date imprint option (A 91) in the Print set screen. Choose Done and press k to also print shooting date and photo information. D Date Imprint 15.05.2009 When date and time of the date...
... for printing are recorded. Creating a DPOF Print Order: Print Set 5 Choose whether or not to complete the print order and exit. Print set is displayed. Only the Date imprint date and time on Printing Shooting Date and Photo Information • When the Date and Info options are enabled in the... are those recorded with the date and time imprinted on pictures. Date and time printed using the Date imprint option (A 91) in the Print set screen. Choose Done and press k to also print shooting date and photo information. D Date Imprint 15.05.2009 When date and time of the date...

L20/19 User's Manual
Page 83
...except movie mode). 71 Before shooting, choose an image mode according to how you plan to display on a computer monitor. N PC screen (1024) 1,024 × 768 Suited to use the picture. O TV screen (640) P 16:9 (3584) (L20 Only) P 16:9 (3200) (L19 Only) 640 × 480 3,584 ×... 2,016 3,200 × 1,800 Suited to full-screen display on a television, or distribution by e-mail or the web. Setting h High (3648 P) (L20 Only) S High (3264 P) (L19 ...
...except movie mode). 71 Before shooting, choose an image mode according to how you plan to display on a computer monitor. N PC screen (1024) 1,024 × 768 Suited to use the picture. O TV screen (640) P 16:9 (3584) (L20 Only) P 16:9 (3200) (L19 Only) 640 × 480 3,584 ×... 2,016 3,200 × 1,800 Suited to full-screen display on a television, or distribution by e-mail or the web. Setting h High (3648 P) (L20 Only) S High (3264 P) (L19 ...

L20/19 User's Manual
Page 84
... 18 Approx. 480 Approx. 17 × 13/6.7 × 5.1 N PC screen (1024) 51 Approx. 1,370 Approx. 9 × 7/3.5 × 2.8 O TV screen (640) 83 Approx. 2,210 Approx. 5 × 4/2 × 1.6 P 16:9 (3584) (L20 Only) 7 Approx. 205 Approx. 30 × 17/11.8 × ...6.7 P 16:9 (3200) (L19 Only) 9 Approx. 260 Approx. 27 × 15/11 × 5.9 *1 If the number of exposures remaining is 10,000 or more, the number of exposures remaining display...
... 18 Approx. 480 Approx. 17 × 13/6.7 × 5.1 N PC screen (1024) 51 Approx. 1,370 Approx. 9 × 7/3.5 × 2.8 O TV screen (640) 83 Approx. 2,210 Approx. 5 × 4/2 × 1.6 P 16:9 (3584) (L20 Only) 7 Approx. 205 Approx. 30 × 17/11.8 × ...6.7 P 16:9 (3200) (L19 Only) 9 Approx. 260 Approx. 27 × 15/11 × 5.9 *1 If the number of exposures remaining is 10,000 or more, the number of exposures remaining display...

L20/19 User's Manual
Page 91
... to select ON or OFF (or the number of copies). Press f (h) to switch back to thumbnail display. 2 Press H or I to select additional pictures. When ON is selected, a check mark (y) is displayed in the menus (shown below to choose the pictures. 1 Press the multi selector J or K to... 3 To fix the selection of the current picture. Playback Options: The Playback Menu Selecting Multiple Pictures The screen shown at right will be selected for Rotate image and Welcome screen. Playback menu: Print set: Select images (A 67) Erase selected images Delete: Erase selected images (A 81...
... to select ON or OFF (or the number of copies). Press f (h) to switch back to thumbnail display. 2 Press H or I to select additional pictures. When ON is selected, a check mark (y) is displayed in the menus (shown below to choose the pictures. 1 Press the multi selector J or K to... 3 To fix the selection of the current picture. Playback Options: The Playback Menu Selecting Multiple Pictures The screen shown at right will be selected for Rotate image and Welcome screen. Playback menu: Print set: Select images (A 67) Erase selected images Delete: Erase selected images (A 81...
L20/19 User's Manual
Page 94
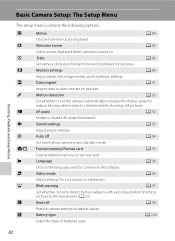
... U Motion detection A 92 Set whether or not the camera automatically increases the shutter speed to a television. c Welcome screen A 85 Select screen displayed when camera is detected while shooting still pictures. d Blink warning A 97 Set whether or not to default values. .... e Monitor settings A 89 Adjust photo info, image review, and brightness settings. o Video mode A 96 Adjust settings for camera monitor display. n Language A 96 Choose the language used . 82 i Sound settings A 93 Adjust sound settings. k Auto off A 94 l/m Set...
... U Motion detection A 92 Set whether or not the camera automatically increases the shutter speed to a television. c Welcome screen A 85 Select screen displayed when camera is detected while shooting still pictures. d Blink warning A 97 Set whether or not to default values. .... e Monitor settings A 89 Adjust photo info, image review, and brightness settings. o Video mode A 96 Adjust settings for camera monitor display. n Language A 96 Choose the language used . 82 i Sound settings A 93 Adjust sound settings. k Auto off A 94 l/m Set...

L20/19 User's Manual
Page 95
... mode, scene mode, or movie mode When using A (auto) mode, playback mode 2 Press the multi selector J to display the menu screen. You can now select a tab. Displaying the Setup Menu Display the menu screen and select z (Setup). 1 Press d to enter the menu. Image mode High (3264 ) Normal (3264) Normal ...(2592) Normal (2048) PC screen (1024) Exit Shooting menu Image mode White balance Continuous Color options Exit Easy auto...
... mode, scene mode, or movie mode When using A (auto) mode, playback mode 2 Press the multi selector J to display the menu screen. You can now select a tab. Displaying the Setup Menu Display the menu screen and select z (Setup). 1 Press d to enter the menu. Image mode High (3264 ) Normal (3264) Normal ...(2592) Normal (2048) PC screen (1024) Exit Shooting menu Image mode White balance Continuous Color options Exit Easy auto...

L20/19 User's Manual
Page 96
... menu. • Use the multi selector to select the z tab. 4 Press K or k. • You can be displayed in list format. Set up Menus Welcome screen Date Monitor settings Date imprint Exit Set up Menus Welcome screen Date Monitor settings Date imprint Exit Menu names Menus Exit 84 Shooting, Playback and Setup Menus Basic...
... menu. • Use the multi selector to select the z tab. 4 Press K or k. • You can be displayed in list format. Set up Menus Welcome screen Date Monitor settings Date imprint Exit Set up Menus Welcome screen Date Monitor settings Date imprint Exit Menu names Menus Exit 84 Shooting, Playback and Setup Menus Basic...


