
Reference Manual
Page 14
... view them. Observe caution when you transfer still images or movies recorded with location data. bNotes about record location data functions and log recording • When Record location data in Location data options of Korea are displayed simplistically according to operate even after the camera is set to On or during log recording, record location data functions and log recording function will not be identified from the actual formations. Make sure to a network such as a guide...
... view them. Observe caution when you transfer still images or movies recorded with location data. bNotes about record location data functions and log recording • When Record location data in Location data options of Korea are displayed simplistically according to operate even after the camera is set to On or during log recording, record location data functions and log recording function will not be identified from the actual formations. Make sure to a network such as a guide...
Reference Manual
Page 19
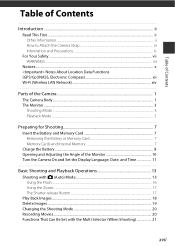
...The Monitor ...3 Shooting Mode ...3 Playback Mode ...5 Preparing for Shooting 7 Insert the Battery and Memory Card 7 Removing the Battery or Memory Card 7 Memory Cards and Internal Memory 7 Charge the Battery ...8 Opening and Adjusting the Angle of the Monitor 10 Turn the Camera On and Set the Display Language, Date, and Time 11 Basic Shooting and Playback Operations 13 Shooting with A (Auto) Mode 13 Using the Flash ...16 Using the Zoom...17 The Shutter-release Button...17 Play Back Images...18 Delete Images ...19 Changing the Shooting Mode 20 Recording Movies ...20 Functions That Can...
...The Monitor ...3 Shooting Mode ...3 Playback Mode ...5 Preparing for Shooting 7 Insert the Battery and Memory Card 7 Removing the Battery or Memory Card 7 Memory Cards and Internal Memory 7 Charge the Battery ...8 Opening and Adjusting the Angle of the Monitor 10 Turn the Camera On and Set the Display Language, Date, and Time 11 Basic Shooting and Playback Operations 13 Shooting with A (Auto) Mode 13 Using the Flash ...16 Using the Zoom...17 The Shutter-release Button...17 Play Back Images...18 Delete Images ...19 Changing the Shooting Mode 20 Recording Movies ...20 Functions That Can...

Reference Manual
Page 21
... Using Target Finding AF ...E18 Focus Lock...E19 The Control Range of the Shutter Speed (A, B, C, or D Modes E20 Playback Zoom ...E21 Thumbnail Playback/Calendar Display E22 List by Date Mode...E23 Viewing and Deleting Images Captured Continuously (Sequence E24 Viewing Images in a Sequence E24 Deleting Images in Shooting Mode) .... E28 Glamour Retouch: Enhancing Human Faces E28 Small Picture: Reducing the Size of Location Data on the Map E42 Recording and Playing Back Movies E43 Capturing Still Images While Recording Movies E46 Operations During Movie Playback...
... Using Target Finding AF ...E18 Focus Lock...E19 The Control Range of the Shutter Speed (A, B, C, or D Modes E20 Playback Zoom ...E21 Thumbnail Playback/Calendar Display E22 List by Date Mode...E23 Viewing and Deleting Images Captured Continuously (Sequence E24 Viewing Images in a Sequence E24 Deleting Images in Shooting Mode) .... E28 Glamour Retouch: Enhancing Human Faces E28 Small Picture: Reducing the Size of Location Data on the Map E42 Recording and Playing Back Movies E43 Capturing Still Images While Recording Movies E46 Operations During Movie Playback...

Reference Manual
Page 25
Parts of the Camera Parts of the Camera The Camera Body 1 2345 6 7 1 16 Flash raised 15 8 14 Lens cover closed 13 12 11 10 9 1 Eyelet for camera strap iii 2 Command dial 31 3 Power switch/power-on lamp 11 4 Shutter-release button 14 5 Mode dial 13, 20 6 Self-timer lamp 38 AF-assist illuminator 54 7 Positioning antenna E33 8 Flash 35 9 Lens cover 10 Lens 11 Microphone (stereo 13 Zoom control 17 f : wide-angle 17...
Parts of the Camera Parts of the Camera The Camera Body 1 2345 6 7 1 16 Flash raised 15 8 14 Lens cover closed 13 12 11 10 9 1 Eyelet for camera strap iii 2 Command dial 31 3 Power switch/power-on lamp 11 4 Shutter-release button 14 5 Mode dial 13, 20 6 Self-timer lamp 38 AF-assist illuminator 54 7 Positioning antenna E33 8 Flash 35 9 Lens cover 10 Lens 11 Microphone (stereo 13 Zoom control 17 f : wide-angle 17...

Reference Manual
Page 27
... +1.0 29m 0s 999 16 13 14 999 15 9999 1 Shooting mode 20 2 Flash mode 35 3 Macro mode 39 4 Zoom indicator 17, 39 5 Focus indicator 14 6 Movie options (normal speed movies 51, E75 7 Movie options (HS movies 51, E76 8 Image quality 49, E60 9 Image size 49, E61 10 Easy panorama E11 11 Vibration reduction icon ........ 51, 54 12 Wind noise reduction 51 13 Exposure compensation value 41, 43 14 Remaining movie recording time E43 15 Number of use.
... +1.0 29m 0s 999 16 13 14 999 15 9999 1 Shooting mode 20 2 Flash mode 35 3 Macro mode 39 4 Zoom indicator 17, 39 5 Focus indicator 14 6 Movie options (normal speed movies 51, E75 7 Movie options (HS movies 51, E76 8 Image quality 49, E60 9 Image size 49, E61 10 Easy panorama E11 11 Vibration reduction icon ........ 51, 54 12 Wind noise reduction 51 13 Exposure compensation value 41, 43 14 Remaining movie recording time E43 15 Number of use.

Reference Manual
Page 31
To use the camera's internal memory, remove the memory card. 7 B Formatting a Memory Card The first time you insert a memory card that has been used in another device into place (5). • Be careful not to format it clicks into this camera, make sure that the power-on a memory card or in the setup menu (A54). Preparing for Shooting Preparing for Shooting Insert the Battery and Memory Card Battery latch Memory card slot • With the battery's positive and negative terminals oriented correctly, move...
To use the camera's internal memory, remove the memory card. 7 B Formatting a Memory Card The first time you insert a memory card that has been used in another device into place (5). • Be careful not to format it clicks into this camera, make sure that the power-on a memory card or in the setup menu (A54). Preparing for Shooting Preparing for Shooting Insert the Battery and Memory Card Battery latch Memory card slot • With the battery's positive and negative terminals oriented correctly, move...

Reference Manual
Page 42
... zoom control toward f (h) to switch to thumbnail playback mode and display multiple images on in full-frame playback mode, you press and hold down the c (playback) button while the camera is displayed in playback mode. 2 Use the multi selector to select an Display the previous image image to display. • Press and hold down HIJK to scroll through the images quickly. • Images can press the k button to apply an effect to shooting mode, press the c button or shutter...
... zoom control toward f (h) to switch to thumbnail playback mode and display multiple images on in full-frame playback mode, you press and hold down the c (playback) button while the camera is displayed in playback mode. 2 Use the multi selector to select an Display the previous image image to display. • Press and hold down HIJK to scroll through the images quickly. • Images can press the k button to apply an effect to shooting mode, press the c button or shutter...
Reference Manual
Page 44
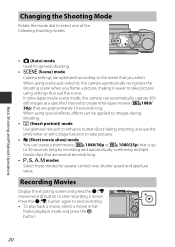
... shooting modes. • A (Auto) mode Used for greater control over shutter speed and aperture value. When using settings that are optimized according to start recording a movie. In time-lapse movie scene mode, the camera can automatically capture 300 still images at a specified interval to take pictures. • n (Short movie show) mode You can be applied to images during shooting. • F (Smart portrait) mode Use glamour retouch to enhance human faces during shooting, and use the smile timer or self-collage function to take pictures using...
... shooting modes. • A (Auto) mode Used for greater control over shutter speed and aperture value. When using settings that are optimized according to start recording a movie. In time-lapse movie scene mode, the camera can automatically capture 300 still images at a specified interval to take pictures. • n (Short movie show) mode You can be applied to images during shooting. • F (Smart portrait) mode Use glamour retouch to enhance human faces during shooting, and use the smile timer or self-collage function to take pictures using...

Reference Manual
Page 51
... is displayed in green during shooting and it changes to white after shooting. • When the camera finishes taking the specified number of shots, Interval, and Shutter sound (A50). • If you want to apply glamour retouch when shooting, set the effect before the camera takes the specified number of shots, shooting is canceled and the collage image is not saved. B Notes About Self-Collage • If you press the shutter-release button, a countdown starts...
... is displayed in green during shooting and it changes to white after shooting. • When the camera finishes taking the specified number of shots, Interval, and Shutter sound (A50). • If you want to apply glamour retouch when shooting, set the effect before the camera takes the specified number of shots, shooting is canceled and the collage image is not saved. B Notes About Self-Collage • If you press the shutter-release button, a countdown starts...

Reference Manual
Page 60
... flash mode icon on the shooting screen is displayed only immediately after the camera is turned off. X Fill flash/Standard flash The flash fires whenever a picture is taken. • Standard flash is displayed in some scene modes. The flash fires when necessary to other areas of the image. In these cases, select another flash mode and take the picture again. 36 C Auto with red-eye reduction/Red-eye reduction Reduce "red-eye" in portraits caused by the flash. • Red-eye...
... flash mode icon on the shooting screen is displayed only immediately after the camera is turned off. X Fill flash/Standard flash The flash fires whenever a picture is taken. • Standard flash is displayed in some scene modes. The flash fires when necessary to other areas of the image. In these cases, select another flash mode and take the picture again. 36 C Auto with red-eye reduction/Red-eye reduction Reduce "red-eye" in portraits caused by the flash. • Red-eye...
Reference Manual
Page 78
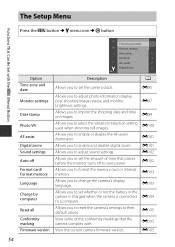
... camera is connected to imprint the shooting date and time on images. The Setup Menu Press the d button M z menu icon M k button Functions That Can Be Set with . Allows you to format the memory card or internal memory. View some of time that the camera complies with the d (Menu) Button Time zone and date Monitor settings Date stamp Photo VR AF assist Digital zoom Option Time zone and date Monitor settings Date stamp Photo VR AF assist Digital zoom Sound settings Auto off to save power. View the current camera firmware version. Allows you to change the camera's display language...
... camera is connected to imprint the shooting date and time on images. The Setup Menu Press the d button M z menu icon M k button Functions That Can Be Set with . Allows you to format the memory card or internal memory. View some of time that the camera complies with the d (Menu) Button Time zone and date Monitor settings Date stamp Photo VR AF assist Digital zoom Option Time zone and date Monitor settings Date stamp Photo VR AF assist Digital zoom Sound settings Auto off to save power. View the current camera firmware version. Allows you to change the camera's display language...

Reference Manual
Page 86
... memory card used, or shooting condition. • Focus, exposure, and hue are fixed at the values determined with the first image in green, press the shutter-release button all the way down, the camera shoots up to about 5 images continuously at a slow shutter speed when the shutter-release button is pressed all the way, hold the camera steady. After taking a picture, do not turn the camera off before the monitor switches to Off in the setup menu...
... memory card used, or shooting condition. • Focus, exposure, and hue are fixed at the values determined with the first image in green, press the shutter-release button all the way down, the camera shoots up to about 5 images continuously at a slow shutter speed when the shutter-release button is pressed all the way, hold the camera steady. After taking a picture, do not turn the camera off before the monitor switches to Off in the setup menu...

Reference Manual
Page 185
...the k button. • Do not turn the camera off or open the battery-chamber/memory card slot cover during formatting. Formatting the Internal Memory • Remove the memory card from the camera. • Select Format memory in the setup menu and then press the k button. Make sure to save important images to format a memory card or the internal memory. Language Press the d button M z menu icon M Language M k button Select a language for display of camera menus and messages. Format Card/Format Memory Press the d button M z menu icon M Format card/Format memory M k button Use this option...
...the k button. • Do not turn the camera off or open the battery-chamber/memory card slot cover during formatting. Formatting the Internal Memory • Remove the memory card from the camera. • Select Format memory in the setup menu and then press the k button. Make sure to save important images to format a memory card or the internal memory. Language Press the d button M z menu icon M Language M k button Select a language for display of camera menus and messages. Format Card/Format Memory Press the d button M z menu icon M Format card/Format memory M k button Use this option...

Reference Manual
Page 186
.... Make sure the USB cable is connected correctly or replace the battery if necessary. • The computer is in sleep mode and is turned off, charging stops. • About 4 hours and 10 minutes are transferred while the battery is charging. • The camera turns off automatically if there is automatically charged using power supplied by computer M k button Option a Auto (default setting) Off Description When the camera is connected to charging. The battery inserted into the camera...
.... Make sure the USB cable is connected correctly or replace the battery if necessary. • The computer is in sleep mode and is turned off, charging stops. • About 4 hours and 10 minutes are transferred while the battery is charging. • The camera turns off automatically if there is automatically charged using power supplied by computer M k button Option a Auto (default setting) Off Description When the camera is connected to charging. The battery inserted into the camera...

Reference Manual
Page 188
... "lock" position. Check that the memory card is correctly inserted. 7, F19 Card is in the camera. Display Cause/Solution A Battery temperature is insufficient space to save the 7, F5 copies to select No and save the copy. off automatically. Slide the write-protect switch to format the memory card. Formatting deletes all data saved on the memory card. Select Yes and press the k button to the "write" position. - Format card? The memory card has not been formatted for use . The camera will turn before formatting the memory card...
... "lock" position. Check that the memory card is correctly inserted. 7, F19 Card is in the camera. Display Cause/Solution A Battery temperature is insufficient space to save the 7, F5 copies to select No and save the copy. off automatically. Slide the write-protect switch to format the memory card. Formatting deletes all data saved on the memory card. Select Yes and press the k button to the "write" position. - Format card? The memory card has not been formatted for use . The camera will turn before formatting the memory card...

Reference Manual
Page 193
... Memory Cards The log data is saved in the "NCFL" folder. • The file names consist of "N", "date (the last two digits of the camera. • DSCN: Original still images, movies, still images created by the movie editing function • SSCN: Small picture copies • RSCN: Cropped copies • FSCN: Images created by an image editing function other than crop and small picture, movies created by the movie editing function Assigned in YYMMDD format)", "identification number...
... Memory Cards The log data is saved in the "NCFL" folder. • The file names consist of "N", "date (the last two digits of the camera. • DSCN: Original still images, movies, still images created by the movie editing function • SSCN: Small picture copies • RSCN: Cropped copies • FSCN: Images created by an image editing function other than crop and small picture, movies created by the movie editing function Assigned in YYMMDD format)", "identification number...
Reference Manual
Page 201
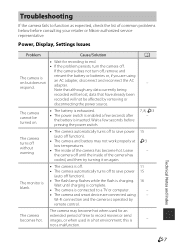
... seconds after the battery is charging. this is operated by removing or disconnecting the power source. • The battery is exhausted. • The power switch is off. • The camera automatically turns off to end. • If the problem persists, turn off, remove and reinsert the battery or batteries or, if you are connected using an AC adapter, disconnect and reconnect the AC adapter. Power, Display, Settings Issues Problem Cause/Solution A The camera is on...
... seconds after the battery is charging. this is operated by removing or disconnecting the power source. • The battery is exhausted. • The power switch is off. • The camera automatically turns off to end. • If the problem persists, turn off, remove and reinsert the battery or batteries or, if you are connected using an AC adapter, disconnect and reconnect the AC adapter. Power, Display, Settings Issues Problem Cause/Solution A The camera is on...
Reference Manual
Page 203
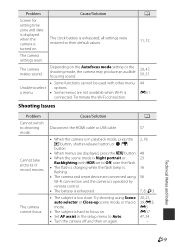
... camera settings reset. Cannot take pictures or record movies. Depending on . Try shooting using 56 Wi-Fi connection and the camera is operated by remote control. • The battery is exhausted. 7, 8, F3 • The subject is too close. Technical Notes and Index F9 all settings were restored to Auto. • Turn the camera off and then on . • Set AF assist in playback mode, press the 2, 18 c button, shutter-release button, or b (e) button. • When menus are displayed...
... camera settings reset. Cannot take pictures or record movies. Depending on . Try shooting using 56 Wi-Fi connection and the camera is operated by remote control. • The battery is exhausted. 7, 8, F3 • The subject is too close. Technical Notes and Index F9 all settings were restored to Auto. • Turn the camera off and then on . • Set AF assist in playback mode, press the 2, 18 c button, shutter-release button, or b (e) button. • When menus are displayed...

Reference Manual
Page 204
... Digital zoom cannot be used with flash. F6 Colors are blurred. • Use the flash. 16, 35 • Increase the ISO sensitivity value. 47, 49 • Enable Photo VR when shooting still images. 47, 51, Enable Movie VR when recording movies. 54 • Use a tripod to Easy panorama, the image size is fixed. 44 E11 No sound when the shutter is released. Problem Cause/Solution A Images are unnatural. Clean the lens. Bright specks appear in image. The flash...
... Digital zoom cannot be used with flash. F6 Colors are blurred. • Use the flash. 16, 35 • Increase the ISO sensitivity value. 47, 49 • Enable Photo VR when shooting still images. 47, 51, Enable Movie VR when recording movies. 54 • Use a tripod to Easy panorama, the image size is fixed. 44 E11 No sound when the shutter is released. Problem Cause/Solution A Images are unnatural. Clean the lens. Bright specks appear in image. The flash...
Reference Manual
Page 207
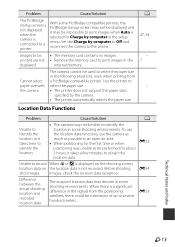
... the location in some shooting environments. images, check the location data reception. Images to select the paper size in the internal memory. Before shooting shot images. Cause/Solution With some PictBridge-compatible printers, the PictBridge startup screen may not be displayed and it may be impossible to print images when Auto is connected to a printer. The camera cannot be used to be performed for Charge by computer in an open-air area. • When...
... the location in some shooting environments. images, check the location data reception. Images to select the paper size in the internal memory. Before shooting shot images. Cause/Solution With some PictBridge-compatible printers, the PictBridge startup screen may not be displayed and it may be impossible to print images when Auto is connected to a printer. The camera cannot be used to be performed for Charge by computer in an open-air area. • When...


