
Product Manual
Page 17
... Shooting Mode ...6 Playback Mode ...8 The Basics of Shooting and Playback 10 Preparation 1 Insert the Battery 10 Preparation 2 Charge the Battery 12 Preparation 3 Insert a Memory Card 14 Internal Memory and Memory Cards 15 Preparation 4 Setting the Display Language, Date, and Time 16 Step 1 Turn the Camera On 20 Step 2 Select a Shooting Mode 22 Available Shooting Modes ...23 Step 3 Frame a Picture ...24 Using the Zoom...25 Step 4 Focus and Shoot...26 The Shutter-release Button...27 Step 5 Play Back Images ...28 Step 6 Delete Images...29 Shooting Features 31 A (Auto) Mode ...31 Using...
... Shooting Mode ...6 Playback Mode ...8 The Basics of Shooting and Playback 10 Preparation 1 Insert the Battery 10 Preparation 2 Charge the Battery 12 Preparation 3 Insert a Memory Card 14 Internal Memory and Memory Cards 15 Preparation 4 Setting the Display Language, Date, and Time 16 Step 1 Turn the Camera On 20 Step 2 Select a Shooting Mode 22 Available Shooting Modes ...23 Step 3 Frame a Picture ...24 Using the Zoom...25 Step 4 Focus and Shoot...26 The Shutter-release Button...27 Step 5 Play Back Images ...28 Step 6 Delete Images...29 Shooting Features 31 A (Auto) Mode ...31 Using...

Product Manual
Page 31
... 12 Red-eye correction 69, E16 13 Internal memory indicator............20 (a) Current image number/ 14 total number of images (b) Movie length 15 Image mode 57, E29 16 Easy panorama 38 17 Movie options 75, E54 18 Small picture icon 69, E18 19 Crop icon 67, E19 20 Volume indicator 76, E51 21 Quick effects guide 28 Easy panorama playback guide 38, E4 22 Sequence playback guide 70, E11 Movie playback guide 76 23 Time of recording 24 Date of recording (a) Battery level indicator 20 25 (b) Charging AC adapter connection indicator 26 File number...
... 12 Red-eye correction 69, E16 13 Internal memory indicator............20 (a) Current image number/ 14 total number of images (b) Movie length 15 Image mode 57, E29 16 Easy panorama 38 17 Movie options 75, E54 18 Small picture icon 69, E18 19 Crop icon 67, E19 20 Volume indicator 76, E51 21 Quick effects guide 28 Easy panorama playback guide 38, E4 22 Sequence playback guide 70, E11 Movie playback guide 76 23 Time of recording 24 Date of recording (a) Battery level indicator 20 25 (b) Charging AC adapter connection indicator 26 File number...

Product Manual
Page 36
B Formatting Memory Cards The first time you insert a memory card that has been used in another device into this camera. Memory card slot The Basics of Shooting and Playback B Be Careful to format it clicks into the camera, press the d button, and select Format card in Correct Direction Inserting the memory card upside down or backwards could damage the camera and the memory card. 3 Close the battery-chamber/ memory card slot cover. Insert the card into place. Preparation...
B Formatting Memory Cards The first time you insert a memory card that has been used in another device into this camera. Memory card slot The Basics of Shooting and Playback B Be Careful to format it clicks into the camera, press the d button, and select Format card in Correct Direction Inserting the memory card upside down or backwards could damage the camera and the memory card. 3 Close the battery-chamber/ memory card slot cover. Insert the card into place. Preparation...

Product Manual
Page 37
Internal Memory and Memory Cards Camera data, including images and movies, can be hot immediately after using the camera. The Basics of Shooting and Playback Removing Memory Cards Turn the camera off and make sure that the power-on a memory card. To use the camera's internal memory, first remove the memory card. 15 B High Temperature Caution The camera, battery, and memory card may be saved either in the camera's internal memory or on lamp and the monitor have turned off, and then open the battery-chamber/memory card slot cover. Gently push...
Internal Memory and Memory Cards Camera data, including images and movies, can be hot immediately after using the camera. The Basics of Shooting and Playback Removing Memory Cards Turn the camera off and make sure that the power-on a memory card. To use the camera's internal memory, first remove the memory card. 15 B High Temperature Caution The camera, battery, and memory card may be saved either in the camera's internal memory or on lamp and the monitor have turned off, and then open the battery-chamber/memory card slot cover. Gently push...

Product Manual
Page 43
C The Auto Off Function No operations performed Flashes No operations performed 3 min 25m 0s 880 Camera enters standby mode. The time can be changed using the Auto off setting in the setup menu (A78). • While the camera is in standby mode, the monitor turns back on if you press the power switch. Rotate the mode dial. • While the charging AC adapter is about 1 minute. Press the power switch, shutter-release button, c button, or b (e movierecord) button. - The Basics...
C The Auto Off Function No operations performed Flashes No operations performed 3 min 25m 0s 880 Camera enters standby mode. The time can be changed using the Auto off setting in the setup menu (A78). • While the camera is in standby mode, the monitor turns back on if you press the power switch. Rotate the mode dial. • While the charging AC adapter is about 1 minute. Press the power switch, shutter-release button, c button, or b (e movierecord) button. - The Basics...

Product Manual
Page 48
... the camera has focused, the focus indicator (A7) glows green. • If the focus area or focus indicator flashes red, the camera is unable to the captured image, press the k button. Quick effects • The screen for about 5 seconds, the monitor display returns to the shooting screen. • To not display the screen shown on the subject in the shooting menu (A56). 26 The Basics of Shooting and Playback Step 4 Focus and Shoot 1 Press the shutter-release button...
... the camera has focused, the focus indicator (A7) glows green. • If the focus area or focus indicator flashes red, the camera is unable to the captured image, press the k button. Quick effects • The screen for about 5 seconds, the monitor display returns to the shooting screen. • To not display the screen shown on the subject in the shooting menu (A56). 26 The Basics of Shooting and Playback Step 4 Focus and Shoot 1 Press the shutter-release button...

Product Manual
Page 69
... "red-eye" in all situations. • In some shooting modes. • The setting applied in A (auto) mode is saved in dim lighting. • The flash mode icon on the shooting screen is displayed only immediately after the camera is turned off. The flash fires when necessary to evening and night portraits that include background scenery. C Auto with some rare cases, red-eye reduction may be available with Red-eye Reduction Pre-flashes are used to...
... "red-eye" in all situations. • In some shooting modes. • The setting applied in A (auto) mode is saved in dim lighting. • The flash mode icon on the shooting screen is displayed only immediately after the camera is turned off. The flash fires when necessary to evening and night portraits that include background scenery. C Auto with some rare cases, red-eye reduction may be available with Red-eye Reduction Pre-flashes are used to...

Product Manual
Page 70
... selector J (n). Set Photo VR to Off in the setup menu (A78) when using a tripod to k. • To stop the countdown, press the shutter-release button again. 48 The self-timer lamp flashes and then glows steadily about 10 seconds or 2 seconds after you press the shutter-release button. The self-timer cannot be canceled. • When the shooting mode is Pet portrait scene mode, Y (pet portrait auto release...
... selector J (n). Set Photo VR to Off in the setup menu (A78) when using a tripod to k. • To stop the countdown, press the shutter-release button again. 48 The self-timer lamp flashes and then glows steadily about 10 seconds or 2 seconds after you press the shutter-release button. The self-timer cannot be canceled. • When the shooting mode is Pet portrait scene mode, Y (pet portrait auto release...

Product Manual
Page 81
... be used . Self-timer Smile timer (A58) When Smile timer is selected, Continuous operates using the creative slider, White balance in the creative slider setting screen to On, the flash cannot be used . Image mode Continuous (A57) Image mode is fixed as follows depending on the continuous shooting setting: • Pre-shooting cache: M (image size: 1280 × 960 pixels) • Continuous H: 120 fps: O 640×480 • Continuous H: 60 fps: M (image size: 1280 × 960 pixels) • Multi-shot 16: L (image size: 2560...
... be used . Self-timer Smile timer (A58) When Smile timer is selected, Continuous operates using the creative slider, White balance in the creative slider setting screen to On, the flash cannot be used . Image mode Continuous (A57) Image mode is fixed as follows depending on the continuous shooting setting: • Pre-shooting cache: M (image size: 1280 × 960 pixels) • Continuous H: 120 fps: O 640×480 • Continuous H: 60 fps: M (image size: 1280 × 960 pixels) • Multi-shot 16: L (image size: 2560...

Product Manual
Page 94
... of data, or in the monitor while recording movies. These phenomena are recommended when recording movies (F21). B Notes About Saving Images and Recording Movies The indicator showing the number of exposures remaining or the indicator showing the maximum movie length flashes while images are used. • When using the camera's internal memory, saving movies may take some time. • There may be skewed when the camera is flashing. Subjects that move quickly from one side of zoom control operation, zoom, autofocus lens drive...
... of data, or in the monitor while recording movies. These phenomena are recommended when recording movies (F21). B Notes About Saving Images and Recording Movies The indicator showing the number of exposures remaining or the indicator showing the maximum movie length flashes while images are used. • When using the camera's internal memory, saving movies may take some time. • There may be skewed when the camera is flashing. Subjects that move quickly from one side of zoom control operation, zoom, autofocus lens drive...

Product Manual
Page 108
... SD card slot, the card can be copied to the computer. The camera automatically turns on. To transfer images that the memory card is displayed, follow the steps below to the computer using Nikon Transfer 2 and click OK. 2 Double-click Import File. Connect the camera to select Nikon Transfer 2. 1 Under Import pictures and videos, click Change program. If a message is displayed prompting you to the computer via a USB hub. 86 Wait until Nikon Transfer 2 starts. Choose one of images, it...
... SD card slot, the card can be copied to the computer. The camera automatically turns on. To transfer images that the memory card is displayed, follow the steps below to the computer using Nikon Transfer 2 and click OK. 2 Double-click Import File. Connect the camera to select Nikon Transfer 2. 1 Under Import pictures and videos, click Change program. If a message is displayed prompting you to the computer via a USB hub. 86 Wait until Nikon Transfer 2 starts. Choose one of images, it...

Product Manual
Page 140
... monitor when shooting (A20). • Note that due to JPEG compression, the number of images that can be saved may vary greatly depending on the make of the memory card. • If the number of exposures remaining is 10,000 or more, the number of exposures remaining display shows "9999". In addition, the number of other than auto. C Printing Images at 1:1 Aspect Ratio Change the printer setting to print images at...
... monitor when shooting (A20). • Note that due to JPEG compression, the number of images that can be saved may vary greatly depending on the make of the memory card. • If the number of exposures remaining is 10,000 or more, the number of exposures remaining display shows "9999". In addition, the number of other than auto. C Printing Images at 1:1 Aspect Ratio Change the printer setting to print images at...

Product Manual
Page 155
... pictures, auto sort, or list by date mode, the screen shown on the right is not displayed. Print Order (Creating a DPOF Print Order) Press the c button (playback mode) M d button M Print order M k button If you configure print order settings in advance, you can use them with the printing methods listed below. • Taking the memory card to a digital photo lab that supports DPOF (Digital Print Order Format) printing. • Inserting the memory card into a DPOF-compatible printer's card slot. • Connecting the camera to a PictBridge-compatible printer (E21). 1 Use...
... pictures, auto sort, or list by date mode, the screen shown on the right is not displayed. Print Order (Creating a DPOF Print Order) Press the c button (playback mode) M d button M Print order M k button If you configure print order settings in advance, you can use them with the printing methods listed below. • Taking the memory card to a digital photo lab that supports DPOF (Digital Print Order Format) printing. • Inserting the memory card into a DPOF-compatible printer's card slot. • Connecting the camera to a PictBridge-compatible printer (E21). 1 Use...

Product Manual
Page 159
... protected images from accidental deletion. E49 Note that formatting the camera's internal memory or the memory card permanently deletes protected files (E72). Select images to select the images. Back 3 Press the k button to select additional images. Repeat steps 1 and 2 to apply image selection. • When Selected images is selected, a confirmation dialog is displayed while operating the camera, follow the procedures described below the image. Protect Press the c button (playback mode) M d button M Protect M k button The camera protects selected images from the image...
... protected images from accidental deletion. E49 Note that formatting the camera's internal memory or the memory card permanently deletes protected files (E72). Select images to select the images. Back 3 Press the k button to select additional images. Repeat steps 1 and 2 to apply image selection. • When Selected images is selected, a confirmation dialog is displayed while operating the camera, follow the procedures described below the image. Protect Press the c button (playback mode) M d button M Protect M k button The camera protects selected images from the image...

Product Manual
Page 184
Charging time increases when images are required to charge a fully exhausted battery. Charge by Computer Press the d button M z menu icon M Charge by the computer. B When the Charge Lamp Quickly Flashes Green Charging cannot be charged because the computer cannot supply power to the camera due to 95°F). • The USB cable is not connected correctly, or the battery is automatically charged using power supplied by computer M k button Option Description a Auto (default setting) When the camera is connected to a computer that is...
Charging time increases when images are required to charge a fully exhausted battery. Charge by Computer Press the d button M z menu icon M Charge by the computer. B When the Charge Lamp Quickly Flashes Green Charging cannot be charged because the computer cannot supply power to the camera due to 95°F). • The USB cable is not connected correctly, or the battery is automatically charged using power supplied by computer M k button Option Description a Auto (default setting) When the camera is connected to a computer that is...

Product Manual
Page 191
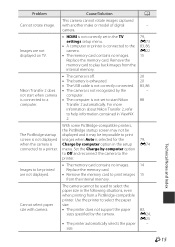
... to select Copy in auto sort mode. Display Cause/Solution A An error occurred while saving the image. Delete images from the camera to play back images in the camera's internal memory. • To copy the images saved in the camera's internal memory to the memory card, press the d button to the selected album. 15 E52 E5, E6 No images are no images in the internal memory or on this file. Select images that support the editing function. - The camera has run out of file numbers. There...
... to select Copy in auto sort mode. Display Cause/Solution A An error occurred while saving the image. Delete images from the camera to play back images in the camera's internal memory. • To copy the images saved in the camera's internal memory to the memory card, press the d button to the selected album. 15 E52 E5, E6 No images are no images in the internal memory or on this file. Select images that support the editing function. - The camera has run out of file numbers. There...

Product Manual
Page 201
... memory card using them with this camera. • Note that data to format it with this camera. Do not disconnect the AC adapter. If there is turned on the memory card that has been used in another device into this camera, be sure to a computer before formatting. Do not turn off the camera. - Do not open the battery-chamber/memory card slot cover or remove the memory card or battery. - Memory Cards • Use only Secure Digital memory cards. is displayed...
... memory card using them with this camera. • Note that data to format it with this camera. Do not disconnect the AC adapter. If there is turned on the memory card that has been used in another device into this camera, be sure to a computer before formatting. Do not turn off the camera. - Do not open the battery-chamber/memory card slot cover or remove the memory card or battery. - Memory Cards • Use only Secure Digital memory cards. is displayed...
Product Manual
Page 205
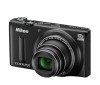
... dated "00/00/0000 00:00" or "01/01/ 2014 00:00" respectively. Cause/Solution • The camera automatically turns off to save power (auto off without warning. Clean the monitor. • If the camera clock has not been set, the "Date not set are connected using Wi-Fi connection and the camera is operated by remote control. • Adjust the monitor brightness. • The monitor is set " indicator flashes during shooting and movie recording...
... dated "00/00/0000 00:00" or "01/01/ 2014 00:00" respectively. Cause/Solution • The camera automatically turns off to save power (auto off without warning. Clean the monitor. • If the camera clock has not been set, the "Date not set are connected using Wi-Fi connection and the camera is operated by remote control. • Adjust the monitor brightness. • The monitor is set " indicator flashes during shooting and movie recording...
Product Manual
Page 210
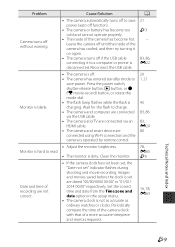
... Index Problem File cannot be edited. digital camera. • This camera may not be used for images are not available for movies. 38, E13 - 69, E13 - Voice memos attached to zoom in on image. Cannot record voice memos. F14 Cause/Solution A • This camera may not be able to play back images saved with another make or model of digital camera. • This camera cannot play back data edited on a computer. • Playback zoom cannot...
... Index Problem File cannot be edited. digital camera. • This camera may not be used for images are not available for movies. 38, E13 - 69, E13 - Voice memos attached to zoom in on image. Cannot record voice memos. F14 Cause/Solution A • This camera may not be able to play back images saved with another make or model of digital camera. • This camera cannot play back data edited on a computer. • Playback zoom cannot...
Product Manual
Page 211
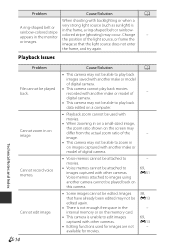
... start Nikon Transfer 2 automatically. The camera cannot be printed are not displayed on TV. Cannot select paper size with another make or model of digital camera. • HDMI is not correctly set to start when camera is selected for the Charge by the computer. • The computer is not set in the TV settings setup menu. • A computer or printer is connected to select the paper size in the setup menu. Remove the memory card to play back images...
... start Nikon Transfer 2 automatically. The camera cannot be printed are not displayed on TV. Cannot select paper size with another make or model of digital camera. • HDMI is not correctly set to start when camera is selected for the Charge by the computer. • The computer is not set in the TV settings setup menu. • A computer or printer is connected to select the paper size in the setup menu. Remove the memory card to play back images...


