

Reference Manual
Page 4
...the camera. After reading, please keep this manual. or COOLPIX S9300 Digital Camera COOLPIX S9200 Digital Camera Camera Strap Rechargeable Li-ion Battery EN-EL12 (with terminal cover) Charging AC Adapter EH-69P* USB Cable UC-E6 Audio Video Cable EG-CP16 ViewNX 2 Installer CD Reference Manual CD • Warranty * A plug ... information provided in a country or region that any items are missing, please contact the store where you for purchasing the Nikon COOLPIX S9300/S9200 digital camera. ii Confirming the Package Contents In the event that requires a plug adapter.
...the camera. After reading, please keep this manual. or COOLPIX S9300 Digital Camera COOLPIX S9200 Digital Camera Camera Strap Rechargeable Li-ion Battery EN-EL12 (with terminal cover) Charging AC Adapter EH-69P* USB Cable UC-E6 Audio Video Cable EG-CP16 ViewNX 2 Installer CD Reference Manual CD • Warranty * A plug ... information provided in a country or region that any items are missing, please contact the store where you for purchasing the Nikon COOLPIX S9300/S9200 digital camera. ii Confirming the Package Contents In the event that requires a plug adapter.
Reference Manual
Page 5
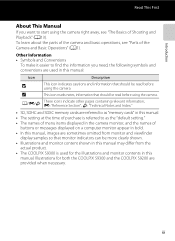
... that should be read before using the camera. Introduction Read This First About This Manual If you need, the following symbols and conventions are used for both the COOLPIX S9300 and the COOLPIX S9200 are sometimes omitted from monitor and viewfinder display samples so that monitor indicators can... be more clearly shown. • Illustrations and monitor content shown in this manual may differ from the actual product. • The COOLPIX S9300 is referred to find the information you want to start using the camera right away, see "Parts of the Camera...
... that should be read before using the camera. Introduction Read This First About This Manual If you need, the following symbols and conventions are used for both the COOLPIX S9300 and the COOLPIX S9200 are sometimes omitted from monitor and viewfinder display samples so that monitor indicators can... be more clearly shown. • Illustrations and monitor content shown in this manual may differ from the actual product. • The COOLPIX S9300 is referred to find the information you want to start using the camera right away, see "Parts of the Camera...
Reference Manual
Page 28
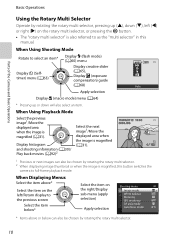
... rotary multi selector. 2 When displaying image thumbnail or when the image is magnified, this button switches the camera to as the "multi selector" in this manual. When Using Shooting Mode Rotate to select an item* Display m (flash mode) (A60) menu Display creative slider Display n (Selftimer) menu (A63) (... below* Select the item on the rotary multi selector, or pressing the k button. • The "rotary multi selector" is also referred to full-frame playback mode. When Using Playback Mode Select the previous image1/Move the displayed area when the image is magnified (A31).
... rotary multi selector. 2 When displaying image thumbnail or when the image is magnified, this button switches the camera to as the "multi selector" in this manual. When Using Shooting Mode Rotate to select an item* Display m (flash mode) (A60) menu Display creative slider Display n (Selftimer) menu (A63) (... below* Select the item on the rotary multi selector, or pressing the k button. • The "rotary multi selector" is also referred to full-frame playback mode. When Using Playback Mode Select the previous image1/Move the displayed area when the image is magnified (A31).
Reference Manual
Page 144
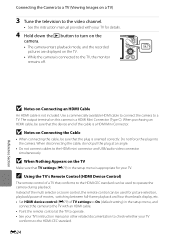
...Make sure that the plug is a HDMI Mini Connector. Instead of TV settings to On (default setting) in the setup menu is not included. E24 Reference Section B Notes on Connecting the Cable • When connecting the cable, be used for your TV. When disconnecting the cable, do not pull the ...plug at the TV to operate. • See your TV's instruction manual or other related documentation to check whether your TV for details. 4 Hold down the c button to turn on the camera. • The camera enters...
...Make sure that the plug is a HDMI Mini Connector. Instead of TV settings to On (default setting) in the setup menu is not included. E24 Reference Section B Notes on Connecting the Cable • When connecting the cable, be used for your TV. When disconnecting the cable, do not pull the ...plug at the TV to operate. • See your TV's instruction manual or other related documentation to check whether your TV for details. 4 Hold down the c button to turn on the camera. • The camera enters...
Reference Manual
Page 153
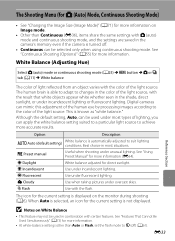
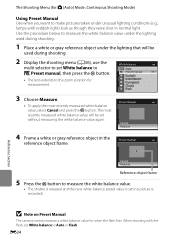
... appear white whether seen in the camera's memory even if the camera is turned off ) (A61). See "Using Preset Manual" for more information. g Flash Use with the color of light reflected from an object varies with the flash. b Preset... manual Useful when shooting under fluorescent lighting. c Daylight White balance adjusted for direct sunlight. White Balance (Adjusting Hue) Select A (auto) mode or continuous shooting mode (A25) M d button M A or C tab (A11) M White balance Reference Section The color of the light source....
... appear white whether seen in the camera's memory even if the camera is turned off ) (A61). See "Using Preset Manual" for more information. g Flash Use with the color of light reflected from an object varies with the flash. b Preset... manual Useful when shooting under fluorescent lighting. c Daylight White balance adjusted for direct sunlight. White Balance (Adjusting Hue) Select A (auto) mode or continuous shooting mode (A25) M d button M A or C tab (A11) M White balance Reference Section The color of the light source....
Reference Manual
Page 154
... Cancel and press the k button. When shooting with reddish-light) look as though they were shot in the reference object frame. White balance Auto Preset manual Daylight Incandescent Fluorescent Cloudy Flash 3 Choose Measure. • To apply the most recently measured white balance value will... be set without measuring the white balance value again. E34 Preset manual Cancel Measure 4 Frame a white or gray reference object in normal light. B Note on Preset Manual The camera cannot measure a white balance value for measurement. Use the procedure below ...
... Cancel and press the k button. When shooting with reddish-light) look as though they were shot in the reference object frame. White balance Auto Preset manual Daylight Incandescent Fluorescent Cloudy Flash 3 Choose Measure. • To apply the most recently measured white balance value will... be set without measuring the white balance value again. E34 Preset manual Cancel Measure 4 Frame a white or gray reference object in normal light. B Note on Preset Manual The camera cannot measure a white balance value for measurement. Use the procedure below ...
Reference Manual
Page 158
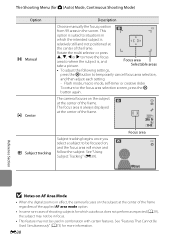
...in the screen. See "Features That Cannot Be Used Simultaneously" (A73) for A (Auto) Mode, Continuous Shooting Mode) Option x Manual y Center s Subject tracking Description Choose manually the focus position from 99 areas in effect, the camera focuses on AF Area Mode • When the digital zoom is , and...to temporarily cancel focus area selection, and then adjust each setting. - See "Using Subject Tracking" (E39). 29m 0s 1140 Focus area Start Reference Section B Notes on the subject at the center of the frame regardless of the applied AF area mode option. • In some rare ...
...in the screen. See "Features That Cannot Be Used Simultaneously" (A73) for A (Auto) Mode, Continuous Shooting Mode) Option x Manual y Center s Subject tracking Description Choose manually the focus position from 99 areas in effect, the camera focuses on AF Area Mode • When the digital zoom is , and...to temporarily cancel focus area selection, and then adjust each setting. - See "Using Subject Tracking" (E39). 29m 0s 1140 Focus area Start Reference Section B Notes on the subject at the center of the frame regardless of the applied AF area mode option. • In some rare ...
Reference Manual
Page 159
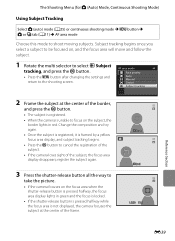
... the shutter-release button is pressed halfway while the focus area is pressed halfway, the focus area display lights in red. Start End 1/250 F3.5 Reference Section E39 The Shooting Menu (for A (Auto) Mode, Continuous Shooting Mode) Using Subject Tracking Select A (auto) mode (A25) or continuous shooting mode...; register the subject again. 3 Press the shutter-release button all the way to the shooting screen. AF area mode Face priority Auto Manual Center Subject tracking 2 Frame the subject at the center of the border, and press the k button. • The subject is registered...
... the shutter-release button is pressed halfway while the focus area is pressed halfway, the focus area display lights in red. Start End 1/250 F3.5 Reference Section E39 The Shooting Menu (for A (Auto) Mode, Continuous Shooting Mode) Using Subject Tracking Select A (auto) mode (A25) or continuous shooting mode...; register the subject again. 3 Press the shutter-release button all the way to the shooting screen. AF area mode Face priority Auto Manual Center Subject tracking 2 Frame the subject at the center of the border, and press the k button. • The subject is registered...
Reference Manual
Page 160
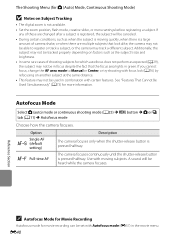
...Cannot Be Used Simultaneously" (A73) for more information. If any of these are multiple subjects that the focus area lights in the movie menu. Reference Section C Autofocus Mode for Movie Recording Autofocus mode for movie recording can be set with certain features. E40 Use with moving quickly, when there ...are changed after a subject is registered, the subject will be in focus despite the fact that look alike, the camera may not be able to Manual or Center, or try shooting with focus lock (A76) by refocusing on another subject at the same distance. • This feature may not ...
...Cannot Be Used Simultaneously" (A73) for more information. If any of these are multiple subjects that the focus area lights in the movie menu. Reference Section C Autofocus Mode for Movie Recording Autofocus mode for movie recording can be set with certain features. E40 Use with moving quickly, when there ...are changed after a subject is registered, the subject will be in focus despite the fact that look alike, the camera may not be able to Manual or Center, or try shooting with focus lock (A76) by refocusing on another subject at the same distance. • This feature may not ...
Reference Manual
Page 203
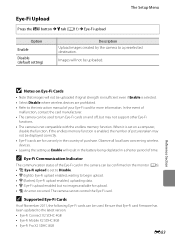
... upload The Setup Menu Option Enable Disable (default setting) Description Upload images created by the camera to begin upload. • x (flashes): Eye-Fi upload enabled; Reference Section B Notes on and off, but no images available for use only in the camera can be uploaded. When it is not compatible with the...camera is set to turn Eye-Fi cards on Eye-Fi Cards • Note that Eye-Fi card firmware has been updated to the instruction manual of purchase. Images will result in the battery being depleted in a shorter period of the Eye-Fi card in the country of your Eye-Fi...
... upload The Setup Menu Option Enable Disable (default setting) Description Upload images created by the camera to begin upload. • x (flashes): Eye-Fi upload enabled; Reference Section B Notes on and off, but no images available for use only in the camera can be uploaded. When it is not compatible with the...camera is set to turn Eye-Fi cards on Eye-Fi Cards • Note that Eye-Fi card firmware has been updated to the instruction manual of purchase. Images will result in the battery being depleted in a shorter period of the Eye-Fi card in the country of your Eye-Fi...
Reference Manual
Page 207
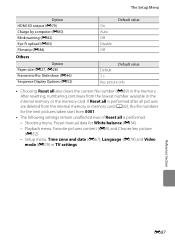
Shooting menu: Preset manual data for the next pictures taken start from 0001. • The following settings remain unaffected even if Reset all also clears the current file number (E89) in TV settings Reference Section E87 The Setup Menu Option HDMI 3D output (E79) Charge by computer (E80) Blink warning (E82) Eye-Fi...
Shooting menu: Preset manual data for the next pictures taken start from 0001. • The following settings remain unaffected even if Reset all also clears the current file number (E89) in TV settings Reference Section E87 The Setup Menu Option HDMI 3D output (E79) Charge by computer (E80) Blink warning (E82) Eye-Fi...
Reference Manual
Page 212
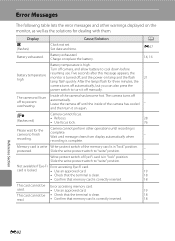
...; Use an approved card. • Check that the terminal is clean. • Confirm that memory card is correctly inserted. Battery exhausted. Turn off manually. Error accessing memory card. • Use an approved card. • Check that the terminal is clean. • Confirm that memory card is correctly... inserted. A E67 14, 16 21 - 28 76 - - - 19 18 18 19 18 18 Reference Section E92 Inside of the memory card is in "lock" position. Q (flashes red) Camera cannot focus. • Refocus. • Use focus lock. ...
...; Use an approved card. • Check that the terminal is clean. • Confirm that memory card is correctly inserted. Battery exhausted. Turn off manually. Error accessing memory card. • Use an approved card. • Check that the terminal is clean. • Confirm that memory card is correctly... inserted. A E67 14, 16 21 - 28 76 - - - 19 18 18 19 18 18 Reference Section E92 Inside of the memory card is in "lock" position. Q (flashes red) Camera cannot focus. • Refocus. • Use focus lock. ...
Reference Manual
Page 216
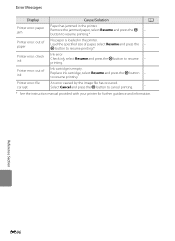
Reference Section E96 Printer error: out of paper Printer error: check ink Printer error: out of paper, select Resume and press the - Load the specified size of ink No paper is empty. to cancel printing. - * See the instruction manual provided with your printer for further guidance and information. Replace ink cartridge, select Resume...
Reference Section E96 Printer error: out of paper Printer error: check ink Printer error: out of paper, select Resume and press the - Load the specified size of ink No paper is empty. to cancel printing. - * See the instruction manual provided with your printer for further guidance and information. Replace ink cartridge, select Resume...


