User Manual
Page 4
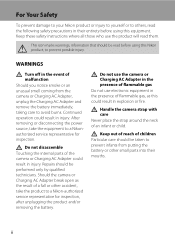
... damage to your Nikon product or injury to yourself or to others, read the following safety precautions in their mouths. Repairs should be taken to prevent infants from the camera or Charging AC Adapter, unplug the Charging AC Adapter and remove the battery immediately, taking care... a fall or other small parts into their entirety before using this equipment. Should the camera or Charging AC Adapter break open as this Nikon product, to a Nikon-authorized service representative for inspection. WARNINGS Turn off in injury. This icon marks warnings, information that ...
... damage to your Nikon product or injury to yourself or to others, read the following safety precautions in their mouths. Repairs should be taken to prevent infants from the camera or Charging AC Adapter, unplug the Charging AC Adapter and remove the battery immediately, taking care... a fall or other small parts into their entirety before using this equipment. Should the camera or Charging AC Adapter break open as this Nikon product, to a Nikon-authorized service representative for inspection. WARNINGS Turn off in injury. This icon marks warnings, information that ...

User Manual
Page 5
...result in this precaution could result in fire. • Do not handle the plug or go near the metal parts of water. To charge the battery with the camera, use immediately should be damaged and the wires become exposed, take it is prone to water. • Replace the ...DCto-AC inverters. To avoid damage to heat or flames. Failure to observe this product: • Before replacing the battery, turn the product off. Charge the battery by using a Battery Charger MH-65 (available separately). Do not transport or store with plenty of the plug should you notice any change in...
...result in this precaution could result in fire. • Do not handle the plug or go near the metal parts of water. To charge the battery with the camera, use immediately should be damaged and the wires become exposed, take it is prone to water. • Replace the ...DCto-AC inverters. To avoid damage to heat or flames. Failure to observe this product: • Before replacing the battery, turn the product off. Charge the battery by using a Battery Charger MH-65 (available separately). Do not transport or store with plenty of the plug should you notice any change in...
User Manual
Page 8
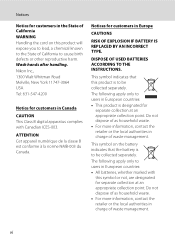
...Notices for separate collection at an appropriate collection point. DISPOSE OF USED BATTERIES ACCORDING TO THE INSTRUCTIONS. vi The following apply only to be collected separately. Wash hands after handling. Nikon Inc., 1300 Walt Whitman Road Melville, New York 11747-3064 USA ... or the local authorities in European countries: • All batteries, whether marked with Canadian ICES-003. This symbol indicates that the battery is designated for customers in charge of California to users in charge of waste management. The following apply only to cause birth defects...
...Notices for separate collection at an appropriate collection point. DISPOSE OF USED BATTERIES ACCORDING TO THE INSTRUCTIONS. vi The following apply only to be collected separately. Wash hands after handling. Nikon Inc., 1300 Walt Whitman Road Melville, New York 11747-3064 USA ... or the local authorities in European countries: • All batteries, whether marked with Canadian ICES-003. This symbol indicates that the battery is designated for customers in charge of California to users in charge of waste management. The following apply only to cause birth defects...
User Manual
Page 9
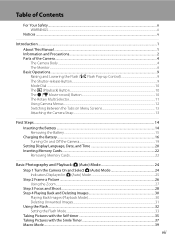
......11 Using Camera Menus...12 Switching Between the Tabs on Menu Screens 13 Attaching the Camera Strap ...13 First Steps ...14 Inserting the Battery ...14 Removing the Battery ...15 Charging the Battery ...16 Turning On and Off the Camera...19 Setting Display Language, Date, and Time 20 Inserting Memory Cards ...22 Removing Memory Cards...
......11 Using Camera Menus...12 Switching Between the Tabs on Menu Screens 13 Attaching the Camera Strap ...13 First Steps ...14 Inserting the Battery ...14 Removing the Battery ...15 Charging the Battery ...16 Turning On and Off the Camera...19 Setting Display Language, Date, and Time 20 Inserting Memory Cards ...22 Removing Memory Cards...
User Manual
Page 14
...site below for contact information: http://imaging.nikon.com/ Use Only Nikon Brand Electronic Accessories Nikon COOLPIX cameras are engineered and proven to operate within the operational and safety requirements of the camera or result in the batteries overheating, igniting, rupturing, or leaking....Before Taking Important Pictures Before taking pictures on important occasions (such as an authentic Nikon product. Only Nikon brand electronic accessories (including battery charger, batteries, Charging AC Adapter, and AC adapters) certified by any damages resulting from product malfunction. ...
...site below for contact information: http://imaging.nikon.com/ Use Only Nikon Brand Electronic Accessories Nikon COOLPIX cameras are engineered and proven to operate within the operational and safety requirements of the camera or result in the batteries overheating, igniting, rupturing, or leaking....Before Taking Important Pictures Before taking pictures on important occasions (such as an authentic Nikon product. Only Nikon brand electronic accessories (including battery charger, batteries, Charging AC Adapter, and AC adapters) certified by any damages resulting from product malfunction. ...
User Manual
Page 26
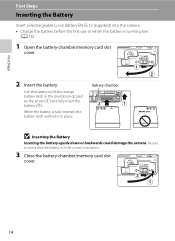
... cover. 14 First Steps First Steps Inserting the Battery Insert a Rechargeable Li-ion Battery EN-EL12 (supplied) into the camera. • Charge the battery before the first use or when the battery is fully inserted, the battery latch will lock it in place. Battery chamber B Inserting the Battery Inserting the battery upside down or backwards could damage the camera.
... cover. 14 First Steps First Steps Inserting the Battery Insert a Rechargeable Li-ion Battery EN-EL12 (supplied) into the camera. • Charge the battery before the first use or when the battery is fully inserted, the battery latch will lock it in place. Battery chamber B Inserting the Battery Inserting the battery upside down or backwards could damage the camera.

User Manual
Page 28
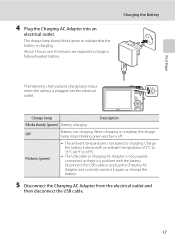
... product. * The shape of the plug adapter varies according to the camera. USB cable 16 First Steps Charging the Battery Charge the supplied Rechargeable Li-ion Battery EN-EL12 inserted into the camera, by connecting the supplied Charging AC Adapter EH-69P to insert connectors at an angle, and do not use force when connecting...
... product. * The shape of the plug adapter varies according to the camera. USB cable 16 First Steps Charging the Battery Charge the supplied Rechargeable Li-ion Battery EN-EL12 inserted into the camera, by connecting the supplied Charging AC Adapter EH-69P to insert connectors at an angle, and do not use force when connecting...
User Manual
Page 29
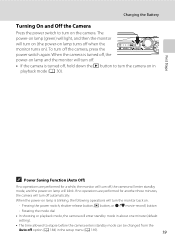
... outlet. About 3 hours and 50 minutes are required to indicate that the battery is charging. Charge lamp Description Blinks slowly (green) Battery charging. Disconnect the USB cable or unplug the Charging AC Adapter and correctly connect it again, or change the battery. 5 Disconnect the Charging AC Adapter from the electrical outlet and then disconnect the USB cable. 17...
... outlet. About 3 hours and 50 minutes are required to indicate that the battery is charging. Charge lamp Description Blinks slowly (green) Battery charging. Disconnect the USB cable or unplug the Charging AC Adapter and correctly connect it again, or change the battery. 5 Disconnect the Charging AC Adapter from the electrical outlet and then disconnect the USB cable. 17...

User Manual
Page 30
..., under any circumstances, use another make or model of AC adapter other than Charging AC Adapter EH-69P. Do not use with AC 100-240 V, 50/60 Hz electrical outlets. D Charging Using Computer or Battery Charger • Connecting the COOLPIX S9100 to the camera. Failure to observe this precaution could result in overheating or in...
..., under any circumstances, use another make or model of AC adapter other than Charging AC Adapter EH-69P. Do not use with AC 100-240 V, 50/60 Hz electrical outlets. D Charging Using Computer or Battery Charger • Connecting the COOLPIX S9100 to the camera. Failure to observe this precaution could result in overheating or in...
User Manual
Page 31
... (A 169). 19 To turn the monitor back on. - The power-on lamp (green) will light, and then the monitor will turn on the camera. Charging the Battery Turning On and Off the Camera Press the power switch to turn on (the power-on lamp turns off . • If the camera is blinking...
... (A 169). 19 To turn the monitor back on. - The power-on lamp (green) will light, and then the monitor will turn on the camera. Charging the Battery Turning On and Off the Camera Press the power switch to turn on (the power-on lamp turns off . • If the camera is blinking...
User Manual
Page 36
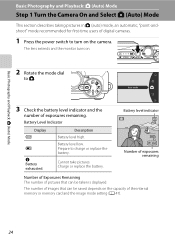
Battery level low. Charge or replace the battery. Auto mode 3 Check the battery level indicator and the number of exposures remaining. B N Battery exhausted. Battery level indicator 25 Number of exposures remaining Number of Exposures Remaining The number of pictures that ...for first-time users of digital cameras. 1 Press the power switch to turn on . 2 Rotate the mode dial to charge or replace the battery. Battery Level Indicator Display b Description Battery level high. Cannot take pictures. The lens extends and the monitor turns on the camera. Prepare to A.
Battery level low. Charge or replace the battery. Auto mode 3 Check the battery level indicator and the number of exposures remaining. B N Battery exhausted. Battery level indicator 25 Number of exposures remaining Number of Exposures Remaining The number of pictures that ...for first-time users of digital cameras. 1 Press the power switch to turn on . 2 Rotate the mode dial to charge or replace the battery. Battery Level Indicator Display b Description Battery level high. Cannot take pictures. The lens extends and the monitor turns on the camera. Prepare to A.
User Manual
Page 46
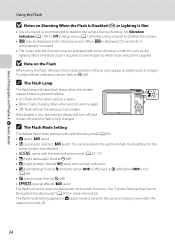
...Lighting Is Dim • Use of a tripod is recommended to stabilize the camera. • E may be displayed in the shooting screen. If the battery is automatically increased. • The noise reduction function may be activated with certain functions. When E is displayed, ISO sensitivity is low, the monitor ...(auto with red-eye reduction) • R (backlighting): fixed at X (fill flash) (when HDR is Off), fixed at W (off) (when HDR is fully charged. The flash mode setting applied in A (auto) mode is saved in the camera's memory even after the camera is turned off , until the flash is...
...Lighting Is Dim • Use of a tripod is recommended to stabilize the camera. • E may be displayed in the shooting screen. If the battery is automatically increased. • The noise reduction function may be activated with certain functions. When E is displayed, ISO sensitivity is low, the monitor ...(auto with red-eye reduction) • R (backlighting): fixed at X (fill flash) (when HDR is Off), fixed at W (off) (when HDR is fully charged. The flash mode setting applied in A (auto) mode is saved in the camera's memory even after the camera is turned off , until the flash is...
User Manual
Page 170
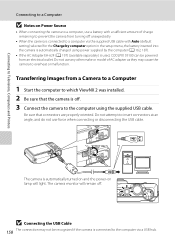
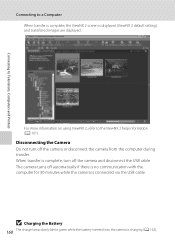
... to a Computer B Notes on lamp will remain off. Do not use a battery with Auto (default setting) selected for the Charge by computer option in the setup menu, the battery inserted into the camera is automatically charged using the supplied USB cable. The camera is automatically turned on and the power-...on Power Source • When connecting the camera to a computer, use any other make or model of charge remaining to prevent the camera from turning off unexpectedly. • When the camera is used, COOLPIX S9100 can be powered from an electrical outlet.
... to a Computer B Notes on lamp will remain off. Do not use a battery with Auto (default setting) selected for the Charge by computer option in the setup menu, the battery inserted into the camera is automatically charged using the supplied USB cable. The camera is automatically turned on and the power-...on Power Source • When connecting the camera to a computer, use any other make or model of charge remaining to prevent the camera from turning off unexpectedly. • When the camera is used, COOLPIX S9100 can be powered from an electrical outlet.
User Manual
Page 171
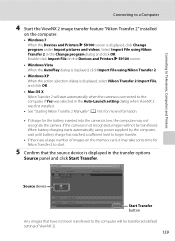
... power supplied by the computer, wait until battery charge has reached a sufficient level to begin transfer. • If there are a large number of images on the Devices and Printers K S9100 screen. • Windows Vista When the AutoPlay dialog is low, the computer may take some time for Nikon Transfer 2 to start. 5 Confirm that have...
... power supplied by the computer, wait until battery charge has reached a sufficient level to begin transfer. • If there are a large number of images on the Devices and Printers K S9100 screen. • Windows Vista When the AutoPlay dialog is low, the computer may take some time for Nikon Transfer 2 to start. 5 Confirm that have...
User Manual
Page 172
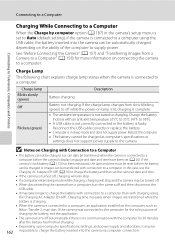
The camera turns off automatically if there is no communication with the computer for 30 minutes while the camera is charging (A 162). B Charging the Battery 160 The charge lamp slowly blinks green while the battery inserted into the camera is connected via the USB cable. Connecting to Televisions, Computers and Printers Connecting to the ViewNX 2 help...
The camera turns off automatically if there is no communication with the computer for 30 minutes while the camera is charging (A 162). B Charging the Battery 160 The charge lamp slowly blinks green while the battery inserted into the camera is connected via the USB cable. Connecting to Televisions, Computers and Printers Connecting to the ViewNX 2 help...
User Manual
Page 174
... the camera from slow blinking (green) to off , charging will also stop. • If a computer enters sleep mode while charging, charging will stop and the camera may be 162 impossible to charge the battery inserted into the camera can be charged as Nikon Transfer 2, may take longer to charge the battery with connection to a computer than with the computer...
... the camera from slow blinking (green) to off , charging will also stop. • If a computer enters sleep mode while charging, charging will stop and the camera may be 162 impossible to charge the battery inserted into the camera can be charged as Nikon Transfer 2, may take longer to charge the battery with connection to a computer than with the computer...
User Manual
Page 175
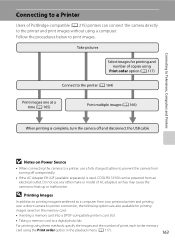
Do not use a fully charged battery to prevent the camera from turning off unexpectedly. • If the AC Adapter EH-62F (available separately) is complete, turn the camera off and disconnect ... copies using Print order option (A 117) Connect to the printer (A 164) Print images one at a time (A 165) Print multiple images (A 166) When printing is used, COOLPIX S9100 can connect the camera directly to the printer and print images without using the Print order option in the playback menu (A 117). 163 Follow the...
Do not use a fully charged battery to prevent the camera from turning off unexpectedly. • If the AC Adapter EH-62F (available separately) is complete, turn the camera off and disconnect ... copies using Print order option (A 117) Connect to the printer (A 164) Print images one at a time (A 165) Print multiple images (A 166) When printing is used, COOLPIX S9100 can connect the camera directly to the printer and print images without using the Print order option in the playback menu (A 117). 163 Follow the...
User Manual
Page 181
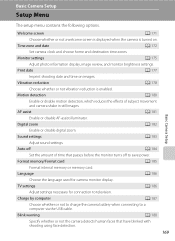
Time zone and date A 172 Set camera clock and choose home and destination time zones. Auto off to save power. Charge by computer A 187 Choose whether or not to charge the camera battery when connecting to television. Print date A 177 Imprint shooting date and time on . Digital zoom A 182 Enable or disable digital zoom...
Time zone and date A 172 Set camera clock and choose home and destination time zones. Auto off to save power. Charge by computer A 187 Choose whether or not to charge the camera battery when connecting to television. Print date A 177 Imprint shooting date and time on . Digital zoom A 182 Enable or disable digital zoom...

User Manual
Page 185
...If daylight saving time is connected, and can provide several days of backup power after the date and time have been set. The clock battery charges when the main battery is inserted or an AC adapter is in step 4. Time zone 15/05/2011 02:30 EDT:New York Toronto, Lima Home time... Enable print date from the time zone selection screen displayed in effect, press H to apply the travel destination time zone is powered by the clock battery. W is advanced one hour. When the Print date option is enabled, images will be saved with shooting date imprinted on them. 173 Press the ...
...If daylight saving time is connected, and can provide several days of backup power after the date and time have been set. The clock battery charges when the main battery is inserted or an AC adapter is in step 4. Time zone 15/05/2011 02:30 EDT:New York Toronto, Lima Home time... Enable print date from the time zone selection screen displayed in effect, press H to apply the travel destination time zone is powered by the clock battery. W is advanced one hour. When the Print date option is enabled, images will be saved with shooting date imprinted on them. 173 Press the ...

User Manual
Page 207
... below 0°C (32°F) or above 40°C (104°F). • Charge the battery indoors with an ambient temperature of its charge, when used batteries in accordance with a clean, dry cloth before use . • When charging the COOLPIX S9100 using the camera and replace or charge the battery if necessary. Please recycle used at ambient temperatures below 0°C (32...
... below 0°C (32°F) or above 40°C (104°F). • Charge the battery indoors with an ambient temperature of its charge, when used batteries in accordance with a clean, dry cloth before use . • When charging the COOLPIX S9100 using the camera and replace or charge the battery if necessary. Please recycle used at ambient temperatures below 0°C (32...


