
Reference Manual
Page 15
... a Memory Card.......... 18 Internal Memory and Memory Cards......... 19 Preparation 4 Setting the Display Language, Date, and Time 20 Step 1 Turn the Camera On 24 Turning the Camera On and Off 25 Step 2 Select a Shooting Mode 26 Available Shooting Modes 27 Step 3 Frame a Picture 28 Using the Zoom 29 Step 4 Focus and Shoot 30 The Shutter-release Button 31 Step 5 Play Back Images 32 Step 6 Delete Unwanted Images 34 Shooting Features 37 A (Auto) Mode 38 Using Quick Effects 39 Scene Mode (Shooting Suited to Scenes 40 To View a Description (Help Display...
... a Memory Card.......... 18 Internal Memory and Memory Cards......... 19 Preparation 4 Setting the Display Language, Date, and Time 20 Step 1 Turn the Camera On 24 Turning the Camera On and Off 25 Step 2 Select a Shooting Mode 26 Available Shooting Modes 27 Step 3 Frame a Picture 28 Using the Zoom 29 Step 4 Focus and Shoot 30 The Shutter-release Button 31 Step 5 Play Back Images 32 Step 6 Delete Unwanted Images 34 Shooting Features 37 A (Auto) Mode 38 Using Quick Effects 39 Scene Mode (Shooting Suited to Scenes 40 To View a Description (Help Display...

Reference Manual
Page 29
... Set with HS footage Movie AF mode Wind noise reduction AF area mode Set up Welcome screen Set up . Image mode 4608×3456 4608×3456 3264×2448 2272×1704 1600×1200 640×480 White balance Auto Preset manual Daylight Incandes. Parts of the shooting or playback menu and tap z Set up Time zone and date Monitor settings Print date Setup menu 11 Tap f to exit the menu. • If I is displayed...
... Set with HS footage Movie AF mode Wind noise reduction AF area mode Set up Welcome screen Set up . Image mode 4608×3456 4608×3456 3264×2448 2272×1704 1600×1200 640×480 White balance Auto Preset manual Daylight Incandes. Parts of the shooting or playback menu and tap z Set up Time zone and date Monitor settings Print date Setup menu 11 Tap f to exit the menu. • If I is displayed...

Reference Manual
Page 43
... taking pictures and playing back images. • Do not, under any of the following operations: ➝ Press the power switch, shutter-release button, A (shooting mode) button, c (playback) button, or b (e movie-record) button Flashes The Basics of AC adapter other than the EH-62G. The lens will turn on (the power-on lamp turns off setting in the setup menu (A104). • By default, the camera enters standby mode in playback mode, press and hold the c (playback) button. When the camera turns off the camera, press the power switch...
... taking pictures and playing back images. • Do not, under any of the following operations: ➝ Press the power switch, shutter-release button, A (shooting mode) button, c (playback) button, or b (e movie-record) button Flashes The Basics of AC adapter other than the EH-62G. The lens will turn on (the power-on lamp turns off setting in the setup menu (A104). • By default, the camera enters standby mode in playback mode, press and hold the c (playback) button. When the camera turns off the camera, press the power switch...

Reference Manual
Page 45
... Shooting and Playback C Changing the Shooting Settings • See "Using the Flash (Flash Modes)" (A58) for more information. • See "Using the Self-timer" (A61) for more information. • See "Using Macro Mode" (A63) for more information. • See "Adjusting Brightness (Exposure Compensation)" (A65) for more information. • See "Features That Can Be Set with F (Shooting Menu)" (A68) for general shooting. You can take pictures using scene auto selector (d), the camera automatically selects the optimum scene mode...
... Shooting and Playback C Changing the Shooting Settings • See "Using the Flash (Flash Modes)" (A58) for more information. • See "Using the Self-timer" (A61) for more information. • See "Using Macro Mode" (A63) for more information. • See "Adjusting Brightness (Exposure Compensation)" (A65) for more information. • See "Features That Can Be Set with F (Shooting Menu)" (A68) for general shooting. You can take pictures using scene auto selector (d), the camera automatically selects the optimum scene mode...
Reference Manual
Page 53
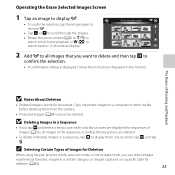
... monitor. Operating the Erase Selected Images Screen 1 Tap an image to display y. • To undo the selection, tap the image again to remove y. • Tap B or C to scroll through the images. • Rotate the zoom control (A2) to g (i) to switch to full-frame playback or f (h) to switch back to confirm the selection. • A confirmation dialog is displayed. Erase selected images 2 Add y to display them from the camera. • Protected images (A84...
... monitor. Operating the Erase Selected Images Screen 1 Tap an image to display y. • To undo the selection, tap the image again to remove y. • Tap B or C to scroll through the images. • Rotate the zoom control (A2) to g (i) to switch to full-frame playback or f (h) to switch back to confirm the selection. • A confirmation dialog is displayed. Erase selected images 2 Add y to display them from the camera. • Protected images (A84...

Reference Manual
Page 56
... how the camera selects the focus area that is used with F (Shooting Menu)" (A68) for more of shot you tap F, the menu options available in A (auto) mode are displayed. Enter shooting mode M A (shooting mode) button M A (auto) mode • You can be adjusted in the shooting menu to the camera. See "Basic Shooting Settings" (A57) for more information. See "Using Target Finding AF" (A74) for the flash mode, self-timer, macro mode, and exposure compensation. The focus area can be changed using the touch shutter or...
... how the camera selects the focus area that is used with F (Shooting Menu)" (A68) for more of shot you tap F, the menu options available in A (auto) mode are displayed. Enter shooting mode M A (shooting mode) button M A (auto) mode • You can be adjusted in the shooting menu to the camera. See "Basic Shooting Settings" (A57) for more information. See "Using Target Finding AF" (A74) for the flash mode, self-timer, macro mode, and exposure compensation. The focus area can be changed using the touch shutter or...

Reference Manual
Page 61
... a time. Vibration reduction is disabled even when Vibration reduction (A104) in the center of shooting. - One image is captured at the values determined with the first image in each series. • The frame rate with continuous shooting may vary depending upon the current image mode setting, the memory card used . 43 After taking a picture, do not turn the camera off before the monitor switches to On. - Once the shutter...
... a time. Vibration reduction is disabled even when Vibration reduction (A104) in the center of shooting. - One image is captured at the values determined with the first image in each series. • The frame rate with continuous shooting may vary depending upon the current image mode setting, the memory card used . 43 After taking a picture, do not turn the camera off before the monitor switches to On. - Once the shutter...

Reference Manual
Page 63
... into a single image and saved. - Vibration reduction is disabled even when Vibration reduction (A104) in the setup menu is enabled and the camera automatically zooms to adjust image saturation. • The camera focuses on the area in the monitor at the time of the camera focusing. 45 After taking a picture, do not turn the camera off before the monitor switches to On. - k Close-up • Macro mode (A63) is set to the shooting screen. -
... into a single image and saved. - Vibration reduction is disabled even when Vibration reduction (A104) in the setup menu is enabled and the camera automatically zooms to adjust image saturation. • The camera focuses on the area in the monitor at the time of the camera focusing. 45 After taking a picture, do not turn the camera off before the monitor switches to On. - k Close-up • Macro mode (A63) is set to the shooting screen. -

Reference Manual
Page 65
..., the camera shoots images continuously at the time of shooting, in which the loss of picture you want to take. • p Off (default setting): The flash fires to prevent the subject from being hidden in the monitor at an image mode setting of the frame. Digital zoom cannot be narrower than that seen in shadow. - An HDR composite image in the same frame. - When the shutter-release button is displayed...
..., the camera shoots images continuously at the time of shooting, in which the loss of picture you want to take. • p Off (default setting): The flash fires to prevent the subject from being hidden in the monitor at an image mode setting of the frame. Digital zoom cannot be narrower than that seen in shadow. - An HDR composite image in the same frame. - When the shutter-release button is displayed...

Reference Manual
Page 67
... continuous shooting is about 2 fps (when Image mode is set Pet portrait auto release to l 4608×2592). release button or touch shutter to 19 images can be detected), the face displayed largest in the same shot, it . If the camera detects a human face and a pet face in the monitor is held down. V Continuous (default setting): When focus is full. B Using Pet Portrait Auto Release • To change the continuous shooting setting...
... continuous shooting is about 2 fps (when Image mode is set Pet portrait auto release to l 4608×2592). release button or touch shutter to 19 images can be detected), the face displayed largest in the same shot, it . If the camera detects a human face and a pet face in the monitor is held down. V Continuous (default setting): When focus is full. B Using Pet Portrait Auto Release • To change the continuous shooting setting...

Reference Manual
Page 81
... front of flowers and other small subjects. 1 Tap the macro mode icon. Shooting Features 2 Tap o. • Tap J to return to the shooting screen without changing the setting. 25 0 1010 Macro mode On Off 3 Use the zoom control to set to a position where F and the zoom indicator glow green, the camera can focus on subjects as close as close -up pictures of the lens. Using Macro Mode When using macro mode, the camera can be to the subject when...
... front of flowers and other small subjects. 1 Tap the macro mode icon. Shooting Features 2 Tap o. • Tap J to return to the shooting screen without changing the setting. 25 0 1010 Macro mode On Off 3 Use the zoom control to set to a position where F and the zoom indicator glow green, the camera can focus on subjects as close as close -up pictures of the lens. Using Macro Mode When using macro mode, the camera can be to the subject when...

Reference Manual
Page 139
Tap F after displaying individual images to apply settings to display them as individual images. • Images captured continuously with cameras other than the COOLPIX S6400 cannot be displayed as a sequence. Display the images in the sequence individually and then tap F. C Changing Key Picture in Sequence A sequence's key picture can be applied to all sequences to be displayed using Choose key picture (E82) in the playback menu. Reference Section E15 C Playback Menu Options Available When...
Tap F after displaying individual images to apply settings to display them as individual images. • Images captured continuously with cameras other than the COOLPIX S6400 cannot be displayed as a sequence. Display the images in the sequence individually and then tap F. C Changing Key Picture in Sequence A sequence's key picture can be applied to all sequences to be displayed using Choose key picture (E82) in the playback menu. Reference Section E15 C Playback Menu Options Available When...

Reference Manual
Page 186
... appear white whether seen in the image. Digital cameras can mimic this adjustment by processing images according to suit lighting conditions. Tap an option to suit the sky conditions or light source and achieve more natural color tones in the shade, direct sunlight, or under overcast skies. Reference Section E62 Although Auto (default setting) can be adjusted to select it and tap I. b Preset manual Useful when shooting...
... appear white whether seen in the image. Digital cameras can mimic this adjustment by processing images according to suit lighting conditions. Tap an option to suit the sky conditions or light source and achieve more natural color tones in the shade, direct sunlight, or under overcast skies. Reference Section E62 Although Auto (default setting) can be adjusted to select it and tap I. b Preset manual Useful when shooting...

Reference Manual
Page 227
...are reset to their default settings (number icons) when the internal memory or memory card is formatted. • Do not turn the camera off or open the battery-chamber/memory card slot cover during formatting. • The first time you insert a memory card that has been deleted cannot be sure to format it with this option to a computer before formatting. Format Memory/Format Card Tap F M z (setup menu) M Format memory/Format card Use this camera. Be sure to transfer important images to format the internal memory or a memory card. Yes No Format card All images will...
...are reset to their default settings (number icons) when the internal memory or memory card is formatted. • Do not turn the camera off or open the battery-chamber/memory card slot cover during formatting. • The first time you insert a memory card that has been deleted cannot be sure to format it with this option to a computer before formatting. Format Memory/Format Card Tap F M z (setup menu) M Format memory/Format card Use this camera. Be sure to transfer important images to format the internal memory or a memory card. Yes No Format card All images will...

Reference Manual
Page 230
... upon computer specifications, settings, and power supply and allocation, it is turned off and then disconnect the USB cable. • About 3 hours and 15 minutes are transferred while the battery is charging. • When the camera is no communication with connection to charge the battery and then set (A20). Charging time increases when images are required to a computer, an application installed on the computer, such as Nikon Transfer 2, may turn off...
... upon computer specifications, settings, and power supply and allocation, it is turned off and then disconnect the USB cable. • About 3 hours and 15 minutes are transferred while the battery is charging. • When the camera is no communication with connection to charge the battery and then set (A20). Charging time increases when images are required to a computer, an application installed on the computer, such as Nikon Transfer 2, may turn off...

Reference Manual
Page 231
... supplying power. If the PictBridge startup screen is not displayed in sleep mode and is connected to a computer. Charge the battery indoors with an ambient temperature of the camera to some printers. Reference Section E107 If the charge lamp changes from slow flashing (green) to off while the power-on , turn the camera off and disconnect the USB cable. Wake up the computer. • The battery cannot be charged because...
... supplying power. If the PictBridge startup screen is not displayed in sleep mode and is connected to a computer. Charge the battery indoors with an ambient temperature of the camera to some printers. Reference Section E107 If the charge lamp changes from slow flashing (green) to off while the power-on , turn the camera off and disconnect the USB cable. Wake up the computer. • The battery cannot be charged because...

Reference Manual
Page 245
... used . The following images cannot be saved. Error accessing memory card. • Use approved card. • Check that terminals are clean. • Confirm that memory card is full. • Select smaller image size. Tap Yes to save the copies to keep copies of file numbers. Formatting deletes all data saved on the memory card. Memory card is correctly inserted. Out of memory. • Delete images. • Insert new memory card. • Remove memory card and use in COOLPIX S6400. Image cannot be registered as welcome screen. • Images captured using Easy panorama...
... used . The following images cannot be saved. Error accessing memory card. • Use approved card. • Check that terminals are clean. • Confirm that memory card is full. • Select smaller image size. Tap Yes to save the copies to keep copies of file numbers. Formatting deletes all data saved on the memory card. Memory card is correctly inserted. Out of memory. • Delete images. • Insert new memory card. • Remove memory card and use in COOLPIX S6400. Image cannot be registered as welcome screen. • Images captured using Easy panorama...

Reference Manual
Page 253
... memory card must be displayed. Do not disconnect the AC adapter. is displayed when the camera is not formatted. To start formatting, tap OK. • Observe the following precautions while formatting the memory card, saving and deleting images, and copying images to format it with this camera. Format card? Memory Cards • Use only Secure Digital memory cards. If there is data saved on the memory card that you do not want to a computer before formatting. • If the message Card is turned on the memory card...
... memory card must be displayed. Do not disconnect the AC adapter. is displayed when the camera is not formatted. To start formatting, tap OK. • Observe the following precautions while formatting the memory card, saving and deleting images, and copying images to format it with this camera. Format card? Memory Cards • Use only Secure Digital memory cards. If there is data saved on the memory card that you do not want to a computer before formatting. • If the message Card is turned on the memory card...

Reference Manual
Page 258
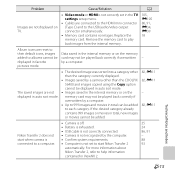
...; Turn camera off ). 59 Try shooting using the self-timer at the same time is more effective). 58 69 104 46, 69, E59 61 Flash is too close. Shooting Issues Problem Cause/Solution A Cannot switch to shooting mode. • Disconnect HDMI cable or USB cable. • The camera cannot be switched to shooting mode while connected to a power outlet via the Charging AC Adapter. 86, 91, E34, E39 17 No image captured when the shutter-release button is...
...; Turn camera off ). 59 Try shooting using the self-timer at the same time is more effective). 58 69 104 46, 69, E59 61 Flash is too close. Shooting Issues Problem Cause/Solution A Cannot switch to shooting mode. • Disconnect HDMI cable or USB cable. • The camera cannot be switched to shooting mode while connected to a power outlet via the Charging AC Adapter. 86, 91, E34, E39 17 No image captured when the shutter-release button is...
Reference Manual
Page 263
... displayed. • Images saved by a camera other than the COOLPIX S6400 and images copied using the Copy option cannot be displayed in auto sort mode. • Images saved in the internal memory or on TV. • Video mode or HDMI is not correctly set to start when camera is connected to a computer. • Camera is off. • Battery is exhausted. • USB cable is not correctly connected. • Camera is not recognized by a computer. • Up to 999 images and movies...
... displayed. • Images saved by a camera other than the COOLPIX S6400 and images copied using the Copy option cannot be displayed in auto sort mode. • Images saved in the internal memory or on TV. • Video mode or HDMI is not correctly set to start when camera is connected to a computer. • Camera is off. • Battery is exhausted. • USB cable is not correctly connected. • Camera is not recognized by a computer. • Up to 999 images and movies...


