
Reference Manual
Page 41
... the display turn off. • To turn the camera on ). • To turn on (the power-on lamp turns off automatically. Camera turns off. • The time that elapses before the camera enters standby mode can be changed using the Auto off setting in the setup menu (A94). • By default, the camera enters standby mode in about one minute when you are using shooting mode or playback mode. • If you perform any of Shooting and Playback C Power Saving Function (Auto...
... the display turn off. • To turn the camera on ). • To turn on (the power-on lamp turns off automatically. Camera turns off. • The time that elapses before the camera enters standby mode can be changed using the Auto off setting in the setup menu (A94). • By default, the camera enters standby mode in about one minute when you are using shooting mode or playback mode. • If you perform any of Shooting and Playback C Power Saving Function (Auto...

Reference Manual
Page 49
... light when the shutter-release button is flashing. Do not open the battery-chamber/memory card slot cover or remove the battery or memory card while an indicator is pressed halfway, and the flash (A62) may not focus as the actual desired subject, and use focus lock (A76). B Subjects Not Suitable for more information. C To Make Sure You Do Not Miss a Shot If you might miss a shot, press the shutter-release button all...
... light when the shutter-release button is flashing. Do not open the battery-chamber/memory card slot cover or remove the battery or memory card while an indicator is pressed halfway, and the flash (A62) may not focus as the actual desired subject, and use focus lock (A76). B Subjects Not Suitable for more information. C To Make Sure You Do Not Miss a Shot If you might miss a shot, press the shutter-release button all...

Reference Manual
Page 61
... frame. • Press and hold the shutter-release button all the way, hold the camera still until a still image is shooting continuously, the image may vary depending upon the current image mode setting, the memory card used . 43 From the screen displayed after the e Night portrait scene mode is displayed in the shooting screen. - If the subject moves while the camera is displayed. The Z icon is selected, select Hand-held or Tripod...
... frame. • Press and hold the shutter-release button all the way, hold the camera still until a still image is shooting continuously, the image may vary depending upon the current image mode setting, the memory card used . 43 From the screen displayed after the e Night portrait scene mode is displayed in the shooting screen. - If the subject moves while the camera is displayed. The Z icon is selected, select Hand-held or Tripod...

Reference Manual
Page 63
... the setting in green, press the shutter-release button all the way to capture a series of the monitor lights in the setup menu. - When the j icon at which will be used. Flash mode - After taking a picture, do not turn the camera off before the monitor switches to stabilize the camera during shooting. - k Close-up Use this option when using a tripod or other small objects at close range. • Macro mode (A65) is displayed...
... the setting in green, press the shutter-release button all the way to capture a series of the monitor lights in the setup menu. - When the j icon at which will be used. Flash mode - After taking a picture, do not turn the camera off before the monitor switches to stabilize the camera during shooting. - k Close-up Use this option when using a tripod or other small objects at close range. • Macro mode (A65) is displayed...

Reference Manual
Page 64
... Off in the setup menu (A94) when using scene modes indicated with O. Self-timer - m Fireworks show O Slow shutter speeds are used to capture the light from fireworks. • Camera focuses at which you do not want to use the flash. • The camera focuses on the area in the center of the frame. • The camera captures a series of up to ten images while the shutter-release button is held all...
... Off in the setup menu (A94) when using scene modes indicated with O. Self-timer - m Fireworks show O Slow shutter speeds are used to capture the light from fireworks. • Camera focuses at which you do not want to use the flash. • The camera focuses on the area in the center of the frame. • The camera captures a series of up to ten images while the shutter-release button is held all...

Reference Manual
Page 68
... viewing. • When connecting the camera using an HDMI cable, set TV settings in this mode for details on the monitor. B Caution for Viewing 3D Images When viewing 3D images on a 3D-compatible TV or monitor for each eye to display images when switching between 3D images and non-3D images. The camera captures one image for an extended period of time, you may experience discomfort such as follows: - Images captured in the setup menu...
... viewing. • When connecting the camera using an HDMI cable, set TV settings in this mode for details on the monitor. B Caution for Viewing 3D Images When viewing 3D images on a 3D-compatible TV or monitor for each eye to display images when switching between 3D images and non-3D images. The camera captures one image for an extended period of time, you may experience discomfort such as follows: - Images captured in the setup menu...

Reference Manual
Page 102
... in the camera's internal memory, remove the memory card from third-party suppliers) to select Nikon Transfer 2. 1 Under Import pictures and videos, click Change program. A program selection dialog will be copied to start. If a message is displayed prompting you to choose a program, select Nikon Transfer 2. • When using Windows 7 If the dialog shown at right is connected to the computer using Nikon Transfer 2 and click OK. 2 Double-click Import File. Wait until Nikon Transfer 2 starts. To transfer images that the memory card is...
... in the camera's internal memory, remove the memory card from third-party suppliers) to select Nikon Transfer 2. 1 Under Import pictures and videos, click Change program. A program selection dialog will be copied to start. If a message is displayed prompting you to choose a program, select Nikon Transfer 2. • When using Windows 7 If the dialog shown at right is connected to the computer using Nikon Transfer 2 and click OK. 2 Double-click Import File. Wait until Nikon Transfer 2 starts. To transfer images that the memory card is...

Reference Manual
Page 114
... Camera Setup The Setup Menu Option Description A Format memory/ Format card Allows you to change the camera's display language. Be sure to save important images by transferring them to match your TV. E80 Blink warning Immediately after taking a picture using face detection (A73) (except when using smart portrait mode), if the camera detects a subject with closed eyes, the camera displays the message Did someone blink?, allowing you to reset the camera's settings to their default values. • Certain settings such as Time zone and date...
... Camera Setup The Setup Menu Option Description A Format memory/ Format card Allows you to change the camera's display language. Be sure to save important images by transferring them to match your TV. E80 Blink warning Immediately after taking a picture using face detection (A73) (except when using smart portrait mode), if the camera detects a subject with closed eyes, the camera displays the message Did someone blink?, allowing you to reset the camera's settings to their default values. • Certain settings such as Time zone and date...

Reference Manual
Page 122
... using favorite pictures mode, the image will not only be removed from the album, but the corresponding image file will also be permanently deleted from the internal memory or the memory card. Favorite Pictures Mode Playing Back Images in full-frame playback mode or thumbnail playback mode, press the d button to the selected album. • The following operations are available from the album selection screen. - To remove y, press I. • Rotate the zoom control (A2) to g (i) to switch...
... using favorite pictures mode, the image will not only be removed from the album, but the corresponding image file will also be permanently deleted from the internal memory or the memory card. Favorite Pictures Mode Playing Back Images in full-frame playback mode or thumbnail playback mode, press the d button to the selected album. • The following operations are available from the album selection screen. - To remove y, press I. • Rotate the zoom control (A2) to g (i) to switch...

Reference Manual
Page 128
... d button. 2 If the d button is pressed when only a key picture displayed, the same settings can be changed using their key pictures or to display them as individual images. • Images captured continuously with cameras other than the COOLPIX S6300 cannot be displayed using Choose key picture (E61) in that sequence. Reference Section E14 Viewing and Deleting Images Captured Continuously (Sequence) B Sequence Display Options • Select Sequence display options (E61) in the playback menu to set all images in...
... d button. 2 If the d button is pressed when only a key picture displayed, the same settings can be changed using their key pictures or to display them as individual images. • Images captured continuously with cameras other than the COOLPIX S6300 cannot be displayed using Choose key picture (E61) in that sequence. Reference Section E14 Viewing and Deleting Images Captured Continuously (Sequence) B Sequence Display Options • Select Sequence display options (E61) in the playback menu to set all images in...

Reference Manual
Page 138
... zoom control to select images, start and pause movie playback, switch between full-screen playback mode and 4-image thumbnail display, etc. • Set the HDMI device control setting (E79) of TV settings to On (default setting) and then connect the camera and TV using an HDMI cable. • Aim the remote control at an angle. • Do not connect cables to the HDMI mini connector (Type C) and to the USB/audio/video output connector simultaneously. C Using a TV Remote Control (HDMI Device Control...
... zoom control to select images, start and pause movie playback, switch between full-screen playback mode and 4-image thumbnail display, etc. • Set the HDMI device control setting (E79) of TV settings to On (default setting) and then connect the camera and TV using an HDMI cable. • Aim the remote control at an angle. • Do not connect cables to the HDMI mini connector (Type C) and to the USB/audio/video output connector simultaneously. C Using a TV Remote Control (HDMI Device Control...
Reference Manual
Page 195
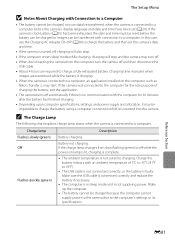
... the battery can be charged or images can data be transferred, when the camera is connected to a computer. Make sure the USB cable is connected correctly and replace the battery if necessary. • The computer is in sleep mode and is inserted into the camera. If the camera's clock battery (A25) has been exhausted, the date and time must be reset before the camera's display language and date and time have been set the camera's date and time. •...
... the battery can be charged or images can data be transferred, when the camera is connected to a computer. Make sure the USB cable is connected correctly and replace the battery if necessary. • The computer is in sleep mode and is inserted into the camera. If the camera's clock battery (A25) has been exhausted, the date and time must be reset before the camera's display language and date and time have been set the camera's date and time. •...
Reference Manual
Page 207
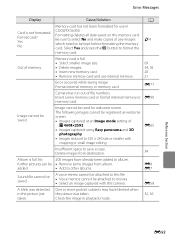
... E7 Sound file cannot be attached to save a copy. Out of file numbers. No 200 images have blinked when the picture was detected in playback mode. 32, 56 Reference Section E93 A voice memo cannot be attached to this camera. - Yes No COOLPIX S6300. Delete images from album. Check the image in the picture just taken. Format card? Memory card is full. • Select smaller image size. • Delete images. • Insert new memory card. • Remove memory card and use in Card is...
... E7 Sound file cannot be attached to save a copy. Out of file numbers. No 200 images have blinked when the picture was detected in playback mode. 32, 56 Reference Section E93 A voice memo cannot be attached to this camera. - Yes No COOLPIX S6300. Delete images from album. Check the image in the picture just taken. Format card? Memory card is full. • Select smaller image size. • Delete images. • Insert new memory card. • Remove memory card and use in Card is...

Reference Manual
Page 209
... loaded in camera's internal circuitry. E5 34 - Failed to save 3D image Failed to resume printing.* Printer error: check paper Specified size of paper is aligned with printer. If error persists, contact retailer or Nikon-authorized service 22 representative. Turn camera off and then on again. Printer error. If error persists, contact retailer or Nikonauthorized service representative. 16, 23 Printer error: check printer status. Lens error Lens error. Turn camera off, remove and reinsert battery, and turn camera on the shooting conditions...
... loaded in camera's internal circuitry. E5 34 - Failed to save 3D image Failed to resume printing.* Printer error: check paper Specified size of paper is aligned with printer. If error persists, contact retailer or Nikon-authorized service 22 representative. Turn camera off and then on again. Printer error. If error persists, contact retailer or Nikonauthorized service representative. 16, 23 Printer error: check printer status. Lens error Lens error. Turn camera off, remove and reinsert battery, and turn camera on the shooting conditions...

Reference Manual
Page 217
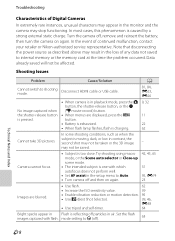
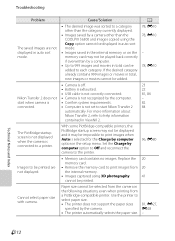
... Print support Print date. 95, E71 date is dirty. environment; Images and movies saved before resuming use. Camera settings reset. 24, 25 Battery temperature is not a malfunction. Troubleshooting Problem Cause/Solution A Monitor is exhausted; Screen for Photo info. power-on lamp flashes After the lamp flashes for an extended period of recording are dated "01/01/2012 00:00". The camera may become hot when used in Hide info is selected for setting time zone and date is displayed...
... Print support Print date. 95, E71 date is dirty. environment; Images and movies saved before resuming use. Camera settings reset. 24, 25 Battery temperature is not a malfunction. Troubleshooting Problem Cause/Solution A Monitor is exhausted; Screen for Photo info. power-on lamp flashes After the lamp flashes for an extended period of recording are dated "01/01/2012 00:00". The camera may become hot when used in Hide info is selected for setting time zone and date is displayed...
Reference Manual
Page 218
... time the problem occurred. Set the flash images captured with which autofocus does not perform well. • Set AF assist in playback mode, press the A button, the shutter-release button, or the b (e movie-record) button. • When menus are blurred. • Use flash. 62 • Increase the ISO sensitivity value. 39 • Enable vibration reduction or motion detection. 95 • Use D (Best Shot Selector). 39, 46, E38 • Use tripod and self-timer...
... time the problem occurred. Set the flash images captured with which autofocus does not perform well. • Set AF assist in playback mode, press the A button, the shutter-release button, or the b (e movie-record) button. • When menus are blurred. • Use flash. 62 • Increase the ISO sensitivity value. 39 • Enable vibration reduction or motion detection. 95 • Use D (Best Shot Selector). 39, 46, E38 • Use tripod and self-timer...

Reference Manual
Page 219
... Continuous in the shooting menu is set to W (off ). • Flash window is blocked. • Subject is beyond flash range. • Adjust exposure compensation. • Increase ISO sensitivity. • Subject is selected for Blink proof in the setup menu. • Digital zoom cannot be used . Off is selected in setup menu. Images are unnatural. Digital zoom cannot be reduced by: • Using flash. • Specifying a lower ISO sensitivity setting. • The flash mode is set to On), Easy panorama, Pet...
... Continuous in the shooting menu is set to W (off ). • Flash window is blocked. • Subject is beyond flash range. • Adjust exposure compensation. • Increase ISO sensitivity. • Subject is selected for Blink proof in the setup menu. • Digital zoom cannot be used . Off is selected in setup menu. Images are unnatural. Digital zoom cannot be reduced by: • Using flash. • Specifying a lower ISO sensitivity setting. • The flash mode is set to On), Easy panorama, Pet...

Reference Manual
Page 221
... connector (Type C) and to their default icons, images Data saved in the TV settings setup menu. • Cables are required for editing images. • Camera is connected via HDMI and they are reset to the USB/audio/video output connector simultaneously. • Memory card contains no images. The COOLPIX S6300 cannot rotate images captured with 3D photography. Images are not displayed on TV. • Video mode or HDMI is not correctly set in the internal memory or on image. pictures mode.
... connector (Type C) and to their default icons, images Data saved in the TV settings setup menu. • Cables are required for editing images. • Camera is connected via HDMI and they are reset to the USB/audio/video output connector simultaneously. • Memory card contains no images. The COOLPIX S6300 cannot rotate images captured with 3D photography. Images are not displayed on TV. • Video mode or HDMI is not correctly set in the internal memory or on image. pictures mode.
Reference Manual
Page 222
... set to each category. Use the printer to select paper size. • The printer does not support the paper sizes specified by the computer. • Confirm system requirements. • Computer is selected for the Charge by a computer. • Up to 999 images and movies in the setup menu. Replace the memory card. • Remove the memory card to print images from the internal memory. • Images captured using the Copy option cannot be displayed in auto sort mode...
... set to each category. Use the printer to select paper size. • The printer does not support the paper sizes specified by the computer. • Confirm system requirements. • Computer is selected for the Charge by a computer. • Up to 999 images and movies in the setup menu. Replace the memory card. • Remove the memory card to print images from the internal memory. • Images captured using the Copy option cannot be displayed in auto sort mode...

Reference Manual
Page 230
... Recording slow motion movies 91, E31, E63 Red-eye reduction 63 Remove from favorites E8 Reset all 96, E86 Rotary multi selector 4, 5, 10 Rotate image 79, E56 RSCN E90 S Scene auto selector x 42 Scene mode 41, 42 Selective color I 51 Self-timer 64 Self-timer lamp 2, 64 Sepia 40, E42 Sequence display options 80, E13, E61 Setup menu 94 Shooting 26, 28, 30 Shooting menu 39, E36 Shooting mode 9, 26 Shutter sound E75 Shutter speed 30 Shutter...
... Recording slow motion movies 91, E31, E63 Red-eye reduction 63 Remove from favorites E8 Reset all 96, E86 Rotary multi selector 4, 5, 10 Rotate image 79, E56 RSCN E90 S Scene auto selector x 42 Scene mode 41, 42 Selective color I 51 Self-timer 64 Self-timer lamp 2, 64 Sepia 40, E42 Sequence display options 80, E13, E61 Setup menu 94 Shooting 26, 28, 30 Shooting menu 39, E36 Shooting mode 9, 26 Shutter sound E75 Shutter speed 30 Shutter...


