Reference Manual
Page 4
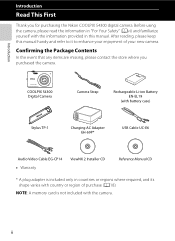
... In the event that any items are missing, please contact the store where you for purchasing the Nikon COOLPIX S4300 digital camera. COOLPIX S4300 Digital Camera Camera Strap Rechargeable Li-ion Battery EN-EL19 (with battery case) Stylus TP-1 Charging AC Adapter EH-69P* USB Cable UC-E6 Audio Video Cable EG-CP14 • Warranty ViewNX...
... In the event that any items are missing, please contact the store where you for purchasing the Nikon COOLPIX S4300 digital camera. COOLPIX S4300 Digital Camera Camera Strap Rechargeable Li-ion Battery EN-EL19 (with battery case) Stylus TP-1 Charging AC Adapter EH-69P* USB Cable UC-E6 Audio Video Cable EG-CP14 • Warranty ViewNX...
Reference Manual
Page 6
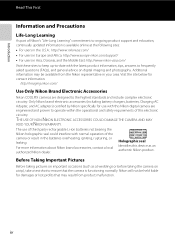
... ongoing product support and education, continually updated information is functioning normally. Only Nikon brand electronic accessories (including battery chargers, batteries, Charging AC Adapter, and AC adapters) certified by Nikon specifically for contact information: http://imaging.nikon.com/ Use Only Nikon Brand Electronic Accessories Nikon COOLPIX cameras are engineered and proven to ensure that may be held liable...
... ongoing product support and education, continually updated information is functioning normally. Only Nikon brand electronic accessories (including battery chargers, batteries, Charging AC Adapter, and AC adapters) certified by Nikon specifically for contact information: http://imaging.nikon.com/ Use Only Nikon Brand Electronic Accessories Nikon COOLPIX cameras are engineered and proven to ensure that may be held liable...
Reference Manual
Page 8
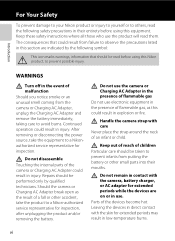
Continued operation could result in injury. Should the camera or Charging AC Adapter break open as this Nikon product, to prevent possible injury. The consequences that should be performed only by qualified technicians. Introduction WARNINGS Turn off in the ...Repairs should be taken to prevent infants from the camera or Charging AC Adapter, unplug the Charging AC Adapter and remove the battery immediately, taking care to a Nikon-authorized service representative for inspection. Do not use the camera or Charging AC Adapter in the presence of children Particular care should be...
Continued operation could result in injury. Should the camera or Charging AC Adapter break open as this Nikon product, to prevent possible injury. The consequences that should be performed only by qualified technicians. Introduction WARNINGS Turn off in the ...Repairs should be taken to prevent infants from the camera or Charging AC Adapter, unplug the Charging AC Adapter and remove the battery immediately, taking care to a Nikon-authorized service representative for inspection. Do not use the camera or Charging AC Adapter in the presence of children Particular care should be...
Reference Manual
Page 9
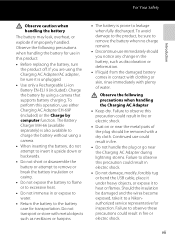
... the product off. Failure to observe this precaution could result in fire or electric shock. • Dust on or near the Charging AC Adapter during lightning storms. Failure to observe this precaution could result in contact with clothing or skin, rinse immediately with plenty of... heavy objects, or expose it to the battery case for inspection. Continued use immediately should be sure to remove the battery when no charge remains. • Discontinue use could result in or expose to water. • Return the battery to a Nikonauthorized service representative for transportation...
... the product off. Failure to observe this precaution could result in fire or electric shock. • Dust on or near the Charging AC Adapter during lightning storms. Failure to observe this precaution could result in contact with clothing or skin, rinse immediately with plenty of... heavy objects, or expose it to the battery case for inspection. Continued use immediately should be sure to remove the battery when no charge remains. • Discontinue use could result in or expose to water. • Return the battery to a Nikonauthorized service representative for transportation...

Reference Manual
Page 10
...designed to convert from the subject. Playing CD-ROMs on audio CD equipment. For Your Safety Introduction • Do not handle the plug or Charging AC Adapter with product regulations. Avoid contact with DCto-AC inverters. Failure to your fingers or other objects are not pinched by... Nikon for the purpose, to prevent liquid crystal from the monitor touching the skin or entering the eyes or mouth. Observe caution when using ...
...designed to convert from the subject. Playing CD-ROMs on audio CD equipment. For Your Safety Introduction • Do not handle the plug or Charging AC Adapter with product regulations. Avoid contact with DCto-AC inverters. Failure to your fingers or other objects are not pinched by... Nikon for the purpose, to prevent liquid crystal from the monitor touching the skin or entering the eyes or mouth. Observe caution when using ...

Reference Manual
Page 12
...Canada. Do not dispose of as household waste. • For more information, contact the retailer or the local authorities in charge of California to be collected separately. Nikon Inc., 1300 Walt Whitman Road Melville, New York 11747-3064 USA Tel: 631-547-4200 Notice for customers in European ...other reproductive harm. Do not dispose of as household waste. • For more information, contact the retailer or the local authorities in charge of California WARNING Handling the cord on the battery indicates that this product will expose you to lead, a chemical known to the ...
...Canada. Do not dispose of as household waste. • For more information, contact the retailer or the local authorities in charge of California to be collected separately. Nikon Inc., 1300 Walt Whitman Road Melville, New York 11747-3064 USA Tel: 631-547-4200 Notice for customers in European ...other reproductive harm. Do not dispose of as household waste. • For more information, contact the retailer or the local authorities in charge of California WARNING Handling the cord on the battery indicates that this product will expose you to lead, a chemical known to the ...

Reference Manual
Page 13
...) ...11 Pressing the Shutter-release Button ...13 Attaching the Camera Strap ...13 Basic Steps for Shooting and Playback 15 Preparation 1 Insert the Battery...16 Preparation 2 Charge the Battery 18 Preparation 3 Insert a Memory Card 20 Internal Memory and Memory Cards ...21 Approved Memory Cards ...21 Step 1 Turn the Camera On ...22 Turning...
...) ...11 Pressing the Shutter-release Button ...13 Attaching the Camera Strap ...13 Basic Steps for Shooting and Playback 15 Preparation 1 Insert the Battery...16 Preparation 2 Charge the Battery 18 Preparation 3 Insert a Memory Card 20 Internal Memory and Memory Cards ...21 Approved Memory Cards ...21 Step 1 Turn the Camera On ...22 Turning...

Reference Manual
Page 16
... U Motion Detection ...E72 h AF Assist ...E73 u Digital Zoom ...E73 i Sound Settings ...E74 k Auto Off ...E75 l/m Format Memory/Format Card E76 n Language ...E77 o Video Mode ...E77 V Charge by Computer ...E78 d Blink Warning...E80 b Eye-Fi Upload...E82 p Reset All...E83 r Firmware Version ...E85 File and Folder Names...E86 Optional Accessories ...E87 Error...
... U Motion Detection ...E72 h AF Assist ...E73 u Digital Zoom ...E73 i Sound Settings ...E74 k Auto Off ...E75 l/m Format Memory/Format Card E76 n Language ...E77 o Video Mode ...E77 V Charge by Computer ...E78 d Blink Warning...E80 b Eye-Fi Upload...E82 p Reset All...E83 r Firmware Version ...E85 File and Folder Names...E86 Optional Accessories ...E87 Error...
Reference Manual
Page 17
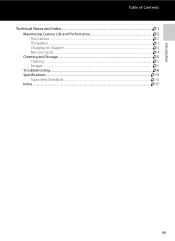
Introduction Table of Contents Technical Notes and Index...F1 Maximizing Camera Life and Performance F2 The Camera ...F2 The Battery...F3 Charging AC Adapter...F4 Memory Cards ...F4 Cleaning and Storage ...F5 Cleaning ...F5 Storage ...F5 Troubleshooting...F6 Specifications ...F13 Supported Standards ...F16 Index ...F17 xv
Introduction Table of Contents Technical Notes and Index...F1 Maximizing Camera Life and Performance F2 The Camera ...F2 The Battery...F3 Charging AC Adapter...F4 Memory Cards ...F4 Cleaning and Storage ...F5 Cleaning ...F5 Storage ...F5 Troubleshooting...F6 Specifications ...F13 Supported Standards ...F16 Index ...F17 xv

Reference Manual
Page 21
Parts of the Camera Parts of the Camera and Basic Operations 1 2 3 4 5 Under the connector cover 6 7 8 9 10 11 12 13 1 Monitor/touch panel 6 2 b (e movie-record) button 82 3 Charge lamp 19, E79 Flash lamp 55 4 A (shooting mode) button.......... 10, 26 5 c (playback) button 10, 32, 73 6 USB/audio/video output connector 18, 76, E27, E30 7 Tripod socket 8 Speaker 86, E59 9 Connector cover 18, 76, E27, E30 10 Battery-chamber/ memory card slot cover 16, 20 11 Memory card slot 20 12 Battery chamber 16 13 Battery latch 16, 17 3
Parts of the Camera Parts of the Camera and Basic Operations 1 2 3 4 5 Under the connector cover 6 7 8 9 10 11 12 13 1 Monitor/touch panel 6 2 b (e movie-record) button 82 3 Charge lamp 19, E79 Flash lamp 55 4 A (shooting mode) button.......... 10, 26 5 c (playback) button 10, 32, 73 6 USB/audio/video output connector 18, 76, E27, E30 7 Tripod socket 8 Speaker 86, E59 9 Connector cover 18, 76, E27, E30 10 Battery-chamber/ memory card slot cover 16, 20 11 Memory card slot 20 12 Battery chamber 16 13 Battery latch 16, 17 3

Reference Manual
Page 33
Basic Steps for Shooting and Playback Basic Steps for Shooting and Playback Preparation Preparation 1 Insert the Battery 16 Preparation 2 Charge the Battery 18 Preparation 3 Insert a Memory Card 20 Shooting Step 1 Turn the Camera On 22 Setting the Display Language, Date and Time (First Use After Purchase) ...24 Step 2 Select a Shooting Mode 26 Step 3 Frame a Picture ...28 Step 4 Focus and Shoot...30 Playback Step 5 Play Back Images ...32 Step 6 Delete Unwanted Images 34 15
Basic Steps for Shooting and Playback Basic Steps for Shooting and Playback Preparation Preparation 1 Insert the Battery 16 Preparation 2 Charge the Battery 18 Preparation 3 Insert a Memory Card 20 Shooting Step 1 Turn the Camera On 22 Setting the Display Language, Date and Time (First Use After Purchase) ...24 Step 2 Select a Shooting Mode 26 Step 3 Frame a Picture ...28 Step 4 Focus and Shoot...30 Playback Step 5 Play Back Images ...32 Step 6 Delete Unwanted Images 34 15

Reference Manual
Page 34
...; When the battery is properly inserted, the battery latch will lock it in the correct orientation. 3 Close the battery-chamber/memory card slot cover. • Charge the battery before first use or when it is in place. See page 18 for Shooting and Playback Preparation 1 Insert the Battery 1 Open the battery...
...; When the battery is properly inserted, the battery latch will lock it in the correct orientation. 3 Close the battery-chamber/memory card slot cover. • Charge the battery before first use or when it is in place. See page 18 for Shooting and Playback Preparation 1 Insert the Battery 1 Open the battery...

Reference Manual
Page 36
... attempt to insert plugs at an angle, and do not use force when connecting or disconnecting the plugs. Once the two are properly oriented. The Charging AC Adapter comes with the plug adapter attached in Argentina and Korea. 2 Make sure the battery is installed in the camera, and then connect the... disconnect the USB cable. • When the camera is connected to the electrical outlet with the EH-69P, the camera cannot be turned on the Charging AC Adapter. Push the plug adapter firmly until it is securely held in which the camera was purchased. Preparation...
... attempt to insert plugs at an angle, and do not use force when connecting or disconnecting the plugs. Once the two are properly oriented. The Charging AC Adapter comes with the plug adapter attached in Argentina and Korea. 2 Make sure the battery is installed in the camera, and then connect the... disconnect the USB cable. • When the camera is connected to the electrical outlet with the EH-69P, the camera cannot be turned on the Charging AC Adapter. Push the plug adapter firmly until it is securely held in which the camera was purchased. Preparation...

Reference Manual
Page 37
... • Do not, under any circumstances, use . Charge the battery indoors with an ambient temperature of AC adapter other than the EH-62G. C Charging Using Computer or Battery Charger • Connecting the COOLPIX S4300 to a computer also charges the Rechargeable Li-ion Battery EN-EL19 (A76, E78...). • Rechargeable Li-ion Battery EN-EL19 can be charged using the Battery Charger MH-66 (...
... • Do not, under any circumstances, use . Charge the battery indoors with an ambient temperature of AC adapter other than the EH-62G. C Charging Using Computer or Battery Charger • Connecting the COOLPIX S4300 to a computer also charges the Rechargeable Li-ion Battery EN-EL19 (A76, E78...). • Rechargeable Li-ion Battery EN-EL19 can be charged using the Battery Charger MH-66 (...

Reference Manual
Page 40
... MB). • The number of exposures remaining depends on . 2 Check the battery level indicator and the number of exposures remaining. Recharge or replace with a fully charged battery. Step 1 Turn the Camera On 1 Press the power switch to charge or replace the battery. Description The battery level is high.
... MB). • The number of exposures remaining depends on . 2 Check the battery level indicator and the number of exposures remaining. Recharge or replace with a fully charged battery. Step 1 Turn the Camera On 1 Press the power switch to charge or replace the battery. Description The battery level is high.

Reference Manual
Page 43
... On 6 Tap Yes. • The settings are taken by the backup battery that is separate from the camera's main battery. • The backup battery charges when the main battery is inserted into the camera or when the camera is connected to turn off the daylight saving time option, tap p again...shooting mode. To turn on the daylight saving time option. • When the daylight saving time option is enabled, W is displayed at the time of charging. • If the backup battery becomes exhausted, the date and time setting screen is displayed when the camera is in effect, tap p in the time...
... On 6 Tap Yes. • The settings are taken by the backup battery that is separate from the camera's main battery. • The backup battery charges when the main battery is inserted into the camera or when the camera is connected to turn off the daylight saving time option, tap p again...shooting mode. To turn on the daylight saving time option. • When the daylight saving time option is enabled, W is displayed at the time of charging. • If the backup battery becomes exhausted, the date and time setting screen is displayed when the camera is in effect, tap p in the time...

Reference Manual
Page 73
... pressed halfway. - Basic Shooting Settings Using the Flash (Flash Modes) Flash mode can be turned off while the flash is changing. Flashing: The flash is charging.
... pressed halfway. - Basic Shooting Settings Using the Flash (Flash Modes) Flash mode can be turned off while the flash is changing. Flashing: The flash is charging.

Reference Manual
Page 108
... camera's battery by connecting the camera to a computer (provided that the computer is able to supply power). • When charging by computer d Blink warning b Eye-Fi upload p Reset all r Firmware version Description Choose the language used for camera monitor display. E82 Fi ... available Eye- E85 General Camera Setup 90 Select from NTSC and PAL. The Setup Menu Option n Language o Video mode V Charge by computer, it takes more time to charge the battery than when using smart portrait mode), if the camera detects a subject with closed eyes, the camera displays the message ...
... camera's battery by connecting the camera to a computer (provided that the computer is able to supply power). • When charging by computer d Blink warning b Eye-Fi upload p Reset all r Firmware version Description Choose the language used for camera monitor display. E82 Fi ... available Eye- E85 General Camera Setup 90 Select from NTSC and PAL. The Setup Menu Option n Language o Video mode V Charge by computer, it takes more time to charge the battery than when using smart portrait mode), if the camera detects a subject with closed eyes, the camera displays the message ...
Reference Manual
Page 137
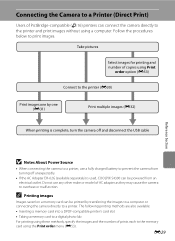
... of AC adapter as they may cause the camera to a printer. Do not use a fully charged battery to prevent the camera from turning off unexpectedly. • If the AC Adapter EH-62G (available separately) is used, COOLPIX S4300 can be powered from an electrical outlet. Take pictures Select images for printing and number...
... of AC adapter as they may cause the camera to a printer. Do not use a fully charged battery to prevent the camera from turning off unexpectedly. • If the AC Adapter EH-62G (available separately) is used, COOLPIX S4300 can be powered from an electrical outlet. Take pictures Select images for printing and number...

Reference Manual
Page 138
E30 Set the Charge by computer option (E78) in the camera monitor, followed by the image selection screen (2). 1 2 15 / 05 / 2012 4/ 4 B If the PictBridge Startup Screen Is not Displayed ...
E30 Set the Charge by computer option (E78) in the camera monitor, followed by the image selection screen (2). 1 2 15 / 05 / 2012 4/ 4 B If the PictBridge Startup Screen Is not Displayed ...


