
Reference Manual
Page 3
Introduction Parts of the Camera and Basic Operations Basic Steps for Shooting and Playback Shooting Features Playback Features Recording and Playing Back Movies General Camera Setup Reference Section Technical Notes and Index i
Introduction Parts of the Camera and Basic Operations Basic Steps for Shooting and Playback Shooting Features Playback Features Recording and Playing Back Movies General Camera Setup Reference Section Technical Notes and Index i
Reference Manual
Page 4
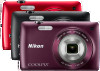
...adapter is not included with the camera. After reading, please keep this manual. Confirming the Package Contents In the event that any items are missing, please contact the store where you for purchasing the Nikon COOLPIX S4300 digital camera. ii Before using the camera, please read the information in... this manual handy and refer to it to enhance your new camera. NOTE: A memory card is included only in countries or ...
...adapter is not included with the camera. After reading, please keep this manual. Confirming the Package Contents In the event that any items are missing, please contact the store where you for purchasing the Nikon COOLPIX S4300 digital camera. ii Before using the camera, please read the information in... this manual handy and refer to it to enhance your new camera. NOTE: A memory card is included only in countries or ...

Reference Manual
Page 5
... sometimes omitted from the actual product. Introduction Other Information • Symbols and Conventions To make it easier to find the information you want to the camera. E: F "Reference Section", F: "Technical Notes and Index." • SD, SDHC, and SDXC memory cards are referred to as "memory cards" in this ...; The setting at the time of purchase is referred to as the "default setting." • The names of menu options displayed in the camera monitor, and the names of buttons or messages displayed on a computer monitor appear in this manual, images are used in bold. • ...
... sometimes omitted from the actual product. Introduction Other Information • Symbols and Conventions To make it easier to find the information you want to the camera. E: F "Reference Section", F: "Technical Notes and Index." • SD, SDHC, and SDXC memory cards are referred to as "memory cards" in this ...; The setting at the time of purchase is referred to as the "default setting." • The names of menu options displayed in the camera monitor, and the names of buttons or messages displayed on a computer monitor appear in this manual, images are used in bold. • ...
Reference Manual
Page 6
... electronic accessories (including battery chargers, batteries, Charging AC Adapter, and AC adapters) certified by Nikon specifically for contact information: http://imaging.nikon.com/ Use Only Nikon Brand Electronic Accessories Nikon COOLPIX cameras are engineered and proven to operate within the operational and safety requirements of this electronic circuitry. The use with this device as at the...
... electronic accessories (including battery chargers, batteries, Charging AC Adapter, and AC adapters) certified by Nikon specifically for contact information: http://imaging.nikon.com/ Use Only Nikon Brand Electronic Accessories Nikon COOLPIX cameras are engineered and proven to operate within the operational and safety requirements of this electronic circuitry. The use with this device as at the...

Reference Manual
Page 7
... would appreciate it with images containing no private information (for the purpose of copyrighted creative works such as memory cards or builtin camera memory does not completely erase the original image data. Disposing of unused postage stamps or post cards issued by the government is...transmitted, transcribed, stored in a retrieval system, or translated into any language in any form, by any means, without Nikon's prior written permission. • Nikon reserves the right to change the specifications of the hardware and software described in the documentation at any time and without prior...
... would appreciate it with images containing no private information (for the purpose of copyrighted creative works such as memory cards or builtin camera memory does not completely erase the original image data. Disposing of unused postage stamps or post cards issued by the government is...transmitted, transcribed, stored in a retrieval system, or translated into any language in any form, by any means, without Nikon's prior written permission. • Nikon reserves the right to change the specifications of the hardware and software described in the documentation at any time and without prior...
Reference Manual
Page 8
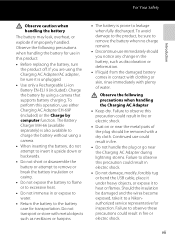
... become hot. After removing or disconnecting the power source, take the product to a Nikon-authorized service representative for inspection. The consequences that should be taken to prevent infants from the camera or Charging AC Adapter, unplug the Charging AC Adapter and remove the battery immediately, ...taking care to avoid burns. Should the camera or Charging AC Adapter break open as this Nikon product, to prevent possible injury. vi For Your Safety To prevent damage to your Nikon product or injury to yourself or to others, read the following ...
... become hot. After removing or disconnecting the power source, take the product to a Nikon-authorized service representative for inspection. The consequences that should be taken to prevent infants from the camera or Charging AC Adapter, unplug the Charging AC Adapter and remove the battery immediately, ...taking care to avoid burns. Should the camera or Charging AC Adapter break open as this Nikon product, to prevent possible injury. vi For Your Safety To prevent damage to your Nikon product or injury to yourself or to others, read the following ...
Reference Manual
Page 9
... off. Observe the following precautions when handling the battery for inspection. Continued use either Charging AC Adapter EH-69P (included) or the Charge by using a camera. • When inserting the battery, do not attempt to insert it is unplugged. • Use only a Rechargeable Li-ion Battery EN-EL19 (included). Charge the... should you are using the Charging AC Adapter/AC adapter, be damaged and the wires become exposed, take it to charge the battery without using a camera that supports battery charging. vii
... off. Observe the following precautions when handling the battery for inspection. Continued use either Charging AC Adapter EH-69P (included) or the Charge by using a camera. • When inserting the battery, do not attempt to insert it is unplugged. • Use only a Rechargeable Li-ion Battery EN-EL19 (included). Charge the... should you are using the Charging AC Adapter/AC adapter, be damaged and the wires become exposed, take it to charge the battery without using a camera that supports battery charging. vii

Reference Manual
Page 10
... waves given out by this device should be played back on an audio CD player could result in a hospital. Failure to another or with this camera may disrupt the electronic systems of the airplane or the instruments of the hospital when using while in burns or fire. Turn the power off... (3 ft 4 in electric shock. • Do not use only the cables provided or sold by the lens cover or other objects are not pinched by Nikon for the purpose, to your fingers or other moving parts. Handle moving parts with product regulations. viii Do not operate the flash with wet hands...
... waves given out by this device should be played back on an audio CD player could result in a hospital. Failure to another or with this camera may disrupt the electronic systems of the airplane or the instruments of the hospital when using while in burns or fire. Turn the power off... (3 ft 4 in electric shock. • Do not use only the cables provided or sold by the lens cover or other objects are not pinched by Nikon for the purpose, to your fingers or other moving parts. Handle moving parts with product regulations. viii Do not operate the flash with wet hands...

Reference Manual
Page 13
...This Manual...iii Information and Precautions...iv For Your Safety...vi WARNINGS ...vi Notices ...ix Parts of the Camera and Basic Operations 1 Parts of the Camera...2 The Camera Body ...2 Operating the Touch Panel ...4 Tapping...4 Dragging ...4 Dragging and Dropping...4 Using the Stylus ...5 Indicators ... ...9 Switching Between Shooting Mode and Playback Mode 10 Using Menus (d Tab) ...11 Pressing the Shutter-release Button ...13 Attaching the Camera Strap ...13 Basic Steps for Shooting and Playback 15 Preparation 1 Insert the Battery...16 Preparation 2 Charge the Battery 18 Preparation 3 ...
...This Manual...iii Information and Precautions...iv For Your Safety...vi WARNINGS ...vi Notices ...ix Parts of the Camera and Basic Operations 1 Parts of the Camera...2 The Camera Body ...2 Operating the Touch Panel ...4 Tapping...4 Dragging ...4 Dragging and Dropping...4 Using the Stylus ...5 Indicators ... ...9 Switching Between Shooting Mode and Playback Mode 10 Using Menus (d Tab) ...11 Pressing the Shutter-release Button ...13 Attaching the Camera Strap ...13 Basic Steps for Shooting and Playback 15 Preparation 1 Insert the Battery...16 Preparation 2 Charge the Battery 18 Preparation 3 ...

Reference Manual
Page 14
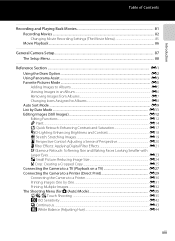
... 72 Available Playback Modes...72 Switching Between Playback Modes ...73 Setting the Picture Rating ...74 Functions Available in Playback Mode (Playback Menu 75 Connecting the Camera to a TV, Computer, or Printer 76 Using ViewNX 2 ...77 Installing ViewNX 2...77 Transferring Images to the Computer 79 Viewing Images...80 xii
... 72 Available Playback Modes...72 Switching Between Playback Modes ...73 Setting the Picture Rating ...74 Functions Available in Playback Mode (Playback Menu 75 Connecting the Camera to a TV, Computer, or Printer 76 Using ViewNX 2 ...77 Installing ViewNX 2...77 Transferring Images to the Computer 79 Viewing Images...80 xii
Reference Manual
Page 15
... Recording and Playing Back Movies 81 Recording Movies ...82 Changing Movie Recording Settings (The Movie Menu 85 Movie Playback ...86 General Camera Setup...87 The Setup Menu ...88 Reference Section ...E1 Using the Draw Option ...E2 Using Panorama Assist...E3 Favorite Pictures Mode ... g Small Picture: Reducing Image Size E24 o Crop: Creating a Cropped Copy E25 Connecting the Camera to a TV (Playback on a TV E27 Connecting the Camera to a Printer (Direct Print E29 Connecting the Camera to a Printer E30 Printing Images One by One...E31 Printing Multiple Images...E32 The Shooting Menu...
... Recording and Playing Back Movies 81 Recording Movies ...82 Changing Movie Recording Settings (The Movie Menu 85 Movie Playback ...86 General Camera Setup...87 The Setup Menu ...88 Reference Section ...E1 Using the Draw Option ...E2 Using Panorama Assist...E3 Favorite Pictures Mode ... g Small Picture: Reducing Image Size E24 o Crop: Creating a Cropped Copy E25 Connecting the Camera to a TV (Playback on a TV E27 Connecting the Camera to a Printer (Direct Print E29 Connecting the Camera to a Printer E30 Printing Images One by One...E31 Printing Multiple Images...E32 The Shooting Menu...
Reference Manual
Page 17
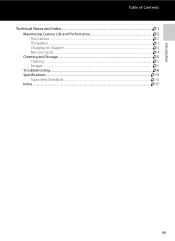
Introduction Table of Contents Technical Notes and Index...F1 Maximizing Camera Life and Performance F2 The Camera ...F2 The Battery...F3 Charging AC Adapter...F4 Memory Cards ...F4 Cleaning and Storage ...F5 Cleaning ...F5 Storage ...F5 Troubleshooting...F6 Specifications ...F13 Supported Standards ...F16 Index ...F17 xv
Introduction Table of Contents Technical Notes and Index...F1 Maximizing Camera Life and Performance F2 The Camera ...F2 The Battery...F3 Charging AC Adapter...F4 Memory Cards ...F4 Cleaning and Storage ...F5 Cleaning ...F5 Storage ...F5 Troubleshooting...F6 Specifications ...F13 Supported Standards ...F16 Index ...F17 xv

Reference Manual
Page 19
......4 Dragging and Dropping 4 Using the Stylus ...5 Indicators and Operations of the camera and also explains how to start using the camera right away, see "Basic Steps for Shooting and Playback" (A15). 1 Parts of the Camera and Basic Operations Parts of the Camera and Basic Operations This chapter describes the parts of the Monitor/Touch... Display 8 Playback Mode (Operation Controls 9 Switching Between Shooting Mode and Playback Mode 10 Using Menus (d Tab 11 Pressing the Shutter-release Button 13 Attaching the Camera Strap 13 If you want to use basic...
......4 Dragging and Dropping 4 Using the Stylus ...5 Indicators and Operations of the camera and also explains how to start using the camera right away, see "Basic Steps for Shooting and Playback" (A15). 1 Parts of the Camera and Basic Operations Parts of the Camera and Basic Operations This chapter describes the parts of the Monitor/Touch... Display 8 Playback Mode (Operation Controls 9 Switching Between Shooting Mode and Playback Mode 10 Using Menus (d Tab 11 Pressing the Shutter-release Button 13 Attaching the Camera Strap 13 If you want to use basic...

Reference Manual
Page 20
Parts of the Camera and Basic Operations Parts of the Camera The Camera Body 1 23 4 56 Parts of the Camera and Basic Operations 9 Lens cover closed 87 1 Shutter-release button 13, 30 Zoom control 29 f: Wide-angle 29 2 g: Telephoto 29 h: Thumbnail playback 33 i: Playback zoom 33 3 Power switch/power-on lamp 22, 23, E75 4 Flash 55 5 Self-timer lamp 57 AF-assist illuminator 89, E73 6 Lens 7 Built-in microphone 82, E58 8 Lens cover F2 9 Eyelet for camera strap 13 2
Parts of the Camera and Basic Operations Parts of the Camera The Camera Body 1 23 4 56 Parts of the Camera and Basic Operations 9 Lens cover closed 87 1 Shutter-release button 13, 30 Zoom control 29 f: Wide-angle 29 2 g: Telephoto 29 h: Thumbnail playback 33 i: Playback zoom 33 3 Power switch/power-on lamp 22, 23, E75 4 Flash 55 5 Self-timer lamp 57 AF-assist illuminator 89, E73 6 Lens 7 Built-in microphone 82, E58 8 Lens cover F2 9 Eyelet for camera strap 13 2

Reference Manual
Page 21
Parts of the Camera Parts of the Camera and Basic Operations 1 2 3 4 5 Under the connector cover 6 7 8 9 10 11 12 13 1 Monitor/touch panel 6 2 b (e movie-record) button 82 3 Charge lamp 19, E79 Flash lamp 55 4 A (shooting mode) button.......... 10, 26 5 c (playback) button 10, 32, 73 6 USB/audio/video output connector 18, 76, E27, E30 7 Tripod socket 8 Speaker 86, E59 9 Connector cover 18, 76, E27, E30 10 Battery-chamber/ memory card slot cover 16, 20 11 Memory card slot 20 12 Battery chamber 16 13 Battery latch 16, 17 3
Parts of the Camera Parts of the Camera and Basic Operations 1 2 3 4 5 Under the connector cover 6 7 8 9 10 11 12 13 1 Monitor/touch panel 6 2 b (e movie-record) button 82 3 Charge lamp 19, E79 Flash lamp 55 4 A (shooting mode) button.......... 10, 26 5 c (playback) button 10, 32, 73 6 USB/audio/video output connector 18, 76, E27, E30 7 Tripod socket 8 Speaker 86, E59 9 Connector cover 18, 76, E27, E30 10 Battery-chamber/ memory card slot cover 16, 20 11 Memory card slot 20 12 Battery chamber 16 13 Battery latch 16, 17 3
Reference Manual
Page 22
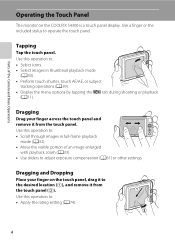
... to: • Select icons. • Select images in full-frame playback mode (A32). • Move the visible portion of the Camera and Basic Operations Operating the Touch Panel The monitor on the touch panel, drag it to the desired location (1), and remove it from the...or subject tracking operations (A39). • Display the menu options by tapping the d tab during shooting or playback (A11). Dragging Drag your finger on the COOLPIX S4300 is a touch panel display. Use a finger or the included stylus to : • Apply the rating setting (A74). 4 Use this operation to operate...
... to: • Select icons. • Select images in full-frame playback mode (A32). • Move the visible portion of the Camera and Basic Operations Operating the Touch Panel The monitor on the touch panel, drag it to the desired location (1), and remove it from the...or subject tracking operations (A39). • Display the menu options by tapping the d tab during shooting or playback (A11). Dragging Drag your finger on the COOLPIX S4300 is a touch panel display. Use a finger or the included stylus to : • Apply the rating setting (A74). 4 Use this operation to operate...

Reference Manual
Page 23
... - Attaching the Stylus Attach the stylus to the touch panel. B Notes About the Touch Panel • Keep the stylus out of reach of the Camera and Basic Operations B Notes About the Touch Panel • Do not press on the touch panel with pointed objects other than using a finger. The stylus... may fall. 5 B Notes About Tapping/Dragging • The camera may not respond if the followings are performed: - Drag your finger is touching the touch panel when your finger off the strap and the...
... - Attaching the Stylus Attach the stylus to the touch panel. B Notes About the Touch Panel • Keep the stylus out of reach of the Camera and Basic Operations B Notes About the Touch Panel • Do not press on the touch panel with pointed objects other than using a finger. The stylus... may fall. 5 B Notes About Tapping/Dragging • The camera may not respond if the followings are performed: - Drag your finger is touching the touch panel when your finger off the strap and the...

Reference Manual
Page 24
... Shooting Mode (Information Indicators) • The information displayed on the monitor varies with current shooting mode. 2 Indicator is displayed when there are displayed when the camera is turned on or is in operation, and they disappear after a few seconds elapse (when Photo info is set to display them again. 22 21..., 51 19 Focus area (center) 20 Focus area (auto 30 21 n Self-timer indicator 57 22 Battery level indicator 22 1 Indicators displayed vary with the camera settings or status. At the default setting, the indicators below are 50 or fewer exposures remaining. 6
... Shooting Mode (Information Indicators) • The information displayed on the monitor varies with current shooting mode. 2 Indicator is displayed when there are displayed when the camera is turned on or is in operation, and they disappear after a few seconds elapse (when Photo info is set to display them again. 22 21..., 51 19 Focus area (center) 20 Focus area (auto 30 21 n Self-timer indicator 57 22 Battery level indicator 22 1 Indicators displayed vary with the camera settings or status. At the default setting, the indicators below are 50 or fewer exposures remaining. 6

Reference Manual
Page 25
Parts of the Camera and Basic Operations Indicators and Operations of the Monitor/Touch Panel Shooting Mode (Operation Controls) Tap the following controls to change settings. • Tap the d ... display the menu options and shooting settings can be changed (A11). • The controls available and indicators displayed vary with shooting mode and the current camera settings. a 7 b 29 0 50 1 2 3 6 4 5 1 d Tab 11 2 Slider display 42, 50 3 Touch AF/AE cancellation E40 4 Basic shooting settings 54 5 Information redisplay 11 6 Menu options 11 a Scene...
Parts of the Camera and Basic Operations Indicators and Operations of the Monitor/Touch Panel Shooting Mode (Operation Controls) Tap the following controls to change settings. • Tap the d ... display the menu options and shooting settings can be changed (A11). • The controls available and indicators displayed vary with shooting mode and the current camera settings. a 7 b 29 0 50 1 2 3 6 4 5 1 d Tab 11 2 Slider display 42, 50 3 Touch AF/AE cancellation E40 4 Basic shooting settings 54 5 Information redisplay 11 6 Menu options 11 a Scene...

Reference Manual
Page 26
...of frames 32 b Movie length 86 8 Image mode2 64 Movie options2 85, E62 9 File number and type E86 10 Date/time of the Camera and Basic Operations 9999. Indicators and Operations of the Monitor/Touch Panel Playback Mode (Information Display) • The information displayed on the monitor varies... with the image played back and the current camera status. • At the default setting, the indicators below are displayed when the camera is turned on or is in operation, and they disappear after a few seconds elapse (when Photo...
...of frames 32 b Movie length 86 8 Image mode2 64 Movie options2 85, E62 9 File number and type E86 10 Date/time of the Camera and Basic Operations 9999. Indicators and Operations of the Monitor/Touch Panel Playback Mode (Information Display) • The information displayed on the monitor varies... with the image played back and the current camera status. • At the default setting, the indicators below are displayed when the camera is turned on or is in operation, and they disappear after a few seconds elapse (when Photo...


