
User Manual
Page 2
...pictures Quick Start Guide (provided) - Basic Playback 68 ...and delete unwanted pictures... ...immediately Keep or Delete 48 ...while shooting Review and Deletion 31 ...during playback Basic Playback 68 Delete multiple pictures Deleting Pictures 76 STEP 4-Install camera software Install software Quick Start Guide (provided) - Review and Deletion 31 ...after shooting... STEP 5-Copy pictures to Using Your Camera STEP 1-Ready the camera Getting ready First Steps 16 Camera setup First Steps Camera Setup 16 59 STEP 2-Take pictures Snapshots (auto mode) Tutorial...
...pictures Quick Start Guide (provided) - Basic Playback 68 ...and delete unwanted pictures... ...immediately Keep or Delete 48 ...while shooting Review and Deletion 31 ...during playback Basic Playback 68 Delete multiple pictures Deleting Pictures 76 STEP 4-Install camera software Install software Quick Start Guide (provided) - Review and Deletion 31 ...after shooting... STEP 5-Copy pictures to Using Your Camera STEP 1-Ready the camera Getting ready First Steps 16 Camera setup First Steps Camera Setup 16 59 STEP 2-Take pictures Snapshots (auto mode) Tutorial...
User Manual
Page 3
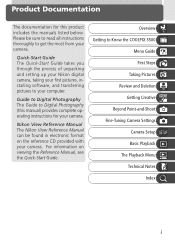
... with your camera. Product Documentation The documentation for this manual) provides complete operating instructions for your camera. Please be found in electronic format on viewing the Reference Manual, see the Quick-Start Guide. Nikon View Reference Manual The Nikon View Reference Manual can be sure to read all instructions thoroughly to Know the COOLPIX 3500 Menu Guide First Steps Taking Pictures Review and Deletion Getting Creative Beyond Point-and-Shoot Fine-Tuning Camera Settings Camera Setup Basic Playback The Playback Menu Technical Notes...
... with your camera. Product Documentation The documentation for this manual) provides complete operating instructions for your camera. Please be found in electronic format on viewing the Reference Manual, see the Quick-Start Guide. Nikon View Reference Manual The Nikon View Reference Manual can be sure to read all instructions thoroughly to Know the COOLPIX 3500 Menu Guide First Steps Taking Pictures Review and Deletion Getting Creative Beyond Point-and-Shoot Fine-Tuning Camera Settings Camera Setup Basic Playback The Playback Menu Technical Notes...
User Manual
Page 9
... -Mode Menu 49 Making Effective Use of Memory: Image Quality and Size 50 Adjusting Exposure: Exp 53 Keeping Colors True: White Balance 54 Taking Pictures in a Sequence: Continuous 56 Getting Sharper Pictures: BSS (Best Shot Selector 57 Making Edges More Distinct: Image Sharpening 58 Camera Setup: The SET-UP Menu 59 Adjusting Monitor Brightness: Brightness 62 Formatting Memory Cards: CF Card Format 62 Setting the Time and Date: Date 63 Conserving Battery Power: Auto Off 63 Choosing a Language: Language 64 Choosing a USB Protocol: USB 64 Restoring Default Settings: Reset All ( Mode...
... -Mode Menu 49 Making Effective Use of Memory: Image Quality and Size 50 Adjusting Exposure: Exp 53 Keeping Colors True: White Balance 54 Taking Pictures in a Sequence: Continuous 56 Getting Sharper Pictures: BSS (Best Shot Selector 57 Making Edges More Distinct: Image Sharpening 58 Camera Setup: The SET-UP Menu 59 Adjusting Monitor Brightness: Brightness 62 Formatting Memory Cards: CF Card Format 62 Setting the Time and Date: Date 63 Conserving Battery Power: Auto Off 63 Choosing a Language: Language 64 Choosing a USB Protocol: USB 64 Restoring Default Settings: Reset All ( Mode...
User Manual
Page 16
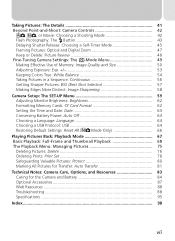
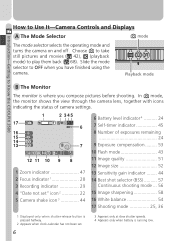
... 12 11 10 9 8 1 Zoom indicator 47 2 Focus indicator 1 28 3 Recording indicator 29 4 "Date not set" icon 2 22 5 Camera shake icon 3 44 6 Battery level indicator 4 .......... 24 7 Self-timer indicator 45 8 Number of exposures remaining 24 9 Exposure compensation ......... 53 10 Flash mode 43 11 Image quality 51 12 Image size 52 13 Sensitivity gain indicator ........ 44 14 Best shot selector (BSS 57 Continuous shooting mode ... 56 15 Image sharpening 58 16 White balance 54 17 Shooting mode 25, 36 1 Displayed only when shutter-release button is pressed halfway. 2 Appears...
... 12 11 10 9 8 1 Zoom indicator 47 2 Focus indicator 1 28 3 Recording indicator 29 4 "Date not set" icon 2 22 5 Camera shake icon 3 44 6 Battery level indicator 4 .......... 24 7 Self-timer indicator 45 8 Number of exposures remaining 24 9 Exposure compensation ......... 53 10 Flash mode 43 11 Image quality 51 12 Image size 52 13 Sensitivity gain indicator ........ 44 14 Best shot selector (BSS 57 Continuous shooting mode ... 56 15 Image sharpening 58 16 White balance 54 17 Shooting mode 25, 36 1 Displayed only when shutter-release button is pressed halfway. 2 Appears...

User Manual
Page 17
... 7 3 Battery level indicator 24 4 Transfer icon 33, 34, 69 5 Print-order icon 78 6 Protect icon 80 7 Current frame number/ total number of frames ... 32, 68 8 Image quality 51 9 Image size 52 10 Time of recording 22 11 Date of recording 22 * Appears only when battery is also used to the left a second time to view indicators again. Controlling the Monitor To hide camera settings or photo info, press the multi selector to play pictures back. Indicators displayed 2048 NORMAL 15 Indicators...
... 7 3 Battery level indicator 24 4 Transfer icon 33, 34, 69 5 Print-order icon 78 6 Protect icon 80 7 Current frame number/ total number of frames ... 32, 68 8 Image quality 51 9 Image size 52 10 Time of recording 22 11 Date of recording 22 * Appears only when battery is also used to the left a second time to view indicators again. Controlling the Monitor To hide camera settings or photo info, press the multi selector to play pictures back. Indicators displayed 2048 NORMAL 15 Indicators...

User Manual
Page 21
... contrast subjects. MENU OFF SELECT EXP. +/- Adjust exposure for 1600 SET printing. 1280 52 1024 640 WHITE BALANCE WHITE BALANCE Match to lighting to ensure that colors are reproduced MENU OFF SELECT SET accurately. 54 A Auto White Bal Preset Fine Incandescent Fluorescent Cloudy Speedlight EXP.+/- SHOOTING MENU The Shooting Menu Introduction-Menu Guide MENU OFF SELECT In (manual) mode, the SHOOTING menu contains four advanced shooting options in addition to reduce file size. SET IMAGE QUALITY FINE NORMAL BASIC IMAGE QUALITY Choose...
... contrast subjects. MENU OFF SELECT EXP. +/- Adjust exposure for 1600 SET printing. 1280 52 1024 640 WHITE BALANCE WHITE BALANCE Match to lighting to ensure that colors are reproduced MENU OFF SELECT SET accurately. 54 A Auto White Bal Preset Fine Incandescent Fluorescent Cloudy Speedlight EXP.+/- SHOOTING MENU The Shooting Menu Introduction-Menu Guide MENU OFF SELECT In (manual) mode, the SHOOTING menu contains four advanced shooting options in addition to reduce file size. SET IMAGE QUALITY FINE NORMAL BASIC IMAGE QUALITY Choose...

User Manual
Page 23
... is set to displays the PLAY BACK menu, which contains options for managing the pictures on a DPOFcompatible device. Introduction-Menu Guide DELETE Delete Print Set Protect Auto Transfer CF Card Format Brightness MENU OFF SELECT The Playback Menu Pressing the MENU button when the mode selector is used to format memory cards for use in your camera. Protected pictures are marked by a icon. DELETE Selected Images All Images Delete Delete all pictures. 81 All ON All OFF CF CARD FORMAT CF Card Format WARNING ! Print set Delete print set Print Set Select pictures for printing on...
... is set to displays the PLAY BACK menu, which contains options for managing the pictures on a DPOFcompatible device. Introduction-Menu Guide DELETE Delete Print Set Protect Auto Transfer CF Card Format Brightness MENU OFF SELECT The Playback Menu Pressing the MENU button when the mode selector is used to format memory cards for use in your camera. Protected pictures are marked by a icon. DELETE Selected Images All Images Delete Delete all pictures. 81 All ON All OFF CF CARD FORMAT CF Card Format WARNING ! Print set Delete print set Print Set Select pictures for printing on...
User Manual
Page 28
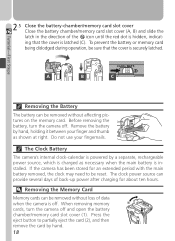
... the red dot is hidden, indicating that the cover is securely latched. The clock power source can be reset. Before removing the battery, turn the camera off . If the camera has been stored for about ten hours. Do not use your finger and thumb as necessary when the main battery is installed. To prevent the battery or memory card being dislodged during operation, be removed without affecting pictures...
... the red dot is hidden, indicating that the cover is securely latched. The clock power source can be reset. Before removing the battery, turn the camera off . If the camera has been stored for about ten hours. Do not use your finger and thumb as necessary when the main battery is installed. To prevent the battery or memory card being dislodged during operation, be removed without affecting pictures...

User Manual
Page 38
.... Remove finger briefly from shutter-release button, then try again. When Lighting Is Poor If lighting is pressed 15 halfway Flash-ready lamp Green Subject in the monitor. 28 Focus indicator Flashes red Camera unable to set focus and exposure. Flash off or not required. Flashready lamp On Flickers Off Flash will focus on the subject closest to the camera, and lock focus at this distance while the shutter-release button is taken. Tutorial-Taking Pictures...
.... Remove finger briefly from shutter-release button, then try again. When Lighting Is Poor If lighting is pressed 15 halfway Flash-ready lamp Green Subject in the monitor. 28 Focus indicator Flashes red Camera unable to set focus and exposure. Flash off or not required. Flashready lamp On Flickers Off Flash will focus on the subject closest to the camera, and lock focus at this distance while the shutter-release button is taken. Tutorial-Taking Pictures...

User Manual
Page 43
... with a icon. Select current picture for transfer to a computer ( Pictures selected for an enlarged view of the current photo ( 71). release button halfway. 33 DELETE •Select No to exit () without deleting picture No • Select Yes to select. Yes lete picture SELECT SET Zoom photo in the monitor. Delete current picture A confirmation dialog will be displayed. Return to mode Shutter To end review and return to a computer at a time as...
... with a icon. Select current picture for transfer to a computer ( Pictures selected for an enlarged view of the current photo ( 71). release button halfway. 33 DELETE •Select No to exit () without deleting picture No • Select Yes to select. Yes lete picture SELECT SET Zoom photo in the monitor. Delete current picture A confirmation dialog will be displayed. Return to mode Shutter To end review and return to a computer at a time as...

User Manual
Page 44
... the pictures that will be transferred to highlight thumbnails. Tutorial-Review and Deletion Thumbnail Review Pressing the ( ) button in full-screen review displays a menu of pictures displayed With four thumbnails displayed, press the button once to view nine thumbnail images. ( )/ Press ( ) to "zoom in" from nine thumbnails to a four-thumbnail view or, when four ( ) thumbnails are displayed, to a computer ( Pictures selected for transfer to view highlighted picture full size. Return to mode Shutter To end review and return...
... the pictures that will be transferred to highlight thumbnails. Tutorial-Review and Deletion Thumbnail Review Pressing the ( ) button in full-screen review displays a menu of pictures displayed With four thumbnails displayed, press the button once to view nine thumbnail images. ( )/ Press ( ) to "zoom in" from nine thumbnails to a four-thumbnail view or, when four ( ) thumbnails are displayed, to a computer ( Pictures selected for transfer to view highlighted picture full size. Return to mode Shutter To end review and return...

User Manual
Page 52
... "Tutorial: Taking Pictures"; 23): Auto Auto produces good results in or mode displays a menu of exposures remaining, the exposure- Recording begins when the shutter-release button is pressed all camera settings, including white balance ( 54), sharpening ( 58), and BSS ( Manual 57). For more space is rotated to your subject and composition and let the camera adjust settings for snapshots or when you have a choice of four basic shooting modes (for information on the memory card...
... "Tutorial: Taking Pictures"; 23): Auto Auto produces good results in or mode displays a menu of exposures remaining, the exposure- Recording begins when the shutter-release button is pressed all camera settings, including white balance ( 54), sharpening ( 58), and BSS ( Manual 57). For more space is rotated to your subject and composition and let the camera adjust settings for snapshots or when you have a choice of four basic shooting modes (for information on the memory card...

User Manual
Page 58
... save picture and return to shooting mode • Select Yes to delete picture No Yes SELECT SET Display will be paused for ten seconds. 48 Taking Pictures-Beyond Point-and-Shoot Keep or Delete: Picture Review After each shot, the picture you can be performed while the picture is displayed: To Delete picture Pause display Press Description A confirmation dialog will be recorded automatically if no operations are performed for ten seconds and pause icon...
... save picture and return to shooting mode • Select Yes to delete picture No Yes SELECT SET Display will be paused for ten seconds. 48 Taking Pictures-Beyond Point-and-Shoot Keep or Delete: Picture Review After each shot, the picture you can be performed while the picture is displayed: To Delete picture Pause display Press Description A confirmation dialog will be recorded automatically if no operations are performed for ten seconds and pause icon...

User Manual
Page 60
... SHOOTING MENU MENU OFF SELECT SET Shooting menu ( mode) Option IMAGE QUALITY IMAGE SIZE WHITE BALANCE EXP. +/- CONTINUOUS BEST SHOT SELECTOR IMAGE SHARPENING 51 52 54-55 53 56 57 58 Making Effective Use of pictures that can be stored. No menu is available in the monitor. 2048 NORMAL 15 50 The current image size and quality are shown in movie mode. Taking Pictures-Fine-Tuning Camera Settings The options available in the SHOOTING menu depend on the memory card, which...
... SHOOTING MENU MENU OFF SELECT SET Shooting menu ( mode) Option IMAGE QUALITY IMAGE SIZE WHITE BALANCE EXP. +/- CONTINUOUS BEST SHOT SELECTOR IMAGE SHARPENING 51 52 54-55 53 56 57 58 Making Effective Use of pictures that can be stored. No menu is available in the monitor. 2048 NORMAL 15 50 The current image size and quality are shown in movie mode. Taking Pictures-Fine-Tuning Camera Settings The options available in the SHOOTING menu depend on the memory card, which...

User Manual
Page 66
... Flash, Focus Exposure, and White Balance At settings of Continuous and Multi-Shot 16, the flash turns off, and focus distance, exposure, and auto white balance are recorded will drop. Option Description Single Camera takes one picture each series. 56 Single Continuous Multi-Shot 16 MENU OFF SELECT SET ing of about three frames every two seconds. This option is not available at image sizes ( 52) other than 2048, or when digital zoom ( 47) is in each time...
... Flash, Focus Exposure, and White Balance At settings of Continuous and Multi-Shot 16, the flash turns off, and focus distance, exposure, and auto white balance are recorded will drop. Option Description Single Camera takes one picture each series. 56 Single Continuous Multi-Shot 16 MENU OFF SELECT SET ing of about three frames every two seconds. This option is not available at image sizes ( 52) other than 2048, or when digital zoom ( 47) is in each time...

User Manual
Page 67
... icon appears in the monitor. 2048 NORMAL 15 Restrictions on BSS BSS is not available at CONTINUOUS settings other than Single. Selecting Continuous or Multi-Shot 16 automatically cancels BSS. 57 Option Description Camera takes photos as long as the shutter-release button is held down . The flash turns off ; Off BSS off , and focus distance, exposure, and auto white balance are then com- Taking Pictures-Fine-Tuning Camera Settings Getting...
... icon appears in the monitor. 2048 NORMAL 15 Restrictions on BSS BSS is not available at CONTINUOUS settings other than Single. Selecting Continuous or Multi-Shot 16 automatically cancels BSS. 57 Option Description Camera takes photos as long as the shutter-release button is held down . The flash turns off ; Off BSS off , and focus distance, exposure, and auto white balance are then com- Taking Pictures-Fine-Tuning Camera Settings Getting...

User Manual
Page 73
... setting in the Auto Off menu. 63 The camera can Auto Off be reactivated by an AC adapter kit (available separately; 87), the camera will AUTO OFF enter sleep mode if no power. DATE rent date and time. The time limit for thirty minutes if no operations are displayed). For more information, see "Tutorial: First Steps" ( 21). MENU OFF SELECT SET Before Formatting Formatting memory cards permanently deletes all data they contain, including protected pictures and any pictures...
... setting in the Auto Off menu. 63 The camera can Auto Off be reactivated by an AC adapter kit (available separately; 87), the camera will AUTO OFF enter sleep mode if no power. DATE rent date and time. The time limit for thirty minutes if no operations are displayed). For more information, see "Tutorial: First Steps" ( 21). MENU OFF SELECT SET Before Formatting Formatting memory cards permanently deletes all data they contain, including protected pictures and any pictures...

User Manual
Page 99
... • Focus indicator flashes red: camera unable to 28 focus focus. 89 ted for use HL-E2500 LCD hood (avail- able separately). • Monitor is dirty. 85 • Monitor brightness requires adjustment. 62 • Camera is in playback mode. 6 • Battery is exhausted. 24 • Message "Please turn the lens to the shoot- 26 ing position" appears in monitor: memory card is not format- No photo is taken when shutter-release button is fully...
... • Focus indicator flashes red: camera unable to 28 focus focus. 89 ted for use HL-E2500 LCD hood (avail- able separately). • Monitor is dirty. 85 • Monitor brightness requires adjustment. 62 • Camera is in playback mode. 6 • Battery is exhausted. 24 • Message "Please turn the lens to the shoot- 26 ing position" appears in monitor: memory card is not format- No photo is taken when shutter-release button is fully...
User Manual
Page 101
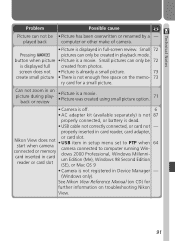
... picture • Picture is dead. • USB cable not correctly connected, or card not - back or review • Picture is a movie. • Picture was created using small picture option. 71 • Camera is off. 6 • AC adapter kit (available separately) is not 87 properly connected, or battery is a movie. properly inserted in card reader, card adapter, Nikon View does not start when camera connected or memory card inserted in card reader or card slot or card slot. • USB item in setup menu set...
... picture • Picture is dead. • USB cable not correctly connected, or card not - back or review • Picture is a movie. • Picture was created using small picture option. 71 • Camera is off. 6 • AC adapter kit (available separately) is not 87 properly connected, or battery is a movie. properly inserted in card reader, card adapter, Nikon View does not start when camera connected or memory card inserted in card reader or card slot or card slot. • USB item in setup menu set...

User Manual
Page 105
Data already recorded to the memory card at the time the problem occurred. In most cases, this phenomenon is caused by a strong external static charge. Note that disconnecting the power source as described above may result in the monitor and the camera may appear in loss of continued malfunction, contact your retailer or Nikon representative. Turn the camera off, remove and replace the battery, and turn the camera on...
Data already recorded to the memory card at the time the problem occurred. In most cases, this phenomenon is caused by a strong external static charge. Note that disconnecting the power source as described above may result in the monitor and the camera may appear in loss of continued malfunction, contact your retailer or Nikon representative. Turn the camera off, remove and replace the battery, and turn the camera on...


