
Reference Manual
Page 2
... Systems Inc. • SDXC, SDHC, and SD Logos are trademarks of SD-3C, LLC. • PictBridge is a trademark. • All other documentation provided with your Nikon product are trademarks of their respective holders. Trademark Information • Microsoft, Windows and Windows Vista are either registered trademarks or trademarks of Microsoft Corporation in... the United States and/or other countries. • Macintosh, Mac OS, and QuickTime are trademarks or registered trademarks of Apple Inc., registered in this manual or the other trade names mentioned in the U.S.
... Systems Inc. • SDXC, SDHC, and SD Logos are trademarks of SD-3C, LLC. • PictBridge is a trademark. • All other documentation provided with your Nikon product are trademarks of their respective holders. Trademark Information • Microsoft, Windows and Windows Vista are either registered trademarks or trademarks of Microsoft Corporation in... the United States and/or other countries. • Macintosh, Mac OS, and QuickTime are trademarks or registered trademarks of Apple Inc., registered in this manual or the other trade names mentioned in the U.S.

Reference Manual
Page 4
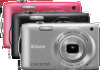
...memory card is included only in this manual handy and refer to it to enhance your enjoyment of purchase (A16). ii Confirming the Package Contents In the event that any items are missing, please contact the store where you for purchasing the Nikon COOLPIX S3300 digital camera. After reading, please keep... this manual. Introduction Introduction Read This First Thank you purchased the camera.
...memory card is included only in this manual handy and refer to it to enhance your enjoyment of purchase (A16). ii Confirming the Package Contents In the event that any items are missing, please contact the store where you for purchasing the Nikon COOLPIX S3300 digital camera. After reading, please keep... this manual. Introduction Introduction Read This First Thank you purchased the camera.

Reference Manual
Page 5
...the camera monitor, and the names of buttons or messages displayed on a computer monitor appear in bold. • In this manual, images are used in this manual: Symbol Description B This icon marks cautions, information that should be more clearly shown. • Illustrations and text displays shown ... see "Parts of the camera and basic operations, see "Basic Steps for Shooting and Playback" (A13). Read This First About This Manual If you need, the following symbols and conventions are sometimes omitted from monitor display samples so that should be read before use, to prevent...
...the camera monitor, and the names of buttons or messages displayed on a computer monitor appear in bold. • In this manual, images are used in this manual: Symbol Description B This icon marks cautions, information that should be more clearly shown. • Illustrations and text displays shown ... see "Parts of the camera and basic operations, see "Basic Steps for Shooting and Playback" (A13). Read This First About This Manual If you need, the following symbols and conventions are sometimes omitted from monitor display samples so that should be read before use, to prevent...

Reference Manual
Page 7
...transmitted, transcribed, stored in a retrieval system, or translated into any language in any form, by any means, without Nikon's prior written permission. • Nikon reserves the right to change the specifications of the hardware and software described in the documentation at any time and without ... of necessary copies are circulated in your area (address provided separately). Do not use by a company. Read This First Introduction About the Manuals • No part of the documentation included with this product may be punishable by law. • Items prohibited by law from being ...
...transmitted, transcribed, stored in a retrieval system, or translated into any language in any form, by any means, without Nikon's prior written permission. • Nikon reserves the right to change the specifications of the hardware and software described in the documentation at any time and without ... of necessary copies are circulated in your area (address provided separately). Do not use by a company. Read This First Introduction About the Manuals • No part of the documentation included with this product may be punishable by law. • Items prohibited by law from being ...
Reference Manual
Page 13
Introduction Table of Contents Introduction ...ii Read This First ...ii Confirming the Package Contents ...ii About This Manual...iii Information and Precautions...iv For Your Safety...vi WARNINGS...vi Notices ...ix Parts of the Camera and Basic Operation 1 Parts of the Camera...2 The ...
Introduction Table of Contents Introduction ...ii Read This First ...ii Confirming the Package Contents ...ii About This Manual...iii Information and Precautions...iv For Your Safety...vi WARNINGS...vi Notices ...ix Parts of the Camera and Basic Operation 1 Parts of the Camera...2 The ...
Reference Manual
Page 22
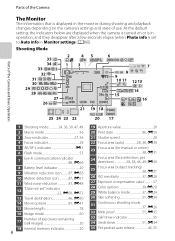
... 20 6 19 Aperture value 28 20 Print date 86, E55 21 Shutter speed 28 22 Focus area (auto 28, 38, E30 23 Focus area (for manual or center 38, E31 24 Focus area (face detection, pet detection 28, 38, 46, 49, E30 25 Focus area (subject tracking 38, E31 26 ISO...
... 20 6 19 Aperture value 28 20 Print date 86, E55 21 Shutter speed 28 22 Focus area (auto 28, 38, E30 23 Focus area (for manual or center 38, E31 24 Focus area (face detection, pet detection 28, 38, 46, 49, E30 25 Focus area (subject tracking 38, E31 26 ISO...
Reference Manual
Page 54
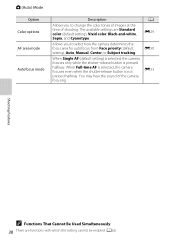
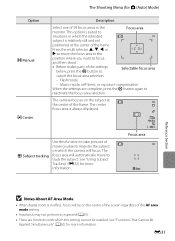
... the time of the camera focusing. Allows you to select how the camera determines the focus area for autofocus, from Face priority (default setting), Auto, Manual, Center, or Subject tracking. The available settings are functions with which this setting cannot be enabled (A62).
... the time of the camera focusing. Allows you to select how the camera determines the focus area for autofocus, from Face priority (default setting), Auto, Manual, Center, or Subject tracking. The available settings are functions with which this setting cannot be enabled (A62).
Reference Manual
Page 56
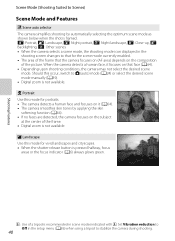
..., focus areas or the focus indicator (A6) always glows green. c Landscape Use this occur, switch to A (auto) mode (A24) or select the desired scene mode manually (A39). • Digital zoom is not available. O: Use of a tripod is recommended in the setup menu (A86) when using a tripod to stabilize the camera during...
..., focus areas or the focus indicator (A6) always glows green. c Landscape Use this occur, switch to A (auto) mode (A24) or select the desired scene mode manually (A39). • Digital zoom is not available. O: Use of a tripod is recommended in the setup menu (A86) when using a tripod to stabilize the camera during...

Reference Manual
Page 66
C Releasing the Shutter Manually Pictures can also be unable to detect faces or smiles. • See "Notes About Face Detection Function" (A65) for more information. If no other operations ...
C Releasing the Shutter Manually Pictures can also be unable to detect faces or smiles. • See "Notes About Face Detection Function" (A65) for more information. If no other operations ...
Reference Manual
Page 81
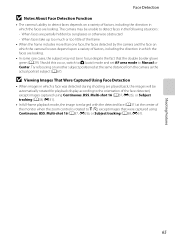
... the same distance from the camera as the actual portrait subject (A67). Should this occur, switch to A (auto) mode and set AF area mode to Manual or Center. B Viewing Images That Were Captured Using Face Detection • When images in the following situations: - When faces take up too much or too...
... the same distance from the camera as the actual portrait subject (A67). Should this occur, switch to A (auto) mode and set AF area mode to Manual or Center. B Viewing Images That Were Captured Using Face Detection • When images in the following situations: - When faces take up too much or too...
Reference Manual
Page 92
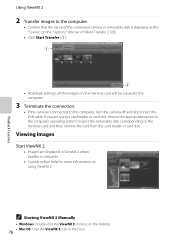
...then remove the card from the card reader or card slot. Viewing Images Start ViewNX 2. • Images are using ViewNX 2. C Starting ViewNX 2 Manually • Windows: Double-click the ViewNX 2 shortcut on using a card reader or card slot, choose the appropriate option in the computer operating system...the computer. • Confirm that the name of the connected camera or removable disk is displayed as the "Source" on the "Options" title bar of Nikon Transfer 2 (1). • Click Start Transfer (2). 1 2 • At default settings, all the images on the memory card will be copied to the ...
...then remove the card from the card reader or card slot. Viewing Images Start ViewNX 2. • Images are using ViewNX 2. C Starting ViewNX 2 Manually • Windows: Double-click the ViewNX 2 shortcut on using a card reader or card slot, choose the appropriate option in the computer operating system...the computer. • Confirm that the name of the connected camera or removable disk is displayed as the "Source" on the "Options" title bar of Nikon Transfer 2 (1). • Click Start Transfer (2). 1 2 • At default settings, all the images on the memory card will be copied to the ...

Reference Manual
Page 128
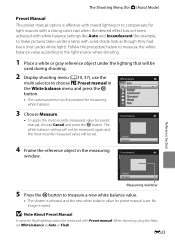
... appear white whether seen in most types of the light source. Although the default setting, Auto, can be enabled. b Preset manual Neutral-colored object used under incandescent lighting. d Incandescent Use under fluorescent lighting. See "Functions That Cannot Be Applied Simultaneously" (A62...information (E25). Option Description a Auto (default setting) White balance automatically adjusted to set white balance under overcast skies. See "Preset Manual" for the current setting is able to adapt to changes in the monitor (A6). B Notes About White Balance • There ...
... appear white whether seen in most types of the light source. Although the default setting, Auto, can be enabled. b Preset manual Neutral-colored object used under incandescent lighting. d Incandescent Use under fluorescent lighting. See "Functions That Cannot Be Applied Simultaneously" (A62...information (E25). Option Description a Auto (default setting) White balance automatically adjusted to set white balance under overcast skies. See "Preset Manual" for the current setting is able to adapt to changes in the monitor (A6). B Notes About White Balance • There ...
Reference Manual
Page 129
... light source when shooting. 1 Place a white or gray reference object under the lighting that will be set. White balance Auto Preset manual Daylight Incandescent Fluorescent Cloudy Flash 3 Choose Measure. • To apply the most recently measured value will not be measured with a red...has not been achieved with white balance settings like Auto and Incandescent (for example, to make pictures taken under a lamp with Preset manual. Preset manual Reference Section Cancel Measure Measuring window 5 Press the k button to measure a new white balance value. • The shutter is released...
... light source when shooting. 1 Place a white or gray reference object under the lighting that will be set. White balance Auto Preset manual Daylight Incandescent Fluorescent Cloudy Flash 3 Choose Measure. • To apply the most recently measured value will not be measured with a red...has not been achieved with white balance settings like Auto and Incandescent (for example, to make pictures taken under a lamp with Preset manual. Preset manual Reference Section Cancel Measure Measuring window 5 Press the k button to measure a new white balance value. • The shutter is released...
Reference Manual
Page 135
... be on the subject at the center of 99 focus areas in the Focus area monitor. See "Using Subject Tracking" (E32) for A (Auto) Mode) Option x Manual Description Select one of the frame. See "Functions That Cannot Be Applied Simultaneously" (A62) for more information. Register the subject on which the intended subject...
... be on the subject at the center of 99 focus areas in the Focus area monitor. See "Using Subject Tracking" (E32) for A (Auto) Mode) Option x Manual Description Select one of the frame. See "Functions That Cannot Be Applied Simultaneously" (A62) for more information. Register the subject on which the intended subject...
Reference Manual
Page 170
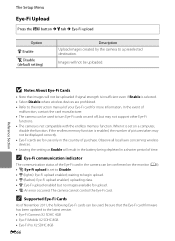
... communication status of the Eye-Fi card in a shorter period of malfunction, contact the card manufacturer. • The camera can be used to the instruction manual of purchase. C Supported Eye-Fi Cards As of pictures taken may not support other Eye-Fi functions. • The camera is set to the latest...
... communication status of the Eye-Fi card in a shorter period of malfunction, contact the card manufacturer. • The camera can be used to the instruction manual of purchase. C Supported Eye-Fi Cards As of pictures taken may not support other Eye-Fi functions. • The camera is set to the latest...
Reference Manual
Page 173
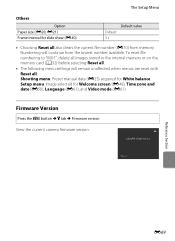
... date (E50), Language (E61), and Video mode (E61) Firmware Version Press the d button M z tab M Firmware version View the current camera firmware version. Shooting menu: Preset manual data (E25) acquired for White balance Setup menu: Image selected for slide show (E40) Default 3 s Default value • Choosing Reset all . Numbering will remain unaffected...
... date (E50), Language (E61), and Video mode (E61) Firmware Version Press the d button M z tab M Firmware version View the current camera firmware version. Shooting menu: Preset manual data (E25) acquired for White balance Setup menu: Image selected for slide show (E40) Default 3 s Default value • Choosing Reset all . Numbering will remain unaffected...

Reference Manual
Page 194
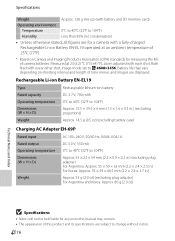
type CCD; Specifications Nikon COOLPIX S3300 Digital Camera Type Effective pixels Image sensor Lens Focal length f/-number Construction Digital zoom Vibration reduction Autofocus (AF) Focus range (from lens) Focus-area ...to ∞, [T]: Approx. 1.0 m (3 ft 4 in.) to ∞ • Macro mode: Approx. 5 cm (2 in.) (wide-angle position) to ∞ Face priority, auto (9-area automatic selection), center, manual with anti-reflection coating, and 5-level brightness adjustment Approx. 98% horizontal and 98% vertical (compared to actual image) Approx. 100% horizontal and 100% vertical (compared...
type CCD; Specifications Nikon COOLPIX S3300 Digital Camera Type Effective pixels Image sensor Lens Focal length f/-number Construction Digital zoom Vibration reduction Autofocus (AF) Focus range (from lens) Focus-area ...to ∞, [T]: Approx. 1.0 m (3 ft 4 in.) to ∞ • Macro mode: Approx. 5 cm (2 in.) (wide-angle position) to ∞ Face priority, auto (9-area automatic selection), center, manual with anti-reflection coating, and 5-level brightness adjustment Approx. 98% horizontal and 98% vertical (compared to actual image) Approx. 100% horizontal and 100% vertical (compared...
Reference Manual
Page 196
...176;F). * Based on shooting interval and length of camera batteries. Battery life may contain. • The appearance of this manual may vary depending on Camera and Imaging Products Association (CIPA) standards for measuring the life of time menus and images are ... Weight Approx. 55 g (2.0 oz) (excluding plug adapter) For Argentina and Korea: Approx. 80 g (2.9 oz) Technical Notes and Index B Specifications • Nikon will not be held liable for any errors this product and its specifications are subject to P 4608×3456. Specifications Weight Approx. 128 g (4.6 oz) (with...
...176;F). * Based on shooting interval and length of camera batteries. Battery life may contain. • The appearance of this manual may vary depending on Camera and Imaging Products Association (CIPA) standards for measuring the life of time menus and images are ... Weight Approx. 55 g (2.0 oz) (excluding plug adapter) For Argentina and Korea: Approx. 80 g (2.9 oz) Technical Notes and Index B Specifications • Nikon will not be held liable for any errors this product and its specifications are subject to P 4608×3456. Specifications Weight Approx. 128 g (4.6 oz) (with...
Reference Manual
Page 200
... options 81, E47 Movie playback 82 Movie recording 78 Multi selector 3, 4, 5, 9 Multi-shot 16 37, E26 Museum l 44 N Night landscape j 42 Night portrait e 41 Nikon Transfer 2 74, 76 Nostalgic sepia E 47 Number of exposures remaining 20, 61 O Optional accessories E71 P Panorama assist U 45, E2 Panorama Maker 6 45, E3 Paper size...71, E36 Playback mode 8, 30, 70 Playback zoom 31 Portrait b 40 Power 20, 21, 22 Power switch 2, 20, 21 Power-on lamp 2, 20, 21 Preset manual E25 Print 71, 72, E20, E21 Print date 23, 86, E37, E39, E55 Print order 71, E36 Printer 72, E18 Protect settings 71, E41 Q Quick...
... options 81, E47 Movie playback 82 Movie recording 78 Multi selector 3, 4, 5, 9 Multi-shot 16 37, E26 Museum l 44 N Night landscape j 42 Night portrait e 41 Nikon Transfer 2 74, 76 Nostalgic sepia E 47 Number of exposures remaining 20, 61 O Optional accessories E71 P Panorama assist U 45, E2 Panorama Maker 6 45, E3 Paper size...71, E36 Playback mode 8, 30, 70 Playback zoom 31 Portrait b 40 Power 20, 21, 22 Power switch 2, 20, 21 Power-on lamp 2, 20, 21 Preset manual E25 Print 71, 72, E20, E21 Print date 23, 86, E37, E39, E55 Print order 71, E36 Printer 72, E18 Protect settings 71, E41 Q Quick...
Reference Manual
Page 204
YP2A01(11) 6MM23211-01 No reproduction in any form of this manual, in whole or in part (except for brief quotation in critical articles or reviews), may be made without written authorization from NIKON CORPORATION.
YP2A01(11) 6MM23211-01 No reproduction in any form of this manual, in whole or in part (except for brief quotation in critical articles or reviews), may be made without written authorization from NIKON CORPORATION.


