
Reference Manual
Page 2
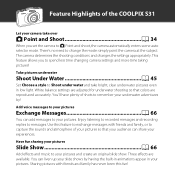
... camera automatically enters scene auto selector mode. You can liven up your slide shows by ! You'll have plenty of shots to messages. Have fun sharing your pictures Slide Show A 66 Add effects and music to change the mode: simply point the camera at the subject. The camera determines the shooting conditions and changes the settings appropriately. White balance settings are available. Enjoy listening to recorded messages and recording...
... camera automatically enters scene auto selector mode. You can liven up your slide shows by ! You'll have plenty of shots to messages. Have fun sharing your pictures Slide Show A 66 Add effects and music to change the mode: simply point the camera at the subject. The camera determines the shooting conditions and changes the settings appropriately. White balance settings are available. Enjoy listening to recorded messages and recording...

Reference Manual
Page 24
... Battery 12 Preparation 3 Insert a Memory Card.......... 14 Internal Memory and Memory Cards......... 15 Preparation 4 Set the Display Language, Date, and Time 16 Step 1 Turn the Camera On 20 Turning the Camera On and Off 21 Step 2 Frame a Picture 22 Using the Zoom 23 Step 3 Focus and Shoot 24 The Shutter-release Button 25 Step 4 Play Back Images 26 Step 5 Delete Images 28 Shooting Features 31 Features Available in Shooting Mode (Shooting Menu 32 A Point and Shoot 34 Using the Flash 35 Using the Self-timer 37 Using the Smile Timer...
... Battery 12 Preparation 3 Insert a Memory Card.......... 14 Internal Memory and Memory Cards......... 15 Preparation 4 Set the Display Language, Date, and Time 16 Step 1 Turn the Camera On 20 Turning the Camera On and Off 21 Step 2 Frame a Picture 22 Using the Zoom 23 Step 3 Focus and Shoot 24 The Shutter-release Button 25 Step 4 Play Back Images 26 Step 5 Delete Images 28 Shooting Features 31 Features Available in Shooting Mode (Shooting Menu 32 A Point and Shoot 34 Using the Flash 35 Using the Self-timer 37 Using the Smile Timer...
Reference Manual
Page 32
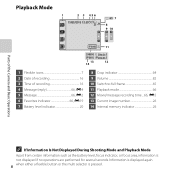
... 1 Flexible icons 7 2 Date of recording 16 3 Time of recording 16 4 Message (reply 66, E4 5 Message 66, E2 6 Favorites indicator 66, E19 7 Battery level indicator 20 8 Crop indicator 64 9 Volume 82 10 Switch to full-frame 65 11 Playback mode 66 12 Movie/message recording time... 66, E5 13 Current image number 26 14 Internal memory indicator 26 C If Information Is Not Displayed During Shooting Mode and Playback Mode Apart from certain information such as the battery level, focus indicator, or focus area, information...
... 1 Flexible icons 7 2 Date of recording 16 3 Time of recording 16 4 Message (reply 66, E4 5 Message 66, E2 6 Favorites indicator 66, E19 7 Battery level indicator 20 8 Crop indicator 64 9 Volume 82 10 Switch to full-frame 65 11 Playback mode 66 12 Movie/message recording time... 66, E5 13 Current image number 26 14 Internal memory indicator 26 C If Information Is Not Displayed During Shooting Mode and Playback Mode Apart from certain information such as the battery level, focus indicator, or focus area, information...
Reference Manual
Page 41
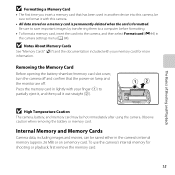
... the memory card in the camera settings menu (A 84). Removing the Memory Card Before opening the battery-chamber/memory card slot cover, turn the camera off and confirm that has been used in the camera's internal memory (approx. 26 MB) or on a memory card. Observe caution when removing the battery or memory card. The Basics of Shooting and Playback B Formatting a Memory Card • The first time you insert a memory card that the power-on a memory card is permanently deleted when the card is formatted. B Notes About Memory Cards See "Memory Cards" (F7...
... the memory card in the camera settings menu (A 84). Removing the Memory Card Before opening the battery-chamber/memory card slot cover, turn the camera off and confirm that has been used in the camera's internal memory (approx. 26 MB) or on a memory card. Observe caution when removing the battery or memory card. The Basics of Shooting and Playback B Formatting a Memory Card • The first time you insert a memory card that the power-on a memory card is permanently deleted when the card is formatted. B Notes About Memory Cards See "Memory Cards" (F7...
Reference Manual
Page 42
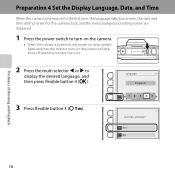
... 16 The Basics of Shooting and Playback Preparation 4 Set the Display Language, Date, and Time When the camera is turned on for the first time, the language-selection screen, the date and time setting screen for the camera clock, and the menu background setting screen are displayed. 1 Press the power switch to turn on the camera. • When the camera is turned on, the power-on lamp (green) lights and then the monitor turns on (the power-on lamp turns off when the...
... 16 The Basics of Shooting and Playback Preparation 4 Set the Display Language, Date, and Time When the camera is turned on for the first time, the language-selection screen, the date and time setting screen for the camera clock, and the menu background setting screen are displayed. 1 Press the power switch to turn on the camera. • When the camera is turned on, the power-on lamp (green) lights and then the monitor turns on (the power-on lamp turns off when the...
Reference Manual
Page 47
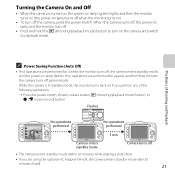
... camera enters standby mode, and the power-on the camera and switch to playback mode. If no operations are using the optional AC Adapter EH-62F, the camera enters standby mode after 30 minutes (fixed). 21 The Basics of the following operations: ➝ Press the power switch, shutter-release button, c (shooting/playback mode) button, or b (e movie-record) button Flashes No operations performed No operations performed 780 3 min 15m 0s Camera enters standby mode. While the camera is turned on, the power-on lamp (green) lights...
... camera enters standby mode, and the power-on the camera and switch to playback mode. If no operations are using the optional AC Adapter EH-62F, the camera enters standby mode after 30 minutes (fixed). 21 The Basics of the following operations: ➝ Press the power switch, shutter-release button, c (shooting/playback mode) button, or b (e movie-record) button Flashes No operations performed No operations performed 780 3 min 15m 0s Camera enters standby mode. While the camera is turned on, the power-on lamp (green) lights...
Reference Manual
Page 69
... adjust the hue setting, and then press flexible button 4 (O). Use focus lock to frame the picture on an object not in the center of the frame (A 61). • The camera focuses even when the shutter-release button is set to a position where the zoom indicator turns green, the camera can focus on subjects as close as about 20 cm (8 in .) from the front of the protective glass. • The camera focuses...
... adjust the hue setting, and then press flexible button 4 (O). Use focus lock to frame the picture on an object not in the center of the frame (A 61). • The camera focuses even when the shutter-release button is set to a position where the zoom indicator turns green, the camera can focus on subjects as close as about 20 cm (8 in .) from the front of the protective glass. • The camera focuses...
Reference Manual
Page 71
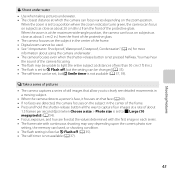
... photo size setting, the memory card used . • See " Shockproof, Waterproof, Dustproof, Condensation" (A xv) for more information about using the camera underwater. • The camera focuses even when the shutter-release button is not pressed halfway. When the zoom is set , but the setting can be changed (A 35). • The self-timer can be set to light the entire subject at y Flash off , but Y Smile timer is not available (A 37, 39). Shooting Features J Shoot...
... photo size setting, the memory card used . • See " Shockproof, Waterproof, Dustproof, Condensation" (A xv) for more information about using the camera underwater. • The camera focuses even when the shutter-release button is not pressed halfway. When the zoom is set , but the setting can be changed (A 35). • The self-timer can be set to light the entire subject at y Flash off , but Y Smile timer is not available (A 37, 39). Shooting Features J Shoot...
Reference Manual
Page 73
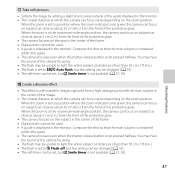
... 20 cm (8 in.) from the front of the protective glass. • The camera focuses on the area in the center of the frame. • Digital zoom cannot be set, but the setting can be changed (A 35). • The self-timer can be used . • A guide is set , but the setting can be changed (A 35). • The self-timer can focus on subjects as close as about 5 cm (2 in...
... 20 cm (8 in.) from the front of the protective glass. • The camera focuses on the area in the center of the frame. • Digital zoom cannot be set, but the setting can be changed (A 35). • The self-timer can be used . • A guide is set , but the setting can be changed (A 35). • The self-timer can focus on subjects as close as about 5 cm (2 in...
Reference Manual
Page 84
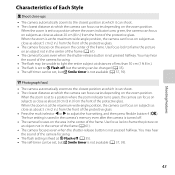
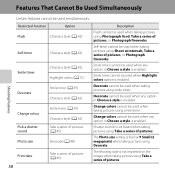
... 42) Self-timer Choose a style (A 42) Smile timer Decorate Change colors Pick a shutter sound Photo size Print date 58 Choose a style (A 42) Highlight colors (A 51) Smile timer (A 39) Choose a style (A 42) Smile timer (A 39) Choose a style (A 42) Take a series of pictures (A 45) Decorate (A 48) Take a series of pictures (A 45) Description Flash cannot be used when taking pictures using Shoot at F Small (2 megapixels) when taking pictures using Take a series of pictures. Change colors cannot be used when taking pictures using Decorate. Self-timer cannot be used when any...
... 42) Self-timer Choose a style (A 42) Smile timer Decorate Change colors Pick a shutter sound Photo size Print date 58 Choose a style (A 42) Highlight colors (A 51) Smile timer (A 39) Choose a style (A 42) Smile timer (A 39) Choose a style (A 42) Take a series of pictures (A 45) Decorate (A 48) Take a series of pictures (A 45) Description Flash cannot be used when taking pictures using Shoot at F Small (2 megapixels) when taking pictures using Take a series of pictures. Change colors cannot be used when taking pictures using Decorate. Self-timer cannot be used when any...
Reference Manual
Page 97
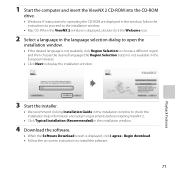
... language selection dialog to open the installation window. • If the desired language is not available, click Region Selection to choose a different region and then choose the desired language (the Region Selection button is not available in the European release). • Click Next to display the installation window. 3 Start the installer. • We recommend clicking Installation Guide in the installation window. 4 Download the software. • When the Software Download screen is displayed...
... language selection dialog to open the installation window. • If the desired language is not available, click Region Selection to choose a different region and then choose the desired language (the Region Selection button is not available in the European release). • Click Next to display the installation window. 3 Start the installer. • We recommend clicking Installation Guide in the installation window. 4 Download the software. • When the Software Download screen is displayed...
Reference Manual
Page 110
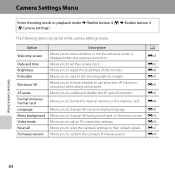
... choose whether to their default values. Allows you to reset the camera's settings to use electronic VR (vibration reduction) when taking still pictures. Allows you to adjust TV-connection settings. Allows you to imprint the shooting date on images. Allows you to set in the camera settings menu: Option Welcome screen Date and time Brightness Print date Electronic VR AF assist Format memory/ Format card Language Menu background Video mode Reset all Firmware version Description Allows you to change the background used on . A E38 E39...
... choose whether to their default values. Allows you to reset the camera's settings to use electronic VR (vibration reduction) when taking still pictures. Allows you to adjust TV-connection settings. Allows you to imprint the shooting date on images. Allows you to set in the camera settings menu: Option Welcome screen Date and time Brightness Print date Electronic VR AF assist Format memory/ Format card Language Menu background Video mode Reset all Firmware version Description Allows you to change the background used on . A E38 E39...
Reference Manual
Page 171
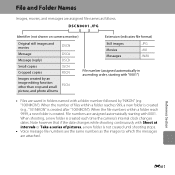
... on camera monitor) Extension (indicates file format) Original still images and movies DSCN Message DSCA Message (reply) DSCB Small copies SSCN Cropped copies RSCN Images created by "NIKON" (e.g. Note however that if the date changes while shooting continuously with a folder number followed by an image editing function other than crop and small picture, and photo albums FSCN Still images Movies Messages .JPG .AVI .WAV File number (assigned automatically in folders named with Shoot at intervals or Take a series of files within a folder...
... on camera monitor) Extension (indicates file format) Original still images and movies DSCN Message DSCA Message (reply) DSCB Small copies SSCN Cropped copies RSCN Images created by "NIKON" (e.g. Note however that if the date changes while shooting continuously with a folder number followed by an image editing function other than crop and small picture, and photo albums FSCN Still images Movies Messages .JPG .AVI .WAV File number (assigned automatically in folders named with Shoot at intervals or Take a series of files within a folder...
Reference Manual
Page 175
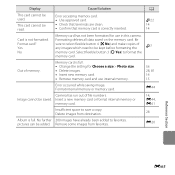
... memory card. Memory card is correctly inserted. Formatting deletes all data saved on the memory card. Select flexible button 3 (R Yes) to be kept before formatting the F7 memory card. E44 Camera has run out of memory. pictures can be saved. Display Cause/Solution A This card cannot be read. No further 200 images have already been added to save a copy. This card cannot be used. Insert a new memory card or format internal memory or memory card. 14, E44, E61 Insufficient space to favorites. Error accessing memory card...
... memory card. Memory card is correctly inserted. Formatting deletes all data saved on the memory card. Select flexible button 3 (R Yes) to be kept before formatting the F7 memory card. E44 Camera has run out of memory. pictures can be saved. Display Cause/Solution A This card cannot be read. No further 200 images have already been added to save a copy. This card cannot be used. Insert a new memory card or format internal memory or memory card. 14, E44, E61 Insufficient space to favorites. Error accessing memory card...

Reference Manual
Page 189
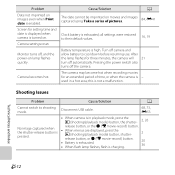
.../Solution A • Camera is off. • Battery exhausted. • Standby mode for saving power: Press the power switch, the shutter-release button, c (shooting/ playback mode) button, or b (e movie-record) button. • When flash lamp flashes, wait until flash has charged. • Camera and computer are connected via audio/video cable. 21 20 2, 21 36 68, 73 68, E50 • Adjust monitor brightness. • Monitor is hard to read. Set the correct time and date using Date and time in the camera settings menu. • Check camera...
.../Solution A • Camera is off. • Battery exhausted. • Standby mode for saving power: Press the power switch, the shutter-release button, c (shooting/ playback mode) button, or b (e movie-record) button. • When flash lamp flashes, wait until flash has charged. • Camera and computer are connected via audio/video cable. 21 20 2, 21 36 68, 73 68, E50 • Adjust monitor brightness. • Monitor is hard to read. Set the correct time and date using Date and time in the camera settings menu. • Check camera...
Reference Manual
Page 190
... setting time and date is displayed when camera is turned on lamp flashes quickly. Camera becomes hot. used in playback mode, press the c (shooting/playback mode) button, the shutter- 2, 26 No image captured when the shutter-release button is pressed. Shooting Issues Problem Cause/Solution A Cannot switch to cool down before resuming use. Disconnect USB cable. 68, 73, E53 • When camera is in a hot area; Cause/Solution A The date cannot be imprinted on images even when Print date is enabled. Pressing the power switch...
... setting time and date is displayed when camera is turned on lamp flashes quickly. Camera becomes hot. used in playback mode, press the c (shooting/playback mode) button, the shutter- 2, 26 No image captured when the shutter-release button is pressed. Shooting Issues Problem Cause/Solution A Cannot switch to cool down before resuming use. Disconnect USB cable. 68, 73, E53 • When camera is in a hot area; Cause/Solution A The date cannot be imprinted on images even when Print date is enabled. Pressing the power switch...
Reference Manual
Page 191
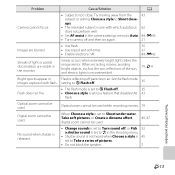
... pictures. • Do not block the speaker. 2 Technical Notes and Index F13 Optical zoom cannot be used . Images are visible in the camera settings menu to Auto. 84, E43 • Turn camera off . 35 • Choose a style is set to Turn sound off particles in air. Digital zoom cannot be used . No sound when shutter is too close - Set the flash mode setting to y Flash off. 35 • The flash mode is set to Shoot close . When recording movies...
... pictures. • Do not block the speaker. 2 Technical Notes and Index F13 Optical zoom cannot be used . Images are visible in the camera settings menu to Auto. 84, E43 • Turn camera off . 35 • Choose a style is set to Turn sound off particles in air. Digital zoom cannot be used . No sound when shutter is too close - Set the flash mode setting to y Flash off. 35 • The flash mode is set to Shoot close . When recording movies...

Reference Manual
Page 193
... functions other than Make photo albums, Small picture, and Rotate pictures cannot be added to images captured using View favorites. • You cannot apply the same editing feature multiple times to movies. - • Messages cannot be played back. Replace the memory card. Cannot zoom in the camera settings menu. • Memory card contains no images. Cannot record messages. • Messages cannot be attached to the same image. • This camera cannot edit images captured with another make or model of digital camera. - This camera...
... functions other than Make photo albums, Small picture, and Rotate pictures cannot be added to images captured using View favorites. • You cannot apply the same editing feature multiple times to movies. - • Messages cannot be played back. Replace the memory card. Cannot zoom in the camera settings menu. • Memory card contains no images. Cannot record messages. • Messages cannot be attached to the same image. • This camera cannot edit images captured with another make or model of digital camera. - This camera...

Reference Manual
Page 194
... not set to favorites cannot be displayed using View favorites Data saved in ViewNX 2. 21 20 68, 73 - 70 73 • Memory card contains no images. by a computer. For more information about Nikon Transfer 2, refer to print images from a PictBridge-compatible printer. memory card. • Remove the memory card to help information contained in the internal memory or on the memory card may not be played back correctly if overwritten - Problem Cause/Solution A Images added to start when camera is connected. • Camera...
... not set to favorites cannot be displayed using View favorites Data saved in ViewNX 2. 21 20 68, 73 - 70 73 • Memory card contains no images. by a computer. For more information about Nikon Transfer 2, refer to print images from a PictBridge-compatible printer. memory card. • Remove the memory card to help information contained in the internal memory or on the memory card may not be played back correctly if overwritten - Problem Cause/Solution A Images added to start when camera is connected. • Camera...
Reference Manual
Page 202
... 3 Battery charger 10 Battery level 20 Battery-chamber/memory card slot cover 3 Brightness 51 Brush xvi Button sound 52 C Camera settings 33, E38 Camera settings menu 84 Change colors (playback mode E7, E14 Change colors (shooting mode) ... 32, 49 Change sounds 33, 52 CHARGE lamp 11 Choose a size 33, 54 Choose a style 32, 42 Compression ratio 54 Computer 69, 73 Copy 67, E30 Create a diorama effect M 47 Crop 64 D Date and time 16, 84, E39 Date format 17, E39 Daylight saving time...
... 3 Battery charger 10 Battery level 20 Battery-chamber/memory card slot cover 3 Brightness 51 Brush xvi Button sound 52 C Camera settings 33, E38 Camera settings menu 84 Change colors (playback mode E7, E14 Change colors (shooting mode) ... 32, 49 Change sounds 33, 52 CHARGE lamp 11 Choose a size 33, 54 Choose a style 32, 42 Compression ratio 54 Computer 69, 73 Copy 67, E30 Create a diorama effect M 47 Crop 64 D Date and time 16, 84, E39 Date format 17, E39 Daylight saving time...


