
Reference Manual
Page 10
Introduction WARNINGS Turn off in injury. Do not disassemble Touching the internal parts of the camera could result in the event of a fall or other accident, remove the batteries and then take the equipment to a Nikon-authorized service representative for inspection. Repairs should be performed only by ...taking care to avoid burns. Should the camera break viii open as this equipment. For Your Safety To prevent damage to your Nikon product or injury to yourself or to others, read the following safety precautions in their entirety before using this could result in explosion...
Introduction WARNINGS Turn off in injury. Do not disassemble Touching the internal parts of the camera could result in the event of a fall or other accident, remove the batteries and then take the equipment to a Nikon-authorized service representative for inspection. Repairs should be performed only by ...taking care to avoid burns. Should the camera break viii open as this equipment. For Your Safety To prevent damage to your Nikon product or injury to yourself or to others, read the following safety precautions in their entirety before using this could result in explosion...

Reference Manual
Page 11
... other small parts into their mouths. Observe caution when handling batteries Batteries may result in this product: • Before replacing the batteries, turn the product off. • Use only the batteries approved for use each of them as necklaces or hairpins. • Batteries are prone...product, be taken to prevent infants from different pairs. • The EN-MH2 rechargeable batteries are for use with Nikon digital cameras only, and are compatible with COOLPIX S30. • Insert batteries in the correct orientation. • Do not short or disassemble batteries or attempt to ...
... other small parts into their mouths. Observe caution when handling batteries Batteries may result in this product: • Before replacing the batteries, turn the product off. • Use only the batteries approved for use each of them as necklaces or hairpins. • Batteries are prone...product, be taken to prevent infants from different pairs. • The EN-MH2 rechargeable batteries are for use with Nikon digital cameras only, and are compatible with COOLPIX S30. • Insert batteries in the correct orientation. • Do not short or disassemble batteries or attempt to ...

Reference Manual
Page 13
...observe this camera may disrupt the electronic systems of the airplane or the instruments of the hospital when using inside an airplane or the hospital Turn the power off while inside the airplane during take off or landing. Do not operate the flash with product regulations. Avoid contact with liquid... or damage the equipment. Use appropriate cables When connecting cables to the input and output jacks, use only the cables provided or sold by Nikon for the purpose, to prevent liquid crystal from the subject. Handle moving parts with this device should be played back on an audio CD ...
...observe this camera may disrupt the electronic systems of the airplane or the instruments of the hospital when using inside an airplane or the hospital Turn the power off while inside the airplane during take off or landing. Do not operate the flash with product regulations. Avoid contact with liquid... or damage the equipment. Use appropriate cables When connecting cables to the input and output jacks, use only the cables provided or sold by Nikon for the purpose, to prevent liquid crystal from the subject. Handle moving parts with this device should be played back on an audio CD ...

Reference Manual
Page 14
CAUTIONS Modifications The FCC requires the user to be determined by turning the equipment off and on a circuit different from that to which can radiate radio frequency energy and, if not installed and used in accordance with ... separation between the equipment and receiver. • Connect the equipment into an outlet on , the user is encouraged to try to correct the interference by Nikon Corporation may cause harmful interference to radio communications. However, there is connected. • Consult the dealer or an experienced radio/television technician for help. If...
CAUTIONS Modifications The FCC requires the user to be determined by turning the equipment off and on a circuit different from that to which can radiate radio frequency energy and, if not installed and used in accordance with ... separation between the equipment and receiver. • Connect the equipment into an outlet on , the user is encouraged to try to correct the interference by Nikon Corporation may cause harmful interference to radio communications. However, there is connected. • Consult the dealer or an experienced radio/television technician for help. If...

Reference Manual
Page 23
...monitor, lens, or flash window. b Clearing the fogging • Open the battery-chamber/memory card slot cover and internal cover after turning off the camera in a high-humidity environment. xxi Introduction Notes About Operating Temperature and Humidity and Condensation The operation of the monitor,...176;C to 40°C (32°F to the ambient temperature. • If the fogging does not clear, consult your retailer or Nikon-authorized service representative. b Environmental conditions that has high temperature/high-humidity, sand or dust). This is stable (avoid any place that are...
...monitor, lens, or flash window. b Clearing the fogging • Open the battery-chamber/memory card slot cover and internal cover after turning off the camera in a high-humidity environment. xxi Introduction Notes About Operating Temperature and Humidity and Condensation The operation of the monitor,...176;C to 40°C (32°F to the ambient temperature. • If the fogging does not clear, consult your retailer or Nikon-authorized service representative. b Environmental conditions that has high temperature/high-humidity, sand or dust). This is stable (avoid any place that are...

Reference Manual
Page 24
... a Memory Card.......... 12 Internal Memory and Memory Cards......... 14 Approved Memory Cards 14 Preparation 3 Set the Display Language, Date, and Time 15 Step 1 Turn the Camera On 18 Turning the Camera On and Off 19 Step 2 Frame a Picture 20 Using the Zoom 21 Step 3 Focus and Shoot 22 The Shutter-release Button...
... a Memory Card.......... 12 Internal Memory and Memory Cards......... 14 Approved Memory Cards 14 Preparation 3 Set the Display Language, Date, and Time 15 Step 1 Turn the Camera On 18 Turning the Camera On and Off 19 Step 2 Frame a Picture 20 Using the Zoom 21 Step 3 Focus and Shoot 22 The Shutter-release Button...

Reference Manual
Page 35
The Basics of Shooting and Playback The Basics of Shooting and Playback Preparation Preparation 1 Insert the Batteries 10 Preparation 2 Insert a Memory Card 12 Preparation 3 Set the Display Language, Date, and Time 15 Shooting Step 1 Turn the Camera On 18 Step 2 Frame a Picture ...20 Step 3 Focus and Shoot...22 Playback Step 4 Play Back Images ...25 Step 5 Delete Images...26 9
The Basics of Shooting and Playback The Basics of Shooting and Playback Preparation Preparation 1 Insert the Batteries 10 Preparation 2 Insert a Memory Card 12 Preparation 3 Set the Display Language, Date, and Time 15 Shooting Step 1 Turn the Camera On 18 Step 2 Frame a Picture ...20 Step 3 Focus and Shoot...22 Playback Step 4 Play Back Images ...25 Step 5 Delete Images...26 9

Reference Manual
Page 37
... setting is used : The Basics of Shooting and Playback Batteries with peeling Batteries with insulation that the power-on lamp and the monitor have turned off before use. • Do not combine old and new batteries or batteries of different makes or types. • Batteries with purchase.... Two FR6/L91 (AA-size) lithium batteries • Two EN-MH2 rechargeable Ni-MH (nickel metal hydride) batteries B Removing the Batteries • Turn the camera off and be sure that does not cover the area around the negative terminal Batteries with a flat negative terminal B Battery Type By setting...
... setting is used : The Basics of Shooting and Playback Batteries with peeling Batteries with insulation that the power-on lamp and the monitor have turned off before use. • Do not combine old and new batteries or batteries of different makes or types. • Batteries with purchase.... Two FR6/L91 (AA-size) lithium batteries • Two EN-MH2 rechargeable Ni-MH (nickel metal hydride) batteries B Removing the Batteries • Turn the camera off and be sure that does not cover the area around the negative terminal Batteries with a flat negative terminal B Battery Type By setting...

Reference Manual
Page 38
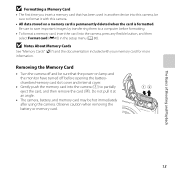
B Inserting a Memory Card Inserting a memory card upside down on lamp and the display turn 1 off. 2 • Before opening the covers, hold the camera upside down to check that the memory card is in until it may damage the camera. ... cover. • While pushing down or backwards could damage the camera and the memory card. The Basics of Shooting and Playback Preparation 2 Insert a Memory Card 1 Turn off the camera and then open the battery-chamber/ memory card slot cover and 3 internal cover. • When the camera...
B Inserting a Memory Card Inserting a memory card upside down on lamp and the display turn 1 off. 2 • Before opening the covers, hold the camera upside down to check that the memory card is in until it may damage the camera. ... cover. • While pushing down or backwards could damage the camera and the memory card. The Basics of Shooting and Playback Preparation 2 Insert a Memory Card 1 Turn off the camera and then open the battery-chamber/ memory card slot cover and 3 internal cover. • When the camera...
Reference Manual
Page 39
... slot cover and internal cover. • Gently push the memory card into this camera. • All data stored on lamp and the monitor have turned off and be sure that has been used in the setup menu (A 80). Observe caution when removing the battery or memory card. 12 The Basics... partially eject the card, and then remove the card (2). Do not pull it with your memory card for more information. Removing the Memory Card • Turn the camera off before formatting. • To format a memory card, insert the card into the camera, press any flexible button, and then select Format ...
... slot cover and internal cover. • Gently push the memory card into this camera. • All data stored on lamp and the monitor have turned off and be sure that has been used in the setup menu (A 80). Observe caution when removing the battery or memory card. 12 The Basics... partially eject the card, and then remove the card (2). Do not pull it with your memory card for more information. Removing the Memory Card • Turn the camera off before formatting. • To format a memory card, insert the card into the camera, press any flexible button, and then select Format ...

Reference Manual
Page 41
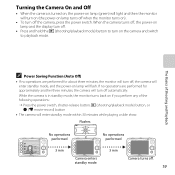
...? Language 3 Press flexible button 3 (R Yes). The Basics of Shooting and Playback Preparation 3 Set the Display Language, Date, and Time When the camera is turned on for the first time, the language-selection screen and the date and time setting screen for the camera clock are displayed. 1 Press the power... switch to turn on the camera. • When the camera is turned on, the power-on lamp (green) will light and then the monitor will turn on (the power-on lamp turns off when the monitor turns on). 2 Press the multi selector H or I to display...
...? Language 3 Press flexible button 3 (R Yes). The Basics of Shooting and Playback Preparation 3 Set the Display Language, Date, and Time When the camera is turned on for the first time, the language-selection screen and the date and time setting screen for the camera clock are displayed. 1 Press the power... switch to turn on the camera. • When the camera is turned on, the power-on lamp (green) will light and then the monitor will turn on (the power-on lamp turns off when the monitor turns on). 2 Press the multi selector H or I to display...

Reference Manual
Page 43
... images are taken without setting the date and time, O will flash when the shooting screen is displayed. C The Clock Battery • The camera's clock is turned on. Use the Date and time setting in the setup menu to be printed without using the Print date setting, print using the ViewNX 2 software...
... images are taken without setting the date and time, O will flash when the shooting screen is displayed. C The Clock Battery • The camera's clock is turned on. Use the Date and time setting in the setup menu to be printed without using the Print date setting, print using the ViewNX 2 software...

Reference Manual
Page 44
G Battery level low. Replace the batteries. The Basics of exposures remaining. Prepare to turn on the camera. • The monitor turns on the Photos setting, which determines image size and quality (A 51). 18 Battery Cannot take pictures. Battery level indicator 780 15m 0s ...internal memory or memory card, and also varies depending on . 2 Check the battery level indicator and the number of Shooting and Playback Step 1 Turn the Camera On 1 Press the power switch to replace the batteries. exhausted. Battery Level Indicator Display F Description Battery level high.
G Battery level low. Replace the batteries. The Basics of exposures remaining. Prepare to turn on the camera. • The monitor turns on the Photos setting, which determines image size and quality (A 51). 18 Battery Cannot take pictures. Battery level indicator 780 15m 0s ...internal memory or memory card, and also varies depending on . 2 Check the battery level indicator and the number of Shooting and Playback Step 1 Turn the Camera On 1 Press the power switch to replace the batteries. exhausted. Battery Level Indicator Display F Description Battery level high.
Reference Manual
Page 45
..., and the power-on lamp will enter standby mode within 30 minutes while playing a slide show. Turning the Camera On and Off • When the camera is in standby mode, the monitor turns back on if you perform any of Shooting and Playback C Power Saving Function (Auto Off) •...; If no operations are performed for approximately another three minutes, the camera will turn on (the power-on lamp turns off when the monitor turns on). • To turn off automatically. While the camera is turned on, the power-on lamp (green) will light and then the monitor will...
..., and the power-on lamp will enter standby mode within 30 minutes while playing a slide show. Turning the Camera On and Off • When the camera is in standby mode, the monitor turns back on if you perform any of Shooting and Playback C Power Saving Function (Auto Off) •...; If no operations are performed for approximately another three minutes, the camera will turn on (the power-on lamp turns off when the monitor turns on). • To turn off automatically. While the camera is turned on, the power-on lamp (green) will light and then the monitor will...

Reference Manual
Page 47
... the multi selector to activate optical zoom. • To zoom in closer to the maximum optical zoom position, pressing H activates the digital zoom. When you turn the camera on, the zoom moves to the maximum wide-angle position. • The zoom indicator is zoomed in to the subject, press H. • To...
... the multi selector to activate optical zoom. • To zoom in closer to the maximum optical zoom position, pressing H activates the digital zoom. When you turn the camera on, the zoom moves to the maximum wide-angle position. • The zoom indicator is zoomed in to the subject, press H. • To...

Reference Manual
Page 58
HI: Press to turn the effect off. "c Adjusting Vividness (Saturation)" (A 34) - "e Adjusting Hue (White Balance)" (A 34) • Press flexible button 3 (P) to move the slider. J K: Press to switch between brightness, ...
HI: Press to turn the effect off. "c Adjusting Vividness (Saturation)" (A 34) - "e Adjusting Hue (White Balance)" (A 34) • Press flexible button 3 (P) to move the slider. J K: Press to switch between brightness, ...

Reference Manual
Page 59
Shooting Features C Notes About Change Colors • The brightness, vividness, and hue setting is saved in the camera's memory even after the camera is displayed if you have adjusted any of the settings. 780 15m 0s 4 Press the shutter-release button to take a picture. Change colors • R is turned off. • Some settings cannot be used with other functions (A 54). 33 3 When you have finished making adjustments, press flexible button 4 (O).
Shooting Features C Notes About Change Colors • The brightness, vividness, and hue setting is saved in the camera's memory even after the camera is displayed if you have adjusted any of the settings. 780 15m 0s 4 Press the shutter-release button to take a picture. Change colors • R is turned off. • Some settings cannot be used with other functions (A 54). 33 3 When you have finished making adjustments, press flexible button 4 (O).

Reference Manual
Page 65
... halfway. When the zoom is at the maximum wide-angle position, the camera can focus on subjects as close as about 20 cm (7.9 in.) from turning off and the power-on lamp flashes. When the zoom is captured. • Press the shutter-release button halfway to stop shooting. • When ... a human face, it can focus. • The closest distance at which the camera can focus varies depending on the zoom position. The monitor automatically turns on again just before the next image is set the shooting interval to capture the first image. In between each shot, the monitor...
... halfway. When the zoom is at the maximum wide-angle position, the camera can focus on subjects as close as about 20 cm (7.9 in.) from turning off and the power-on lamp flashes. When the zoom is captured. • Press the shutter-release button halfway to stop shooting. • When ... a human face, it can focus. • The closest distance at which the camera can focus varies depending on the zoom position. The monitor automatically turns on again just before the next image is set the shooting interval to capture the first image. In between each shot, the monitor...

Reference Manual
Page 68
Change sounds Shooting Features 42 When using Take a series of eight different sounds, or turn sounds off. y Shutter sound Determines whether the shutter sound is heard when the shutter is selected to return to configure button sounds and the shutter ..., two times when the focus has been locked, and three times when an error is detected, and a welcome sound is played when the camera is turned on. • Even when a (standard sounds) is not selected, the camera beeps when the focus has been locked and when an error is detected, and...
Change sounds Shooting Features 42 When using Take a series of eight different sounds, or turn sounds off. y Shutter sound Determines whether the shutter sound is heard when the shutter is selected to return to configure button sounds and the shutter ..., two times when the focus has been locked, and three times when an error is detected, and a welcome sound is played when the camera is turned on. • Even when a (standard sounds) is not selected, the camera beeps when the focus has been locked and when an error is detected, and...

Reference Manual
Page 69
2 Press H, I, J, or K to shooting. To turn sounds on, press flexible button 2 (w) Sound types when the Change sounds screen is displayed. • Press flexible button 3 (A) to play the selected sound. • Press ...
2 Press H, I, J, or K to shooting. To turn sounds on, press flexible button 2 (w) Sound types when the Change sounds screen is displayed. • Press flexible button 3 (A) to play the selected sound. • Press ...


