Reference Manual
Page 15
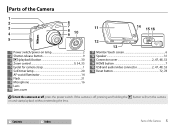
... Monitor/touch screen 6 12 Speaker 31 13 Connector cover 2, 47, 48, 53 14 HOME button 7 15 USB and audio/video connector 2, 47, 48, 53 16 Reset button 72, 78 To turn the camera on or off , pressing and holding the c button will turn the camera on and start playback without extending...
... Monitor/touch screen 6 12 Speaker 31 13 Connector cover 2, 47, 48, 53 14 HOME button 7 15 USB and audio/video connector 2, 47, 48, 53 16 Reset button 72, 78 To turn the camera on or off , pressing and holding the c button will turn the camera on and start playback without extending...
Reference Manual
Page 22
... Technical Notes Contents Index Point-and-Shoot Photography and Movie Recording 12 Note that if fill flash is selected, the camera will be sure to reset the clock (A 57). Motion detection: If the camera detects subject movement or camera shake, it will raise ISO sensitivity for faster shutter speeds and the...
... Technical Notes Contents Index Point-and-Shoot Photography and Movie Recording 12 Note that if fill flash is selected, the camera will be sure to reset the clock (A 57). Motion detection: If the camera detects subject movement or camera shake, it will raise ISO sensitivity for faster shutter speeds and the...

Reference Manual
Page 35
The Setup Menu Technical Notes Image mode is not reset when the camera is turned off. 2 Tap an option. Due to JPEG compression, file size varies from shot to shot, producing large variations in number ...
The Setup Menu Technical Notes Image mode is not reset when the camera is turned off. 2 Tap an option. Due to JPEG compression, file size varies from shot to shot, producing large variations in number ...

Reference Manual
Page 62
Contents Index Print Orders (DPOF) 52 The Setup Menu Technical Notes The Date and Info options are reset each time the print order menu is not affected by later adjustments to complete the print order. Tap I . The date is the date recorded when the picture was taken and is displayed. Shoot View Connect 3 Select imprint options. Tap the following options to select or deselect: • Date: Print the date of recording on all pictures. • Info: Print shooting information on all pictures. 4 Tap I to the time zone or camera clock.
Contents Index Print Orders (DPOF) 52 The Setup Menu Technical Notes The Date and Info options are reset each time the print order menu is not affected by later adjustments to complete the print order. Tap I . The date is the date recorded when the picture was taken and is displayed. Shoot View Connect 3 Select imprint options. Tap the following options to select or deselect: • Date: Print the date of recording on all pictures. • Info: Print shooting information on all pictures. 4 Tap I to the time zone or camera clock.

Reference Manual
Page 64
... for connection to adjust basic camera settings. Restore default settings. Choose whether the camera displays a welcome message at startup. Silence the beeps made by computer Reset all Firmware version Choose the design of the HOME display. Choose whether the camera charges when connected to view options. View the camera firmware version...
... for connection to adjust basic camera settings. Restore default settings. Choose whether the camera displays a welcome message at startup. Silence the beeps made by computer Reset all Firmware version Choose the design of the HOME display. Choose whether the camera charges when connected to view options. View the camera firmware version...

Reference Manual
Page 75
A confirmation dialog will be displayed; Off On Auto Default Contents Index Restoring Default Settings 65 The following options are reset: Option Mode (A 7) Default A Shooting/movie menu options Self-timer (A 20) Flash mode (A 21) Special effects (A 23) Exposure comp. (A 24) ... by computer (A 63) PictBridge Paper size (A 48) Default - Shoot View Restoring Default Settings Connect Tap: W ➜ z Set up ➜ Reset all To restore camera settings to their default values, tap Reset all. The Setup Menu Technical Notes To exit without changing settings, tap J or No. tap...
A confirmation dialog will be displayed; Off On Auto Default Contents Index Restoring Default Settings 65 The following options are reset: Option Mode (A 7) Default A Shooting/movie menu options Self-timer (A 20) Flash mode (A 21) Special effects (A 23) Exposure comp. (A 24) ... by computer (A 63) PictBridge Paper size (A 48) Default - Shoot View Restoring Default Settings Connect Tap: W ➜ z Set up ➜ Reset all To restore camera settings to their default values, tap Reset all. The Setup Menu Technical Notes To exit without changing settings, tap J or No. tap...
Reference Manual
Page 82
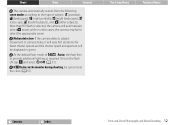
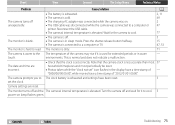
...by computer in . 2 • If the camera is connected to a computer. The camera does not turn the camera off , press the reset button using the charging AC adapter, confirm that it is connected and plugged in the setup menu, 63 - If the camera does not - ... to function as expected, check this list of common problems before consulting your retailer or Nikon representative. ❚❚ Battery/Display/Setup Problem Cause/solution A Wait for Charge by pressing the reset button. Auto is selected for recording to the camera even when the clock is set ...
...by computer in . 2 • If the camera is connected to a computer. The camera does not turn the camera off , press the reset button using the charging AC adapter, confirm that it is connected and plugged in the setup menu, 63 - If the camera does not - ... to function as expected, check this list of common problems before consulting your retailer or Nikon representative. ❚❚ Battery/Display/Setup Problem Cause/solution A Wait for Charge by pressing the reset button. Auto is selected for recording to the camera even when the clock is set ...
Reference Manual
Page 83
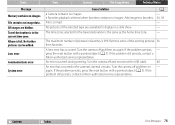
Wait for the camera to The clock battery is exhausted and settings have been reset. 3 set the clock. environments. This is elevated. Contents Index Troubleshooting 73 The date and time are reset. The camera prompts you to cool. 77 The monitor is blank. • The camera .... Camera settings are incorrect. • Check that the camera clock is less accurate than most 57 household timepieces and must periodically be reset. • Photos taken while the "clock not set correctly. Shoot View Connect The Setup Menu Technical Notes Problem Cause/solution A The...
Wait for the camera to The clock battery is exhausted and settings have been reset. 3 set the clock. environments. This is elevated. Contents Index Troubleshooting 73 The date and time are reset. The camera prompts you to cool. 77 The monitor is blank. • The camera .... Camera settings are incorrect. • Check that the camera clock is less accurate than most 57 household timepieces and must periodically be reset. • Photos taken while the "clock not set correctly. Shoot View Connect The Setup Menu Technical Notes Problem Cause/solution A The...
Reference Manual
Page 88
... no images. • Favorites playback selected when favorites contains no images. If the problem still persists, contact a Nikon-authorized service representative. again. press the reset button with a pointed object (A 5). File contains no image data. Remove some of pictures in the current time zone.... Turn the camera off and then on again. If the problem persists, press the reset button with a pointed object (A 5). If the problem persists, - An error occurred during printing. A - 36, 38 - - - If the...
... no images. • Favorites playback selected when favorites contains no images. If the problem still persists, contact a Nikon-authorized service representative. again. press the reset button with a pointed object (A 5). File contains no image data. Remove some of pictures in the current time zone.... Turn the camera off and then on again. If the problem persists, press the reset button with a pointed object (A 5). If the problem persists, - An error occurred during printing. A - 36, 38 - - - If the...

Reference Manual
Page 95
... 11, 17, 32 MOV 67 Movie frame size 29 Movie menu 18 Movie options 29 Movies 16, 31 N Night landscapes 12 Night portraits 12 Nikon Transfer 2 47 Nostalgic sepia 23 Number of exposures remaining..... 11, 25 P PictBridge 48, 82 Playback 30 Playback button 5, 30 Playback menu 33 ...way down 9 Connect The Setup Menu Technical Notes Press the shutter-release button halfway 9 Print order 51 Printing 48 R Red-eye reduction 22 Reset all 65 Reset button 5 S Self-timer 20 Sepia 42 Setup menu 54 Shoot 8 Shooting menu 13 Shutter-release button 9 Single AF 28 Slide show ...
... 11, 17, 32 MOV 67 Movie frame size 29 Movie menu 18 Movie options 29 Movies 16, 31 N Night landscapes 12 Night portraits 12 Nikon Transfer 2 47 Nostalgic sepia 23 Number of exposures remaining..... 11, 25 P PictBridge 48, 82 Playback 30 Playback button 5, 30 Playback menu 33 ...way down 9 Connect The Setup Menu Technical Notes Press the shutter-release button halfway 9 Print order 51 Printing 48 R Red-eye reduction 22 Reset all 65 Reset button 5 S Self-timer 20 Sepia 42 Setup menu 54 Shoot 8 Shooting menu 13 Shutter-release button 9 Single AF 28 Slide show ...


