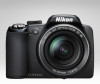

P90 User's Manual
Page 9
... s (display) Button ...15 First Steps ...16 Charging the Battery ...16 Inserting the Battery ...18 Removing the Battery...19 Turning On and Off the Camera...19 Setting Display Language, Date and Time 20 Inserting Memory Cards...22 Removing Memory Cards...22 A Basic Photography and Playback: Auto Mode 24 Step 1 Turn the Camera... Zoom ...27 Step 3 Focus and Shoot ...28 Step 4 Viewing and Deleting Pictures 30 Viewing Pictures (Playback Mode) ...30 Deleting Pictures ...30 Using the Flash...32 Setting the Flash Mode...33 Taking Pictures with the Self-Timer 35 vii
... s (display) Button ...15 First Steps ...16 Charging the Battery ...16 Inserting the Battery ...18 Removing the Battery...19 Turning On and Off the Camera...19 Setting Display Language, Date and Time 20 Inserting Memory Cards...22 Removing Memory Cards...22 A Basic Photography and Playback: Auto Mode 24 Step 1 Turn the Camera... Zoom ...27 Step 3 Focus and Shoot ...28 Step 4 Viewing and Deleting Pictures 30 Viewing Pictures (Playback Mode) ...30 Deleting Pictures ...30 Using the Flash...32 Setting the Flash Mode...33 Taking Pictures with the Self-Timer 35 vii

P90 User's Manual
Page 10
...Mode ...37 Using Manual Focus...38 Exposure Compensation ...39 y/x Shooting Suited for the Scenes 40 Shooting in Scene Mode ...40 Setting the Scene Mode...40 Features...41 Taking Pictures in Food Mode ...48 Taking Pictures for a Panorama ...50 Shooting in the...62 B (Shutter-Priority Auto) Mode ...63 C (Aperture-Priority Auto) Mode 64 D (Manual) Mode ...65 Using E, F (User Setting Mode 67 Save the Settings in E or F...68 Resetting Saved Settings ...69 Active D-Lighting ...70 c More on Playback...71 Viewing Multiple Pictures: Thumbnail Playback 71 Calendar display ...72 Taking a Closer Look: ...
...Mode ...37 Using Manual Focus...38 Exposure Compensation ...39 y/x Shooting Suited for the Scenes 40 Shooting in Scene Mode ...40 Setting the Scene Mode...40 Features...41 Taking Pictures in Food Mode ...48 Taking Pictures for a Panorama ...50 Shooting in the...62 B (Shutter-Priority Auto) Mode ...63 C (Aperture-Priority Auto) Mode 64 D (Manual) Mode ...65 Using E, F (User Setting Mode 67 Save the Settings in E or F...68 Resetting Saved Settings ...69 Active D-Lighting ...70 c More on Playback...71 Viewing Multiple Pictures: Thumbnail Playback 71 Calendar display ...72 Taking a Closer Look: ...

P90 User's Manual
Page 11
... Connecting to a Printer...97 Connecting the Camera and Printer...98 Printing Pictures One at a Time...99 Printing Multiple Pictures ...100 Creating a DPOF Print Order: Print Set 103 d Shooting, Playback and Setup Menus 105 Shooting Options: The Shooting Menu 105 Displaying the Shooting Menu...106 q Image Quality ...107 r Image size ...108 F Optimize...
... Connecting to a Printer...97 Connecting the Camera and Printer...98 Printing Pictures One at a Time...99 Printing Multiple Pictures ...100 Creating a DPOF Print Order: Print Set 103 d Shooting, Playback and Setup Menus 105 Shooting Options: The Shooting Menu 105 Displaying the Shooting Menu...106 q Image Quality ...107 r Image size ...108 F Optimize...

P90 User's Manual
Page 12
... Camera Setup: The Setup Menu 135 Displaying the Setup Menu...136 c Welcome Screen...137 d Date...138 e Monitor Settings ...141 f Date Imprint ...142 g Vibration Reduction...143 U Motion Detection...144 h AF Assist ...145 u Digital Zoom ...145 i Sound Settings ...146 k Auto Off...146 l/m Format Memory/Format Card 147 n Language...148 o Video Mode...148 d Blink Warning...
... Camera Setup: The Setup Menu 135 Displaying the Setup Menu...136 c Welcome Screen...137 d Date...138 e Monitor Settings ...141 f Date Imprint ...142 g Vibration Reduction...143 U Motion Detection...144 h AF Assist ...145 u Digital Zoom ...145 i Sound Settings ...146 k Auto Off...146 l/m Format Memory/Format Card 147 n Language...148 o Video Mode...148 d Blink Warning...

P90 User's Manual
Page 13
...be read it where all new pictures will apply only to the camera. C Memory Cards Pictures taken with your purchase of a Nikon COOLPIX P90 digital camera. Illustrations and Screen Display Illustrations and text displays shown in this manual or in the camera's internal memory or on ... elsewhere in bold text. Notations • A Secure Digital (SD) memory card is referred to as a "memory card". • The setting at the time of buttons or messages displayed in a computer monitor are sometimes omitted from actual display. This icon indicates that should be formatted...
...be read it where all new pictures will apply only to the camera. C Memory Cards Pictures taken with your purchase of a Nikon COOLPIX P90 digital camera. Illustrations and Screen Display Illustrations and text displays shown in this manual or in the camera's internal memory or on ... elsewhere in bold text. Notations • A Secure Digital (SD) memory card is referred to as a "memory card". • The setting at the time of buttons or messages displayed in a computer monitor are sometimes omitted from actual display. This icon indicates that should be formatted...
P90 User's Manual
Page 20
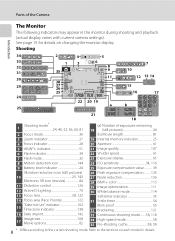
...movies 84 11 Distortion control 126 12 Active D-Lighting 70 13 Focus area 28, 122 14 Focus area (Face Priority 122 "Date not set" indicator 162 15 Time zone indicator 138 16 Date imprint 142 Image size 108 17 Movie options 82 (a) Number of the Camera Introduction... The Monitor The following indicators may appear in the monitor during shooting and playback (actual display varies with current camera settings). Parts of exposures remaining 18 (still pictures 24 (b) Movie length 81 19 Internal memory indicator 25 20 Aperture 61 21 Image quality ...
...movies 84 11 Distortion control 126 12 Active D-Lighting 70 13 Focus area 28, 122 14 Focus area (Face Priority 122 "Date not set" indicator 162 15 Time zone indicator 138 16 Date imprint 142 Image size 108 17 Movie options 82 (a) Number of the Camera Introduction... The Monitor The following indicators may appear in the monitor during shooting and playback (actual display varies with current camera settings). Parts of exposures remaining 18 (still pictures 24 (b) Movie length 81 19 Internal memory indicator 25 20 Aperture 61 21 Image quality ...

P90 User's Manual
Page 22
... saved, you can shoot with the mark next to this mode for automatic adjustment of settings to suit the selected subject type, or use the voice recording option to shoot movies. x Scene Auto Selector (A52) By simply framing a picture,... shutterrelease button is pressed down fully. Basic Operations The Mode Dial Align the mode icon with the settings that are more frequently used by just changing over shutter speed and aperture. E, F User Setting (A67) Save the settings made in shooting modes A, B, C and D. d Sport Continuous (A56) Continuous shooting of digital cameras. Introduction A...
... saved, you can shoot with the mark next to this mode for automatic adjustment of settings to suit the selected subject type, or use the voice recording option to shoot movies. x Scene Auto Selector (A52) By simply framing a picture,... shutterrelease button is pressed down fully. Basic Operations The Mode Dial Align the mode icon with the settings that are more frequently used by just changing over shutter speed and aperture. E, F User Setting (A67) Save the settings made in shooting modes A, B, C and D. d Sport Continuous (A56) Continuous shooting of digital cameras. Introduction A...

P90 User's Manual
Page 23
Introduction For Shooting Mode Programmed auto (mode dial set to A) Shutter-priority auto (mode dial set to B) Aperture-priority auto (mode dial set to C) Manual (mode dial set to D) For Playback Mode Full-frame playback or thumbnail playback Calendar display Playback zoom Movie/Audio playback Use Description A Change the flexible program 62 Adjust ...
Introduction For Shooting Mode Programmed auto (mode dial set to A) Shutter-priority auto (mode dial set to B) Aperture-priority auto (mode dial set to C) Manual (mode dial set to D) For Playback Mode Full-frame playback or thumbnail playback Calendar display Playback zoom Movie/Audio playback Use Description A Change the flexible program 62 Adjust ...

P90 User's Manual
Page 25
... the tab. Switching Between Tabs Shooting menu Image quality Image size Optimize image White balance ISO sensitivity Metering Press the multi selector J to the next set of options. comp. Auto bracketing ±0.3 ±0.7 ±1.0 Off Press the k button or the multi selector K to choose another tab, and press either the ... Press the d button to display the menu and to select options for each menu item. • Press the d button again to exit the menu. Set up Welcome screen Date Monitor settings Date imprint Vibration reduction Motion detection The chosen menu is displayed. 13
... the tab. Switching Between Tabs Shooting menu Image quality Image size Optimize image White balance ISO sensitivity Metering Press the multi selector J to the next set of options. comp. Auto bracketing ±0.3 ±0.7 ±1.0 Off Press the k button or the multi selector K to choose another tab, and press either the ... Press the d button to display the menu and to select options for each menu item. • Press the d button again to exit the menu. Set up Welcome screen Date Monitor settings Date imprint Vibration reduction Motion detection The chosen menu is displayed. 13

P90 User's Manual
Page 26
... Viewfinder When the diopter for the electronic viewfinder is out of focus and the display is clearly visible. White balance For accurate color reproduction, choose a setting that suits the shooting conditions. Switch to see the monitor. To return to the original menu, rotate the zoom control to g (j) again.
... Viewfinder When the diopter for the electronic viewfinder is out of focus and the display is clearly visible. White balance For accurate color reproduction, choose a setting that suits the shooting conditions. Switch to see the monitor. To return to the original menu, rotate the zoom control to g (j) again.

P90 User's Manual
Page 27
Use highlights as a guide when setting exposure. 3 A graph showing tone distribution. The vertical axis shows the number of pixels. 4 The shooting data displayed includes the folder name, file name, shooting mode ... Playback 1/125 F2.8 16 Framing grids1 Display a boxed guide for movies) Display highlight2, histogram3 and shooting data4. A is displayed when the shooting mode A, y, x, d or A is set to the right. For Shooting Basic Operations 1/125 F2.8 16 Display information Display the picture and the shooting data.
Use highlights as a guide when setting exposure. 3 A graph showing tone distribution. The vertical axis shows the number of pixels. 4 The shooting data displayed includes the folder name, file name, shooting mode ... Playback 1/125 F2.8 16 Framing grids1 Display a boxed guide for movies) Display highlight2, histogram3 and shooting data4. A is displayed when the shooting mode A, y, x, d or A is set to the right. For Shooting Basic Operations 1/125 F2.8 16 Display information Display the picture and the shooting data.

P90 User's Manual
Page 31
... been removed and turn off function). Press the power switch to elapse before turning on lamp and the monitor are performed for about a minute (default setting), the monitor will turn off automatically and the camera will turn the camera on the camera. First Steps Inserting the Battery Removing the Battery Turn...
... been removed and turn off function). Press the power switch to elapse before turning on lamp and the monitor are performed for about a minute (default setting), the monitor will turn off automatically and the camera will turn the camera on the camera. First Steps Inserting the Battery Removing the Battery Turn...

P90 User's Manual
Page 32
... 3 Choose Yes and press the k button. • If No is selected, the date and time will turn on. • Remove the lens cap. Date Set time and date? 4 Press the multi selector J or K to turn off the daylight saving time option, press I. 20 Back London Casablanca Back When the daylight...press the multi selector H in the time zone selection screen displayed in step 4 to select your home time zone (A140) and press the k button. Setting Display Language, Date and Time A language-selection dialog is displayed the first time the camera is turned on. 1 Press the power switch to turn on...
... 3 Choose Yes and press the k button. • If No is selected, the date and time will turn on. • Remove the lens cap. Date Set time and date? 4 Press the multi selector J or K to turn off the daylight saving time option, press I. 20 Back London Casablanca Back When the daylight...press the multi selector H in the time zone selection screen displayed in step 4 to select your home time zone (A140) and press the k button. Setting Display Language, Date and Time A language-selection dialog is displayed the first time the camera is turned on. 1 Press the power switch to turn on...

P90 User's Manual
Page 33
.... D Changing the Date and Time • Select Date from Date (A138) in the setup menu (A135) to change the time zone and daylight saving time settings (A138). 21 D (day) ➝ M (month) ➝ Y (year) ➝ hour ➝ minute ➝ DMY (the order in which the day, month, and year ...are displayed) • Press J to return to the previous cursor. 6 Choose the order in the following order. First Steps Setting Display Language, Date and Time 5 Edit the date. • Press H or I to edit the highlighted item. • Press K to change the current ...
.... D Changing the Date and Time • Select Date from Date (A138) in the setup menu (A135) to change the time zone and daylight saving time settings (A138). 21 D (day) ➝ M (month) ➝ Y (year) ➝ hour ➝ minute ➝ DMY (the order in which the day, month, and year ...are displayed) • Press J to return to the previous cursor. 6 Choose the order in the following order. First Steps Setting Display Language, Date and Time 5 Edit the date. • Press H or I to edit the highlighted item. • Press K to change the current ...

P90 User's Manual
Page 37
..., C is needed, such as in flash (A33). In situations where flash is not displayed and pictures will be recorded to specify settings for the shooting menu options Image quality (A107) and Image size (A108). Image Quality and Image Size The combination of camera shake. ... D Note on the Flash When the built-in A (auto) mode allows you to internal memory. D Vibration Reduction When On (default setting) is displayed. The default settings are W (Normal) for image quality and G (4000 × 3000) for Vibration reduction (A143), the camera effectively reduces camera shake ...
..., C is needed, such as in flash (A33). In situations where flash is not displayed and pictures will be recorded to specify settings for the shooting menu options Image quality (A107) and Image size (A108). Image Quality and Image Size The combination of camera shake. ... D Note on the Flash When the built-in A (auto) mode allows you to internal memory. D Vibration Reduction When On (default setting) is displayed. The default settings are W (Normal) for image quality and G (4000 × 3000) for Vibration reduction (A143), the camera effectively reduces camera shake ...

P90 User's Manual
Page 39
...focus area will trigger digital zoom. When zoom is increased beyond V. Digital zoom is being applied. Focus will be magnified up to set the digital zoom so that interpolation is in effect. The subject can be on the subject. Basic Photography and Playback: Auto Mode ...8226; By using Digital zoom (A145) in A zoom indicator is displayed at the top of the zoom positions at the current image size setting. C Digital Zoom and Interpolation Unlike optical zoom, digital zoom uses a digital imaging process known as image size decreases, allowing for confirmation of...
...focus area will trigger digital zoom. When zoom is increased beyond V. Digital zoom is being applied. Focus will be magnified up to set the digital zoom so that interpolation is in effect. The subject can be on the subject. Basic Photography and Playback: Auto Mode ...8226; By using Digital zoom (A145) in A zoom indicator is displayed at the top of the zoom positions at the current image size setting. C Digital Zoom and Interpolation Unlike optical zoom, digital zoom uses a digital imaging process known as image size decreases, allowing for confirmation of...

P90 User's Manual
Page 40
... Mode Step 3 Focus and Shoot 1 Press the shutter-release button halfway. • The camera focuses on the subject in camera shake and blurred pictures. To set focus and exposure, press the shutterrelease button halfway, stopping when you feel resistance.
... Mode Step 3 Focus and Shoot 1 Press the shutter-release button halfway. • The camera focuses on the subject in camera shake and blurred pictures. To set focus and exposure, press the shutterrelease button halfway, stopping when you feel resistance.

P90 User's Manual
Page 44
Change the flash setting according to "fill-in" (illuminate) shadows and backlit subjects. W Off Flash will not fire even when lighting is combined with slow shutter speed. Y Slow sync ... Flash fires just before shutter closes, creating the effect of a stream of about 1.7 to 8.0 m (1 ft. 8 in . to 26 ft.) for tele (when ISO sensitivity is set to capture background at night or under dim light. Basic Photography and Playback: Auto Mode Using the Flash In dark locations or when the subject...
Change the flash setting according to "fill-in" (illuminate) shadows and backlit subjects. W Off Flash will not fire even when lighting is combined with slow shutter speed. Y Slow sync ... Flash fires just before shutter closes, creating the effect of a stream of about 1.7 to 8.0 m (1 ft. 8 in . to 26 ft.) for tele (when ISO sensitivity is set to capture background at night or under dim light. Basic Photography and Playback: Auto Mode Using the Flash In dark locations or when the subject...

P90 User's Manual
Page 45
... using the built-in flash is not applied by pressing the k button within a few seconds even if monitor indicators (A15) are turned on. • If a setting is lowered, the flash mode will be fixed to lower the flash until it clicks shut (A7). 1/125 F2.8 16 33 Using the Flash...
... using the built-in flash is not applied by pressing the k button within a few seconds even if monitor indicators (A15) are turned on. • If a setting is lowered, the flash mode will be fixed to lower the flash until it clicks shut (A7). 1/125 F2.8 16 33 Using the Flash...

P90 User's Manual
Page 46
...) mode: W (off , and reapplied the next time A (auto) mode is selected. • For A, B, C and D shooting modes, the setting for flash mode will fire when picture is shot. • Blinks: Flash is charging. C Red-eye Reduction This camera uses Advanced Red-eye Reduction ("In...47). - A (auto) mode: U (auto) - x (scene auto selector) mode: U (auto) the camera automatically chooses the optimum flash mode setting for different scene modes (A41 to red-eye may be shot also increases slightly. Basic Photography and Playback: Auto Mode Using the Flash B Shooting When...
...) mode: W (off , and reapplied the next time A (auto) mode is selected. • For A, B, C and D shooting modes, the setting for flash mode will fire when picture is shot. • Blinks: Flash is charging. C Red-eye Reduction This camera uses Advanced Red-eye Reduction ("In...47). - A (auto) mode: U (auto) - x (scene auto selector) mode: U (auto) the camera automatically chooses the optimum flash mode setting for different scene modes (A41 to red-eye may be shot also increases slightly. Basic Photography and Playback: Auto Mode Using the Flash B Shooting When...


