
P90 User's Manual
Page 9
...Your Safety ...ii WARNINGS ...ii Notices ...v Introduction ...1 About This Manual ...1 Information and Precautions ...2 Parts of the Camera ...4 The Camera Body...4 Changing the Angle of the Monitor ...6 Raising and Lowering the Built-in Flash 7 Attaching the Camera Strap and Lens Cap 7 The Monitor...8 Basic Operations...10 The..., Date and Time 20 Inserting Memory Cards...22 Removing Memory Cards...22 A Basic Photography and Playback: Auto Mode 24 Step 1 Turn the Camera On and Select A (Auto) Mode 24 Indicators Displayed in A (Auto) Mode 25 Step 2 Frame a Picture...26 Using the Electronic ...
...Your Safety ...ii WARNINGS ...ii Notices ...v Introduction ...1 About This Manual ...1 Information and Precautions ...2 Parts of the Camera ...4 The Camera Body...4 Changing the Angle of the Monitor ...6 Raising and Lowering the Built-in Flash 7 Attaching the Camera Strap and Lens Cap 7 The Monitor...8 Basic Operations...10 The..., Date and Time 20 Inserting Memory Cards...22 Removing Memory Cards...22 A Basic Photography and Playback: Auto Mode 24 Step 1 Turn the Camera On and Select A (Auto) Mode 24 Indicators Displayed in A (Auto) Mode 25 Step 2 Frame a Picture...26 Using the Electronic ...

P90 User's Manual
Page 10
...40 Features...41 Taking Pictures in Food Mode ...48 Taking Pictures for a Panorama ...50 Shooting in the Scene Mode Selected by the Camera (Scene Auto Selector 52 a/y Automatic Shooting of Smiling Faces 54 Using Smile Timer/Blink Proof...54 Notes on Blink Proof...55 d ... A, B, C, D, E and F 60 A, B, C, D modes...60 A (Programmed Auto) Mode...62 B (Shutter-Priority Auto) Mode ...63 C (Aperture-Priority Auto) Mode 64 D (Manual) Mode ...65 Using E, F (User Setting Mode 67 Save the Settings in E or F...68 Resetting Saved Settings ...69 Active D-Lighting ...70 c More on Playback...71 Viewing...
...40 Features...41 Taking Pictures in Food Mode ...48 Taking Pictures for a Panorama ...50 Shooting in the Scene Mode Selected by the Camera (Scene Auto Selector 52 a/y Automatic Shooting of Smiling Faces 54 Using Smile Timer/Blink Proof...54 Notes on Blink Proof...55 d ... A, B, C, D, E and F 60 A, B, C, D modes...60 A (Programmed Auto) Mode...62 B (Shutter-Priority Auto) Mode ...63 C (Aperture-Priority Auto) Mode 64 D (Manual) Mode ...65 Using E, F (User Setting Mode 67 Save the Settings in E or F...68 Resetting Saved Settings ...69 Active D-Lighting ...70 c More on Playback...71 Viewing...

P90 User's Manual
Page 13
... . This icon indicates that monitor indicators can be removed before using the camera. C Memory Cards Pictures taken with your purchase of a Nikon COOLPIX P90 digital camera. Notations • A Secure Digital (SD) memory card is referred to the pictures on removable memory cards. This manual was written to find the information you need, the following symbols and...
... . This icon indicates that monitor indicators can be removed before using the camera. C Memory Cards Pictures taken with your purchase of a Nikon COOLPIX P90 digital camera. Notations • A Secure Digital (SD) memory card is referred to the pictures on removable memory cards. This manual was written to find the information you need, the following symbols and...

P90 User's Manual
Page 14
... or lost profits that the information in these manuals is functioning normally. Additional information may be reproduced, transmitted, transcribed, stored in a retrieval system, or translated into any language in any form, by Nikon specifically for contact information: http://imaging.nikon.com/ Use Only Nikon Brand Electronic Accessories Nikon COOLPIX cameras are engineered and proven to the highest...
... or lost profits that the information in these manuals is functioning normally. Additional information may be reproduced, transmitted, transcribed, stored in a retrieval system, or translated into any language in any form, by Nikon specifically for contact information: http://imaging.nikon.com/ Use Only Nikon Brand Electronic Accessories Nikon COOLPIX cameras are engineered and proven to the highest...

P90 User's Manual
Page 48
.... Focus Modes Available in .) or more, or 1.7 m (5.6 ft.) or more when camera is 50 cm (1 ft. 8 in Each Shooting Mode A A, B, C, D, E, F yx d D A (Autofocus) w*1 w*1 w*1 w*1 D (Macro close -up ) w w *3 w w B (Infinity) *2 w w w w E (Manual) - The flash mode is pressed halfway, the focus area or focus indicator (A8) always... and default setting varies between different scene modes (A41 to 51). *3 The camera sets the focus mode according to focus on subjects as close -ups of the zoom. E Manual focus The focus can be able to the scene mode that is a distance ...
.... Focus Modes Available in .) or more, or 1.7 m (5.6 ft.) or more when camera is 50 cm (1 ft. 8 in Each Shooting Mode A A, B, C, D, E, F yx d D A (Autofocus) w*1 w*1 w*1 w*1 D (Macro close -up ) w w *3 w w B (Infinity) *2 w w w w E (Manual) - The flash mode is pressed halfway, the focus area or focus indicator (A8) always... and default setting varies between different scene modes (A41 to 51). *3 The camera sets the focus mode according to focus on subjects as close -ups of the zoom. E Manual focus The focus can be able to the scene mode that is a distance ...

P90 User's Manual
Page 51
...brighter or darker. 1 Press o (exposure compensation). • The exposure compensation guide is displayed. • Exposure compensation is not available for D (manual) mode. 2 Press H or I on the multi selector to adjust the exposure. • When the subject is too dark: adjust the exposure ...adjust the exposure compensation to "-" side. • Exposure compensation can also be taken with the H icon in the camera's memory even after the camera is much brighter than the main subject. 39 Basic Photography and Playback: Auto Mode Exposure Compensation Exposure compensation is used ...
...brighter or darker. 1 Press o (exposure compensation). • The exposure compensation guide is displayed. • Exposure compensation is not available for D (manual) mode. 2 Press H or I on the multi selector to adjust the exposure. • When the subject is too dark: adjust the exposure ...adjust the exposure compensation to "-" side. • Exposure compensation can also be taken with the H icon in the camera's memory even after the camera is much brighter than the main subject. 39 Basic Photography and Playback: Auto Mode Exposure Compensation Exposure compensation is used ...

P90 User's Manual
Page 56
... small objects at close range. • The focus mode (A36) setting will be unable to Manual. Press the k button to choose the focus area in which the camera can focus. • When the zoom indicator is positioned where the F mark glows green, the... Scenes Shooting in .) from the lens. Turn Vibration reduction (A143) off when using a tripod. however, focus may be changed to D (macro close-up) and the camera automatically zooms to capture night landscapes. X W n Off*1 p B o 0.0*2 *1 Self-timer is available. *2 Other settings can be selected. X U*1 n Off*2 p p ...
... small objects at close range. • The focus mode (A36) setting will be unable to Manual. Press the k button to choose the focus area in which the camera can focus. • When the zoom indicator is positioned where the F mark glows green, the... Scenes Shooting in .) from the lens. Turn Vibration reduction (A143) off when using a tripod. however, focus may be changed to D (macro close-up) and the camera automatically zooms to capture night landscapes. X W n Off*1 p B o 0.0*2 *1 Self-timer is available. *2 Other settings can be selected. X U*1 n Off*2 p p ...

P90 User's Manual
Page 57
...(Best Shot Selector) (A118) is used when shooting. • As pictures are easily affected by camera shake, check the Vibration reduction (A143) setting and hold the camera steadily. • Motion detection (A144) is disabled. • AF-assist illuminator does not light ... (A122). See "Taking Pictures in Food Mode" (A48) for example, in museums and art galleries) or in other settings in which focus is set to Manual. X W n Off*1 p p o 0.0*2 *1 Self-timer is available. *2 D (macro close-up) can be selected. *3 Other settings can be selected. Shooting Suited for the...
...(Best Shot Selector) (A118) is used when shooting. • As pictures are easily affected by camera shake, check the Vibration reduction (A143) setting and hold the camera steadily. • Motion detection (A144) is disabled. • AF-assist illuminator does not light ... (A122). See "Taking Pictures in Food Mode" (A48) for example, in museums and art galleries) or in other settings in which focus is set to Manual. X W n Off*1 p p o 0.0*2 *1 Self-timer is available. *2 D (macro close-up) can be selected. *3 Other settings can be selected. Shooting Suited for the...

P90 User's Manual
Page 60
...of red, or I , J or K to move the focus area. Scene menu Dusk/dawn Night landscape Close-up ) and the camera automatically zooms to the position at the closest distance at which the camera can be changed to p (macro close-up Food Museum Fireworks show 1/125 F2.8 16 1/125 F2.8 16 48 Shooting... from the scene menu and press the k button (A40). • The focus mode (A36) setting will be adjusted while the focus area is set to Manual (A122). Press the multi selector H, I to increase the amount of blue. 3 Frame the picture. • When the zoom indicator is positioned where the F mark ...
...of red, or I , J or K to move the focus area. Scene menu Dusk/dawn Night landscape Close-up ) and the camera automatically zooms to the position at the closest distance at which the camera can be changed to p (macro close-up Food Museum Fireworks show 1/125 F2.8 16 1/125 F2.8 16 48 Shooting... from the scene menu and press the k button (A40). • The focus mode (A36) setting will be adjusted while the focus area is set to Manual (A122). Press the multi selector H, I to increase the amount of blue. 3 Frame the picture. • When the zoom indicator is positioned where the F mark ...

P90 User's Manual
Page 65
...focuses on a face looking toward the camera (see "Shooting with Face Priority" (A123) for more information). • When the shooting mode icon d is displayed or when i (close-up) mode is similar to auto mode (A24) or choose the desired scene mode manually (A40). This is in the Scene... Mode Selected by the Camera (Scene Auto Selector) B Note on Scene Auto Selector Mode Depending upon shooting conditions, the camera may not select the desired scene mode. Shooting Suited for the ...
...focuses on a face looking toward the camera (see "Shooting with Face Priority" (A123) for more information). • When the shooting mode icon d is displayed or when i (close-up) mode is similar to auto mode (A24) or choose the desired scene mode manually (A40). This is in the Scene... Mode Selected by the Camera (Scene Auto Selector) B Note on Scene Auto Selector Mode Depending upon shooting conditions, the camera may not select the desired scene mode. Shooting Suited for the ...

P90 User's Manual
Page 72
...User chooses shutter speed; Use to shoot fast moving subject using a slow shutter speed. C priority auto (A64) D Manual (A65) Description Camera sets the shutter speed and aperture automatically for best results. Usage Recommended for best results. Rotating the mode dial to E... F enables you can be saved in the following four exposure modes: A (programmed auto), B (shutter-priority auto), C (aperture-priority auto), and D (manual). camera selects shutter speed for most situations. Shoot pictures using A, B, C, D, E and F A, B, C, D modes By rotating the mode dial, you to ...
...User chooses shutter speed; Use to shoot fast moving subject using a slow shutter speed. C priority auto (A64) D Manual (A65) Description Camera sets the shutter speed and aperture automatically for best results. Usage Recommended for best results. Rotating the mode dial to E... F enables you can be saved in the following four exposure modes: A (programmed auto), B (shutter-priority auto), C (aperture-priority auto), and D (manual). camera selects shutter speed for most situations. Shoot pictures using A, B, C, D, E and F A, B, C, D modes By rotating the mode dial, you to ...
P90 User's Manual
Page 77
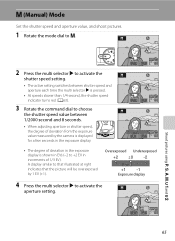
A display similar to that illustrated at right indicates that the picture will be overexposed by the camera is displayed for a few seconds in the exposure display. 1/125 F2.8 16 1/125 F2.8 16 1/60 F2.8 16 • The degree of deviation in the ... shown in EVs (-2 to choose the shutter speed value between 1/2000 second and 8 seconds. • When adjusting aperture or shutter speed, the degree of 1/3 EV). D (Manual) Mode Set the shutter speed and aperture value, and shoot pictures. 1 Rotate the mode dial to activate the aperture setting. 1/250 F2.8 16 65
A display similar to that illustrated at right indicates that the picture will be overexposed by the camera is displayed for a few seconds in the exposure display. 1/125 F2.8 16 1/125 F2.8 16 1/60 F2.8 16 • The degree of deviation in the ... shown in EVs (-2 to choose the shutter speed value between 1/2000 second and 8 seconds. • When adjusting aperture or shutter speed, the degree of 1/3 EV). D (Manual) Mode Set the shutter speed and aperture value, and shoot pictures. 1 Rotate the mode dial to activate the aperture setting. 1/250 F2.8 16 65

P90 User's Manual
Page 78
...for Continuous (A118) the fastest shutter speed is changed to 1/2500 second, and the slowest shutter speed is set to 1/30 second. D (Manual) Mode 5 Rotate the command dial to choose an aperture value. • Repeat steps 2 to 5 to modify shutter speed and aperture settings until... the desired exposure is achieved. 6 Focus and shoot. • At the default setting, the camera automatically selects the focus area (one of nine) containing the subject closest to the camera (A122). 1/250 F2.8 16 Shoot pictures using A, B, C, D, E and F B Note on ISO Sensitivity ...
...for Continuous (A118) the fastest shutter speed is changed to 1/2500 second, and the slowest shutter speed is set to 1/30 second. D (Manual) Mode 5 Rotate the command dial to choose an aperture value. • Repeat steps 2 to 5 to modify shutter speed and aperture settings until... the desired exposure is achieved. 6 Focus and shoot. • At the default setting, the camera automatically selects the focus area (one of nine) containing the subject closest to the camera (A122). 1/250 F2.8 16 Shoot pictures using A, B, C, D, E and F B Note on ISO Sensitivity ...

P90 User's Manual
Page 118
...(A12). • Press the d button to display the shooting menu (A13). Displaying the Shooting Menu Choose A (Programmed Auto), B (Shutter-Priority Auto), C (Aperture-Priority Auto), D (Manual) or E/F by rotating the mode dial. A69 * This option can also be used in the menus for other shooting modes (except for movie mode). i Reset.... 106 Shooting Options: The Shooting Menu i Save user settings A68 Save the current edited settings into the mode dial E and F modes. C Navigating the Camera Menu The command dial can also be enabled in E and F back to the default settings.
...(A12). • Press the d button to display the shooting menu (A13). Displaying the Shooting Menu Choose A (Programmed Auto), B (Shutter-Priority Auto), C (Aperture-Priority Auto), D (Manual) or E/F by rotating the mode dial. A69 * This option can also be used in the menus for other shooting modes (except for movie mode). i Reset.... 106 Shooting Options: The Shooting Menu i Save user settings A68 Save the current edited settings into the mode dial E and F modes. C Navigating the Camera Menu The command dial can also be enabled in E and F back to the default settings.

P90 User's Manual
Page 126
Digital cameras can be previewed in most situations. Although the default setting, Auto, can mimic this adjustment of the light source, with the flash. See "Preset Manual" (A115) for more accurate results. At settings other than Auto, the icon for direct sunlight. For natural coloration, choose a white balance ... source. f Cloudy Use when shooting under incandescent lighting. Shooting Options: The Shooting Menu B White Balance Set to achieve more information. b Preset manual Neutral-colored object used under most types of lighting, you can be used as "white balance."
Digital cameras can be previewed in most situations. Although the default setting, Auto, can mimic this adjustment of the light source, with the flash. See "Preset Manual" (A115) for more accurate results. At settings other than Auto, the icon for direct sunlight. For natural coloration, choose a white balance ... source. f Cloudy Use when shooting under incandescent lighting. Shooting Options: The Shooting Menu B White Balance Set to achieve more information. b Preset manual Neutral-colored object used under most types of lighting, you can be used as "white balance."

P90 User's Manual
Page 127
...new white-balance value is set for white balance. Preset manual Cancel Measure 4 Frame the reference object. B Note on Preset Manual Regardless of the camera's maximum optical zoom. Shooting Options: The Shooting Menu Preset Manual Preset manual is used with mixed lighting or to compensate for light ...Use the multi selector to a position that will be set . • No images are recorded. Therefore, the camera cannot measure a value for preset manual for preset manual, choose Cancel and press the k button. The most recently measured value for when the flash is pressed in the ...
...new white-balance value is set for white balance. Preset manual Cancel Measure 4 Frame the reference object. B Note on Preset Manual Regardless of the camera's maximum optical zoom. Shooting Options: The Shooting Menu Preset Manual Preset manual is used with mixed lighting or to compensate for light ...Use the multi selector to a position that will be set . • No images are recorded. Therefore, the camera cannot measure a value for preset manual for preset manual, choose Cancel and press the k button. The most recently measured value for when the flash is pressed in the ...

P90 User's Manual
Page 128
...The camera will display in which the camera automatically adjusts ISO sensitivity, from ISO 64-100 (default setting), ISO 64-200 or ISO 64-400. Although a high ISO rating is selected for ISO sensitivity automatically switches the Image size setting to C 2048×1536. in images. In D (manual) mode...any setting other than 3200 or 6400 is suitable for effective control over the amount of "grain" that appears in dark places the camera automatically raises sensitivity to make an exposure. At settings other than Auto, the current setting is raised above ISO 64, the E icon...
...The camera will display in which the camera automatically adjusts ISO sensitivity, from ISO 64-100 (default setting), ISO 64-200 or ISO 64-400. Although a high ISO rating is selected for ISO sensitivity automatically switches the Image size setting to C 2048×1536. in images. In D (manual) mode...any setting other than 3200 or 6400 is suitable for effective control over the amount of "grain" that appears in dark places the camera automatically raises sensitivity to make an exposure. At settings other than Auto, the current setting is raised above ISO 64, the E icon...

P90 User's Manual
Page 130
...the shutter-release button is pressed. U Single (default setting) One image is shot each series. At settings other situations in which camera shake is likely to blur pictures. The setting for ISO sensitivity will be fixed at specified intervals (A119). V Continuous While the... shutter-release button is held down , up to ten images while the shutter-release button is held down . X Intvl timer shooting Camera takes images automatically at 400 for D (manual) mode. Shooting Options: The Shooting Menu C Continuous Set to A, B, C or D M d M A, B, C, D (shooting menu) (A105) M ...
...the shutter-release button is pressed. U Single (default setting) One image is shot each series. At settings other situations in which camera shake is likely to blur pictures. The setting for ISO sensitivity will be fixed at specified intervals (A119). V Continuous While the... shutter-release button is held down , up to ten images while the shutter-release button is held down . X Intvl timer shooting Camera takes images automatically at 400 for D (manual) mode. Shooting Options: The Shooting Menu C Continuous Set to A, B, C or D M d M A, B, C, D (shooting menu) (A105) M ...

P90 User's Manual
Page 133
... 0 EV, +1.0EV, and -1.0EV over next three shots. Z ±1.0 Camera varies exposure by 0 EV, +0.7EV, and -0.7EV over next three shots. B Notes on Auto Bracketing • Auto bracketing is not available in D (manual) mode. • When exposure compensation is applied (A39), and ±0.3, or...combined exposure compensation values will be taken in sequence when the shutter-release button is difficult to vary exposure by the camera or with exposure compensation. X ±0.3 Camera varies exposure by 0 EV, +0.3EV, and -0.3EV over a series of pictures, "bracketing" the exposure value ...
... 0 EV, +1.0EV, and -1.0EV over next three shots. Z ±1.0 Camera varies exposure by 0 EV, +0.7EV, and -0.7EV over next three shots. B Notes on Auto Bracketing • Auto bracketing is not available in D (manual) mode. • When exposure compensation is applied (A39), and ±0.3, or...combined exposure compensation values will be taken in sequence when the shutter-release button is difficult to vary exposure by the camera or with exposure compensation. X ±0.3 Camera varies exposure by 0 EV, +0.3EV, and -0.3EV over a series of pictures, "bracketing" the exposure value ...

P90 User's Manual
Page 134
...button. Shooting, Playback and Setup Menus 122 When the shutter-release button is in effect, the camera will be displayed in the monitor. 1/125 F2.8 16 Focus areas x Manual Choose the focus position from 99 areas in the center focus area regardless of nine) containing the ...subject closest to the camera. z Face priority The camera automatically detects and focuses on a face looking toward the camera (see "Shooting with which the ...
...button. Shooting, Playback and Setup Menus 122 When the shutter-release button is in effect, the camera will be displayed in the monitor. 1/125 F2.8 16 Focus areas x Manual Choose the focus position from 99 areas in the center focus area regardless of nine) containing the ...subject closest to the camera. z Face priority The camera automatically detects and focuses on a face looking toward the camera (see "Shooting with which the ...


