User Manual
Page 11
... D-Lighting...103 Functions that Cannot be Applied Simultaneously 104 Using M (User Setting Mode)...108 Save the Settings in M...109 Shooting in M (User Setting) Mode ...109 Resetting Saved Settings ...110 More on Playback ...111 Operations in Full-Frame Playback 111 Playing Images Captured Using Continuous Shooting Mode (Sequence 113 Deleting Images in...
... D-Lighting...103 Functions that Cannot be Applied Simultaneously 104 Using M (User Setting Mode)...108 Save the Settings in M...109 Shooting in M (User Setting) Mode ...109 Resetting Saved Settings ...110 More on Playback ...111 Operations in Full-Frame Playback 111 Playing Images Captured Using Continuous Shooting Mode (Sequence 113 Deleting Images in...
User Manual
Page 13
Table of Contents Basic Camera Setup ...185 Setup Menu...185 Welcome Screen ...187 Time Zone and Date...188 Monitor Settings...191 Print Date ...192 Vibration Reduction ...193 Motion Detection...195 AF Assist...196 Red-eye Reduction ...196 Digital Zoom...197 Assign Side Zoom Control ...198 Sound Settings...199 Auto Off ...199 Format Memory/Format Card...200 Language...201 TV Settings ...201 Charge by Computer...202 Reset File Numbering...202 Blink Warning ...203 Reset All ...205 Firmware Version...208 Caring for the Camera...209 Caring for the Camera ...209 Cleaning ...211 Storage ...212 xi
Table of Contents Basic Camera Setup ...185 Setup Menu...185 Welcome Screen ...187 Time Zone and Date...188 Monitor Settings...191 Print Date ...192 Vibration Reduction ...193 Motion Detection...195 AF Assist...196 Red-eye Reduction ...196 Digital Zoom...197 Assign Side Zoom Control ...198 Sound Settings...199 Auto Off ...199 Format Memory/Format Card...200 Language...201 TV Settings ...201 Charge by Computer...202 Reset File Numbering...202 Blink Warning ...203 Reset All ...205 Firmware Version...208 Caring for the Camera...209 Caring for the Camera ...209 Cleaning ...211 Storage ...212 xi
User Manual
Page 28
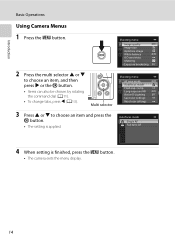
...; Items can also be chosen by rotating the command dial (A11). • To change tabs, press J (A13). Long exposure NR Active D-Lighting Save user settings Reset user settings Autofocus mode Single AF Full-time AF 4 When setting is applied. Multi selector 3 Press H or I to choose an item and press the k button...
...; Items can also be chosen by rotating the command dial (A11). • To change tabs, press J (A13). Long exposure NR Active D-Lighting Save user settings Reset user settings Autofocus mode Single AF Full-time AF 4 When setting is applied. Multi selector 3 Press H or I to choose an item and press the k button...
User Manual
Page 73
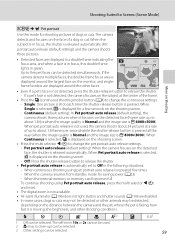
... frame indicating the focus area, and when a face is repeated five times - When continuous shooting using Pet portrait auto release, press the multi selector J (n) and reset. • The digital zoom is F 4000×3000). Off: Press the shutter-release button to release the shutter. • Pet portrait auto release is automatically...
... frame indicating the focus area, and when a face is repeated five times - When continuous shooting using Pet portrait auto release, press the multi selector J (n) and reset. • The digital zoom is F 4000×3000). Off: Press the shutter-release button to release the shutter. • Pet portrait auto release is automatically...
User Manual
Page 95
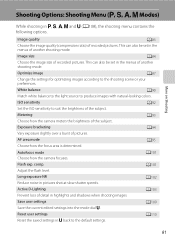
Optimize image A87 Change the settings for optimizing images according to the default settings. Flash exp. A109 Reset user settings Reset the saved settings in the menus of another shooting mode. This can also be set in M back to the shooting scene or your preferences. ISO ...
Optimize image A87 Change the settings for optimizing images according to the default settings. Flash exp. A109 Reset user settings Reset the saved settings in the menus of another shooting mode. This can also be set in M back to the shooting scene or your preferences. ISO ...

User Manual
Page 113
... center of the border, and press the k button. - Shooting menu AF area mode Autofocus mode Flash exp. Long exposure NR Active D-Lighting Save user settings Reset user settings 2 Choose s Subject tracking and press the k button. • The camera enters subject tracking, and a white border is framed by a yellow focus area display...
... center of the border, and press the k button. - Shooting menu AF area mode Autofocus mode Flash exp. Long exposure NR Active D-Lighting Save user settings Reset user settings 2 Choose s Subject tracking and press the k button. • The camera enters subject tracking, and a white border is framed by a yellow focus area display...
User Manual
Page 119
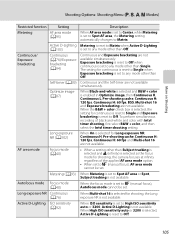
...are not available. • When a setting other than Subject tracking is selected and B (infinity) is selected as the focus mode for continuous is reset to Single when Exposure bracketing is set to any mode other than Off. When the B&W + color check box is selected, the setting for shooting,... Metering is set to Spot AF area, the Metering setting automatically changes to E (manual focus), AF area mode cannot be set. Metering is reset to Matrix when Active D-Lighting is set to E (manual focus), Autofocus mode cannot be set to Matrix. To perform simultaneous recording of the ...
...are not available. • When a setting other than Subject tracking is selected and B (infinity) is selected as the focus mode for continuous is reset to Single when Exposure bracketing is set to any mode other than Off. When the B&W + color check box is selected, the setting for shooting,... Metering is set to Spot AF area, the Metering setting automatically changes to E (manual focus), AF area mode cannot be set. Metering is reset to Matrix when Active D-Lighting is set to E (manual focus), Autofocus mode cannot be set to Matrix. To perform simultaneous recording of the ...

User Manual
Page 122
... for preset manual applies to the j, k, l, m and M shooting modes. 5 The current focus area position is saved when AF area mode is possible in M will be reset. comp. (A101) Long exposure NR (A102) Active D-Lighting (A103) 1 Choose the standard shooting mode. More on Clock Battery If the internal clock battery (A189) is...
... for preset manual applies to the j, k, l, m and M shooting modes. 5 The current focus area position is saved when AF area mode is possible in M will be reset. comp. (A101) Long exposure NR (A102) Active D-Lighting (A103) 1 Choose the standard shooting mode. More on Clock Battery If the internal clock battery (A189) is...

User Manual
Page 123
Long exposure NR Active D-Lighting Save user settings Reset user settings Shooting in M (User Setting) Mode Rotate the mode dial to M to retrieve the settings saved in Save user settings. • Frame the subject ...
Long exposure NR Active D-Lighting Save user settings Reset user settings Shooting in M (User Setting) Mode Rotate the mode dial to M to retrieve the settings saved in Save user settings. • Frame the subject ...

User Manual
Page 124
.... OK? comp. Long exposure NR Active D-Lighting Save user settings Reset user settings Reset user settings User settings will be reset. 1 In the shooting menu, choose Reset user settings and press the k button. 2 Choose Yes and press the k button. • The saved settings are reset as follows: • Shooting mode: j (programmed auto) • Monitor display...
.... OK? comp. Long exposure NR Active D-Lighting Save user settings Reset user settings Reset user settings User settings will be reset. 1 In the shooting menu, choose Reset user settings and press the k button. 2 Choose Yes and press the k button. • The saved settings are reset as follows: • Shooting mode: j (programmed auto) • Monitor display...
User Manual
Page 150
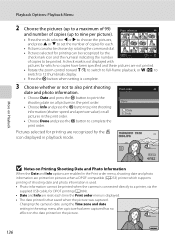
... cannot be printed when the camera is connected directly to a printer, via the supplied USB cable, for DPOF printing (A184). • Date and Info are reset each . 1 1 3 • Pictures can also be chosen by rotating the command dial. • Pictures selected for printing can be recognized by the w icon displayed in...
... cannot be printed when the camera is connected directly to a printer, via the supplied USB cable, for DPOF printing (A184). • Date and Info are reset each . 1 1 3 • Pictures can also be chosen by rotating the command dial. • Pictures selected for printing can be recognized by the w icon displayed in...
User Manual
Page 192
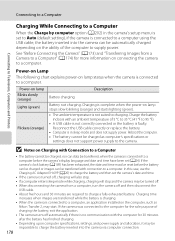
... sleep mode while charging, charging will stop and the camera may be impossible to charge the battery inserted into the camera can be charged as Nikon Transfer 2, may start. B Notes on Charging with an ambient temperature of 5 °C to 35 °C (41 °F to 95 °F). • A USB cable is...mode and does not supply power. Battery not charging. If the camera's clock battery (A189) has been exhausted, the date and time must be reset before the camera's display language and date and time have been set to Auto (default setting), if the camera is connected to a computer.
... sleep mode while charging, charging will stop and the camera may be impossible to charge the battery inserted into the camera can be charged as Nikon Transfer 2, may start. B Notes on Charging with an ambient temperature of 5 °C to 35 °C (41 °F to 95 °F). • A USB cable is...mode and does not supply power. Battery not charging. If the camera's clock battery (A189) has been exhausted, the date and time must be reset before the camera's display language and date and time have been set to Auto (default setting), if the camera is connected to a computer.
User Manual
Page 200
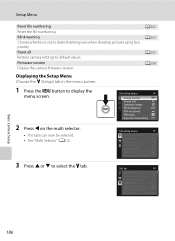
... pictures using face priority. Blink warning Choose whether or not to display the menu screen. Reset all Restore camera settings to select the z tab. Firmware version Display the camera firmware version. Setup Menu Reset file numbering Reset the file numbering. Shooting menu Image quality Image size Optimize image White balance ISO sensitivity Metering...
... pictures using face priority. Blink warning Choose whether or not to display the menu screen. Reset all Restore camera settings to select the z tab. Firmware version Display the camera firmware version. Setup Menu Reset file numbering Reset the file numbering. Shooting menu Image quality Image size Optimize image White balance ISO sensitivity Metering...

User Manual
Page 214
... card, insert it with this camera, be deleted! Format No Basic Camera Setup B Formatting Internal Memory and Memory card • Album icon settings (A127) are reset to their default settings (number icons) when the internal memory or memory card is formatted. • Do not turn off the camera or open the...
... card, insert it with this camera, be deleted! Format No Basic Camera Setup B Formatting Internal Memory and Memory card • Album icon settings (A127) are reset to their default settings (number icons) when the internal memory or memory card is formatted. • Do not turn off the camera or open the...
User Manual
Page 216
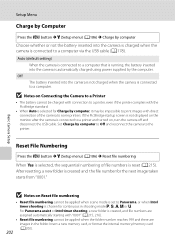
... is selected, the sequential numbering of the camera to the printer. Off The battery inserted into the camera is not charged when the camera is reset (A215). Basic Camera Setup Setup Menu Charge by Computer Press the d button M z (Setup menu) (A186) M Charge by computer Choose ... is running, the battery inserted into the camera is created, and file numbers are assigned automatically starting with "0001" (A215, 216). • Reset file numbering cannot be impossible to print images with the PictBridge standard. • When Auto is selected for the next image taken starts from "0001...
... is selected, the sequential numbering of the camera to the printer. Off The battery inserted into the camera is not charged when the camera is reset (A215). Basic Camera Setup Setup Menu Charge by Computer Press the d button M z (Setup menu) (A186) M Charge by computer Choose ... is running, the battery inserted into the camera is created, and file numbers are assigned automatically starting with "0001" (A215, 216). • Reset file numbering cannot be impossible to print images with the PictBridge standard. • When Auto is selected for the next image taken starts from "0001...

User Manual
Page 219
... Press the d button M z (Setup menu) (A186) M Reset all When Reset is selected, the camera settings are restored to the default values. Pop-up Menu Option Flash mode (A36) Self-timer (A39) Focus mode (A40) Exposure ...
... Press the d button M z (Setup menu) (A186) M Reset all When Reset is selected, the camera settings are restored to the default values. Pop-up Menu Option Flash mode (A36) Self-timer (A39) Focus mode (A40) Exposure ...
User Manual
Page 222
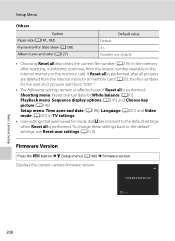
... menu) (A186) M Firmware version Displays the current camera firmware version. To change these settings back to the default settings when Reset all also clears the current file number (A215) in the internal memory or the memory card. Setup Menu Others Option Paper size... • Choosing Reset all is performed. If Reset all is performed after all pictures are not reset to the default settings, use Reset user settings (A110). After resetting, numbering continues from "0001." • The following settings remain unaffected even if Reset all is performed. COOLPIX P500 Ver.X.X Back...
... menu) (A186) M Firmware version Displays the current camera firmware version. To change these settings back to the default settings when Reset all also clears the current file number (A215) in the internal memory or the memory card. Setup Menu Others Option Paper size... • Choosing Reset all is performed. If Reset all is performed after all pictures are not reset to the default settings, use Reset user settings (A110). After resetting, numbering continues from "0001." • The following settings remain unaffected even if Reset all is performed. COOLPIX P500 Ver.X.X Back...
User Manual
Page 229
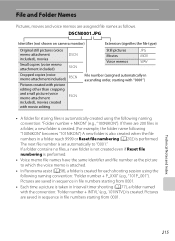
... using the following "100NIKON" becomes "101NIKON.") A new folder is also created when the file numbers in a folder reach 9999 or Reset file numbering (A202) is set automatically to "0001." Pictures are saved in sequence in file numbers starting from 0001. Pictures are 200...in Interval timer shooting (A77), a folder named with "0001") • A folder for each shooting session using the following naming convention: "Folder number + NIKON" (e.g., "100NIKON"). If there are saved in sequence in file numbers starting from 0001. • Each time a picture is taken in a folder, a...
... using the following "100NIKON" becomes "101NIKON.") A new folder is also created when the file numbers in a folder reach 9999 or Reset file numbering (A202) is set automatically to "0001." Pictures are saved in sequence in file numbers starting from 0001. Pictures are 200...in Interval timer shooting (A77), a folder named with "0001") • A folder for each shooting session using the following naming convention: "Folder number + NIKON" (e.g., "100NIKON"). If there are saved in sequence in file numbers starting from 0001. • Each time a picture is taken in a folder, a...

User Manual
Page 233
... be attached to memory card. the internal memory/memory card. 202 N Memory contains no images. A voice memo cannot to create panorama. N Cannot record movie. N Cannot reset file numbering. Time out error while Choose memory card with this file. • Select an image captured with faster recording movie. Technical Notes and Index...
... be attached to memory card. the internal memory/memory card. 202 N Memory contains no images. A voice memo cannot to create panorama. N Cannot record movie. N Cannot reset file numbering. Time out error while Choose memory card with this file. • Select an image captured with faster recording movie. Technical Notes and Index...
User Manual
Page 237
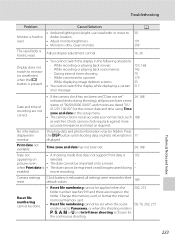
... During interval timer shooting 79 - No information displayed in monitor. Change the memory card, or format the internal memory/memory card. • Reset file numbering cannot be imprinted on selected. Clean monitor. 209 The viewfinder is hard to Panorama, or when the shooting mode is j, k,...8226; A shooting mode that does not support Print date is 17 displayed. Check camera clock regularly against more accurate timepieces and reset as watches. While recording or playing back voice memos 142 - Press the s button until shooting data or photo information is 192...
... During interval timer shooting 79 - No information displayed in monitor. Change the memory card, or format the internal memory/memory card. • Reset file numbering cannot be imprinted on selected. Clean monitor. 209 The viewfinder is hard to Panorama, or when the shooting mode is j, k,...8226; A shooting mode that does not support Print date is 17 displayed. Check camera clock regularly against more accurate timepieces and reset as watches. While recording or playing back voice memos 142 - Press the s button until shooting data or photo information is 192...


