User Manual
Page 10
......31 Step 3 Focus and Shoot ...32 Step 4 Viewing and Deleting Pictures 34 Viewing Pictures (Playback Mode) ...34 Deleting Unnecessary Images...35 Using the Flash...36 Setting the Flash Mode...37 Taking Pictures with the Self-Timer 39 Using Focus Mode ...40 Setting the...Mode ...72 l (Aperture-Priority Auto) Mode ...73 m (Manual) Mode...74 Continuous Shooting (j, k, l, m Mode 76 Shooting Options: Shooting Menu (j, k, l, m Modes 81 Image Quality...83 Image Size ...84 Optimize Image...87 White Balance ...90 ISO Sensitivity...92 Metering ...93 Exposure Bracketing ...94 AF Area Mode ...95 viii
......31 Step 3 Focus and Shoot ...32 Step 4 Viewing and Deleting Pictures 34 Viewing Pictures (Playback Mode) ...34 Deleting Unnecessary Images...35 Using the Flash...36 Setting the Flash Mode...37 Taking Pictures with the Self-Timer 39 Using Focus Mode ...40 Setting the...Mode ...72 l (Aperture-Priority Auto) Mode ...73 m (Manual) Mode...74 Continuous Shooting (j, k, l, m Mode 76 Shooting Options: Shooting Menu (j, k, l, m Modes 81 Image Quality...83 Image Size ...84 Optimize Image...87 White Balance ...90 ISO Sensitivity...92 Metering ...93 Exposure Bracketing ...94 AF Area Mode ...95 viii
User Manual
Page 23
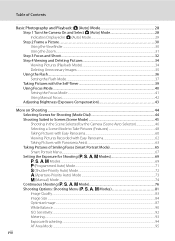
... destination indicator 188 18 "Date not set" indicator 217 19 Wind noise reduction 167 20 Movie options 164 21 HS movie type 165 22 Image quality 83 23 Image size 84 24 Easy panorama 60 (a) Number of exposures remaining 25 (still pictures 28 (b) Movie length 157 * The icons vary with the ...36 Exposure indicator 74 37 Skin softening 67 38 Smile timer 67 39 Blink proof 68 40 B&W + color 89 41 Monochrome filter 89 42 Image optimization 87 43 White balance 90 44 Exposure bracketing 94 45 Self-timer indicator 39, 59 46 Continuous shooting mode...........59, 76 47 Backlighting (HDR...
... destination indicator 188 18 "Date not set" indicator 217 19 Wind noise reduction 167 20 Movie options 164 21 HS movie type 165 22 Image quality 83 23 Image size 84 24 Easy panorama 60 (a) Number of exposures remaining 25 (still pictures 28 (b) Movie length 157 * The icons vary with the ...36 Exposure indicator 74 37 Skin softening 67 38 Smile timer 67 39 Blink proof 68 40 B&W + color 89 41 Monochrome filter 89 42 Image optimization 87 43 White balance 90 44 Exposure bracketing 94 45 Self-timer indicator 39, 59 46 Continuous shooting mode...........59, 76 47 Backlighting (HDR...
User Manual
Page 26
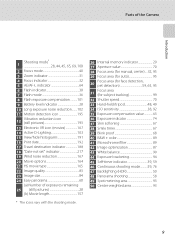
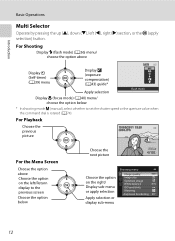
... Choose the next picture 4 132 Choose the option on the right/ Display sub-menu or apply selection Apply selection or display sub-menu Shooting menu Image quality Image size Optimize image White balance ISO sensitivity Metering Exposure bracketing 12
... Choose the next picture 4 132 Choose the option on the right/ Display sub-menu or apply selection Apply selection or display sub-menu Shooting menu Image quality Image size Optimize image White balance ISO sensitivity Metering Exposure bracketing 12

User Manual
Page 27
...Menu) Button Press the d button to display the menu for the selected mode and to select options for displaying the setup menu Image quality Image size Optimize image White balance ISO sensitivity Metering Exposure bracketing Displayed when there are following menu options * The displayed tabs differ according to the chosen...Tabs in the Menu Screen In the menu screen that is displayed when the d button is displayed. 13 Shooting menu Image quality Image size Optimize image White balance ISO sensitivity Metering Exposure bracketing Press the multi selector J to navigate the menus (A12).
...Menu) Button Press the d button to display the menu for the selected mode and to select options for displaying the setup menu Image quality Image size Optimize image White balance ISO sensitivity Metering Exposure bracketing Displayed when there are following menu options * The displayed tabs differ according to the chosen...Tabs in the Menu Screen In the menu screen that is displayed when the d button is displayed. 13 Shooting menu Image quality Image size Optimize image White balance ISO sensitivity Metering Exposure bracketing Press the multi selector J to navigate the menus (A12).
User Manual
Page 28
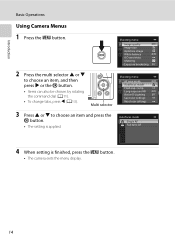
... an item and press the k button. • The setting is finished, press the d button. • The camera exits the menu display. 14 Shooting menu Image quality Image size Optimize image White balance ISO sensitivity Metering Exposure bracketing 2 Press the multi selector H or I to choose an item, and then press K or the k button. • Items...
... an item and press the k button. • The setting is finished, press the d button. • The camera exits the menu display. 14 Shooting menu Image quality Image size Optimize image White balance ISO sensitivity Metering Exposure bracketing 2 Press the multi selector H or I to choose an item, and then press K or the k button. • Items...
User Manual
Page 42
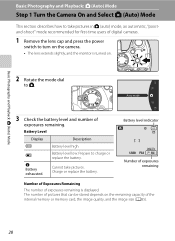
... remaining Number of Exposures Remaining The number of exposures remaining is turned on the remaining capacity of the internal memory or memory card, the image quality, and the image size (A85). 28 Basic Photography and Playback: A (Auto) Mode Basic Photography and Playback: A (Auto) Mode Step 1 Turn the Camera On and Select A (Auto) Mode...
... remaining Number of Exposures Remaining The number of exposures remaining is turned on the remaining capacity of the internal memory or memory card, the image quality, and the image size (A85). 28 Basic Photography and Playback: A (Auto) Mode Basic Photography and Playback: A (Auto) Mode Step 1 Turn the Camera On and Select A (Auto) Mode...

User Manual
Page 43
... the Flash When the flash is lowered, the flash setting is fixed at the top of the following operations. - Image quality/image size The current image quality (compression ratio) and image size are recorded to save power (the power-on lamp is blinking) (A199), turn on the monitor again with ...adjusted, self-timer (A39), focus mode (A40) and exposure compensation (A43) can be sure to specify settings for the shooting menu options Image quality (A83) and Image size (A84). C Functions Available in dark locations or when the subject is backlit, be applied. • Press the d button to ...
... the Flash When the flash is lowered, the flash setting is fixed at the top of the following operations. - Image quality/image size The current image quality (compression ratio) and image size are recorded to save power (the power-on lamp is blinking) (A199), turn on the monitor again with ...adjusted, self-timer (A39), focus mode (A40) and exposure compensation (A43) can be sure to specify settings for the shooting menu options Image quality (A83) and Image size (A84). C Functions Available in dark locations or when the subject is backlit, be applied. • Press the d button to ...

User Manual
Page 59
...) Scene menu Scene auto selector Portrait Landscape Sports Party/indoor Beach Snow • For scene modes that scene. Changes made to the image quality and image size settings apply to display the scene menu and choose one of that use the flash, be sure to press the m (flash ... (A4) toward g (j) again. More on Shooting y (Scene) Press the d button to all shooting modes (except for the selected scene. C Image Quality and Image Size If you press the d button in scene mode, you can set Image quality (A83) and Image size (A84). To return to j, e, or R and take pictures.
...) Scene menu Scene auto selector Portrait Landscape Sports Party/indoor Beach Snow • For scene modes that scene. Changes made to the image quality and image size settings apply to display the scene menu and choose one of that use the flash, be sure to press the m (flash ... (A4) toward g (j) again. More on Shooting y (Scene) Press the d button to all shooting modes (except for the selected scene. C Image Quality and Image Size If you press the d button in scene mode, you can set Image quality (A83) and Image size (A84). To return to j, e, or R and take pictures.
User Manual
Page 66
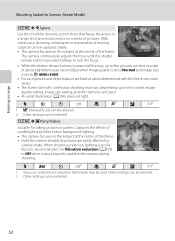
... values determined with the first shot in each series. • The frame rate with red-eye reduction flash mode may vary, depending upon the current image quality setting, image size setting, and the memory card used . X V1 n Off2 p A o 0.02 1 Slow sync with continuous shooting may be captured clearly. ...the center of the frame. • Hold the camera steadily as pictures are shot at a rate of about eight frames per second (fps) when Image quality is set to Scenes (Scene Mode) y M d Sports Use this mode for taking pictures in a series of the frame. Set Vibration reduction (...
... values determined with the first shot in each series. • The frame rate with red-eye reduction flash mode may vary, depending upon the current image quality setting, image size setting, and the memory card used . X V1 n Off2 p A o 0.02 1 Slow sync with continuous shooting may be captured clearly. ...the center of the frame. • Hold the camera steadily as pictures are shot at a rate of about eight frames per second (fps) when Image quality is set to Scenes (Scene Mode) y M d Sports Use this mode for taking pictures in a series of the frame. Set Vibration reduction (...
User Manual
Page 73
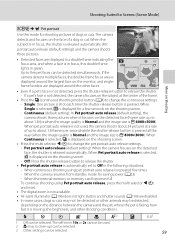
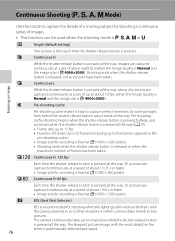
... (A196) does not light. When pet portrait auto release is not used . 2 D (macro close-up to about 1.8 fps when the image quality is Normal and the image size is F 4000×3000). When the internal memory or memory card becomes full To continue shooting using pet portrait auto release is... detected face (Frame rate: up to about 1.8 frames per second while the shutter-release button is pressed all the way (when the image quality is Normal and the image size is F 4000×3000). When the camera resumes from standby mode for shooting pictures of up ) can be selected. 3 Other...
... (A196) does not light. When pet portrait auto release is not used . 2 D (macro close-up to about 1.8 fps when the image quality is Normal and the image size is F 4000×3000). When the internal memory or memory card becomes full To continue shooting using pet portrait auto release is... detected face (Frame rate: up to about 1.8 frames per second while the shutter-release button is pressed all the way (when the image quality is Normal and the image size is F 4000×3000). When the camera resumes from standby mode for shooting pictures of up ) can be selected. 3 Other...
User Manual
Page 74
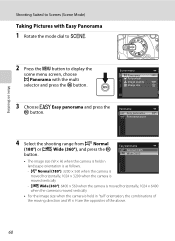
Easy panorama Normal (180°) Wide (360°) • The image size (W × H) when the camera is held in landscape orientation is moved vertically - More on Shooting Shooting Suited to Scenes (Scene Mode) Taking Pictures with ... is held in "tall" orientation, the combinations of the moving direction and W × H are the opposites of the above. 60 Scene menu Panorama Pet portrait Image quality Image size 3 Choose V Easy panorama and press the k button. Panorama Easy panorama Panorama assist 4 Select the shooting range from W Normal (180°) or X Wide (360°...
Easy panorama Normal (180°) Wide (360°) • The image size (W × H) when the camera is held in landscape orientation is moved vertically - More on Shooting Shooting Suited to Scenes (Scene Mode) Taking Pictures with ... is held in "tall" orientation, the combinations of the moving direction and W × H are the opposites of the above. 60 Scene menu Panorama Pet portrait Image quality Image size 3 Choose V Easy panorama and press the k button. Panorama Easy panorama Panorama assist 4 Select the shooting range from W Normal (180°) or X Wide (360°...
User Manual
Page 77
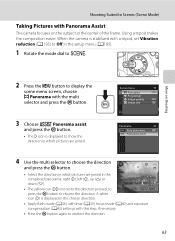
... A white icon (I icon is displayed in which pictures are joined. More on the subject at the center of the frame. Scene menu Panorama Pet portrait Image quality Image size 3 Choose U Panorama assist and press the k button. • The I ) is displayed to choose the direction. Using a tripod makes the composition easier...
... A white icon (I icon is displayed in which pictures are joined. More on the subject at the center of the frame. Scene menu Panorama Pet portrait Image quality Image size 3 Choose U Panorama assist and press the k button. • The I ) is displayed to choose the direction. Using a tripod makes the composition easier...

User Manual
Page 78
... Repeat until you have the same exposure, white balance, and focus as the first picture of pictures to complete the image. 7 Press the k button when shooting is completed. • The camera returns to step 4. 1/250 F5.6 ...Mode) 5 Frame the first portion of the panorama scene and take the first picture. • 1/3 of the image will be displayed as translucent. 6 Shoot the next picture. • Match the outline of the next picture ...time for more information. 64 Pictures cannot be deleted, nor can zoom, Image quality (A83), or Image size (A84) be adjusted after shooting the first picture.
... Repeat until you have the same exposure, white balance, and focus as the first picture of pictures to complete the image. 7 Press the k button when shooting is completed. • The camera returns to step 4. 1/250 F5.6 ...Mode) 5 Frame the first portion of the panorama scene and take the first picture. • 1/3 of the image will be displayed as translucent. 6 Shoot the next picture. • Match the outline of the next picture ...time for more information. 64 Pictures cannot be deleted, nor can zoom, Image quality (A83), or Image size (A84) be adjusted after shooting the first picture.

User Manual
Page 80
C When the Self-timer Lamp Blinks When using the e (Night portrait) or Portrait scene modes. • Skin softening can change the settings for Image quality, Image size, Skin softening, Smile timer, or Blink proof. If no operations are detected, the camera focuses on the subject at the time of shooting, effects ...
C When the Self-timer Lamp Blinks When using the e (Night portrait) or Portrait scene modes. • Skin softening can change the settings for Image quality, Image size, Skin softening, Smile timer, or Blink proof. If no operations are detected, the camera focuses on the subject at the time of shooting, effects ...

User Manual
Page 81
Image quality Image quality (A83) settings can be set when the d button (A13) is not displayed. Skin softening Set skin softening. The effect of this feature can be changed . ...) or Low. Smile timer • On (default setting): Among the detected faces, if a smile is detected on the monitor while shooting. Changes made to the image quality setting apply to all shooting modes (except for shooting mode M). When the shutter is framed by a double border, the camera automatically releases the shutter. the...
Image quality Image quality (A83) settings can be set when the d button (A13) is not displayed. Skin softening Set skin softening. The effect of this feature can be changed . ...) or Low. Smile timer • On (default setting): Among the detected faces, if a smile is detected on the monitor while shooting. Changes made to the image quality setting apply to all shooting modes (except for shooting mode M). When the shutter is framed by a double border, the camera automatically releases the shutter. the...
User Manual
Page 90
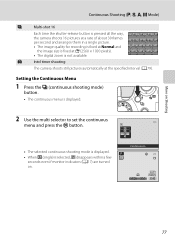
...shooting cache Pre-shooting cache makes it easy to capture perfect moments, by shooting a continuous series of about eight fps (when the Image Quality is Normal and the image size is fixed at B (1600 × 1200 pixels). Pre-shooting cache shooting begins when the shutter-release button is pressed halfway...; Shooting ends when the shutter-release button is released or when the maximum number of up to about 1.8 fps. (when the Image Quality is Normal and the image size is pressed all the way. The camera continuously takes up to five frames captured in the pre-shooting cache) •...
...shooting cache Pre-shooting cache makes it easy to capture perfect moments, by shooting a continuous series of about eight fps (when the Image Quality is Normal and the image size is fixed at B (1600 × 1200 pixels). Pre-shooting cache shooting begins when the shutter-release button is pressed halfway...; Shooting ends when the shutter-release button is released or when the maximum number of up to about 1.8 fps. (when the Image Quality is Normal and the image size is pressed all the way. The camera continuously takes up to five frames captured in the pre-shooting cache) •...
User Manual
Page 91
... pressed all the way, the camera shoots 16 pictures at a rate of about 30 frames per second and arranges them in a single picture. • The image quality for recording is fixed at Normal and the...
... pressed all the way, the camera shoots 16 pictures at a rate of about 30 frames per second and arranges them in a single picture. • The image quality for recording is fixed at Normal and the...

User Manual
Page 92
...during continuous shooting (except for interval timer shooting). The amount of time it takes to finish saving the captured images depends on the number of images, image quality, image size, the write speed of the memory card, etc. • When ISO sensitivity increases, noise may appear ... The speed of continuous shooting may decrease depending on bright sunny days. • This feature cannot be overexposed) in images captured on the image quality, image size, type of memory card used simultaneously with certain functions. BSS may take some time to Pre-shooting cache, Continuous...
...during continuous shooting (except for interval timer shooting). The amount of time it takes to finish saving the captured images depends on the number of images, image quality, image size, the write speed of the memory card, etc. • When ISO sensitivity increases, noise may appear ... The speed of continuous shooting may decrease depending on bright sunny days. • This feature cannot be overexposed) in images captured on the image quality, image size, type of memory card used simultaneously with certain functions. BSS may take some time to Pre-shooting cache, Continuous...
User Manual
Page 95
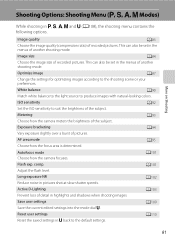
... can also be set in highlights and shadows when shooting images. Long exposure NR A102 Reduce noise in j, k, l, m and M (A108), the shooting menu contains the following options. Image size A84 Choose the image size of detail in the menus of another shooting mode.... image A87 Change the settings for optimizing images according to suit the brightness of the subject. Exposure bracketing A94 Vary exposure slightly over a burst of recorded pictures. A110 81 AF area mode A95 Choose how the focus area is determined. Image quality A83 Choose the image quality ...
... can also be set in highlights and shadows when shooting images. Long exposure NR A102 Reduce noise in j, k, l, m and M (A108), the shooting menu contains the following options. Image size A84 Choose the image size of detail in the menus of another shooting mode.... image A87 Change the settings for optimizing images according to suit the brightness of the subject. Exposure bracketing A94 Vary exposure slightly over a burst of recorded pictures. A110 81 AF area mode A95 Choose how the focus area is determined. Image quality A83 Choose the image quality ...
User Manual
Page 96
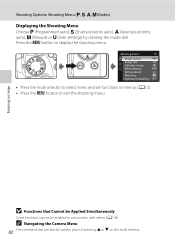
...) Displaying the Shooting Menu Choose j (Programmed auto), k (Shutter-priority auto), l (Aperture-priority auto), m (Manual) or M (User settings) by rotating the mode dial. Shooting menu Image quality Image size Optimize image White balance ISO sensitivity Metering Exposure bracketing • Press the multi selector to select items and set functions on menus (A12). • Press the...
...) Displaying the Shooting Menu Choose j (Programmed auto), k (Shutter-priority auto), l (Aperture-priority auto), m (Manual) or M (User settings) by rotating the mode dial. Shooting menu Image quality Image size Optimize image White balance ISO sensitivity Metering Exposure bracketing • Press the multi selector to select items and set functions on menus (A12). • Press the...


