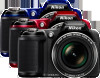
User Manual
Page 18
... Flash 5 The Monitor 6 Shooting Mode 6 Playback Mode 8 The Basics of Shooting and Playback.... 9 Preparation 1 Insert the Batteries 10 Applicable Batteries 11 Preparation 2 Insert a Memory Card.......... 13 Internal Memory and Memory Cards......... 14 Approved Memory Cards 15 Preparation 3 Set the Display Language, Date, and Time 16 Step 1 Turn the Camera On and Select Shooting Mode 20 Turning the Camera On and Off 22 Step 2 Frame a Picture 23 xvi Using the Zoom 24 Step 3 Focus and Shoot 26 The Shutter-release Button 27 Step 4 Play Back Images 29 Step 5 Delete...
... Flash 5 The Monitor 6 Shooting Mode 6 Playback Mode 8 The Basics of Shooting and Playback.... 9 Preparation 1 Insert the Batteries 10 Applicable Batteries 11 Preparation 2 Insert a Memory Card.......... 13 Internal Memory and Memory Cards......... 14 Approved Memory Cards 15 Preparation 3 Set the Display Language, Date, and Time 16 Step 1 Turn the Camera On and Select Shooting Mode 20 Turning the Camera On and Off 22 Step 2 Frame a Picture 23 xvi Using the Zoom 24 Step 3 Focus and Shoot 26 The Shutter-release Button 27 Step 4 Play Back Images 29 Step 5 Delete...
User Manual
Page 19
...(Viewing Images on a TV E17 Connecting the Camera to a Printer (Direct Print E19 Connecting the Camera to the Reference Manual CD for pages indicated with E. E11 g Small Picture: Reducing the Size of an Image E12 a Crop: Creating a Cropped Copy .... Introduction Changing the Image Size (Image Mode).... 62 Image Mode Settings (Image Size and Quality 62 Features That Cannot Be Used Simultaneously 64 Focusing 65 Using Face Detection 65 Focus Lock 66 Playback Features 67 Playback Zoom 68 Thumbnail Display, Calendar Display........ 69 Features Available in Playback Mode (Playback Menu...
...(Viewing Images on a TV E17 Connecting the Camera to a Printer (Direct Print E19 Connecting the Camera to the Reference Manual CD for pages indicated with E. E11 g Small Picture: Reducing the Size of an Image E12 a Crop: Creating a Cropped Copy .... Introduction Changing the Image Size (Image Mode).... 62 Image Mode Settings (Image Size and Quality 62 Features That Cannot Be Used Simultaneously 64 Focusing 65 Using Face Detection 65 Focus Lock 66 Playback Features 67 Playback Zoom 68 Thumbnail Display, Calendar Display........ 69 Features Available in Playback Mode (Playback Menu...

User Manual
Page 20
... Format Memory/Format Card E59 Language E60 TV Settings E61 Blink Warning E62 Eye-Fi Upload E64 Reset All E65 Battery Type E68 Firmware Version E68 File and Folder Names E69 Optional Accessories E70 Error Messages E71 Technical Notes and Index F1 Caring for A (Auto) Mode E29 White Balance (Adjusting Hue E29 Continuous Shooting E32 ISO Sensitivity E33 Color Options E34 The Playback Menu E35 a Print Order (Creating a DPOF Print Order E35 b Slide Show E38 d Protect E39 f Rotate Image E41 h Copy (Copy Between Internal Memory...
... Format Memory/Format Card E59 Language E60 TV Settings E61 Blink Warning E62 Eye-Fi Upload E64 Reset All E65 Battery Type E68 Firmware Version E68 File and Folder Names E69 Optional Accessories E70 Error Messages E71 Technical Notes and Index F1 Caring for A (Auto) Mode E29 White Balance (Adjusting Hue E29 Continuous Shooting E32 ISO Sensitivity E33 Color Options E34 The Playback Menu E35 a Print Order (Creating a DPOF Print Order E35 b Slide Show E38 d Protect E39 f Rotate Image E41 h Copy (Copy Between Internal Memory...

User Manual
Page 42
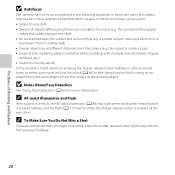
..., remove the lens cap, and turn the camera off the camera, press the power switch. Camera turns off. • The time that the lens cap has been removed, and turn the camera on. C Power Saving Function (Auto Off) If no operations are performed for a while, the monitor will flash. The lens will turn off . • You can be changed using the Auto off , the camera will enter standby mode, and the power-on lamp will turn off setting in the setup menu...
..., remove the lens cap, and turn the camera off the camera, press the power switch. Camera turns off. • The time that the lens cap has been removed, and turn the camera on. C Power Saving Function (Auto Off) If no operations are performed for a while, the monitor will flash. The lens will turn off . • You can be changed using the Auto off , the camera will enter standby mode, and the power-on lamp will turn off setting in the setup menu...
User Manual
Page 47
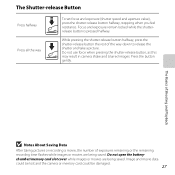
Press the button gently. Do not open the battery- Focus and exposure remain locked while the shutterrelease button is pressed halfway. The Basics of Shooting and Playback B Notes About Saving Data After taking pictures or recording a movie, the number of the way down to release the shutter and take a picture. Image and movie data could be lost and the camera or memory card could be damaged. 27 While pressing the shutter-release button halfway, press the shutter-release button the...
Press the button gently. Do not open the battery- Focus and exposure remain locked while the shutterrelease button is pressed halfway. The Basics of Shooting and Playback B Notes About Saving Data After taking pictures or recording a movie, the number of the way down to release the shutter and take a picture. Image and movie data could be lost and the camera or memory card could be damaged. 27 While pressing the shutter-release button halfway, press the shutter-release button the...
User Manual
Page 48
... distances from the camera as expected in the following situations. a portrait subject, wearing a white shirt, is very dark • Objects of similarly shaped windows, etc.) • Subject is moving rapidly In the situations noted above, try pressing the shutter-release button halfway to refocus several times, or select auto mode and use focus lock (A 66) to take the picture by first focusing on an...
... distances from the camera as expected in the following situations. a portrait subject, wearing a white shirt, is very dark • Objects of similarly shaped windows, etc.) • Subject is moving rapidly In the situations noted above, try pressing the shutter-release button halfway to refocus several times, or select auto mode and use focus lock (A 66) to take the picture by first focusing on an...
User Manual
Page 60
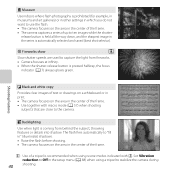
... camera. Shooting Features n Black and white copy Provides clear images of text or drawings on a whiteboard or in print. • The camera focuses on the area in the center of the frame. • The camera captures a series of up to ten images while the shutter- o Backlighting Use when light is coming from fireworks. • Camera focuses at infinity. • When the shutter-release button is pressed halfway, the focus indicator...
... camera. Shooting Features n Black and white copy Provides clear images of text or drawings on a whiteboard or in print. • The camera focuses on the area in the center of the frame. • The camera captures a series of up to ten images while the shutter- o Backlighting Use when light is coming from fireworks. • Camera focuses at infinity. • When the shutter-release button is pressed halfway, the focus indicator...
User Manual
Page 62
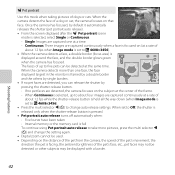
... others by default it automatically releases the shutter (pet portrait auto release). • From the screen displayed after the O Pet portrait scene mode is pressed. • Pet portrait auto release turns off automatically when: - When Continuous is displayed around the face, and the double border glows green when the camera has focused. Internal memory or the memory card is full To continue using Pet portrait auto release to take more than...
... others by default it automatically releases the shutter (pet portrait auto release). • From the screen displayed after the O Pet portrait scene mode is pressed. • Pet portrait auto release turns off automatically when: - When Continuous is displayed around the face, and the double border glows green when the camera has focused. Internal memory or the memory card is full To continue using Pet portrait auto release to take more than...
User Manual
Page 63
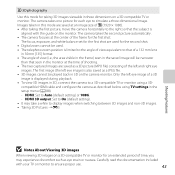
... Viewing 3D images When viewing 3D images on the monitor. The first image (the left and right eye images. HDMI: Set to simulate a three-dimensional image. s 3D photography Use this mode are saved at an image size of n (1920 × 1080). • After taking 3D images viewable in the setup menu (A 88). - HDMI 3D output: Set to ensure proper use. 43 The focus, exposure, and white balance set for the first shot are saved as a 3D picture (MPO file...
... Viewing 3D images When viewing 3D images on the monitor. The first image (the left and right eye images. HDMI: Set to simulate a three-dimensional image. s 3D photography Use this mode are saved at an image size of n (1920 × 1080). • After taking 3D images viewable in the setup menu (A 88). - HDMI 3D output: Set to ensure proper use. 43 The focus, exposure, and white balance set for the first shot are saved as a 3D picture (MPO file...

User Manual
Page 84
Self-timer Smile timer (A 46) When Smile timer is used for shooting, the self-timer cannot be used . Continuous Self-timer (A 55) When using Black-and-white, Sepia, or Cyanotype, the White balance setting is fixed at Single. When the ISO sensitivity is set to On, the flash cannot be used. Image mode Continuous (A 49) When Multi-shot 16 is selected, the Image mode setting is fixed at Auto. White balance Color options (A 49) When using the self-timer, Continuous is disabled. Motion detection Continuous (A 49) ISO sensitivity (A 49) When Multi-shot 16 is...
Self-timer Smile timer (A 46) When Smile timer is used for shooting, the self-timer cannot be used . Continuous Self-timer (A 55) When using Black-and-white, Sepia, or Cyanotype, the White balance setting is fixed at Single. When the ISO sensitivity is set to On, the flash cannot be used. Image mode Continuous (A 49) When Multi-shot 16 is selected, the Image mode setting is fixed at Auto. White balance Color options (A 49) When using the self-timer, Continuous is disabled. Motion detection Continuous (A 49) ISO sensitivity (A 49) When Multi-shot 16 is...

User Manual
Page 96
... the memory card. To transfer images that the memory card is connected to the computer via a USB hub. If the memory card contains a large number of the following methods: • Direct USB connection: Turn the camera off and ensure that are saved in the camera. Turn the camera on. Wait until Nikon Transfer 2 starts. Connect the camera to the computer using Nikon Transfer 2 and click OK. 2 Double-click Import File. A program selection dialog will be displayed; Playback Features select Import File using the supplied USB Cable. Choose...
... the memory card. To transfer images that the memory card is connected to the computer via a USB hub. If the memory card contains a large number of the following methods: • Direct USB connection: Turn the camera off and ensure that are saved in the camera. Turn the camera on. Wait until Nikon Transfer 2 starts. Connect the camera to the computer using Nikon Transfer 2 and click OK. 2 Double-click Import File. A program selection dialog will be displayed; Playback Features select Import File using the supplied USB Cable. Choose...
User Manual
Page 101
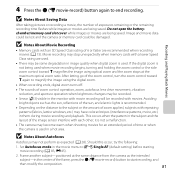
... Speed Class rating of zoom control operation, zoom, autofocus lens drive movement, vibration reduction, and aperture operation when brightness changes may not perform as expected (A 28). B Notes About Autofocus Autofocus may be recorded. • Smear (F3) visible in the movie menu to end recording. Image and movie data could be lost and the camera or memory card could be recorded with each other; 4 Press the b (e movie-record) button again to A Single AF (default setting) before starting movie recording...
... Speed Class rating of zoom control operation, zoom, autofocus lens drive movement, vibration reduction, and aperture operation when brightness changes may not perform as expected (A 28). B Notes About Autofocus Autofocus may be recorded. • Smear (F3) visible in the movie menu to end recording. Image and movie data could be lost and the camera or memory card could be recorded with each other; 4 Press the b (e movie-record) button again to A Single AF (default setting) before starting movie recording...

User Manual
Page 103
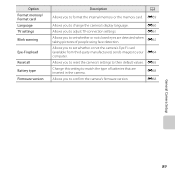
.... E45 83 Movie Movie options Autofocus mode Wind noise reduction Option Description A Movie options The following settings can be heard in recorded movies. If you want to reduce wind noise during movie recording. When B Full-time AF is locked when movie recording begins. E44 Autofocus mode When A Single AF (default setting) is selected, focus is selected, the camera focuses continuously while recording. Recording and Playing Back Movies Changing Movie Recording Settings (the Movie Menu) Enter shooting mode M d button M D tab M k button The following movie types are...
.... E45 83 Movie Movie options Autofocus mode Wind noise reduction Option Description A Movie options The following settings can be heard in recorded movies. If you want to reduce wind noise during movie recording. When B Full-time AF is locked when movie recording begins. E44 Autofocus mode When A Single AF (default setting) is selected, focus is selected, the camera focuses continuously while recording. Recording and Playing Back Movies Changing Movie Recording Settings (the Movie Menu) Enter shooting mode M d button M D tab M k button The following movie types are...
User Manual
Page 109
... internal memory or the memory card. E68 General Camera Setup 89 E65 Change this setting to match the type of batteries that are detected when taking pictures of people using face detection. Option Format memory/ Format card Language TV settings Blink warning Eye-Fi upload Reset all Battery type Firmware version Description A Allows you to change the camera's display language. E62 Allows you to set whether or not closed eyes are inserted in the camera. E61 Allows you to reset the camera's settings to adjust...
... internal memory or the memory card. E68 General Camera Setup 89 E65 Change this setting to match the type of batteries that are detected when taking pictures of people using face detection. Option Format memory/ Format card Language TV settings Blink warning Eye-Fi upload Reset all Battery type Firmware version Description A Allows you to change the camera's display language. E62 Allows you to set whether or not closed eyes are inserted in the camera. E61 Allows you to reset the camera's settings to adjust...
User Manual
Page 114
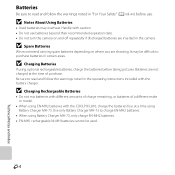
B Charging Batteries If using optional rechargeable batteries, charge the batteries before use batteries beyond their recommended expiration date. • Do not turn the camera on where you are shooting. Batteries are inserted in certain areas. Handle with the COOLPIX L810, charge the batteries four at a time using Battery Charger MH-73, only charge EN-MH2 batteries. • EN-MH1 rechargeable Ni-MH batteries cannot be difficult to purchase batteries in the camera. B Charging Rechargeable Batteries • Do not mix...
B Charging Batteries If using optional rechargeable batteries, charge the batteries before use batteries beyond their recommended expiration date. • Do not turn the camera on where you are shooting. Batteries are inserted in certain areas. Handle with the COOLPIX L810, charge the batteries four at a time using Battery Charger MH-73, only charge EN-MH2 batteries. • EN-MH1 rechargeable Ni-MH batteries cannot be difficult to purchase batteries in the camera. B Charging Rechargeable Batteries • Do not mix...

User Manual
Page 118
... save power. 88, E58 • The camera or battery have become too cold and F4 cannot operate properly. • Camera is off without warning. Power, Display, Settings Issues Problem Camera turns off . • Battery is exhausted. • Standby mode for the flash to charge. • Camera and computer are connected via USB cable. • Camera and TV are connected via audio/video cable or HDMI cable. 22 21 2, 22 52 71, 76 71, E17 • Adjust...
... save power. 88, E58 • The camera or battery have become too cold and F4 cannot operate properly. • Camera is off without warning. Power, Display, Settings Issues Problem Camera turns off . • Battery is exhausted. • Standby mode for the flash to charge. • Camera and computer are connected via USB cable. • Camera and TV are connected via audio/video cable or HDMI cable. 22 21 2, 22 52 71, 76 71, E17 • Adjust...
User Manual
Page 120
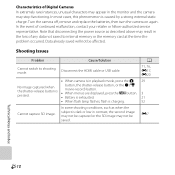
Shooting Issues Problem Cannot switch to internal memory or the memory card at the time the problem occurred. Cause/Solution Disconnect the HDMI cable or USB cable. • When camera is in playback mode, press the A button, the shutter-release button, or the b (e movie-record) button. • When menus are displayed, press the d button. • Battery is exhausted. • When flash lamp flashes, flash is pressed. No image captured when the shutter-release button is charging. Cannot capture 3D image. A 71, 76, E17, E20...
Shooting Issues Problem Cannot switch to internal memory or the memory card at the time the problem occurred. Cause/Solution Disconnect the HDMI cable or USB cable. • When camera is in playback mode, press the A button, the shutter-release button, or the b (e movie-record) button. • When menus are displayed, press the d button. • Battery is exhausted. • When flash lamp flashes, flash is pressed. No image captured when the shutter-release button is charging. Cannot capture 3D image. A 71, 76, E17, E20...
User Manual
Page 124
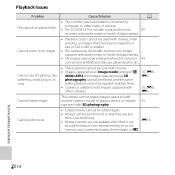
... movies, small - Cannot use D-Lighting, skin softening, small picture, or crop. Playback Issues Problem File cannot be trimmed so that have been cropped to a size of 320 × 240 or smaller. • This camera may not be able to play back movies 85 recorded with another make or model of digital camera. • Playback zoom cannot be used with movies. • Images captured at an Image mode setting of g 4608×2592 and images captured using...
... movies, small - Cannot use D-Lighting, skin softening, small picture, or crop. Playback Issues Problem File cannot be trimmed so that have been cropped to a size of 320 × 240 or smaller. • This camera may not be able to play back movies 85 recorded with another make or model of digital camera. • Playback zoom cannot be used with movies. • Images captured at an Image mode setting of g 4608×2592 and images captured using...
User Manual
Page 125
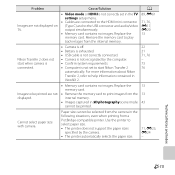
... set to start when camera is not set in ViewNX 2. • Memory card contains no images. Use the printer to select paper size. • The printer does not support the paper sizes specified by the computer. • Confirm system requirements. • Computer is connected. Images to be printed. Cannot select paper size with camera. For more information about Nikon Transfer 2, refer to help information contained in the TV settings setup menu. • Cables are not displayed...
... set to start when camera is not set in ViewNX 2. • Memory card contains no images. Use the printer to select paper size. • The printer does not support the paper sizes specified by the computer. • Confirm system requirements. • Computer is connected. Images to be printed. Cannot select paper size with camera. For more information about Nikon Transfer 2, refer to help information contained in the TV settings setup menu. • Cables are not displayed...
User Manual
Page 134
..., E35 Print order date option... 19, E36, E37 Printer 72, E19 Protect 70, E39 R Rechargeable battery E70 Rechargeable nickel-metal hydride batteries 11 Recording movies 80 Red-eye reduction 53, 54 Reset all 89, E65 Rotate image 70, E41 RSCN E69 S Scene mode 35, 36 Self-timer 55 F24 Self-timer lamp 2, 56 Sepia 49, E34 Setup menu 88 Shooting 20, 23, 26 Shooting menu 49, E29 Shooting mode button 3 Shutter sound E57 Shutter speed 27 Shutter-release button 2, 26 Side zoom control...
..., E35 Print order date option... 19, E36, E37 Printer 72, E19 Protect 70, E39 R Rechargeable battery E70 Rechargeable nickel-metal hydride batteries 11 Recording movies 80 Red-eye reduction 53, 54 Reset all 89, E65 Rotate image 70, E41 RSCN E69 S Scene mode 35, 36 Self-timer 55 F24 Self-timer lamp 2, 56 Sepia 49, E34 Setup menu 88 Shooting 20, 23, 26 Shooting menu 49, E29 Shooting mode button 3 Shutter sound E57 Shutter speed 27 Shutter-release button 2, 26 Side zoom control...


