
Reference Manual
Page 2
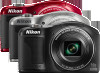
... unique shots Special Effects Mode A 46 Brighten, darken, or soften your pictures, or keep a specific color in your pictures, and focus automatically on your subject, allowing you to be creative with your camera selects the appropriate scene mode. Feature Highlights of the COOLPIX L610 Let your camera take over G (Easy Auto) Mode A 36 Simply... colors to center the shot on that subject. There's no need to black and white. Spend less time changing camera settings and more time taking pictures!
... unique shots Special Effects Mode A 46 Brighten, darken, or soften your pictures, or keep a specific color in your pictures, and focus automatically on your subject, allowing you to be creative with your camera selects the appropriate scene mode. Feature Highlights of the COOLPIX L610 Let your camera take over G (Easy Auto) Mode A 36 Simply... colors to center the shot on that subject. There's no need to black and white. Spend less time changing camera settings and more time taking pictures!

Reference Manual
Page 6
... that may be held liable for contact information: http://imaging.nikon.com/ Use Only Nikon Brand Electronic Accessories Nikon COOLPIX cameras are engineered and proven to the highest standards and include complex electronic circuitry. Nikon will not be available from product malfunction. iv Before Taking Important Pictures Before taking the camera on a trip), take a test shot...
... that may be held liable for contact information: http://imaging.nikon.com/ Use Only Nikon Brand Electronic Accessories Nikon COOLPIX cameras are engineered and proven to the highest standards and include complex electronic circuitry. Nikon will not be available from product malfunction. iv Before Taking Important Pictures Before taking the camera on a trip), take a test shot...

Reference Manual
Page 8
... to property when physically destroying data storage devices. vi Deleted files can sometimes be taken to avoid injury or damage to also replace any pictures selected for example, pictures of empty sky). Before discarding a data storage device or transferring ownership to another person, erase all data using commercially available software, potentially resulting...
... to property when physically destroying data storage devices. vi Deleted files can sometimes be taken to avoid injury or damage to also replace any pictures selected for example, pictures of empty sky). Before discarding a data storage device or transferring ownership to another person, erase all data using commercially available software, potentially resulting...
Reference Manual
Page 15
... 18 Step 1 Turn the Camera On 22 Turning the Camera On and Off 23 Step 2 Select a Shooting Mode 24 Available Shooting Modes 25 Step 3 Frame a Picture 26 Using the Zoom 27 Step 4 Focus and Shoot 28 The Shutter-release Button 29 Step 5 Play Back Images 30 Step 6 Delete Images 32 Shooting...
... 18 Step 1 Turn the Camera On 22 Turning the Camera On and Off 23 Step 2 Select a Shooting Mode 24 Available Shooting Modes 25 Step 3 Frame a Picture 26 Using the Zoom 27 Step 4 Focus and Shoot 28 The Shutter-release Button 29 Step 5 Play Back Images 30 Step 6 Delete Images 32 Shooting...

Reference Manual
Page 16
...Menu 98 Reference Section E1 Using Easy Panorama (Shooting and Playback E3 Shooting with Easy Panorama E3 Viewing Images Captured with Easy Panorama E6 Favorite Pictures Mode E7 Adding Images to the Computer ...... 85 Viewing Images 87 Recording and Playing Back Movies.... 89 Recording Movies 90 Features That Can ... and Saturation E19 I D-Lighting: Enhancing Brightness and Contrast E20 e Skin Softening: Softening Skin Tones E21 p Filter Effects: Applying Digital Filter Effects E22 g Small Picture: Reducing the Size of an Image E24 a Crop: Creating a Cropped Copy .... E25 xiv
...Menu 98 Reference Section E1 Using Easy Panorama (Shooting and Playback E3 Shooting with Easy Panorama E3 Viewing Images Captured with Easy Panorama E6 Favorite Pictures Mode E7 Adding Images to the Computer ...... 85 Viewing Images 87 Recording and Playing Back Movies.... 89 Recording Movies 90 Features That Can ... and Saturation E19 I D-Lighting: Enhancing Brightness and Contrast E20 e Skin Softening: Softening Skin Tones E21 p Filter Effects: Applying Digital Filter Effects E22 g Small Picture: Reducing the Size of an Image E24 a Crop: Creating a Cropped Copy .... E25 xiv

Reference Manual
Page 17
... Show E55 d Protect E56 f Rotate Image E58 E Voice Memo E59 h Copy (Copy Between Internal Memory and Memory Card E61 C Sequence Display Options E63 N Choose Key Picture E63 The Movie Menu E64 Movie Options E64 Autofocus Mode E68 Wind Noise Reduction E68 The Setup Menu E69 Welcome Screen E69 Time Zone and...
... Show E55 d Protect E56 f Rotate Image E58 E Voice Memo E59 h Copy (Copy Between Internal Memory and Memory Card E61 C Sequence Display Options E63 N Choose Key Picture E63 The Movie Menu E64 Movie Options E64 Autofocus Mode E68 Wind Noise Reduction E68 The Setup Menu E69 Welcome Screen E69 Time Zone and...

Reference Manual
Page 29
Parts of the Camera 1 Date of recording 18 2 Time of recording 18 3 Voice memo indicator 79, E59 4 Album icon in favorite pictures mode 76, E7 5 Category icon in auto sort mode 76, E11 6 List by date icon 76, E13 7 Battery level indicator 22 8 Protect icon 78, E56 9 ...Eye-Fi indicator 99, E87 10 Small picture icon 78, E24 11 Cropped image icon 74, E25 12 Print order icon 78, E51 13 Image mode 64, E39 14 Easy panorama 42, E3...
Parts of the Camera 1 Date of recording 18 2 Time of recording 18 3 Voice memo indicator 79, E59 4 Album icon in favorite pictures mode 76, E7 5 Category icon in auto sort mode 76, E11 6 List by date icon 76, E13 7 Battery level indicator 22 8 Protect icon 78, E56 9 ...Eye-Fi indicator 99, E87 10 Small picture icon 78, E24 11 Cropped image icon 74, E25 12 Print order icon 78, E51 13 Image mode 64, E39 14 Easy panorama 42, E3...

Reference Manual
Page 31
The Basics of Shooting and Playback The Basics of Shooting and Playback Preparation Preparation 1 Insert the Batteries 14 Preparation 2 Insert a Memory Card 16 Preparation 3 Set the Display Language, Date, and Time 18 Shooting Step 1 Turn the Camera On 22 Step 2 Select a Shooting Mode 24 Step 3 Frame a Picture ...26 Step 4 Focus and Shoot...28 Playback Step 5 Play Back Images ...30 Step 6 Delete Images...32 13
The Basics of Shooting and Playback The Basics of Shooting and Playback Preparation Preparation 1 Insert the Batteries 14 Preparation 2 Insert a Memory Card 16 Preparation 3 Set the Display Language, Date, and Time 18 Shooting Step 1 Turn the Camera On 22 Step 2 Select a Shooting Mode 24 Step 3 Frame a Picture ...26 Step 4 Focus and Shoot...28 Playback Step 5 Play Back Images ...30 Step 6 Delete Images...32 13

Reference Manual
Page 38
Easy auto mode The Basics of Shooting and Playback 20 8 Press the A button. • The lens extends and the shooting-mode selection screen is displayed, press the k button. • The camera enters the shooting mode and you can take pictures in shooting mode for shooting-mode selection menu. 9 When Easy auto mode is displayed. Press this button in Easy auto mode (A 24). • To switch to another shooting mode, press the multi selector H or I before pressing the k button.
Easy auto mode The Basics of Shooting and Playback 20 8 Press the A button. • The lens extends and the shooting-mode selection screen is displayed, press the k button. • The camera enters the shooting mode and you can take pictures in shooting mode for shooting-mode selection menu. 9 When Easy auto mode is displayed. Press this button in Easy auto mode (A 24). • To switch to another shooting mode, press the multi selector H or I before pressing the k button.

Reference Manual
Page 40
Cannot take pictures. C Notes About the Flash The flash does not pop-up ) control to raise the flash (A 5). 2 Check the battery level indicator and the number of available ... image size (determined by the image mode setting; Battery level indicator 29m 0s 860 Number of exposures remaining Number of Exposures Remaining The number of pictures that can be taken is displayed. • C is displayed when no memory card is backlit.
Cannot take pictures. C Notes About the Flash The flash does not pop-up ) control to raise the flash (A 5). 2 Check the battery level indicator and the number of available ... image size (determined by the image mode setting; Battery level indicator 29m 0s 860 Number of exposures remaining Number of Exposures Remaining The number of pictures that can be taken is displayed. • C is displayed when no memory card is backlit.

Reference Manual
Page 43
... available. • To select an effect, first display the shooting-mode selection menu and then press the multi selector K. The Basics of picture you can be applied to take a picture automatically without pressing the shutter-release button (smile timer). A Auto mode (A 51) Used for general shooting. Settings can take . Using the self... (A 46) Effects can also use the skin softening option to smooth the skin tones in the shooting menu (A 63) to the scene that you frame a picture. Using the flash ➝ A 53 -
... available. • To select an effect, first display the shooting-mode selection menu and then press the multi selector K. The Basics of picture you can be applied to take a picture automatically without pressing the shutter-release button (smile timer). A Auto mode (A 51) Used for general shooting. Settings can take . Using the self... (A 46) Effects can also use the skin softening option to smooth the skin tones in the shooting menu (A 63) to the scene that you frame a picture. Using the flash ➝ A 53 -

Reference Manual
Page 44
Shooting mode icon 29m 0s 860 26 The Basics of Shooting and Playback 2 Frame the picture. • Aim the camera at the desired subject. • When the camera determines the scene mode, the shooting mode icon changes (A 36). Step 3 Frame a Picture 1 Hold the camera steady. • Keep fingers, hair, the camera strap, and other objects away from the lens, flash, AF-assist illuminator, and microphone.
Shooting mode icon 29m 0s 860 26 The Basics of Shooting and Playback 2 Frame the picture. • Aim the camera at the desired subject. • When the camera determines the scene mode, the shooting mode icon changes (A 36). Step 3 Frame a Picture 1 Hold the camera steady. • Keep fingers, hair, the camera strap, and other objects away from the lens, flash, AF-assist illuminator, and microphone.

Reference Manual
Page 47
The Basics of Shooting and Playback B Notes About Saving Data After taking pictures or recording a movie, the number of the way down . C To Make Sure You Do Not Miss a Shot If you are being saved. Do not use ... shutter-release button halfway, stopping when you might miss a shot, press the shutter-release button all the way down to release the shutter and take a picture.
The Basics of Shooting and Playback B Notes About Saving Data After taking pictures or recording a movie, the number of the way down . C To Make Sure You Do Not Miss a Shot If you are being saved. Do not use ... shutter-release button halfway, stopping when you might miss a shot, press the shutter-release button all the way down to release the shutter and take a picture.

Reference Manual
Page 49
...) was detected at the time of shooting, depending on the orientation of images captured using continuous shooting is saved in the sequence (key picture) is displayed to the key picture only display. Press the k button to display them (A 79). C More Information • Playback Zoom ➝ A 74 • Thumbnail Display, Calendar Display ➝...
...) was detected at the time of shooting, depending on the orientation of images captured using continuous shooting is saved in the sequence (key picture) is displayed to the key picture only display. Press the k button to display them (A 79). C More Information • Playback Zoom ➝ A 74 • Thumbnail Display, Calendar Display ➝...

Reference Manual
Page 51
...Deletion When using shooting mode, press the l button to delete the last image that you press the l button and delete a key picture while only key pictures are deleted. • To delete individual images in the monitor. C Selecting Certain Types of Shooting and Playback B Notes About Deletion ...computer before deleting them one at a time and then press the l button. C Deleting the Last Image Captured While in Shooting Mode When using favorite pictures mode, auto sort mode, or list by date mode (A 76), you can select images registered as favorites, images in a Sequence • If...
...Deletion When using shooting mode, press the l button to delete the last image that you press the l button and delete a key picture while only key pictures are deleted. • To delete individual images in the monitor. C Selecting Certain Types of Shooting and Playback B Notes About Deletion ...computer before deleting them one at a time and then press the l button. C Deleting the Last Image Captured While in Shooting Mode When using favorite pictures mode, auto sort mode, or list by date mode (A 76), you can select images registered as favorites, images in a Sequence • If...

Reference Manual
Page 53
... modes and the features that are available when using each shooting mode. You can adjust settings according to the shooting conditions and the kind of pictures you want to Scenes 37 Special Effects Mode (Applying Effects When Shooting)... 46 Smart Portrait Mode (Capturing Smiling Faces) ... 48 A (Auto) Mode 51 Features That...
... modes and the features that are available when using each shooting mode. You can adjust settings according to the shooting conditions and the kind of pictures you want to Scenes 37 Special Effects Mode (Applying Effects When Shooting)... 46 Smart Portrait Mode (Capturing Smiling Faces) ... 48 A (Auto) Mode 51 Features That...

Reference Manual
Page 54
... landscape • i Close-up • j Backlighting • U Other scenes Changing G (Easy Auto) Mode Settings • Depending on the scene selected by the camera, you frame a picture.
... landscape • i Close-up • j Backlighting • U Other scenes Changing G (Easy Auto) Mode Settings • Depending on the scene selected by the camera, you frame a picture.
Reference Manual
Page 58
k Close-up • Macro mode (A 58) is not pressed halfway. Use focus lock to frame the picture on an object not in the center of the frame (A 71). • The camera focuses even when the shutter-release button is enabled and the ... when shooting. - Set Vibration reduction to Off in the setup menu is narrower than that will be combined and saved as a single image. - After taking a picture, do not turn the camera off before the monitor switches to capture a series of the camera focusing. The angle of the frame. Vibration reduction is...
k Close-up • Macro mode (A 58) is not pressed halfway. Use focus lock to frame the picture on an object not in the center of the frame (A 71). • The camera focuses even when the shutter-release button is enabled and the ... when shooting. - Set Vibration reduction to Off in the setup menu is narrower than that will be combined and saved as a single image. - After taking a picture, do not turn the camera off before the monitor switches to capture a series of the camera focusing. The angle of the frame. Vibration reduction is...

Reference Manual
Page 59
...; The camera focuses even when the shutter-release button is pressed halfway, the focus indicator (A 9) always glows green. • There are close to frame the picture on an object not in the center of the frame. • The camera captures a series of the camera 860 focusing.
...; The camera focuses even when the shutter-release button is pressed halfway, the focus indicator (A 9) always glows green. • There are close to frame the picture on an object not in the center of the frame. • The camera captures a series of the camera 860 focusing.

Reference Manual
Page 60
... automatically ends when the camera captures the specified shooting range. • The camera focuses on the printer's settings. p Easy panorama • You can take a panorama picture simply by moving the camera in fullframe playback mode, the image scrolls automatically. ➝ "Using Easy Panorama (Shooting and Playback)" (E3) B Notes About Printing Panorama...
... automatically ends when the camera captures the specified shooting range. • The camera focuses on the printer's settings. p Easy panorama • You can take a panorama picture simply by moving the camera in fullframe playback mode, the image scrolls automatically. ➝ "Using Easy Panorama (Shooting and Playback)" (E3) B Notes About Printing Panorama...


