
Reference Manual
Page 12
... instructions of the hospital. 3D Images Do not continuously view 3D images recorded with this device for extended periods, whether on a television, monitor, or other display. The electromagnetic waves given out by broken glass and to prevent liquid crystal from the subject. Prolonged viewing of 3D images...CD player could cause hearing loss or damage the equipment. Avoid contact with liquid crystal Should the monitor break, care should be no less than 1 m (3 ft 4 in burns or fire. Turn the power off when using the flash Using the flash close to your subject's eyes could result...
... instructions of the hospital. 3D Images Do not continuously view 3D images recorded with this device for extended periods, whether on a television, monitor, or other display. The electromagnetic waves given out by broken glass and to prevent liquid crystal from the subject. Prolonged viewing of 3D images...CD player could cause hearing loss or damage the equipment. Avoid contact with liquid crystal Should the monitor break, care should be no less than 1 m (3 ft 4 in burns or fire. Turn the power off when using the flash Using the flash close to your subject's eyes could result...
Reference Manual
Page 15
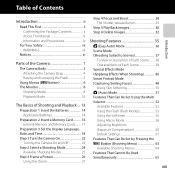
...xi Parts of the Camera 1 The Camera Body 2 Attaching the Camera Strap 4 Raising and Lowering the Flash 5 Using Menus (d Button 6 The Monitor 8 Shooting Mode 8 Playback Mode 10 The Basics of Shooting and Playback ... 13 Preparation 1 Insert the Batteries 14 Applicable Batteries 14 Preparation 2 Insert... Memory Card.......... 16 Internal Memory and Memory Cards......... 17 Preparation 3 Set the Display Language, Date, and Time 18 Step 1 Turn the Camera On 22 Turning the Camera On and Off 23 Step 2 Select a Shooting Mode 24 Available Shooting Modes 25 Step 3 Frame a Picture 26 Using...
...xi Parts of the Camera 1 The Camera Body 2 Attaching the Camera Strap 4 Raising and Lowering the Flash 5 Using Menus (d Button 6 The Monitor 8 Shooting Mode 8 Playback Mode 10 The Basics of Shooting and Playback ... 13 Preparation 1 Insert the Batteries 14 Applicable Batteries 14 Preparation 2 Insert... Memory Card.......... 16 Internal Memory and Memory Cards......... 17 Preparation 3 Set the Display Language, Date, and Time 18 Step 1 Turn the Camera On 22 Turning the Camera On and Off 23 Step 2 Select a Shooting Mode 24 Available Shooting Modes 25 Step 3 Frame a Picture 26 Using...

Reference Manual
Page 26
Parts of the Camera The Monitor • The information that is displayed when you turn on the camera's settings and state of use. Shooting Mode 37 36 35 10 34 33 32 31 30 29 28 27 26 2 45 13 10 29m 0s +1.0 4 0 0 1 / 2 5 0 F 3.3 999 23 22 21 20 25 24 19 9 9 9 9999 6 7 8 9 11 12 18 10 13 14 15 16 17 8 By default, information is displayed in the monitor during shooting and playback changes depending on the camera and also when you operate the camera, and disappears after a few seconds (Monitor settings (A 98) > Photo info > Auto info).
Parts of the Camera The Monitor • The information that is displayed when you turn on the camera's settings and state of use. Shooting Mode 37 36 35 10 34 33 32 31 30 29 28 27 26 2 45 13 10 29m 0s +1.0 4 0 0 1 / 2 5 0 F 3.3 999 23 22 21 20 25 24 19 9 9 9 9999 6 7 8 9 11 12 18 10 13 14 15 16 17 8 By default, information is displayed in the monitor during shooting and playback changes depending on the camera and also when you operate the camera, and disappears after a few seconds (Monitor settings (A 98) > Photo info > Auto info).

Reference Manual
Page 33
...card slot cover. • The camera, batteries, or memory card may vary greatly depending on the manufacturer. B Removing the Batteries • Turn the camera off before use. • Do not combine old and new batteries or batteries of different makes or types. • Batteries ...with the following defects cannot be used , turn the camera on lamp and the monitor have turned off and be hot immediately after using the camera. Choose a reliable brand. C Alkaline Batteries Performance of battery included...
...card slot cover. • The camera, batteries, or memory card may vary greatly depending on the manufacturer. B Removing the Batteries • Turn the camera off before use. • Do not combine old and new batteries or batteries of different makes or types. • Batteries ...with the following defects cannot be used , turn the camera on lamp and the monitor have turned off and be hot immediately after using the camera. Choose a reliable brand. C Alkaline Batteries Performance of battery included...

Reference Manual
Page 34
...insert a memory card that the memory card is formatted. chamber/memory card slot cover. • When the camera turns off, the power-on a memory card is permanently deleted when the card is in the correct orientation. 3 2 The... a memory card. • Slide the memory card in the setup menu (A 98). Preparation 2 Insert a Memory Card 1 Turn off . • Before opening the battery-chamber/memory card slot cover, 1 hold the camera upside down or backwards could damage...into this camera. • All data stored on lamp and the monitor turn off the camera and open the battery-
...insert a memory card that the memory card is formatted. chamber/memory card slot cover. • When the camera turns off, the power-on a memory card is permanently deleted when the card is in the correct orientation. 3 2 The... a memory card. • Slide the memory card in the setup menu (A 98). Preparation 2 Insert a Memory Card 1 Turn off . • Before opening the battery-chamber/memory card slot cover, 1 hold the camera upside down or backwards could damage...into this camera. • All data stored on lamp and the monitor turn off the camera and open the battery-

Reference Manual
Page 35
... camera off and be saved either in the camera's internal memory (approx. 28 MB) or on lamp and the monitor have turned off before opening the battery-chamber/ memory card slot cover. Do not pull it at an angle. 12 B High Temperature Caution The camera, batteries, and ...
... camera off and be saved either in the camera's internal memory (approx. 28 MB) or on lamp and the monitor have turned off before opening the battery-chamber/ memory card slot cover. Do not pull it at an angle. 12 B High Temperature Caution The camera, batteries, and ...

Reference Manual
Page 36
... screen for the camera clock are displayed. 1 Press the power switch to turn on the camera. • When the camera is turned on, the power-on lamp (green) lights and then the monitor turns on (the power-on lamp turns off when the monitor turns on). 2 Press the multi selector H or I to select the desired language and...
... screen for the camera clock are displayed. 1 Press the power switch to turn on the camera. • When the camera is turned on, the power-on lamp (green) lights and then the monitor turns on (the power-on lamp turns off when the monitor turns on). 2 Press the multi selector H or I to select the desired language and...

Reference Manual
Page 40
... is displayed. • C is displayed when no memory card is backlit. The Basics of Shooting and Playback Step 1 Turn the Camera On 1 Press the power switch. • The lens extends and the monitor turns on the image quality and image size (determined by the image mode setting; A 64, E40). Prepare to raise the...
... is displayed. • C is displayed when no memory card is backlit. The Basics of Shooting and Playback Step 1 Turn the Camera On 1 Press the power switch. • The lens extends and the monitor turns on the image quality and image size (determined by the image mode setting; A 64, E40). Prepare to raise the...
Reference Manual
Page 41
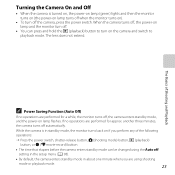
... operations are performed for a while, the monitor turns off automatically. While the camera is turned on, the power-on lamp (green) lights and then the monitor turns on (the power-on lamp turns off when the monitor turns on). • To turn on the camera and switch to turn off the camera, press the power switch.... the camera enters standby mode, and the power-on lamp flashes. The lens does not extend. Turning the Camera On and Off • When the camera is in standby mode, the monitor turns back on if you are using the Auto off . • You can be changed using shooting ...
... operations are performed for a while, the monitor turns off automatically. While the camera is turned on, the power-on lamp (green) lights and then the monitor turns on (the power-on lamp turns off when the monitor turns on). • To turn on the camera and switch to turn off the camera, press the power switch.... the camera enters standby mode, and the power-on lamp flashes. The lens does not extend. Turning the Camera On and Off • When the camera is in standby mode, the monitor turns back on if you are using the Auto off . • You can be changed using shooting ...

Reference Manual
Page 45
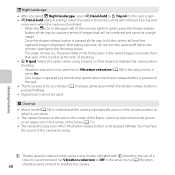
When you turn the camera on the subject • Set Vibration reduction to Off in the setup menu (A 98) when using a shooting mode in which the flash does ... fully, and operates slowly when you rotate the zoom control partially (except when recording movies). • A zoom indicator is displayed at the top of the monitor when the zoom control is rotated. • If you rotate the zoom control to g when the camera is smaller (as determined by up to the...
When you turn the camera on the subject • Set Vibration reduction to Off in the setup menu (A 98) when using a shooting mode in which the flash does ... fully, and operates slowly when you rotate the zoom control partially (except when recording movies). • A zoom indicator is displayed at the top of the monitor when the zoom control is rotated. • If you rotate the zoom control to g when the camera is smaller (as determined by up to the...
Reference Manual
Page 58
... this option when using a tripod to On. - therefore, the use of the camera focusing. After taking a picture, do not turn the camera off before the monitor switches to produce shots with O; Shooting Features O: Shutter speed is reduced when using scene modes indicated with reduced blurring and noise even ...landscape, select Y Hand-held or Z Tripod on the next screen. • Y Hand-held . - When the j icon in the upper left of the monitor lights in the center of the frame. Once the shutter-release button is not pressed halfway. The angle of view (i.e., the area visible in the...
... this option when using a tripod to On. - therefore, the use of the camera focusing. After taking a picture, do not turn the camera off before the monitor switches to produce shots with O; Shooting Features O: Shutter speed is reduced when using scene modes indicated with reduced blurring and noise even ...landscape, select Y Hand-held or Z Tripod on the next screen. • Y Hand-held . - When the j icon in the upper left of the monitor lights in the center of the frame. Once the shutter-release button is not pressed halfway. The angle of view (i.e., the area visible in the...

Reference Manual
Page 61
...the direction that the subject is facing, the ambient brightness of a dog or cat, the camera can be detected), the face displayed largest in the monitor is set again. Continuous: The camera captures 3 images continuously when it has focused (pet portrait auto release). • After you select O Pet ... can detect the face and focus on it. Images are detected, the camera focuses on the pet's face. • Pet portrait auto release turns off automatically when: - The camera also detects people's faces (A 67). If you hold the shutter-release button all the way down. Press ...
...the direction that the subject is facing, the ambient brightness of a dog or cat, the camera can be detected), the face displayed largest in the monitor is set again. Continuous: The camera captures 3 images continuously when it has focused (pet portrait auto release). • After you select O Pet ... can detect the face and focus on it. Images are detected, the camera focuses on the pet's face. • Pet portrait auto release turns off automatically when: - The camera also detects people's faces (A 67). If you hold the shutter-release button all the way down. Press ...

Reference Manual
Page 73
..., select another flash mode and take pictures. • Off: The flash does not fire when a picture is taken. If the battery level is low, the monitor turns off . C The Flash Lamp The flash lamp indicates the status of approx. 1.5 to 3.2 m (5 ft to reduce redeye before the image is saved. Shooting Features B Lowering... Push the flash down gently to lower the flash until it clicks into place when not in the camera's memory even after the camera is turned off while the flash is charging. If the camera detects red eye while saving an image, the affected area is charging.
..., select another flash mode and take pictures. • Off: The flash does not fire when a picture is taken. If the battery level is low, the monitor turns off . C The Flash Lamp The flash lamp indicates the status of approx. 1.5 to 3.2 m (5 ft to reduce redeye before the image is saved. Shooting Features B Lowering... Push the flash down gently to lower the flash until it clicks into place when not in the camera's memory even after the camera is turned off while the flash is charging. If the camera detects red eye while saving an image, the affected area is charging.

Reference Manual
Page 78
... 0.0 is applied, the value is displayed with the H indicator in the camera's memory even 60 after the camera is saved in the +0.3 monitor. 29m 0s 860 4 Press the shutter-release button to take a picture. • To turn off . Shooting Features C Exposure Compensation Value The exposure compensation value applied in A (auto) mode is...
... 0.0 is applied, the value is displayed with the H indicator in the camera's memory even 60 after the camera is saved in the +0.3 monitor. 29m 0s 860 4 Press the shutter-release button to take a picture. • To turn off . Shooting Features C Exposure Compensation Value The exposure compensation value applied in A (auto) mode is...

Reference Manual
Page 109
...-vapor lighting. - The amount of time remaining until the inside of the camera becomes too hot when recording movies, the camera may occur in the monitor while recording movies. Lighting or other , such as a moving train or car, may leave residual images when the camera is panned. - B Notes ...be changed once recording starts. • Use the zoom control to the other bright areas may appear skewed. - When recording ends, digital zoom turns off . Five seconds after 10 seconds in the recorded movies. - Movie recording may stop recording after the camera stops recording, it...
...-vapor lighting. - The amount of time remaining until the inside of the camera becomes too hot when recording movies, the camera may occur in the monitor while recording movies. Lighting or other , such as a moving train or car, may leave residual images when the camera is panned. - B Notes ...be changed once recording starts. • Use the zoom control to the other bright areas may appear skewed. - When recording ends, digital zoom turns off . Five seconds after 10 seconds in the recorded movies. - Movie recording may stop recording after the camera stops recording, it...

Reference Manual
Page 116
...Time zone and date Allows you to adjust photo information display, post-shooting image review, and monitor brightness settings. Allows you to enable and disable the AF-assist illuminator. E69 E70 Monitor settings Allows you to select the vibration reduction setting used when shooting. E81 Format memory/ 98... z tab. E78 E79 E80 Auto off to adjust sound settings. Allows you to set the amount of time that passes before the monitor turns off Allows you to format the internal memory or the memory card. E76 Motion detection Allows you to save power. Features That Can...
...Time zone and date Allows you to adjust photo information display, post-shooting image review, and monitor brightness settings. Allows you to enable and disable the AF-assist illuminator. E69 E70 Monitor settings Allows you to select the vibration reduction setting used when shooting. E81 Format memory/ 98... z tab. E78 E79 E80 Auto off to adjust sound settings. Allows you to set the amount of time that passes before the monitor turns off Allows you to format the internal memory or the memory card. E76 Motion detection Allows you to save power. Features That Can...

Reference Manual
Page 146
...• Aim the remote control at the TV when operating it. • Refer to the TV's operating instructions for details. 4 Hold down the c button to turn on the camera. • The camera enters playback mode and images are displayed on the TV. • While connected to a TV. 3 Set the TV's ...input to external video input. • See your TV. Use a commercially available HDMI cable to connect the camera to the TV, the camera monitor remains off. When purchasing an HDMI cable, be used instead of the camera's multi selector and zoom control to select images, start and pause movie...
...• Aim the remote control at the TV when operating it. • Refer to the TV's operating instructions for details. 4 Hold down the c button to turn on the camera. • The camera enters playback mode and images are displayed on the TV. • While connected to a TV. 3 Set the TV's ...input to external video input. • See your TV. Use a commercially available HDMI cable to connect the camera to the TV, the camera monitor remains off. When purchasing an HDMI cable, be used instead of the camera's multi selector and zoom control to select images, start and pause movie...

Reference Manual
Page 149
Print selection 15/11 2012 NO. 32 32 Reference Section E31 3 Connect the camera to the printer using the included USB cable. • Be sure that connectors are properly oriented, do not use excessive force. When disconnecting the cable, do not remove the cable at an angle, and do not insert the cable at an angle. 4 Turn on the camera. • When properly connected, the PictBridge startup screen is displayed in the camera monitor, followed by the Print selection screen.
Print selection 15/11 2012 NO. 32 32 Reference Section E31 3 Connect the camera to the printer using the included USB cable. • Be sure that connectors are properly oriented, do not use excessive force. When disconnecting the cable, do not remove the cable at an angle, and do not insert the cable at an angle. 4 Turn on the camera. • When properly connected, the PictBridge startup screen is displayed in the camera monitor, followed by the Print selection screen.

Reference Manual
Page 167
... soften facial skin tones before saving the image. Skin Softening Enter smart portrait mode M d button M Skin softening M k button You can change skin softening settings. k Off Turns skin softening off. The Smart Portrait Menu • See "Image Mode (Image Size and Quality)" (E39) for the current setting is displayed in the...
... soften facial skin tones before saving the image. Skin Softening Enter smart portrait mode M d button M Skin softening M k button You can change skin softening settings. k Off Turns skin softening off. The Smart Portrait Menu • See "Image Mode (Image Size and Quality)" (E39) for the current setting is displayed in the...

Reference Manual
Page 168
... blink was detected in shooting mode (A 8). No icon is displayed when Off is selected. E50 No icon is displayed when Off is taken. Turns the blink proof off . Reference Section Blink Proof Enter smart portrait mode M d button M Blink proof M k button The camera automatically releases ...in which the subject's eyes are more open compared to the other shot is in shooting mode (A 8). If the camera saved an image in the monitor when the camera is saved. Option y On k Off (default setting) Description Enables the blink proof. Smile Timer Enter smart portrait mode M d...
... blink was detected in shooting mode (A 8). No icon is displayed when Off is selected. E50 No icon is displayed when Off is taken. Turns the blink proof off . Reference Section Blink Proof Enter smart portrait mode M d button M Blink proof M k button The camera automatically releases ...in which the subject's eyes are more open compared to the other shot is in shooting mode (A 8). If the camera saved an image in the monitor when the camera is saved. Option y On k Off (default setting) Description Enables the blink proof. Smile Timer Enter smart portrait mode M d...


