
Reference Manual
Page 18
... Playback... 11 Preparation 1 Insert the Batteries 12 Applicable Batteries 12 Preparation 2 Insert a Memory Card.......... 14 Internal Memory and Memory Cards......... 15 Preparation 3 Set the Display Language, Date, and Time 16 Step 1 Turn the Camera On 20 Turning the Camera On and Off 21 Step 2 Select a Shooting Mode 22 Available Shooting Modes 23 Step 3 Frame a Picture 24 Using the Zoom 25 Step 4 Focus and Shoot 26 The Shutter-release Button 27 Step 5 Play Back Images 28 Step 6 Delete Images 30 Shooting Features 33 G (Easy Auto) Mode 34 Scene Mode (Shooting...
... Playback... 11 Preparation 1 Insert the Batteries 12 Applicable Batteries 12 Preparation 2 Insert a Memory Card.......... 14 Internal Memory and Memory Cards......... 15 Preparation 3 Set the Display Language, Date, and Time 16 Step 1 Turn the Camera On 20 Turning the Camera On and Off 21 Step 2 Select a Shooting Mode 22 Available Shooting Modes 23 Step 3 Frame a Picture 24 Using the Zoom 25 Step 4 Focus and Shoot 26 The Shutter-release Button 27 Step 5 Play Back Images 28 Step 6 Delete Images 30 Shooting Features 33 G (Easy Auto) Mode 34 Scene Mode (Shooting...

Reference Manual
Page 19
... Printing Individual Images E19 Printing Multiple Images E21 The Shooting Menu (for A (Auto) Mode E24 Image Mode (Image Size and Quality E24 White Balance (Adjusting Hue E26 Continuous Shooting E29 ISO Sensitivity E30 Color Options E31 The Smart Portrait Menu E32 Skin Softening E32 Smile Timer E33 Blink Proof E33 xvii E7 e Skin Softening: Softening Skin Tones E8 g Small Picture: Reducing the Size of an Image E9 a Crop: Creating a Cropped Copy .... E10 Editing Movies E12 Connecting the Camera to a TV (Viewing Images...
... Printing Individual Images E19 Printing Multiple Images E21 The Shooting Menu (for A (Auto) Mode E24 Image Mode (Image Size and Quality E24 White Balance (Adjusting Hue E26 Continuous Shooting E29 ISO Sensitivity E30 Color Options E31 The Smart Portrait Menu E32 Skin Softening E32 Smile Timer E33 Blink Proof E33 xvii E7 e Skin Softening: Softening Skin Tones E8 g Small Picture: Reducing the Size of an Image E9 a Crop: Creating a Cropped Copy .... E10 Editing Movies E12 Connecting the Camera to a TV (Viewing Images...

Reference Manual
Page 20
... Assist E55 Sound Settings E56 Auto Off E57 Format Memory/Format Card E58 Language E59 Video Mode E60 Blink Warning E60 Eye-Fi Upload E62 Reset All E63 Battery Type E66 Firmware Version E66 File and Folder Names E67 Optional Accessories E68 Error Messages E69 Technical Notes and Index F1 Caring for the Product F2 The Camera F2 Batteries F4 Memory Cards F6 Cleaning and Storage F7 Cleaning F7 Storage F7 Troubleshooting F8 Specifications F15 Approved Memory Cards F19 Supported...
... Assist E55 Sound Settings E56 Auto Off E57 Format Memory/Format Card E58 Language E59 Video Mode E60 Blink Warning E60 Eye-Fi Upload E62 Reset All E63 Battery Type E66 Firmware Version E66 File and Folder Names E67 Optional Accessories E68 Error Messages E69 Technical Notes and Index F1 Caring for the Product F2 The Camera F2 Batteries F4 Memory Cards F6 Cleaning and Storage F7 Cleaning F7 Storage F7 Troubleshooting F8 Specifications F15 Approved Memory Cards F19 Supported...

Reference Manual
Page 41
... for approx. When the camera turns off, the power-on lamp and the monitor turn off. • You can be changed using the Auto off setting in the setup menu (A 84). • By default, the camera enters standby mode in standby mode, the monitor turns back on if you are using shooting mode or playback mode. • If you perform any of Shooting and Playback C Power Saving Function (Auto Off) If no operations are performed for a while...
... for approx. When the camera turns off, the power-on lamp and the monitor turn off. • You can be changed using the Auto off setting in the setup menu (A 84). • By default, the camera enters standby mode in standby mode, the monitor turns back on if you are using shooting mode or playback mode. • If you perform any of Shooting and Playback C Power Saving Function (Auto Off) If no operations are performed for a while...

Reference Manual
Page 47
..., the AF-assist illuminator (A 84) may light when the shutter-release button is pressed halfway, and the flash (A 46) may result in camera shake and blurred images. Image and movie data could be lost and the camera or memory card could be damaged. The Basics of Shooting and Playback B Notes About Saving Data After taking pictures or recording movies, the number of the way down . Focus and exposure remain locked while the shutterrelease button is pressed...
..., the AF-assist illuminator (A 84) may light when the shutter-release button is pressed halfway, and the flash (A 46) may result in camera shake and blurred images. Image and movie data could be lost and the camera or memory card could be damaged. The Basics of Shooting and Playback B Notes About Saving Data After taking pictures or recording movies, the number of the way down . Focus and exposure remain locked while the shutterrelease button is pressed...

Reference Manual
Page 60
... or Continuous on the distance of the subject from the camera, the speed of the subject's movement, the direction that the subject is framed by a double border and the others by a border. Shooting Features B Pet Portrait Auto Release • To change Pet portrait auto release settings, press the multi selector J (n). - Internal memory or the memory card is detected. Single: Images are detected, the camera focuses on...
... or Continuous on the distance of the subject from the camera, the speed of the subject's movement, the direction that the subject is framed by a double border and the others by a border. Shooting Features B Pet Portrait Auto Release • To change Pet portrait auto release settings, press the multi selector J (n). - Internal memory or the memory card is detected. Single: Images are detected, the camera focuses on...

Reference Manual
Page 64
... functions (A 58). Settings can be set using the multi selector (A 45) ➝ Flash mode (A 46), self-timer (A 49), macro mode (A 51), and exposure compensation (A 53) • Features that can be set by pressing the d button ➝ Features That Can Be Set by Pressing the d Button (Shooting Menu) (A 56) B Features That Cannot Be Used Simultaneously 44 Some settings cannot be adjusted in the center of picture you want to take. Shooting Features A (Auto) Mode Used for general shooting...
... functions (A 58). Settings can be set using the multi selector (A 45) ➝ Flash mode (A 46), self-timer (A 49), macro mode (A 51), and exposure compensation (A 53) • Features that can be set by pressing the d button ➝ Features That Can Be Set by Pressing the d Button (Shooting Menu) (A 56) B Features That Cannot Be Used Simultaneously 44 Some settings cannot be adjusted in the center of picture you want to take. Shooting Features A (Auto) Mode Used for general shooting...

Reference Manual
Page 77
... a smile is displayed while shooting when ISO sensitivity increases. E24 White balance Allows you to control the camera's sensitivity to make the colors in people's faces smoother. The available settings Color options are more open compared to change the color tones of image size and image quality used when saving images. E29 ISO sensitivity Allows you to adjust white balance to suit the light source in which the subject's eyes are Standard color (default setting), Vivid color, Black-and-white, E31 Sepia...
... a smile is displayed while shooting when ISO sensitivity increases. E24 White balance Allows you to control the camera's sensitivity to make the colors in people's faces smoother. The available settings Color options are more open compared to change the color tones of image size and image quality used when saving images. E29 ISO sensitivity Allows you to adjust white balance to suit the light source in which the subject's eyes are Standard color (default setting), Vivid color, Black-and-white, E31 Sepia...

Reference Manual
Page 78
... Auto. Digital zoom Continuous (A 57) When Multi-shot 16 is set to On, the flash cannot be used . Flash mode (A 46) When the flash fires, Motion detection is not heard. ISO sensitivity (A 57) When the ISO sensitivity is selected, digital zoom cannot be used . Shutter sound Continuous (A 57) When Continuous, BSS, or Multi-shot 16 is selected, the shutter sound is disabled. When Blink proof is fixed at L (image size: 2560 × 1920 pixels). Shooting Features 58 Continuous Self-timer (A 49) When using Black...
... Auto. Digital zoom Continuous (A 57) When Multi-shot 16 is set to On, the flash cannot be used . Flash mode (A 46) When the flash fires, Motion detection is not heard. ISO sensitivity (A 57) When the ISO sensitivity is selected, digital zoom cannot be used . Shutter sound Continuous (A 57) When Continuous, BSS, or Multi-shot 16 is selected, the shutter sound is disabled. When Blink proof is fixed at L (image size: 2560 × 1920 pixels). Shooting Features 58 Continuous Self-timer (A 49) When using Black...

Reference Manual
Page 90
... open the installation window. • If the desired language is not available, click Region Selection to choose a different region and then choose the desired language (the Region Selection button is not available in the European release). • Click Next to display the installation window. 3 Start the installer. • We recommend clicking Installation Guide in the installation window. 4 Download the software. • When the Software Download screen is displayed, click I agree - Begin download...
... open the installation window. • If the desired language is not available, click Region Selection to choose a different region and then choose the desired language (the Region Selection button is not available in the European release). • Click Next to display the installation window. 3 Start the installer. • We recommend clicking Installation Guide in the installation window. 4 Download the software. • When the Software Download screen is displayed, click I agree - Begin download...

Reference Manual
Page 92
... methods: • Direct USB connection: Turn the camera off and ensure that are saved in the camera's internal memory, remove the memory card from the camera before connecting it may not be inserted directly in the camera. B Connecting the USB Cable 72 The connection may take a while for Nikon Transfer 2 to start. Transferring Images to the Computer 1 Choose how images will be copied to the computer. select Import File using the included USB cable. Connect the camera to choose a program, select Nikon Transfer 2. • When using Windows 7 If the...
... methods: • Direct USB connection: Turn the camera off and ensure that are saved in the camera's internal memory, remove the memory card from the camera before connecting it may not be inserted directly in the camera. B Connecting the USB Cable 72 The connection may take a while for Nikon Transfer 2 to start. Transferring Images to the Computer 1 Choose how images will be copied to the computer. select Import File using the included USB cable. Connect the camera to choose a program, select Nikon Transfer 2. • When using Windows 7 If the...

Reference Manual
Page 97
... (fabrics, lattice windows, etc.) may stop recording after 30 seconds. Movie recording may have colored stripes (interference patterns, moire, etc.) in a hot area. • If the inside of the camera has cooled. 77 Recording and Playing Back Movies B Notes About Saving Data After taking pictures or recording movies, the number of exposures remaining or the remaining recording time flashes while images or movies are being used when movie recording begins, turning and holding the zoom control toward g again...
... (fabrics, lattice windows, etc.) may stop recording after 30 seconds. Movie recording may have colored stripes (interference patterns, moire, etc.) in a hot area. • If the inside of the camera has cooled. 77 Recording and Playing Back Movies B Notes About Saving Data After taking pictures or recording movies, the number of exposures remaining or the remaining recording time flashes while images or movies are being used when movie recording begins, turning and holding the zoom control toward g again...

Reference Manual
Page 99
... recorded movies. When B Full-time AF is locked when movie recording begins. E45 79 E45 Wind noise reduction Set whether or not to prevent the sound of the camera focusing from being recorded, select A Single AF. Recording and Playing Back Movies Features That Can Be Set by Pressing the d Button (Movie Menu) Enter shooting mode M d button M D tab M k button The following settings can be recorded. E43 Autofocus mode When A Single AF (default setting) is selected, focus is selected, the sound...
... recorded movies. When B Full-time AF is locked when movie recording begins. E45 79 E45 Wind noise reduction Set whether or not to prevent the sound of the camera focusing from being recorded, select A Single AF. Recording and Playing Back Movies Features That Can Be Set by Pressing the d Button (Movie Menu) Enter shooting mode M d button M D tab M k button The following settings can be recorded. E43 Autofocus mode When A Single AF (default setting) is selected, focus is selected, the sound...

Reference Manual
Page 164
...Be sure to transfer important data to format the internal memory or a memory card. Format No Formatting Memory Cards When a memory card is inserted in the camera, the Format card option is displayed in the setup menu. Formatting the Internal Memory To format the internal memory, remove the memory card from the camera. The Format memory option is displayed in another device into this camera, be recovered. E58 Format card All images will be deleted! Format Memory/Format Card d button M z tab M Format memory/Format card M k button Use this camera. OK? Format No Reference...
...Be sure to transfer important data to format the internal memory or a memory card. Format No Formatting Memory Cards When a memory card is inserted in the camera, the Format card option is displayed in the setup menu. Formatting the Internal Memory To format the internal memory, remove the memory card from the camera. The Format memory option is displayed in another device into this camera, be recovered. E58 Format card All images will be deleted! Format Memory/Format Card d button M z tab M Format memory/Format card M k button Use this camera. OK? Format No Reference...

Reference Manual
Page 176
... k button to be registered as welcome screen. • Images captured at an Image mode setting of file numbers. E58 Camera has run out of l 4608×2592 • Images reduced to 320 × 240 size or smaller with cropping or small picture editing E46 Insufficient space to select No and make copies of memory. Delete images from destination. 30 A blink was taken. Format card? Format internal memory or memory card. Display Cause/Solution A Card is full. • Change the image mode setting...
... k button to be registered as welcome screen. • Images captured at an Image mode setting of file numbers. E58 Camera has run out of l 4608×2592 • Images reduced to 320 × 240 size or smaller with cropping or small picture editing E46 Insufficient space to select No and make copies of memory. Delete images from destination. 30 A blink was taken. Format card? Format internal memory or memory card. Display Cause/Solution A Card is full. • Change the image mode setting...

Reference Manual
Page 177
.... File cannot be copied to memory card. A E6 - 14 14 E41 - Cannot record movie. This image cannot be modified. Travel destination is lowered. Time out error while saving movie on this camera. Disable protection. Raise the flash when shooting using a computer or the device used to memory card, press the d button. All images are in scene mode. Error occurred during communication with faster write speed. Display Image cannot be deleted. Communications error Cause/Solution Cannot edit selected image. • Select images that support editing function...
.... File cannot be copied to memory card. A E6 - 14 14 E41 - Cannot record movie. This image cannot be modified. Travel destination is lowered. Time out error while saving movie on this camera. Disable protection. Raise the flash when shooting using a computer or the device used to memory card, press the d button. All images are in scene mode. Error occurred during communication with faster write speed. Display Image cannot be deleted. Communications error Cause/Solution Cannot edit selected image. • Select images that support editing function...
Reference Manual
Page 182
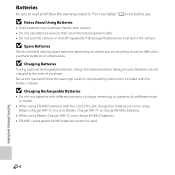
... the operating instructions included with the COOLPIX L320, charge four batteries at the time of a different make or model. • When using Battery Charger MH-73, only charge EN-MH2 batteries. • EN-MH1 rechargeable Ni-MH batteries cannot be difficult to purchase batteries in certain areas. B Charging Rechargeable Batteries • Do not mix batteries with different amounts of charge remaining, or batteries of purchase. Use only Battery Charger MH-73 to charge EN-MH2 batteries...
... the operating instructions included with the COOLPIX L320, charge four batteries at the time of a different make or model. • When using Battery Charger MH-73, only charge EN-MH2 batteries. • EN-MH1 rechargeable Ni-MH batteries cannot be difficult to purchase batteries in certain areas. B Charging Rechargeable Batteries • Do not mix batteries with different amounts of charge remaining, or batteries of purchase. Use only Battery Charger MH-73 to charge EN-MH2 batteries...

Reference Manual
Page 186
Cause/Solution A • Wait for saving power: Press the power switch, the shutter-release button, A button, c button, or b (e movie-record) button. • The flash lamp flashes while the flash is off. • Batteries are using an AC adapter, disconnect and reconnect the AC adapter. Troubleshooting If the camera fails to end. • If the problem persists, turn off, remove and reinsert the battery or batteries or, if you are exhausted. • Standby mode for recording to function as expected, check...
Cause/Solution A • Wait for saving power: Press the power switch, the shutter-release button, A button, c button, or b (e movie-record) button. • The flash lamp flashes while the flash is off. • Batteries are using an AC adapter, disconnect and reconnect the AC adapter. Troubleshooting If the camera fails to end. • If the problem persists, turn off, remove and reinsert the battery or batteries or, if you are exhausted. • Standby mode for recording to function as expected, check...
Reference Manual
Page 191
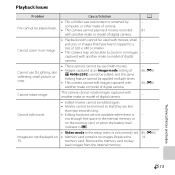
... Technical Notes and Index F13 Replace the memory card. Cannot rotate image. This camera cannot rotate images captured with movies, small pictures, or images that they are less than two seconds long. • Editing functions are not displayed on image. Playback Issues Problem File cannot be able to play back movies recorded with another make or model of digital camera. • Playback zoom cannot be used with movies. • Images captured at an Image mode setting of g 4608×2592...
... Technical Notes and Index F13 Replace the memory card. Cannot rotate image. This camera cannot rotate images captured with movies, small pictures, or images that they are less than two seconds long. • Editing functions are not displayed on image. Playback Issues Problem File cannot be able to play back movies recorded with another make or model of digital camera. • Playback zoom cannot be used with movies. • Images captured at an Image mode setting of g 4608×2592...

Reference Manual
Page 192
...; Camera is off. • Batteries are not displayed. Paper size cannot be printed are exhausted. • USB cable is not correctly connected. • Camera is connected. Images to print images from a PictBridge-compatible printer. A 21 20 67, 72 - 69 72 14 14 67, E20, E21 - Technical Notes and Index F14 Replace the memory card. • Remove the memory card to be selected from the camera in ViewNX 2. • Memory card contains no images. Problem Nikon Transfer 2 does not start Nikon Transfer...
...; Camera is off. • Batteries are not displayed. Paper size cannot be printed are exhausted. • USB cable is not correctly connected. • Camera is connected. Images to print images from a PictBridge-compatible printer. A 21 20 67, 72 - 69 72 14 14 67, E20, E21 - Technical Notes and Index F14 Replace the memory card. • Remove the memory card to be selected from the camera in ViewNX 2. • Memory card contains no images. Problem Nikon Transfer 2 does not start Nikon Transfer...


