Reference Manual
Page 18
... Shooting and Playback.... 9 Preparation 1 Insert the Batteries 10 Applicable Batteries 10 Preparation 2 Insert a Memory Card.......... 12 Internal Memory and Memory Cards......... 13 Preparation 3 Set the Display Language, Date, and Time 14 Step 1 Turn the Camera On 18 Turning the Camera On and Off 19 Step 2 Select a Shooting Mode 20 Available Shooting Modes 21 Step 3 Frame a Picture 22 Using the Zoom 23 Step 4 Focus and Shoot 24 The Shutter-release Button 25 Step 5 Play Back Images 26 Step 6 Delete Images 28 Shooting Features 31 G (Easy Auto) Mode 32 Scene Mode (Shooting...
... Shooting and Playback.... 9 Preparation 1 Insert the Batteries 10 Applicable Batteries 10 Preparation 2 Insert a Memory Card.......... 12 Internal Memory and Memory Cards......... 13 Preparation 3 Set the Display Language, Date, and Time 14 Step 1 Turn the Camera On 18 Turning the Camera On and Off 19 Step 2 Select a Shooting Mode 20 Available Shooting Modes 21 Step 3 Frame a Picture 22 Using the Zoom 23 Step 4 Focus and Shoot 24 The Shutter-release Button 25 Step 5 Play Back Images 26 Step 6 Delete Images 28 Shooting Features 31 G (Easy Auto) Mode 32 Scene Mode (Shooting...

Reference Manual
Page 19
... Printing Individual Images E17 Printing Multiple Images E19 The Shooting Menu (for A (Auto) Mode E22 Image Mode (Image Size and Quality E22 White Balance (Adjusting Hue E24 Continuous Shooting E27 Color Options E28 The Smart Portrait Menu E29 Skin Softening E29 Smile Timer E30 Blink Proof E30 xvii E7 e Skin Softening: Softening Skin Tones E8 g Small Picture: Reducing the Size of an Image E9 a Crop: Creating a Cropped Copy .... Introduction Focusing 57 Using Face Detection 57 Focus Lock 58 Playback Features 61 Playback Zoom...
... Printing Individual Images E17 Printing Multiple Images E19 The Shooting Menu (for A (Auto) Mode E22 Image Mode (Image Size and Quality E22 White Balance (Adjusting Hue E24 Continuous Shooting E27 Color Options E28 The Smart Portrait Menu E29 Skin Softening E29 Smile Timer E30 Blink Proof E30 xvii E7 e Skin Softening: Softening Skin Tones E8 g Small Picture: Reducing the Size of an Image E9 a Crop: Creating a Cropped Copy .... Introduction Focusing 57 Using Face Detection 57 Focus Lock 58 Playback Features 61 Playback Zoom...
Reference Manual
Page 20
... d Protect E35 f Rotate Image E37 h Copy (Copy Between Internal Memory and Memory Card E38 The Movie Menu E40 Movie Options E40 Autofocus Mode E42 The Setup Menu E43 Welcome Screen E43 Time Zone and Date E44 Monitor Settings E47 Print Date (Imprinting Date and Time E49 Motion Detection E50 Sound Settings E51 Auto Off E52 Format Memory/Format Card E53 Language E54 Video Mode E55 Blink Warning E55 Eye-Fi Upload E57 Reset All E58 Battery Type E61 Firmware Version E61 File and Folder Names E62 Optional Accessories E63 Error Messages E64...
... d Protect E35 f Rotate Image E37 h Copy (Copy Between Internal Memory and Memory Card E38 The Movie Menu E40 Movie Options E40 Autofocus Mode E42 The Setup Menu E43 Welcome Screen E43 Time Zone and Date E44 Monitor Settings E47 Print Date (Imprinting Date and Time E49 Motion Detection E50 Sound Settings E51 Auto Off E52 Format Memory/Format Card E53 Language E54 Video Mode E55 Blink Warning E55 Eye-Fi Upload E57 Reset All E58 Battery Type E61 Firmware Version E61 File and Folder Names E62 Optional Accessories E63 Error Messages E64...

Reference Manual
Page 22
The Camera Body 1 23 4 5 Lens cover closed 6 7 Parts of the Camera 8 10 9 1 Shutter-release button 24 Zoom control 23 f : Wide-angle 23 2 g : Telephoto 23 h : Thumbnail playback 63 i : Playback zoom 62 j : Help 34 3 Power switch/power-on lamp 18 4 Self-timer lamp 47 5 Flash 44 6 Lens cover 7 Microphone 74 8 Lens 9 Power connector cover (for connecting optional AC adapter E63 10 Eyelet for camera strap iii 2
The Camera Body 1 23 4 5 Lens cover closed 6 7 Parts of the Camera 8 10 9 1 Shutter-release button 24 Zoom control 23 f : Wide-angle 23 2 g : Telephoto 23 h : Thumbnail playback 63 i : Playback zoom 62 j : Help 34 3 Power switch/power-on lamp 18 4 Self-timer lamp 47 5 Flash 44 6 Lens cover 7 Microphone 74 8 Lens 9 Power connector cover (for connecting optional AC adapter E63 10 Eyelet for camera strap iii 2

Reference Manual
Page 39
... any of Shooting and Playback C Power Saving Function (Auto Off) If no operations are using the Auto off automatically. If no operations are performed for approx. The lens does not extend. Camera turns off. • The time that elapses before the camera enters standby mode can press and hold the c (playback) button to playback mode. The Basics of the following operations: ➝ Press the power switch, shutter-release button, A (shooting mode) button, c (playback) button, or b (e movie-record) button Flashes No operations performed No operations performed 15m...
... any of Shooting and Playback C Power Saving Function (Auto Off) If no operations are using the Auto off automatically. If no operations are performed for approx. The lens does not extend. Camera turns off. • The time that elapses before the camera enters standby mode can press and hold the c (playback) button to playback mode. The Basics of the following operations: ➝ Press the power switch, shutter-release button, A (shooting mode) button, c (playback) button, or b (e movie-record) button Flashes No operations performed No operations performed 15m...

Reference Manual
Page 56
... (A 58). • The camera focuses even when the shutter-release button is not pressed halfway. u Food • Macro mode (A 49) is pressed halfway, the focus indicator (A 7) always turns green. O: Shutter speed is recommended. therefore, the use of a 36 tripod is reduced when using scene modes indicated with O; The hue setting is saved in the camera's memory even after the camera is automatically selected and saved (BSS (best shot selector)). Use focus lock to the closest position...
... (A 58). • The camera focuses even when the shutter-release button is not pressed halfway. u Food • Macro mode (A 49) is pressed halfway, the focus indicator (A 7) always turns green. O: Shutter speed is recommended. therefore, the use of a 36 tripod is reduced when using scene modes indicated with O; The hue setting is saved in the camera's memory even after the camera is automatically selected and saved (BSS (best shot selector)). Use focus lock to the closest position...

Reference Manual
Page 58
...; To change Pet portrait auto release settings, press the multi selector J (n). - Continuous: When the camera has focused on the distance of the subject from the camera, the speed of the subject's movement, the direction that the subject is set again. Internal memory or the memory card is detected. O Pet portrait • When you aim the camera at a rate of about 1.2 fps. Press the shutter-release button to...
...; To change Pet portrait auto release settings, press the multi selector J (n). - Continuous: When the camera has focused on the distance of the subject from the camera, the speed of the subject's movement, the direction that the subject is set again. Internal memory or the memory card is detected. O Pet portrait • When you aim the camera at a rate of about 1.2 fps. Press the shutter-release button to...

Reference Manual
Page 62
Settings can be set using the multi selector (A 43) ➝ Flash mode (A 44), self-timer (A 47), macro mode (A 49), and exposure compensation (A 51) • Features that can be used with other functions (A 56). Enter shooting mode M A (shooting mode) button M A (auto) mode M k button • The camera focuses on the area in the shooting menu (A 54) to suit the shooting conditions and the type of the frame. Shooting Features A (Auto) Mode Used for general shooting. Changing A (Auto) Mode Settings • Features that can be set by pressing the...
Settings can be set using the multi selector (A 43) ➝ Flash mode (A 44), self-timer (A 47), macro mode (A 49), and exposure compensation (A 51) • Features that can be used with other functions (A 56). Enter shooting mode M A (shooting mode) button M A (auto) mode M k button • The camera focuses on the area in the shooting menu (A 54) to suit the shooting conditions and the type of the frame. Shooting Features A (Auto) Mode Used for general shooting. Changing A (Auto) Mode Settings • Features that can be set by pressing the...

Reference Manual
Page 76
... using the self-timer, Continuous is selected, the flash cannot be used simultaneously. When using Black-and-white, Sepia, or Cyanotype, the White balance setting is disabled. Restricted function Option Flash mode Continuous (A 55) Blink proof (A 55) Self-timer Smile timer (A 55) Digital zoom Continuous (A 55) Image mode Continuous (A 55) White balance Color options (A 55) Continuous Motion detection Self-timer (A 47) Flash mode (A 44) Continuous (A 55) Shutter sound Continuous (A 55) Description When Continuous, BSS, or Multi-shot 16 is fixed at Auto. When Multi-shot...
... using the self-timer, Continuous is selected, the flash cannot be used simultaneously. When using Black-and-white, Sepia, or Cyanotype, the White balance setting is disabled. Restricted function Option Flash mode Continuous (A 55) Blink proof (A 55) Self-timer Smile timer (A 55) Digital zoom Continuous (A 55) Image mode Continuous (A 55) White balance Color options (A 55) Continuous Motion detection Self-timer (A 47) Flash mode (A 44) Continuous (A 55) Shutter sound Continuous (A 55) Description When Continuous, BSS, or Multi-shot 16 is fixed at Auto. When Multi-shot...

Reference Manual
Page 88
... open the installation window. • If the desired language is not available, click Region Selection to choose a different region and then choose the desired language (the Region Selection button is not available in the European release). • Click Next to display the installation window. 3 Start the installer. • We recommend clicking Installation Guide in the installation window. 4 Download the software. • When the Software Download screen is displayed, click I agree - Begin download...
... open the installation window. • If the desired language is not available, click Region Selection to choose a different region and then choose the desired language (the Region Selection button is not available in the European release). • Click Next to display the installation window. 3 Start the installer. • We recommend clicking Installation Guide in the installation window. 4 Download the software. • When the Software Download screen is displayed, click I agree - Begin download...
Reference Manual
Page 90
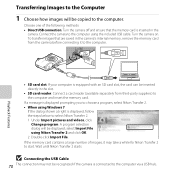
... select Nikon Transfer 2. 1 Under Import pictures and videos, click Change program. select Import File using Windows 7 If the dialog shown at right is connected to the computer via a USB hub. If a message is equipped with an SD card slot, the card can be inserted directly in the camera. Playback Features If the memory card contains a large number of the following methods: • Direct USB connection: Turn the camera off and ensure that are saved in the camera's internal memory, remove the memory card...
... select Nikon Transfer 2. 1 Under Import pictures and videos, click Change program. select Import File using Windows 7 If the dialog shown at right is connected to the computer via a USB hub. If a message is equipped with an SD card slot, the card can be inserted directly in the camera. Playback Features If the memory card contains a large number of the following methods: • Direct USB connection: Turn the camera off and ensure that are saved in the camera's internal memory, remove the memory card...

Reference Manual
Page 97
..., focus is selected, the camera focuses continuously while recording. When no memory card is inserted (i.e., when using the camera's internal memory), the default setting is n HD 720p (1280×720). If you want to prevent the sound of movie that will be heard in recorded movies. The default setting is m VGA (640×480). Recording and Playing Back Movies Features That Can Be Set by Pressing the d Button (Movie Menu) Enter shooting mode M d button M D tab M k button The following settings can be changed.
..., focus is selected, the camera focuses continuously while recording. When no memory card is inserted (i.e., when using the camera's internal memory), the default setting is n HD 720p (1280×720). If you want to prevent the sound of movie that will be heard in recorded movies. The default setting is m VGA (640×480). Recording and Playing Back Movies Features That Can Be Set by Pressing the d Button (Movie Menu) Enter shooting mode M d button M D tab M k button The following settings can be changed.

Reference Manual
Page 102
...turns off Format memory/ Format card Language Video mode Description A Allows you to save power. Features That Can Be Set by Pressing the d Button (Setup Menu) General Camera Setup Press the d button M z (setup) tab M k button You can change the camera's display language. Set up Welcome screen Time zone and date Monitor settings Print date Motion detection Sound settings Auto off Option Welcome screen Time zone and date Monitor settings Print date Motion detection Sound settings Auto off to imprint the shooting date and time on . E47 Allows you to adjust sound settings...
...turns off Format memory/ Format card Language Video mode Description A Allows you to save power. Features That Can Be Set by Pressing the d Button (Setup Menu) General Camera Setup Press the d button M z (setup) tab M k button You can change the camera's display language. Set up Welcome screen Time zone and date Monitor settings Print date Motion detection Sound settings Auto off Option Welcome screen Time zone and date Monitor settings Print date Motion detection Sound settings Auto off to imprint the shooting date and time on . E47 Allows you to adjust sound settings...

Reference Manual
Page 168
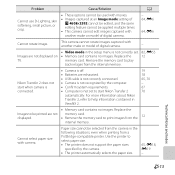
... that terminals are clean. • Confirm that the card is correctly inserted. A E44 10 24, 59 58 - - - 12 12 F18 12 12 Reference Section E64 Camera cannot focus. • Refocus. • Use focus lock. Eye-Fi card write-protect switch is saved and the message disappears from the display. This card cannot be used. Error Messages Display O (flashes) Battery exhausted. Memory card is correctly inserted. Set date and time. Replace the batteries. Slide write-protect switch to finish recording. Slide write-protect switch to "write" position.
... that terminals are clean. • Confirm that the card is correctly inserted. A E44 10 24, 59 58 - - - 12 12 F18 12 12 Reference Section E64 Camera cannot focus. • Refocus. • Use focus lock. Eye-Fi card write-protect switch is saved and the message disappears from the display. This card cannot be used. Error Messages Display O (flashes) Battery exhausted. Memory card is correctly inserted. Set date and time. Replace the batteries. Slide write-protect switch to finish recording. Slide write-protect switch to "write" position.

Reference Manual
Page 169
... 12 13 Error occurred while saving image. E62 Image cannot be registered as welcome screen. • Images captured at an Image mode setting of any images which need F6 to be used for use internal memory. Yes No Memory card has not been formatted for welcome screen. Insert a new memory card or format internal memory or memory card. Format card? The following images cannot be saved. Formatting deletes all data saved on the memory card. Select Yes and then press the k button to save a copy. Out of file numbers. E53 Camera has...
... 12 13 Error occurred while saving image. E62 Image cannot be registered as welcome screen. • Images captured at an Image mode setting of any images which need F6 to be used for use internal memory. Yes No Memory card has not been formatted for welcome screen. Insert a new memory card or format internal memory or memory card. Format card? The following images cannot be saved. Formatting deletes all data saved on the memory card. Select Yes and then press the k button to save a copy. Out of file numbers. E53 Camera has...
Reference Manual
Page 170
.... E45 Lens error. Cannot record movie. Memory contains no image data. Error occurred during communication with printer. The copy screen is displayed and images in the current time zone. No images available for a slide show. All images are in the camera's internal memory. • To copy images from the camera to create or edit this camera. Lens error Communications error Cause/Solution Cannot edit selected image. • Select images that support editing function. • Movies cannot be viewed on the memory card. Turn camera off and reconnect USB cable...
.... E45 Lens error. Cannot record movie. Memory contains no image data. Error occurred during communication with printer. The copy screen is displayed and images in the current time zone. No images available for a slide show. All images are in the camera's internal memory. • To copy images from the camera to create or edit this camera. Lens error Communications error Cause/Solution Cannot edit selected image. • Select images that support editing function. • Movies cannot be viewed on the memory card. Turn camera off and reconnect USB cable...
Reference Manual
Page 171
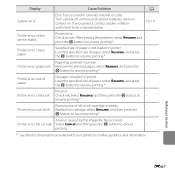
... camera's internal circuitry. the k button to resume printing.* Printer error: out of paper is empty. Display Cause/Solution A System error Printer error: check printer status. k button to resume printing.* Ink error. Printer error: check ink Check ink, select Resume, and then press the k button to - resume printing.* Running out of paper, select Resume, and press - If error persists, contact retailer or Nikonauthorized service representative. 10, 19 Printer error. Load the specified size of ink Replace...
... camera's internal circuitry. the k button to resume printing.* Printer error: out of paper is empty. Display Cause/Solution A System error Printer error: check printer status. k button to resume printing.* Ink error. Printer error: check ink Check ink, select Resume, and then press the k button to - resume printing.* Running out of paper, select Resume, and press - If error persists, contact retailer or Nikonauthorized service representative. 10, 19 Printer error. Load the specified size of ink Replace...
Reference Manual
Page 176
... amounts of charge remaining, or batteries of purchase. Batteries are shooting. Use only Battery Charger MH-72 or MH-73 to charge EN-MH2 batteries. • When using optional rechargeable batteries, charge the batteries before use batteries beyond their recommended expiration date. • Do not turn the camera on where you are not charged at the time of a different make or model. • When using Battery Charger MH-72. Handle with the COOLPIX L27, charge two batteries at a time. F4...
... amounts of charge remaining, or batteries of purchase. Batteries are shooting. Use only Battery Charger MH-72 or MH-73 to charge EN-MH2 batteries. • When using optional rechargeable batteries, charge the batteries before use batteries beyond their recommended expiration date. • Do not turn the camera on where you are not charged at the time of a different make or model. • When using Battery Charger MH-72. Handle with the COOLPIX L27, charge two batteries at a time. F4...

Reference Manual
Page 180
.... Troubleshooting If the camera fails to read. Power, Display, Settings Issues Problem The camera is blank. Note that although any data currently being recorded will be lost, data that have become too cold F5 and cannot operate properly. • Camera is off . If the camera does not turn the camera off . • Batteries are exhausted. • Standby mode for saving power: Press the power switch, the shutter-release button, A button, c button, or b (e movie-record) button. • When flash lamp flashes...
.... Troubleshooting If the camera fails to read. Power, Display, Settings Issues Problem The camera is blank. Note that although any data currently being recorded will be lost, data that have become too cold F5 and cannot operate properly. • Camera is off . If the camera does not turn the camera off . • Batteries are exhausted. • Standby mode for saving power: Press the power switch, the shutter-release button, A button, c button, or b (e movie-record) button. • When flash lamp flashes...
Reference Manual
Page 185
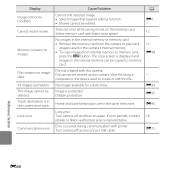
... correctly set to print images from a PictBridge-compatible printer. memory card. • Remove the memory card to start when camera is connected. • Camera is off. • Batteries are exhausted. • USB cable is not correctly connected. • Camera is not recognized by the camera. • The printer automatically selects the paper size. 65, E18, E19 - Images are not displayed. For more information about Nikon Transfer 2, refer to play back images from the internal memory. - 82, E55 12 Nikon Transfer 2 does not start Nikon Transfer...
... correctly set to print images from a PictBridge-compatible printer. memory card. • Remove the memory card to start when camera is connected. • Camera is off. • Batteries are exhausted. • USB cable is not correctly connected. • Camera is not recognized by the camera. • The printer automatically selects the paper size. 65, E18, E19 - Images are not displayed. For more information about Nikon Transfer 2, refer to play back images from the internal memory. - 82, E55 12 Nikon Transfer 2 does not start Nikon Transfer...


