
Reference Manual
Page 2
... either registered trademarks or trademarks of Microsoft Corporation in the United States and/or other documentation provided with your Nikon product are trademarks or registered trademarks of Apple Inc., registered in this manual or the other countries. • Macintosh, Mac OS, and QuickTime are trademarks of SD-3C, LLC. • PictBridge is...
... either registered trademarks or trademarks of Microsoft Corporation in the United States and/or other documentation provided with your Nikon product are trademarks or registered trademarks of Apple Inc., registered in this manual or the other countries. • Macintosh, Mac OS, and QuickTime are trademarks of SD-3C, LLC. • PictBridge is...

Reference Manual
Page 4
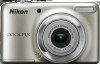
... Contents In the event that any items are for purchasing the Nikon COOLPIX L26 or COOLPIX L25 digital camera. ii or COOLPIX L26 Digital Camera COOLPIX L25 Digital Camera Camera Strap LR6/L40 (AA-size) alkaline batteries (×2)* USB Cable UC-E16 ViewNX 2 Installer CD Reference Manual CD • Warranty * The included batteries are missing, please...with the camera. Introduction Introduction Read This First Thank you purchased the camera. Before using the camera, please read the information in this manual handy and refer to it to enhance your enjoyment of your new camera.
... Contents In the event that any items are for purchasing the Nikon COOLPIX L26 or COOLPIX L25 digital camera. ii or COOLPIX L26 Digital Camera COOLPIX L25 Digital Camera Camera Strap LR6/L40 (AA-size) alkaline batteries (×2)* USB Cable UC-E16 ViewNX 2 Installer CD Reference Manual CD • Warranty * The included batteries are missing, please...with the camera. Introduction Introduction Read This First Thank you purchased the camera. Before using the camera, please read the information in this manual handy and refer to it to enhance your enjoyment of your new camera.

Reference Manual
Page 5
iii To learn about the parts of the camera and information that is displayed in the monitor, see "The Basics of the Camera" (A 1). Introduction Attaching the Camera Strap COOLPIX L26 COOLPIX L25 1 2 1 2 About This Manual If you want to start using the camera right away, see "Parts of Shooting and Playback" (A 9).
iii To learn about the parts of the camera and information that is displayed in the monitor, see "The Basics of the Camera" (A 1). Introduction Attaching the Camera Strap COOLPIX L26 COOLPIX L25 1 2 1 2 About This Manual If you want to start using the camera right away, see "Parts of Shooting and Playback" (A 9).
Reference Manual
Page 6
... can be more clearly shown. • Illustrations and text displays shown in this manual are for COOLPIX L25 may also be shown in this manual if necessary. • Illustrations and monitor content shown in this manual may sometimes be abbreviated as "L26" and "L25." • SD, SDHC, and SDXC memory cards are referred to as "memory...
... can be more clearly shown. • Illustrations and text displays shown in this manual are for COOLPIX L25 may also be shown in this manual if necessary. • Illustrations and monitor content shown in this manual may sometimes be abbreviated as "L26" and "L25." • SD, SDHC, and SDXC memory cards are referred to as "memory...

Reference Manual
Page 8
...Notice Concerning Prohibition of Copying or Reproduction Note that simply being in possession of material that the information in these manuals at any time and without prior notice. • Nikon will not be held liable for business use of this product may be punishable by law. • Items ...bonds, even if such copies or reproductions are to change the specifications of the hardware and software described in any language in these manuals is prohibited. Also, do not copy or reproduce passports issued by the government, licenses issued by public agencies and private groups, ID...
...Notice Concerning Prohibition of Copying or Reproduction Note that simply being in possession of material that the information in these manuals at any time and without prior notice. • Nikon will not be held liable for business use of this product may be punishable by law. • Items ...bonds, even if such copies or reproductions are to change the specifications of the hardware and software described in any language in these manuals is prohibited. Also, do not copy or reproduce passports issued by the government, licenses issued by public agencies and private groups, ID...

Reference Manual
Page 17
Table of Contents Introduction Introduction ii Read This First ii Confirming the Package Contents ii Attaching the Camera Strap iii About This Manual iii Information and Precautions v For Your Safety viii WARNINGS viii Notices xii Parts of the Camera 1 The Camera Body 2 The Monitor 6 Shooting Mode 6 Playback Mode 8 ...
Table of Contents Introduction Introduction ii Read This First ii Confirming the Package Contents ii Attaching the Camera Strap iii About This Manual iii Information and Precautions v For Your Safety viii WARNINGS viii Notices xii Parts of the Camera 1 The Camera Body 2 The Monitor 6 Shooting Mode 6 Playback Mode 8 ...

Reference Manual
Page 64
C Releasing the Shutter Manually The shutter can also be released by pressing the d button ➝ Options Available in Smile Timer Mode When Smile timer is set to detect faces ...
C Releasing the Shutter Manually The shutter can also be released by pressing the d button ➝ Options Available in Smile Timer Mode When Smile timer is set to detect faces ...

Reference Manual
Page 68
The available settings are Standard color (default setting), Vivid color, Black-and-white, Sepia, and Cyanotype. The available settings are Auto (default setting), Preset manual, Daylight, Incandescent, Fluorescent, Cloudy, and Flash. This setting is also applied to capture a series of images. The available settings are Single (default setting), Continuous, BSS, ...
The available settings are Standard color (default setting), Vivid color, Black-and-white, Sepia, and Cyanotype. The available settings are Auto (default setting), Preset manual, Daylight, Incandescent, Fluorescent, Cloudy, and Flash. This setting is also applied to capture a series of images. The available settings are Single (default setting), Continuous, BSS, ...
Reference Manual
Page 96
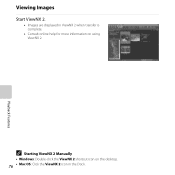
Playback Features C Starting ViewNX 2 Manually • Windows: Double-click the ViewNX 2 shortcut icon on using ViewNX 2. Viewing Images Start ViewNX 2. • Images are displayed in ViewNX 2 when transfer is complete. • Consult online help for more information on the desktop. 76 • Mac OS: Click the ViewNX 2 icon in the Dock.
Playback Features C Starting ViewNX 2 Manually • Windows: Double-click the ViewNX 2 shortcut icon on using ViewNX 2. Viewing Images Start ViewNX 2. • Images are displayed in ViewNX 2 when transfer is complete. • Consult online help for more information on the desktop. 76 • Mac OS: Click the ViewNX 2 icon in the Dock.
Reference Manual
Page 132
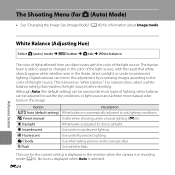
... pictures under incandescent lighting. White balance adjusted for information about Image mode. Digital cameras can be used under incandescent lighting. Option a Auto (default setting) b Preset manual c Daylight d Incandescent e Fluorescent f Cloudy g Flash Description White balance is known as "white balance." E24 For natural colors, select a white balance setting that white objects appear...
... pictures under incandescent lighting. White balance adjusted for information about Image mode. Digital cameras can be used under incandescent lighting. Option a Auto (default setting) b Preset manual c Daylight d Incandescent e Fluorescent f Cloudy g Flash Description White balance is known as "white balance." E24 For natural colors, select a white balance setting that white objects appear...

Reference Manual
Page 133
... the most recently measured value will be used when shooting. 2 Display the shooting menu (A 48), use the multi selector to select b Preset manual in the White balance menu, and press the k button. • The camera zooms in to measure the white balance value under the lighting used...color cast when the desired effect has not been achieved with white balance settings like Auto and Incandescent (for measuring white balance. Preset manual Cancel Measure Reference Section E25 The white balance setting will not be measured again and the most recently measured white balance value, select...
... the most recently measured value will be used when shooting. 2 Display the shooting menu (A 48), use the multi selector to select b Preset manual in the White balance menu, and press the k button. • The camera zooms in to measure the white balance value under the lighting used...color cast when the desired effect has not been achieved with white balance settings like Auto and Incandescent (for measuring white balance. Preset manual Cancel Measure Reference Section E25 The white balance setting will not be measured again and the most recently measured white balance value, select...

Reference Manual
Page 134
...Some settings cannot be measured with other functions (A 62). • Set the flash to measure a value for flash lighting cannot be used with Preset manual. When shooting using the flash, set . E26 4 Frame the reference object in the measuring window. No image is set to Auto or Flash. ...B Notes About Preset Manual A value for preset manual. • The shutter is released and the new white-balance value is set White balance to any setting other than Auto and Flash ...
...Some settings cannot be measured with other functions (A 62). • Set the flash to measure a value for flash lighting cannot be used with Preset manual. When shooting using the flash, set . E26 4 Frame the reference object in the measuring window. No image is set to Auto or Flash. ...B Notes About Preset Manual A value for preset manual. • The shutter is released and the new white-balance value is set White balance to any setting other than Auto and Flash ...

Reference Manual
Page 166
... it is not permitted, set on the monitor (A 6, 8). • w: Eye-Fi upload is not compatible with this feature to Disable. • Refer to the instruction manual of your computer. Before using the camera in the camera can be confirmed on a computer, disable the function. E58 Reference Section B Notes About Eye-Fi...
... it is not permitted, set on the monitor (A 6, 8). • w: Eye-Fi upload is not compatible with this feature to Disable. • Refer to the instruction manual of your computer. Before using the camera in the camera can be confirmed on a computer, disable the function. E58 Reference Section B Notes About Eye-Fi...

Reference Manual
Page 169
... will remain unaffected when menus are reset with Reset all also clears the current file number (E63) from the lowest number available. Shooting menu: Preset manual data (E25) acquired for White balance Setup menu: Settings for image registered for Welcome screen (E40), Time zone and date (E41), Language (E55), Video mode...
... will remain unaffected when menus are reset with Reset all also clears the current file number (E63) from the lowest number available. Shooting menu: Preset manual data (E25) acquired for White balance Setup menu: Settings for image registered for Welcome screen (E40), Time zone and date (E41), Language (E55), Video mode...

Reference Manual
Page 195
Technical Notes and Index B Specifications • Nikon will not be held liable for any errors this product and its specifications are subject to P 4608×3456 for the L26, i 3648×2736 for the L25. Data for trial use only. Measured at an ambient temperature of 25°...-size) alkaline batteries operated at 23 (±2)°C (73 (±4)°F); Battery life may contain. • The appearance of this manual may vary depending on Camera and Imaging Products Association (CIPA) standards for measuring the life of time menus and images are displayed. The included...
Technical Notes and Index B Specifications • Nikon will not be held liable for any errors this product and its specifications are subject to P 4608×3456 for the L26, i 3648×2736 for the L25. Data for trial use only. Measured at an ambient temperature of 25°...-size) alkaline batteries operated at 23 (±2)°C (73 (±4)°F); Battery life may contain. • The appearance of this manual may vary depending on Camera and Imaging Products Association (CIPA) standards for measuring the life of time menus and images are displayed. The included...

Reference Manual
Page 200
Technical Notes and Index Power-on lamp 20, 21 Preset manual E25 Pressing halfway 27 Print 68, 70, E17, E19, E29 Print date 19, 86, E47 Print order 68, E29 Print order date option... 19, E30, ...
Technical Notes and Index Power-on lamp 20, 21 Preset manual E25 Pressing halfway 27 Print 68, 70, E17, E19, E29 Print date 19, 86, E47 Print order 68, E29 Print order date option... 19, E30, ...
Reference Manual
Page 204
No reproduction in any form of this manual, in whole or in part (except for brief quotation in critical articles or reviews), may be made without written authorization from NIKON CORPORATION. CT1L01(11) 2012 6MM26611-01
No reproduction in any form of this manual, in whole or in part (except for brief quotation in critical articles or reviews), may be made without written authorization from NIKON CORPORATION. CT1L01(11) 2012 6MM26611-01


