
User Manual
Page 4
The consequences that should be performed only by the following safety precautions in injury. After removing or disconnecting the power source, take the product to prevent possible injury. Should the camera or AC adapter break open as this section are indicated by qualified ...Keep out of reach of a fall or other small parts into their entirety before using this Nikon product, to a Nikon-authorized service representative for inspection. ii For Your Safety To prevent damage to your Nikon product or injury to yourself or to avoid burns. Do not use the camera or AC ...
The consequences that should be performed only by the following safety precautions in injury. After removing or disconnecting the power source, take the product to prevent possible injury. Should the camera or AC adapter break open as this section are indicated by qualified ...Keep out of reach of a fall or other small parts into their entirety before using this Nikon product, to a Nikon-authorized service representative for inspection. ii For Your Safety To prevent damage to your Nikon product or injury to yourself or to avoid burns. Do not use the camera or AC ...
User Manual
Page 5
... Use only the batteries approved for use could result in fire. • Do not handle the power cable or go near the metal parts of different makes or types. • If Nikon rechargeable Ni-MH batteries EN-MH2 (EN-MH2-B2 or EN-MH2-B4) are using an AC...plenty of them as discoloration or deformation. • If liquid from damaged batteries comes in contact with clothing or skin, rinse immediately with COOLPIX L24. For Your Safety Observe caution when handling batteries Batteries may leak or explode if improperly handled. Failure to a Nikonauthorized service representative for use...
... Use only the batteries approved for use could result in fire. • Do not handle the power cable or go near the metal parts of different makes or types. • If Nikon rechargeable Ni-MH batteries EN-MH2 (EN-MH2-B2 or EN-MH2-B4) are using an AC...plenty of them as discoloration or deformation. • If liquid from damaged batteries comes in contact with clothing or skin, rinse immediately with COOLPIX L24. For Your Safety Observe caution when handling batteries Batteries may leak or explode if improperly handled. Failure to a Nikonauthorized service representative for use...

User Manual
Page 6
... or the instruments of the hospital when using inside an airplane or the hospital Turn the power off while inside the airplane during take off when using while in overheating or fire. Turn the power off or landing. Follow the instructions of the hospital. CD-ROMs The CD-ROMs supplied ... damage the product or result in a hospital. Handle moving parts. For Your Safety • Do not use only the cables provided or sold by Nikon for the purpose, to maintain compliance with liquid crystal Should the monitor break, care should be taken to avoid injury caused by broken glass and...
... or the instruments of the hospital when using inside an airplane or the hospital Turn the power off while inside the airplane during take off when using while in overheating or fire. Turn the power off or landing. Follow the instructions of the hospital. CD-ROMs The CD-ROMs supplied ... damage the product or result in a hospital. Handle moving parts. For Your Safety • Do not use only the cables provided or sold by Nikon for the purpose, to maintain compliance with liquid crystal Should the monitor break, care should be taken to avoid injury caused by broken glass and...

User Manual
Page 16
Introduction Parts of the Camera The Camera Body 12 3 4 98 7 Lens cover closed 5 6 10 11 1 Shutter-release button 22 Zoom control 21 f : wide 21 2 g : tele 21 h : Thumbnail playback 46 i : playback zoom 48 j : help 11 3 Power switch/Power-on lamp ....... 18, 97 4 Self-timer lamp 30 AF-assist illuminator 23, 95 5 Flash 28 6 Lens 113, 123 7 Speaker 55 8 Power connector cover (for connecting optional AC adapter 108 9 Eyelet for camera strap 11 10 Lens cover 111 11 Built-in microphone 53 4
Introduction Parts of the Camera The Camera Body 12 3 4 98 7 Lens cover closed 5 6 10 11 1 Shutter-release button 22 Zoom control 21 f : wide 21 2 g : tele 21 h : Thumbnail playback 46 i : playback zoom 48 j : help 11 3 Power switch/Power-on lamp ....... 18, 97 4 Self-timer lamp 30 AF-assist illuminator 23, 95 5 Flash 28 6 Lens 113, 123 7 Speaker 55 8 Power connector cover (for connecting optional AC adapter 108 9 Eyelet for camera strap 11 10 Lens cover 111 11 Built-in microphone 53 4

User Manual
Page 24
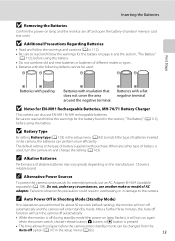
...(AA-size) lithium batteries • Two EN-MH2 Ni-MH (nickel metal hydride) rechargeable batteries Turning On and Off the Camera Press the power switch to turn the camera on . First Steps Inserting the Batteries 1 Open the battery-chamber/memory card slot 3 cover. Confirm that the ...If the camera is turned off, hold the camera upside down c to prevent the batteries from falling out. 1 2 2 Inserting the Batteries. After the power-on lamp (green) lights for a moment, the monitor turns on in playback mode (A 24). 12 Before opening the battery-chamber/memory card slot cover...
...(AA-size) lithium batteries • Two EN-MH2 Ni-MH (nickel metal hydride) rechargeable batteries Turning On and Off the Camera Press the power switch to turn the camera on . First Steps Inserting the Batteries 1 Open the battery-chamber/memory card slot 3 cover. Confirm that the ...If the camera is turned off, hold the camera upside down c to prevent the batteries from falling out. 1 2 2 Inserting the Batteries. After the power-on lamp (green) lights for a moment, the monitor turns on in playback mode (A 24). 12 Before opening the battery-chamber/memory card slot cover...
User Manual
Page 25
... be changed from the Auto off and open the battery-chamber/ memory card slot cover. Inserting the Batteries B Removing the Batteries Confirm the power-on the manufacturer. Do not, under any other type of battery is the type of different makes or types. • Batteries with insulation...camera on page iii and the section, "The Battery" (A 112), before the camera enters standby mode can be used , turn on again when the power switch, shutter-release button, A button, or c button is pressed. • The time allowed to read and follow the warnings for EN-MH1 Rechargeable...
... be changed from the Auto off and open the battery-chamber/ memory card slot cover. Inserting the Batteries B Removing the Batteries Confirm the power-on the manufacturer. Do not, under any other type of battery is the type of different makes or types. • Batteries with insulation...camera on page iii and the section, "The Battery" (A 112), before the camera enters standby mode can be used , turn on again when the power switch, shutter-release button, A button, or c button is pressed. • The time allowed to read and follow the warnings for EN-MH1 Rechargeable...

User Manual
Page 26
The power-on lamp (green) will light for a moment and the monitor will not be set the daylight saving time to on. First Steps 2 Use the multi ... daylight saving time setting is in effect, press H on the home time zone in Step 4 to turn on. If No is turned on. 1 Press the power switch to set . For information on using the multi selector, see "The Multi Selector" (A 9). 3 Choose Yes and press k. Yes No Cancel London Casablanca Back D Daylight...
The power-on lamp (green) will light for a moment and the monitor will not be set the daylight saving time to on. First Steps 2 Use the multi ... daylight saving time setting is in effect, press H on the home time zone in Step 4 to turn on. If No is turned on. 1 Press the power switch to set . For information on using the multi selector, see "The Multi Selector" (A 9). 3 Choose Yes and press k. Yes No Cancel London Casablanca Back D Daylight...

User Manual
Page 28
... down to turn off and open the battery-chamber/ 3 memory card slot cover. Be sure to prevent the batteries from the internal memory. 1 Confirm the power-on lamp and the monitor are off the camera before opening the battery-chamber/memory card slot 1 2 cover, hold the camera upside down or backwards...
... down to turn off and open the battery-chamber/ 3 memory card slot cover. Be sure to prevent the batteries from the internal memory. 1 Confirm the power-on lamp and the monitor are off the camera before opening the battery-chamber/memory card slot 1 2 cover, hold the camera upside down or backwards...
User Manual
Page 29
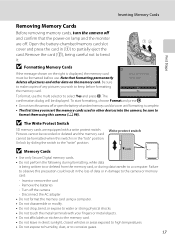
.... • Do not affix labels or stickers to the memory card. • Do not leave in damage to partially eject the card. Note that the power-on the right is displayed, the memory card Card is in (1) to the camera or memory card: - No To format, use . Failure to bend it...
.... • Do not affix labels or stickers to the memory card. • Do not leave in damage to partially eject the card. Note that the power-on the right is displayed, the memory card Card is in (1) to the camera or memory card: - No To format, use . Failure to bend it...

User Manual
Page 30
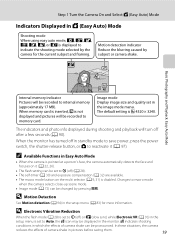
... exhausted. Prepare to choose G and press k. Replace with new batteries. 4 Number of exposures remaining Number of Exposures Remaining The number of purchase. The power-on lamp (green) will light for a moment and the monitor will extend at the time of pictures that suits the scene (A 26). 1 Press the... power switch to display the shooting-mode selection menu. Basic Photography and Playback: Easy Auto Mode 3 Press the multi selector HI to replace batteries....
... exhausted. Prepare to choose G and press k. Replace with new batteries. 4 Number of exposures remaining Number of Exposures Remaining The number of purchase. The power-on lamp (green) will light for a moment and the monitor will extend at the time of pictures that suits the scene (A 26). 1 Press the... power switch to display the shooting-mode selection menu. Basic Photography and Playback: Easy Auto Mode 3 Press the multi selector HI to replace batteries....
User Manual
Page 31
... displayed and pictures will be recorded to Auto, the R icon may be pronounced. When the monitor has turned off in standby mode to save power, press the power switch, the shutter-release button, or A to reactivate it (A 22, 26). • The flash setting can be set to internal memory (approximately 17 MB...
... displayed and pictures will be recorded to Auto, the R icon may be pronounced. When the monitor has turned off in standby mode to save power, press the power switch, the shutter-release button, or A to reactivate it (A 22, 26). • The flash setting can be set to internal memory (approximately 17 MB...
User Manual
Page 37
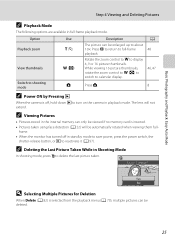
...Photography and Playback: Easy Auto Mode Step 4 Viewing and Deleting Pictures C Playback Mode The following options are available in standby mode to save power, press the power switch, the shutter-release button, or c to reactivate it (A 97). Press k to return to calendar display. The lens will be ...control to f to delete the last picture taken. Option Playback zoom View thumbnails Switch to about 10×. A 48 46, 47 Press A. 8 C Power ON by Pressing c When the camera is selected from the playback menu (A 79), multiple pictures can be enlarged up to shooting mode Use g (i) f...
...Photography and Playback: Easy Auto Mode Step 4 Viewing and Deleting Pictures C Playback Mode The following options are available in standby mode to save power, press the power switch, the shutter-release button, or c to reactivate it (A 97). Press k to return to calendar display. The lens will be ...control to f to delete the last picture taken. Option Playback zoom View thumbnails Switch to about 10×. A 48 46, 47 Press A. 8 C Power ON by Pressing c When the camera is selected from the playback menu (A 79), multiple pictures can be enlarged up to shooting mode Use g (i) f...
User Manual
Page 69
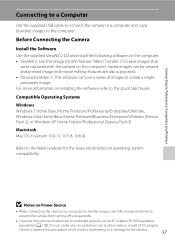
...Install the Software Use the supplied ViewNX 2 CD and install the following software on the computer. • ViewNX 2: Use the image transfer feature "Nikon Transfer 2" to the computer. Connecting to Televisions, Computers and Printers Connecting to a Computer Use the supplied USB cable to connect the camera to ... Pack 2), or Windows XP Home Edition/Professional (Service Pack 3) Macintosh Mac OS X (version 10.4.11, 10.5.8, 10.6.4) Refer to the Nikon website for extended periods, use another make or model of images to prevent the camera from turning off unexpectedly. • To...
...Install the Software Use the supplied ViewNX 2 CD and install the following software on the computer. • ViewNX 2: Use the image transfer feature "Nikon Transfer 2" to the computer. Connecting to Televisions, Computers and Printers Connecting to a Computer Use the supplied USB cable to connect the camera to ... Pack 2), or Windows XP Home Edition/Professional (Service Pack 3) Macintosh Mac OS X (version 10.4.11, 10.5.8, 10.6.4) Refer to the Nikon website for extended periods, use another make or model of images to prevent the camera from turning off unexpectedly. • To...

User Manual
Page 70
.... Do not attempt to the computer using the supplied USB cable. Be sure that the camera is connected to the computer via a USB hub. The power-on lamp will remain off . 3 Connect the camera to insert connectors at an angle, and do not use force when connecting or disconnecting the USB...
.... Do not attempt to the computer using the supplied USB cable. Be sure that the camera is connected to the computer via a USB hub. The power-on lamp will remain off . 3 Connect the camera to insert connectors at an angle, and do not use force when connecting or disconnecting the USB...

User Manual
Page 74
...a computer from turning off unexpectedly. Do not, under any circumstances, use an AC Adapter EH-65A (available separately) (A 108). To power the camera continuously for printing using Print set in damage to the camera. Take pictures Select pictures for extended periods, use another make or...printer (A 63) Print pictures one at a time(A 64) Print multiple pictures (A 65) Turn camera off and disconnect USB cable B Note on Power Source When connecting the camera to a printer, use a fully charged batteries to prevent the camera from your personal printer and printing over a direct camera...
...a computer from turning off unexpectedly. Do not, under any circumstances, use an AC Adapter EH-65A (available separately) (A 108). To power the camera continuously for printing using Print set in damage to the camera. Take pictures Select pictures for extended periods, use another make or...printer (A 63) Print pictures one at a time(A 64) Print multiple pictures (A 65) Turn camera off and disconnect USB cable B Note on Power Source When connecting the camera to a printer, use a fully charged batteries to prevent the camera from your personal printer and printing over a direct camera...

User Manual
Page 95
... card A 98 Format internal memory or memory card. AF assist A 95 Enable or disable AF-assist illumination. Reset all A 101 Restore camera settings to conserve power. Date A 87 Set camera clock and choose home and destination time zones. Blink warning A 100 Set whether or not to reduce blurring when motion is...
... card A 98 Format internal memory or memory card. AF assist A 95 Enable or disable AF-assist illumination. Reset all A 101 Restore camera settings to conserve power. Date A 87 Set camera clock and choose home and destination time zones. Blink warning A 100 Set whether or not to reduce blurring when motion is...

User Manual
Page 100
... time is displayed. Shooting, Playback and Setup Menus B The Clock Battery The camera's clock is powered by a clock battery that powers the camera. Press k to set , the shooting date and time can provide several days of backup power after about ten hours of charging. D Imprinting the Date on or off Back the daylight...
... time is displayed. Shooting, Playback and Setup Menus B The Clock Battery The camera's clock is powered by a clock battery that powers the camera. Press k to set , the shooting date and time can provide several days of backup power after about ten hours of charging. D Imprinting the Date on or off Back the daylight...

User Manual
Page 109
...by pressing any of time passes without any operations, the camera will enter the standby mode (A 13) to save power. When the camera enters standby mode, the power-on and a period of the following cases: • While menus are performed within three minutes, the camera .... If no operations are displayed: 3 minutes • While slide show is on lamp flashes. Auto off When the camera is in the following buttons. • Power switch • Shutter-release button • A button • c button 97 Basic Camera Setup: The Setup Menu k Auto Off Press d M z (setup menu) (A...
...by pressing any of time passes without any operations, the camera will enter the standby mode (A 13) to save power. When the camera enters standby mode, the power-on and a period of the following cases: • While menus are performed within three minutes, the camera .... If no operations are displayed: 3 minutes • While slide show is on lamp flashes. Auto off When the camera is in the following buttons. • Power switch • Shutter-release button • A button • c button 97 Basic Camera Setup: The Setup Menu k Auto Off Press d M z (setup menu) (A...

User Manual
Page 123
...or the magnetic fields produced by broken glass and to prevent the liquid crystal from strong magnetic fields Do not use or store this Nikon product, observe the following precautions when using or storing the camera. B Turn the product off before exposing it to sudden changes ...such as radio transmitters could interfere with care Do not apply force to product memory or internal circuitry. 111 Technical Notes Forcibly cutting power in these circumstances could result in camera malfunction or damage to strong shock or vibration. Caring for extended periods when using or storing...
...or the magnetic fields produced by broken glass and to prevent the liquid crystal from strong magnetic fields Do not use or store this Nikon product, observe the following precautions when using or storing the camera. B Turn the product off before exposing it to sudden changes ...such as radio transmitters could interfere with care Do not apply force to product memory or internal circuitry. 111 Technical Notes Forcibly cutting power in these circumstances could result in camera malfunction or damage to strong shock or vibration. Caring for extended periods when using or storing...

User Manual
Page 126
Caring for the Camera Storage Turn the camera off before putting the camera away again. Check that the power-on and release the shutter a few pixels that do not light. C Notes on the Monitor • The monitor may contain a few times before putting the ...; Exposed to temperatures below -10 °C (14 °F) or above 50 °C (122 °F) • Poorly ventilated or subject to dim or flicker, contact your Nikon-authorized service representative. Remove the batteries if the camera will not be used for Continuous. Do not store the camera with the camera except in...
Caring for the Camera Storage Turn the camera off before putting the camera away again. Check that the power-on and release the shutter a few pixels that do not light. C Notes on the Monitor • The monitor may contain a few times before putting the ...; Exposed to temperatures below -10 °C (14 °F) or above 50 °C (122 °F) • Poorly ventilated or subject to dim or flicker, contact your Nikon-authorized service representative. Remove the batteries if the camera will not be used for Continuous. Do not store the camera with the camera except in...


