
L22 / L21 User's Manual
Page 5
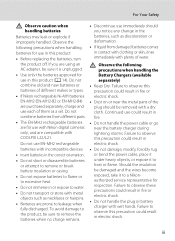
...remove the batteries when no charge remains. • Discontinue use in this precaution could result in contact with clothing or skin, rinse immediately with COOLPIX L22/L21. iii Do not combine batteries from damaged batteries comes in fire or electric shock. • Do not handle the plug or battery charger... may leak or explode if improperly handled. Do not combine old and new batteries or batteries of different makes or types. • If Nikon rechargeable Ni-MH batteries EN-MH2 (EN-MH2-B2 or EN-MH2-B4) are compatible with plenty of water. Should the insulation be sure...
...remove the batteries when no charge remains. • Discontinue use in this precaution could result in contact with clothing or skin, rinse immediately with COOLPIX L22/L21. iii Do not combine batteries from damaged batteries comes in fire or electric shock. • Do not handle the plug or battery charger... may leak or explode if improperly handled. Do not combine old and new batteries or batteries of different makes or types. • If Nikon rechargeable Ni-MH batteries EN-MH2 (EN-MH2-B2 or EN-MH2-B4) are compatible with plenty of water. Should the insulation be sure...
L22 / L21 User's Manual
Page 13
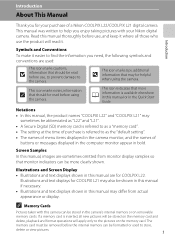
... to as the "default setting". • The names of menu items displayed in the camera monitor, and the names of a Nikon COOLPIX L22/COOLPIX L21 digital camera. Screen Samples In this manual thoroughly before use, and keep it where all new pictures will be read before using...may also be read it easier to find the information you need, the following symbols and conventions are for COOLPIX L22. Notations • In this manual, the product names "COOLPIX L22" and "COOLPIX L21" may sometimes be formatted or used : This icon marks cautions, B information that more clearly shown...
... to as the "default setting". • The names of menu items displayed in the camera monitor, and the names of a Nikon COOLPIX L22/COOLPIX L21 digital camera. Screen Samples In this manual thoroughly before use, and keep it where all new pictures will be read before using...may also be read it easier to find the information you need, the following symbols and conventions are for COOLPIX L22. Notations • In this manual, the product names "COOLPIX L22" and "COOLPIX L21" may sometimes be formatted or used : This icon marks cautions, B information that more clearly shown...
L22 / L21 User's Manual
Page 14
... not be reproduced, transmitted, transcribed, stored in a retrieval system, or translated into any language in any form, by Nikon specifically for contact information: http://imaging.nikon.com/ Use Only Nikon Brand Electronic Accessories Nikon COOLPIX cameras are engineered and proven to operate within the operational and safety requirements of this product may be held liable...
... not be reproduced, transmitted, transcribed, stored in a retrieval system, or translated into any language in any form, by Nikon specifically for contact information: http://imaging.nikon.com/ Use Only Nikon Brand Electronic Accessories Nikon COOLPIX cameras are engineered and proven to operate within the operational and safety requirements of this product may be held liable...
L22 / L21 User's Manual
Page 16
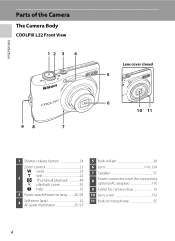
Introduction Parts of the Camera The Camera Body COOLPIX L22 Front View 12 3 4 98 7 Lens cover closed 5 6 10 11 1 Shutter-release button 24 Zoom control 23 f : wide 23 2 g : tele 23 h : Thumbnail playback 48 i : playback zoom 50 j : help 13 3 Power switch/Power-on lamp ....... 20, 99 4 Self-timer lamp 32 AF-assist illuminator 25, 97 5 Built-in flash 30 6 Lens 114, 124 7 Speaker 57 8 Power connector cover (for connecting optional AC adapter 110 9 Eyelet for camera strap 13 10 Lens cover 112 11 Built-in microphone 55 4
Introduction Parts of the Camera The Camera Body COOLPIX L22 Front View 12 3 4 98 7 Lens cover closed 5 6 10 11 1 Shutter-release button 24 Zoom control 23 f : wide 23 2 g : tele 23 h : Thumbnail playback 48 i : playback zoom 50 j : help 13 3 Power switch/Power-on lamp ....... 20, 99 4 Self-timer lamp 32 AF-assist illuminator 25, 97 5 Built-in flash 30 6 Lens 114, 124 7 Speaker 57 8 Power connector cover (for connecting optional AC adapter 110 9 Eyelet for camera strap 13 10 Lens cover 112 11 Built-in microphone 55 4
L22 / L21 User's Manual
Page 17
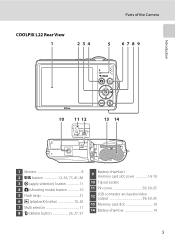
COOLPIX L22 Rear View 1 2 34 Parts of the Camera 5 67 89 Introduction 10 11 12 13 14 1 Monitor 8 2 d button 12, 56, 73, 81, 86 3 k (apply selection) button 11 4 A (shooting mode) button 10 5 Flash lamp 31 6 c (playback) button 10, 26 7 Multi selector 11 8 l (delete) button 26, 27, 57 9 Battery-chamber/ memory card slot cover 14, 18 10 Tripod socket 11 Pin cover 58, 60, 65 12 USB connector and audio/video output 58, 60, 65 13 Memory card slot 18 14 Battery-chamber 14 5
COOLPIX L22 Rear View 1 2 34 Parts of the Camera 5 67 89 Introduction 10 11 12 13 14 1 Monitor 8 2 d button 12, 56, 73, 81, 86 3 k (apply selection) button 11 4 A (shooting mode) button 10 5 Flash lamp 31 6 c (playback) button 10, 26 7 Multi selector 11 8 l (delete) button 26, 27, 57 9 Battery-chamber/ memory card slot cover 14, 18 10 Tripod socket 11 Pin cover 58, 60, 65 12 USB connector and audio/video output 58, 60, 65 13 Memory card slot 18 14 Battery-chamber 14 5
L22 / L21 User's Manual
Page 18
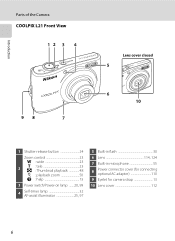
Introduction Parts of the Camera COOLPIX L21 Front View 12 3 4 98 7 Lens cover closed 5 6 10 1 Shutter-release button 24 Zoom control 23 f : wide 23 2 g : tele 23 h : Thumbnail playback 48 i : playback zoom 50 j : help 13 3 Power switch/Power-on lamp ....... 20, 99 4 Self-timer lamp 32 AF-assist illuminator 25, 97 5 Built-in flash 30 6 Lens 114, 124 7 Built-in microphone 55 8 Power connector cover (for connecting optional AC adapter 110 9 Eyelet for camera strap 13 10 Lens cover 112 6
Introduction Parts of the Camera COOLPIX L21 Front View 12 3 4 98 7 Lens cover closed 5 6 10 1 Shutter-release button 24 Zoom control 23 f : wide 23 2 g : tele 23 h : Thumbnail playback 48 i : playback zoom 50 j : help 13 3 Power switch/Power-on lamp ....... 20, 99 4 Self-timer lamp 32 AF-assist illuminator 25, 97 5 Built-in flash 30 6 Lens 114, 124 7 Built-in microphone 55 8 Power connector cover (for connecting optional AC adapter 110 9 Eyelet for camera strap 13 10 Lens cover 112 6
L22 / L21 User's Manual
Page 19
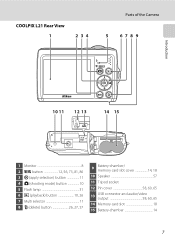
COOLPIX L21 Rear View 1 2 34 Parts of the Camera 5 67 8 9 Introduction 10 11 12 13 14 15 1 Monitor 8 2 d button 12, 56, 73, 81, 86 3 k (apply selection) button 11 4 A (shooting mode) button 10 5 Flash lamp 31 6 c (playback) button 10, 26 7 Multi selector 11 8 l (delete) button 26, 27, 57 9 Battery-chamber/ memory card slot cover 14, 18 10 Speaker 57 11 Tripod socket 12 Pin cover 58, 60, 65 13 USB connector and audio/video output 58, 60, 65 14 Memory card slot 18 15 Battery-chamber 14 7
COOLPIX L21 Rear View 1 2 34 Parts of the Camera 5 67 8 9 Introduction 10 11 12 13 14 15 1 Monitor 8 2 d button 12, 56, 73, 81, 86 3 k (apply selection) button 11 4 A (shooting mode) button 10 5 Flash lamp 31 6 c (playback) button 10, 26 7 Multi selector 11 8 l (delete) button 26, 27, 57 9 Battery-chamber/ memory card slot cover 14, 18 10 Speaker 57 11 Tripod socket 12 Pin cover 58, 60, 65 13 USB connector and audio/video output 58, 60, 65 14 Memory card slot 18 15 Battery-chamber 14 7

L22 / L21 User's Manual
Page 25
... the way down to g (j) again. Exit Back About the Shutter-release Button The camera features a two-stage shutter-release button. Attaching the Camera Strap 2 3 1 13 COOLPIX L22 COOLPIX L21 Continuous Choose single frame, continuous mode, BSS (camera chooses sharpest shot in camera shake and blurred pictures. Press the shutterrelease button the rest of...
... the way down to g (j) again. Exit Back About the Shutter-release Button The camera features a two-stage shutter-release button. Attaching the Camera Strap 2 3 1 13 COOLPIX L22 COOLPIX L21 Continuous Choose single frame, continuous mode, BSS (camera chooses sharpest shot in camera shake and blurred pictures. Press the shutterrelease button the rest of...
L22 / L21 User's Manual
Page 26
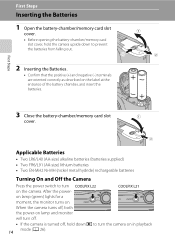
... Inserting the Batteries 1 Open the battery-chamber/memory card slot 3 cover. • Before opening the battery-chamber/memory card slot cover, hold down to turn COOLPIX L22 COOLPIX L21 on the camera.
... Inserting the Batteries 1 Open the battery-chamber/memory card slot 3 cover. • Before opening the battery-chamber/memory card slot cover, hold down to turn COOLPIX L22 COOLPIX L21 on the camera.
L22 / L21 User's Manual
Page 28
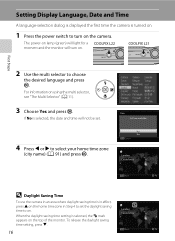
... Language, Date and Time A language-selection dialog is displayed the first time the camera is selected, the W mark appears on the top of the monitor. COOLPIX L21 First Steps 2 Use the multi selector to select your home time zone (city name) (A 91) and press k. The power-on lamp (green) will... light for a COOLPIX L22 moment and the monitor will not be set the daylight saving time to turn on using the multi selector, see "The Multi Selector" (A 11). 3 Choose...
... Language, Date and Time A language-selection dialog is displayed the first time the camera is selected, the W mark appears on the top of the monitor. COOLPIX L21 First Steps 2 Use the multi selector to select your home time zone (city name) (A 91) and press k. The power-on lamp (green) will... light for a COOLPIX L22 moment and the monitor will not be set the daylight saving time to turn on using the multi selector, see "The Multi Selector" (A 11). 3 Choose...

L22 / L21 User's Manual
Page 32
.... Cannot take pictures using a shooting mode that can be stored depends on lamp (green) will light COOLPIX L22 for a moment and the monitor will extend at the time of purchase. The lens will turn on . COOLPIX L21 Basic Photography and Playback: Easy Auto Mode 3 Press the multi selector HI to turn on the...
.... Cannot take pictures using a shooting mode that can be stored depends on lamp (green) will light COOLPIX L22 for a moment and the monitor will extend at the time of purchase. The lens will turn on . COOLPIX L21 Basic Photography and Playback: Easy Auto Mode 3 Press the multi selector HI to turn on the...
L22 / L21 User's Manual
Page 35
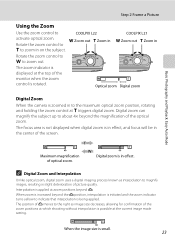
Interpolation is zoomed in to the right as interpolation to COOLPIX L22 activate optical zoom. Basic Photography and Playback: Easy Auto Mode Step 2 Frame a Picture Using the Zoom Use the zoom control to magnify images, resulting in ... focus will be in the center of the zoom positions at which shooting without interpolation is in effect. f Zoom out g Zoom in on the subject. COOLPIX L21 f Zoom out g Zoom in Rotate the zoom control to f to zoom in Rotate the zoom control to g to zoom out. The zoom indicator is...
Interpolation is zoomed in to the right as interpolation to COOLPIX L22 activate optical zoom. Basic Photography and Playback: Easy Auto Mode Step 2 Frame a Picture Using the Zoom Use the zoom control to magnify images, resulting in ... focus will be in the center of the zoom positions at which shooting without interpolation is in effect. f Zoom out g Zoom in on the subject. COOLPIX L21 f Zoom out g Zoom in Rotate the zoom control to f to zoom in Rotate the zoom control to g to zoom out. The zoom indicator is...

L22 / L21 User's Manual
Page 44
... a tripod is pressed. The self-timer lamp will be set . When the shutter is released. If a setting is taken, press the shutter-release button again. COOLPIX L22 COOLPIX L21 32 Focus and exposure will be set to select ON and press k. Auto Mode Taking Pictures with the Self-timer When using the self...
... a tripod is pressed. The self-timer lamp will be set . When the shutter is released. If a setting is taken, press the shutter-release button again. COOLPIX L22 COOLPIX L21 32 Focus and exposure will be set to select ON and press k. Auto Mode Taking Pictures with the Self-timer When using the self...
L22 / L21 User's Manual
Page 63
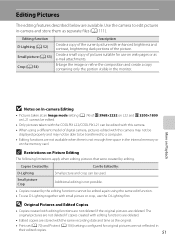
... copies. 51 The original pictures are not deleted if copies created with editing functions are deleted. • Edited copies are stored with the COOLPIX L22/COOLPIX L21 can be edited again using a different model of pictures suitable for original pictures are not available when there is not possible. •.... More on Playback B Notes on In-camera Editing • Pictures taken at an Image mode setting (A 74) of P 3968×2232 on L22 and P 3200×1800 on L21 cannot be edited. • Only pictures taken with the same recording date and time as e-mail attachments. Small...
... copies. 51 The original pictures are not deleted if copies created with editing functions are deleted. • Edited copies are stored with the COOLPIX L22/COOLPIX L21 can be edited again using a different model of pictures suitable for original pictures are not available when there is not possible. •.... More on Playback B Notes on In-camera Editing • Pictures taken at an Image mode setting (A 74) of P 3968×2232 on L22 and P 3200×1800 on L21 cannot be edited. • Only pictures taken with the same recording date and time as e-mail attachments. Small...
L22 / L21 User's Manual
Page 66
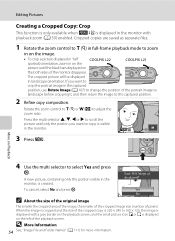
... control to g (i) or f (h) to select Yes and press k. A new picture, containing only the portion visible in on the COOLPIX L21 picture until only the portion you want to copy is cropped and the size of the monitor disappear. Cropped copies are saved as displayed... is 320 × 240 or 160 × 120, the image is created. More on the image. • To crop a picture displayed in "tall" COOLPIX L22 (portrait) orientation, zoom in the monitor, is displayed with playback zoom (A 50) enabled. If you want to the captured position. 2 Refine copy composition. Save...
... control to g (i) or f (h) to select Yes and press k. A new picture, containing only the portion visible in on the COOLPIX L21 picture until only the portion you want to copy is cropped and the size of the monitor disappear. Cropped copies are saved as displayed... is 320 × 240 or 160 × 120, the image is created. More on the image. • To crop a picture displayed in "tall" COOLPIX L22 (portrait) orientation, zoom in the monitor, is displayed with playback zoom (A 50) enabled. If you want to the captured position. 2 Refine copy composition. Save...

L22 / L21 User's Manual
Page 70
... by your television for details. 4 Hold down c to the audioin jack. The camera enters playback mode, and the pictures taken will remain off the camera. COOLPIX L22 COOLPIX L21 Connecting to Televisions, Computers and Printers 2 Connect the camera to the video channel. Connect the yellow plug to the video-in the Set up...
... by your television for details. 4 Hold down c to the audioin jack. The camera enters playback mode, and the pictures taken will remain off the camera. COOLPIX L22 COOLPIX L21 Connecting to Televisions, Computers and Printers 2 Connect the camera to the video channel. Connect the yellow plug to the video-in the Set up...
L22 / L21 User's Manual
Page 71
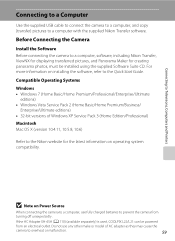
... Enterprise/Ultimate editions) • 32-bit versions of AC adapter as they may cause the camera to a computer, software, including Nikon Transfer, ViewNX for displaying transferred pictures, and Panorama Maker for the latest information on operating system compatibility. Before Connecting the Camera Install...to a computer, and copy (transfer) pictures to the Nikon website for creating panorama photos, must be powered from turning off unexpectedly. If the AC Adapter EH-65A (A 110) (available separately) is used, COOLPIX L22/L21 can be installed using the supplied Software Suite CD....
... Enterprise/Ultimate editions) • 32-bit versions of AC adapter as they may cause the camera to a computer, software, including Nikon Transfer, ViewNX for displaying transferred pictures, and Panorama Maker for the latest information on operating system compatibility. Before Connecting the Camera Install...to a computer, and copy (transfer) pictures to the Nikon website for creating panorama photos, must be powered from turning off unexpectedly. If the AC Adapter EH-65A (A 110) (available separately) is used, COOLPIX L22/L21 can be installed using the supplied Software Suite CD....
L22 / L21 User's Manual
Page 72
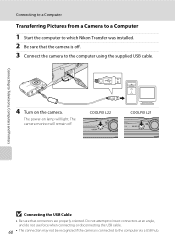
Connecting to Televisions, Computers and Printers Connecting to a Computer Transferring Pictures from a Camera to a Computer 1 Start the computer to which Nikon Transfer was installed. 2 Be sure that connectors are properly oriented. The camera monitor will light. The power-on the camera. Do not... cable. 60 • The connection may not be recognized if the camera is off. 3 Connect the camera to the computer via a USB hub. COOLPIX L22 COOLPIX L21 B Connecting the USB Cable • Be sure that the camera is connected to the computer using the supplied USB cable. 4 Turn on lamp...
Connecting to Televisions, Computers and Printers Connecting to a Computer Transferring Pictures from a Camera to a Computer 1 Start the computer to which Nikon Transfer was installed. 2 Be sure that connectors are properly oriented. The camera monitor will light. The power-on the camera. Do not... cable. 60 • The connection may not be recognized if the camera is off. 3 Connect the camera to the computer via a USB hub. COOLPIX L22 COOLPIX L21 B Connecting the USB Cable • Be sure that the camera is connected to the computer using the supplied USB cable. 4 Turn on lamp...

L22 / L21 User's Manual
Page 77
... on the camera. • When connected correctly, the PictBridge startup screen (1) is displayed in the camera monitor, then the Print selection screen (2) is displayed. 1 COOLPIX L22 2 Print selection COOLPIX L21 15/05 2010 NO. 12 [ 12] B Connecting the Audio Video/USB Cable When connecting the USB cable, be sure that the connectors are...
... on the camera. • When connected correctly, the PictBridge startup screen (1) is displayed in the camera monitor, then the Print selection screen (2) is displayed. 1 COOLPIX L22 2 Print selection COOLPIX L21 15/05 2010 NO. 12 [ 12] B Connecting the Audio Video/USB Cable When connecting the USB cable, be sure that the connectors are...
L22 / L21 User's Manual
Page 100
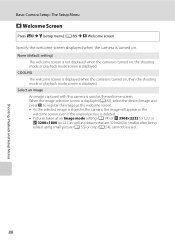
Select an image An image captured with this camera is deleted. • Pictures taken at an Image mode setting (A 74) of P 3968×2232 for L22 or P 3200×1800 for L21, as well as pictures that are 320×240 or smaller after being edited using small picture (A 53) or ...; As the selected image is stored in the camera, the image will appear in the welcome screen even if the original picture is used . 88 COOLPIX The welcome screen is displayed when the camera is turned on, then the shooting mode or playback mode screen is turned on . None (default setting...
Select an image An image captured with this camera is deleted. • Pictures taken at an Image mode setting (A 74) of P 3968×2232 for L22 or P 3200×1800 for L21, as well as pictures that are 320×240 or smaller after being edited using small picture (A 53) or ...; As the selected image is stored in the camera, the image will appear in the welcome screen even if the original picture is used . 88 COOLPIX The welcome screen is displayed when the camera is turned on, then the shooting mode or playback mode screen is turned on . None (default setting...


