Reference Manual
Page 4
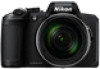
.... For more information about Nikon brand accessories, contact a local authorized Nikon dealer. iv Introduction Read This First https://imaging.nikon.com/ Use Only Nikon Brand Electronic Accessories Nikon COOLPIX cameras are engineered and proven... to operate within the operational and safety requirements of this device as at the following websites: • For users in the U.S.A.: https://www.nikonusa.com/ • For users in Europe: https://www.europe-nikon.com/support/ • For users in your area. Before Taking Important Pictures...
.... For more information about Nikon brand accessories, contact a local authorized Nikon dealer. iv Introduction Read This First https://imaging.nikon.com/ Use Only Nikon Brand Electronic Accessories Nikon COOLPIX cameras are engineered and proven... to operate within the operational and safety requirements of this device as at the following websites: • For users in the U.S.A.: https://www.nikonusa.com/ • For users in Europe: https://www.europe-nikon.com/support/ • For users in your area. Before Taking Important Pictures...
Reference Manual
Page 11
......44 Setting the Flash Mode, Self-timer, Macro Mode, and Exposure Compensation.......... 46 Flash Mode...47 Self-timer ...49 Macro Mode (Taking Close-up Pictures 50 Exposure Compensation (Adjusting Brightness 51 Using the Zoom...52 Focusing...54 The Shutter-release Button...54 Using Target Finding AF ...55 Using Face Detection...Lighting: Enhancing Brightness and Contrast 70 Red-eye Correction: Correcting Red-eye When Shooting with the Flash 71 Glamour Retouch: Enhancing Human Faces 71 Small Picture: Reducing the Size of an Image 73 Crop: Creating a Cropped Copy...74 xi Table of Contents
......44 Setting the Flash Mode, Self-timer, Macro Mode, and Exposure Compensation.......... 46 Flash Mode...47 Self-timer ...49 Macro Mode (Taking Close-up Pictures 50 Exposure Compensation (Adjusting Brightness 51 Using the Zoom...52 Focusing...54 The Shutter-release Button...54 Using Target Finding AF ...55 Using Face Detection...Lighting: Enhancing Brightness and Contrast 70 Red-eye Correction: Correcting Red-eye When Shooting with the Flash 71 Glamour Retouch: Enhancing Human Faces 71 Small Picture: Reducing the Size of an Image 73 Crop: Creating a Cropped Copy...74 xi Table of Contents
Reference Manual
Page 22
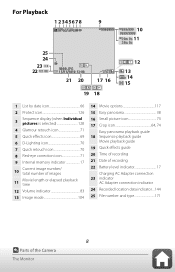
.../2019 12:00 21 20 17 16 12 13 14 15 19 18 1 List by date icon 66 2 Protect icon 126 Sequence display (when Individual 3 pictures is selected 128 4 Glamour retouch icon 71 5 Quick effects icon 69 6 D-Lighting icon 70 7 Quick retouch icon 70 8 Red-eye correction icon 71 9 Internal memory... 11 Movie length or elapsed playback time 12 Volume indicator 83 13 Image mode 104 14 Movie options 117 15 Easy panorama 38 16 Small picture icon 73 17 Crop icon 64, 74 Easy panorama playback guide 18 Sequence playback guide Movie playback guide 19 Quick effects guide 20 Time of...
.../2019 12:00 21 20 17 16 12 13 14 15 19 18 1 List by date icon 66 2 Protect icon 126 Sequence display (when Individual 3 pictures is selected 128 4 Glamour retouch icon 71 5 Quick effects icon 69 6 D-Lighting icon 70 7 Quick retouch icon 70 8 Red-eye correction icon 71 9 Internal memory... 11 Movie length or elapsed playback time 12 Volume indicator 83 13 Image mode 104 14 Movie options 117 15 Easy panorama 38 16 Small picture icon 73 17 Crop icon 64, 74 Easy panorama playback guide 18 Sequence playback guide Movie playback guide 19 Quick effects guide 20 Time of...
Reference Manual
Page 32
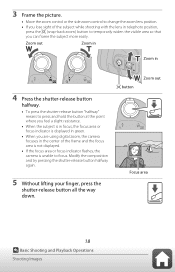
q button Zoom out 1 / 2 5 0 F 3.3 Focus area 18 Basic Shooting and Playback Operations Shooting Images 3 Frame the picture. • Move the zoom control or the side zoom control to change the zoom lens position. • If you lose sight of the subject while ...
q button Zoom out 1 / 2 5 0 F 3.3 Focus area 18 Basic Shooting and Playback Operations Shooting Images 3 Frame the picture. • Move the zoom control or the side zoom control to change the zoom lens position. • If you lose sight of the subject while ...
Reference Manual
Page 35
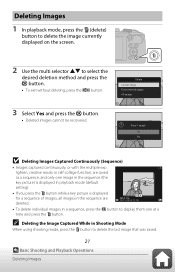
..., or self-collage function, are saved as a sequence, and only one image in the sequence (the key picture) is displayed in playback mode (default setting). • If you press the l button while a key picture is displayed for a sequence of images, all images in the sequence are deleted. 0004.JPG 15/11/2019...
..., or self-collage function, are saved as a sequence, and only one image in the sequence (the key picture) is displayed in playback mode (default setting). • If you press the l button while a key picture is displayed for a sequence of images, all images in the sequence are deleted. 0004.JPG 15/11/2019...

Reference Manual
Page 37
... Shooting 41 Setting the Flash Mode, Self-timer, Macro Mode, and Exposure Compensation ...46 Flash Mode...47 Self-timer ...49 Macro Mode (Taking Close-up Pictures 50 Exposure Compensation (Adjusting Brightness 51 Using the Zoom ...52 Focusing ...54 Default Settings (Flash Mode, Self-timer, and Macro Mode 59 Functions That Cannot...
... Shooting 41 Setting the Flash Mode, Self-timer, Macro Mode, and Exposure Compensation ...46 Flash Mode...47 Self-timer ...49 Macro Mode (Taking Close-up Pictures 50 Exposure Compensation (Adjusting Brightness 51 Using the Zoom ...52 Focusing ...54 Default Settings (Flash Mode, Self-timer, and Macro Mode 59 Functions That Cannot...
Reference Manual
Page 38
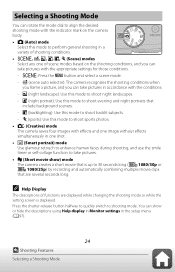
...You can rotate the mode dial to align the desired shooting mode with the indicator mark on the shooting conditions, and you can take pictures in the setup menu (A97). 24 Shooting Features Selecting a Shooting Mode o (backlighting): Use this mode to 30 seconds long (e 1080... creates a short movie that is displayed. y: Press the d button and select a scene mode. - e (night portrait): Use this mode to take pictures. • M (Short movie show or hide the descriptions using Help display in Monitor settings in accordance with the appropriate settings for those conditions. - C...
...You can rotate the mode dial to align the desired shooting mode with the indicator mark on the shooting conditions, and you can take pictures in the setup menu (A97). 24 Shooting Features Selecting a Shooting Mode o (backlighting): Use this mode to 30 seconds long (e 1080... creates a short movie that is displayed. y: Press the d button and select a scene mode. - e (night portrait): Use this mode to take pictures. • M (Short movie show or hide the descriptions using Help display in Monitor settings in accordance with the appropriate settings for those conditions. - C...
Reference Manual
Page 41
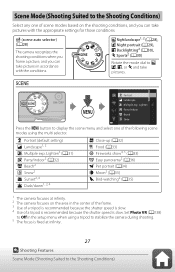
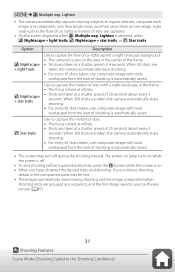
...because the shutter speed is fixed at infinity. 2 The camera focuses on the shooting conditions, and you can take pictures with the conditions. Scene Mode (Shooting Suited to the Shooting Conditions) Select any one of the following scene modes ...b Portrait (default setting) c Landscape1, 2 U Multiple exp. B (scene auto selector) (A28) The camera recognizes the shooting conditions when you frame a picture, and you can take pictures. Lighten Party/indoor Beach Snow Press the d button to the Shooting Conditions) Lighten3 (A31) f Party/indoor2 (A32) Z Beach2 z Snow2 h Sunset2,...
...because the shutter speed is fixed at infinity. 2 The camera focuses on the shooting conditions, and you can take pictures with the conditions. Scene Mode (Shooting Suited to the Shooting Conditions) Select any one of the following scene modes ...b Portrait (default setting) c Landscape1, 2 U Multiple exp. B (scene auto selector) (A28) The camera recognizes the shooting conditions when you frame a picture, and you can take pictures. Lighten Party/indoor Beach Snow Press the d button to the Shooting Conditions) Lighten3 (A31) f Party/indoor2 (A32) Z Beach2 z Snow2 h Sunset2,...
Reference Manual
Page 42
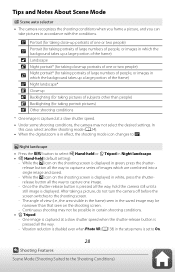
.... Tips and Notes About Scene Mode B Scene auto selector • The camera recognizes the shooting conditions when you frame a picture, and you can take pictures in white, press the shutterrelease button all the way to capture one or two people) c Night portrait* (for taking portraits...-held or Z Tripod in which the background takes up a large portion of the frame) g Night landscape* i Close-up j Backlighting (for taking pictures of subjects other than that seen on the shooting screen is displayed in accordance with the conditions. e Portrait (for taking close -up portraits of one...
.... Tips and Notes About Scene Mode B Scene auto selector • The camera recognizes the shooting conditions when you frame a picture, and you can take pictures in white, press the shutterrelease button all the way to capture one or two people) c Night portrait* (for taking portraits...-held or Z Tripod in which the background takes up a large portion of the frame) g Night landscape* i Close-up j Backlighting (for taking pictures of subjects other than that seen on the shooting screen is displayed in accordance with the conditions. e Portrait (for taking close -up portraits of one...
Reference Manual
Page 43
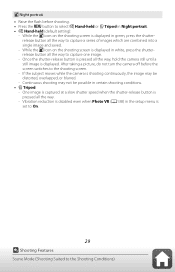
... until a still image is pressed all the way. - One image is captured at a slow shutter speed when the shutter-release button is displayed. After taking a picture, do not turn the camera off before shooting. • Press the d button to the shooting screen. - Vibration reduction is disabled even when Photo VR (A138...
... until a still image is pressed all the way. - One image is captured at a slow shutter speed when the shutter-release button is displayed. After taking a picture, do not turn the camera off before shooting. • Press the d button to the shooting screen. - Vibration reduction is disabled even when Photo VR (A138...
Reference Manual
Page 44
... time of a tripod is recommended. If there is only enough memory to save one image. • On: Use when taking a picture, do not turn the camera off before shooting. - After taking pictures with the first image. 30 Shooting Features Scene Mode (Shooting Suited to capture one image, an image processed by D-Lighting...
... time of a tripod is recommended. If there is only enough memory to save one image. • On: Use when taking a picture, do not turn the camera off before shooting. - After taking pictures with the first image. 30 Shooting Features Scene Mode (Shooting Suited to capture one image, an image processed by D-Lighting...
Reference Manual
Page 45
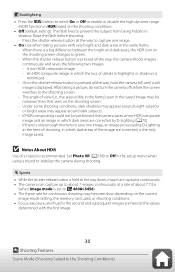
... background. • The camera focuses on . • When you continue shooting, details in the center of the frame. • Shots are grouped as the key picture (A67). 31 Shooting Features Scene Mode (Shooting Suited to capture the flow of 4 seconds. Option V Nightscape + light trails W Nightscape + star trails S Star trails Description Use...
... background. • The camera focuses on . • When you continue shooting, details in the center of the frame. • Shots are grouped as the key picture (A67). 31 Shooting Features Scene Mode (Shooting Suited to capture the flow of 4 seconds. Option V Nightscape + light trails W Nightscape + star trails S Star trails Description Use...
Reference Manual
Page 53
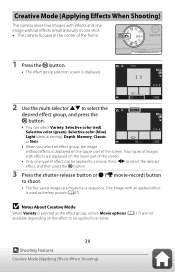
... as the effect group, certain Movie options (A117) are treated as a sequence. Four types of images with an applied effect is selected as the key picture (A67).
... as the effect group, certain Movie options (A117) are treated as a sequence. Four types of images with an applied effect is selected as the key picture (A67).
Reference Manual
Page 55
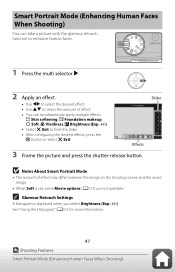
... Features Smart Portrait Mode (Enhancing Human Faces When Shooting) Smart Portrait Mode (Enhancing Human Faces When Shooting) You can take a picture with the glamour retouch function to enhance human faces. 1 Press the multi selector K. 2 Apply an effect. • Use ...2 1 OFF B Notes About Smart Portrait Mode • The amount of effect. • You can simultaneously apply multiple effects. Skin softening Effects 3 Frame the picture and press the shutter-release button. B Skin softening, l Foundation makeup, Q Soft, G Vividness, o Brightness (Exp. +/-) • Select f Exit to ...
... Features Smart Portrait Mode (Enhancing Human Faces When Shooting) Smart Portrait Mode (Enhancing Human Faces When Shooting) You can take a picture with the glamour retouch function to enhance human faces. 1 Press the multi selector K. 2 Apply an effect. • Use ...2 1 OFF B Notes About Smart Portrait Mode • The amount of effect. • You can simultaneously apply multiple effects. Skin softening Effects 3 Frame the picture and press the shutter-release button. B Skin softening, l Foundation makeup, Q Soft, G Vividness, o Brightness (Exp. +/-) • Select f Exit to ...

Reference Manual
Page 57
... (A41). • When you press the shutter-release button to detect faces or smiles (A56). The shutter-release button can also be unable to take a picture, smile timer is released. 43 Shooting Features Smart Portrait Mode (Enhancing Human Faces When Shooting) C When the Self-timer Lamp Flashes When using smile timer...
... (A41). • When you press the shutter-release button to detect faces or smiles (A56). The shutter-release button can also be unable to take a picture, smile timer is released. 43 Shooting Features Smart Portrait Mode (Enhancing Human Faces When Shooting) C When the Self-timer Lamp Flashes When using smile timer...
Reference Manual
Page 58
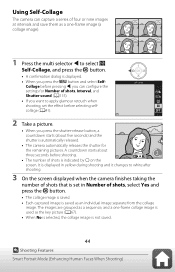
... saved. 44 Shooting Features Smart Portrait Mode (Enhancing Human Faces When Shooting) Using Self-Collage The camera can configure the settings for the remaining pictures. Self-Collage 2 Take a picture. • When you want to white after shooting. 3 On the screen displayed when the camera finishes taking the number of shots that is... set the effect before shooting. 2 • The number of four or nine images at intervals and save them as the key picture (A67). • When No is selected, the collage image is indicated by U on the screen.
... saved. 44 Shooting Features Smart Portrait Mode (Enhancing Human Faces When Shooting) Using Self-Collage The camera can configure the settings for the remaining pictures. Self-Collage 2 Take a picture. • When you want to white after shooting. 3 On the screen displayed when the camera finishes taking the number of shots that is... set the effect before shooting. 2 • The number of four or nine images at intervals and save them as the key picture (A67). • When No is selected, the collage image is indicated by U on the screen.
Reference Manual
Page 59
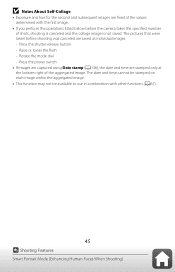
...-release button - Press the power switch • If images are captured using Date stamp (A136), the date and time are saved as individual images. - The pictures that were taken before shooting was canceled are stamped only at the values determined with other functions (A61). 45 Shooting Features Smart Portrait Mode (Enhancing...
...-release button - Press the power switch • If images are captured using Date stamp (A136), the date and time are saved as individual images. - The pictures that were taken before shooting was canceled are stamped only at the values determined with other functions (A61). 45 Shooting Features Smart Portrait Mode (Enhancing...
Reference Manual
Page 60
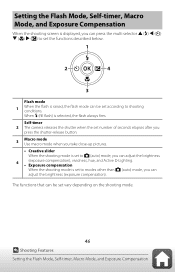
... shutter when the set number of seconds elapses after you press the shutter-release button. 3 Macro mode Use macro mode when you take close-up pictures. • Creative slider When the shooting mode is set to A (auto) mode, you can adjust the brightness 4 (exposure compensation), vividness, hue, and Active D-Lighting. •...
... shutter when the set number of seconds elapses after you press the shutter-release button. 3 Macro mode Use macro mode when you take close-up pictures. • Creative slider When the shooting mode is set to A (auto) mode, you can adjust the brightness 4 (exposure compensation), vividness, hue, and Active D-Lighting. •...
Reference Manual
Page 62
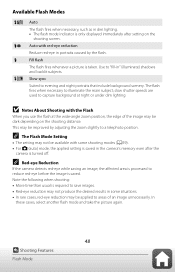
...produce the desired results in the camera's memory even after setting on the shooting distance. In these cases, select another flash mode and take the picture again. 48 Shooting Features Flash Mode Auto with some shooting modes (A59). • For A (auto) mode, the applied setting is saved... some situations. • In rare cases, red-eye reduction may be applied to a telephoto position. Fill flash The flash fires whenever a picture is required to capture background at the wide-angle zoom position, the edge of an image unnecessarily. Note the following when shooting: • ...
...produce the desired results in the camera's memory even after setting on the shooting distance. In these cases, select another flash mode and take the picture again. 48 Shooting Features Flash Mode Auto with some shooting modes (A59). • For A (auto) mode, the applied setting is saved... some situations. • In rare cases, red-eye reduction may be applied to a telephoto position. Fill flash The flash fires whenever a picture is required to capture background at the wide-angle zoom position, the edge of an image unnecessarily. Note the following when shooting: • ...
Reference Manual
Page 63
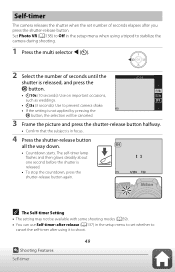
... released. • To stop the countdown, press the shutter-release button again. 1 / 2 5 0 F 3.3 C The Self-timer Setting • The setting may not be canceled. 3 Frame the picture and press the shutter-release button halfway. • Confirm that the subject is not applied by pressing the k button, the selection will be available with...
... released. • To stop the countdown, press the shutter-release button again. 1 / 2 5 0 F 3.3 C The Self-timer Setting • The setting may not be canceled. 3 Frame the picture and press the shutter-release button halfway. • Confirm that the subject is not applied by pressing the k button, the selection will be available with...


