
Reference Manual - English
Page 3
...where you capture with a compatible iPhone®, iPad® and/or iPod touch® or smart devices running on SnapBridge, visit the Nikon website for your devices. Take advantage of Bluetooth® low energy (BLE) technology and a dedicated app. The world. Download the SnapBridge ...For Smart Device Users Connected Welcome to get started! Nikon's new family of services to cloud storage services, inviting access across all your area (Avi). You can even be uploaded effortlessly to enrich your Nikon camera and lenses are automatically transferred to the device as they are ...
...where you capture with a compatible iPhone®, iPad® and/or iPod touch® or smart devices running on SnapBridge, visit the Nikon website for your devices. Take advantage of Bluetooth® low energy (BLE) technology and a dedicated app. The world. Download the SnapBridge ...For Smart Device Users Connected Welcome to get started! Nikon's new family of services to cloud storage services, inviting access across all your area (Avi). You can even be uploaded effortlessly to enrich your Nikon camera and lenses are automatically transferred to the device as they are ...

Quick Start Guide - English for customers in Europe
Page 2
... operating system. Take advantage of services to the device as they are taken. They can share your Nikon camera and lenses are automatically transferred to enrich your smart device now. Download the SnapBridge app to SnapBridge - COOLPIX B500 Model Name: N1516 ii For Smart Device Users Connected Welcome to get started! The stories you...
... operating system. Take advantage of services to the device as they are taken. They can share your Nikon camera and lenses are automatically transferred to enrich your smart device now. Download the SnapBridge app to SnapBridge - COOLPIX B500 Model Name: N1516 ii For Smart Device Users Connected Welcome to get started! The stories you...

Quick Start Guide - English for customers in India
Page 2
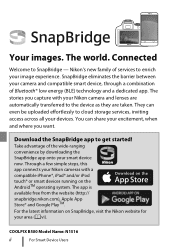
...The app is available free from the website (http:// snapbridge.nikon.com), Apple App Store® and Google PlayTM. COOLPIX B500 Model Name: N1516 ii For Smart Device Users Through a few simple steps, this app connects your Nikon cameras with your smart device now. Connected Welcome to get started... camera and compatible smart device, through a combination of the wide-ranging convenience by downloading the SnapBridge app onto your Nikon camera and lenses are automatically transferred to enrich your area (Avi). Nikon's new family of services to the device as they are taken.
...The app is available free from the website (http:// snapbridge.nikon.com), Apple App Store® and Google PlayTM. COOLPIX B500 Model Name: N1516 ii For Smart Device Users Through a few simple steps, this app connects your Nikon cameras with your smart device now. Connected Welcome to get started... camera and compatible smart device, through a combination of the wide-ranging convenience by downloading the SnapBridge app onto your Nikon camera and lenses are automatically transferred to enrich your area (Avi). Nikon's new family of services to the device as they are taken.
Quick Start Guide - English for customers in the Americas
Page 2
... even be uploaded effortlessly to the device as they are taken. Connected Welcome to get started! They can share your Nikon camera and lenses are automatically transferred to cloud storage services, inviting access across all your devices. The app is available free from the ... devices running on SnapBridge, visit the Nikon website for your smart device now. For Smart Device Users Your images. Download the SnapBridge app to SnapBridge - For the latest information on the AndroidTM operating system. The world. COOLPIX B500 Model Name: N1516 ii For Smart Device...
... even be uploaded effortlessly to the device as they are taken. Connected Welcome to get started! They can share your Nikon camera and lenses are automatically transferred to cloud storage services, inviting access across all your devices. The app is available free from the ... devices running on SnapBridge, visit the Nikon website for your smart device now. For Smart Device Users Your images. Download the SnapBridge app to SnapBridge - For the latest information on the AndroidTM operating system. The world. COOLPIX B500 Model Name: N1516 ii For Smart Device...

Quick Start Guide - English for customers in Asia Oceania the Middle East and Africa
Page 2
... across all your devices. They can share your area (Avi). Through a few simple steps, this app connects your Nikon cameras with your Nikon camera and lenses are taken. Nikon's new family of services to the device as they are automatically transferred to enrich your smart device now. The app is...of the wide-ranging convenience by downloading the SnapBridge app onto your image experience. You can even be uploaded effortlessly to get started! COOLPIX B500 Model Name: N1516 ii For Smart Device Users Connected Welcome to SnapBridge - For Smart Device Users Your images.
... across all your devices. They can share your area (Avi). Through a few simple steps, this app connects your Nikon cameras with your Nikon camera and lenses are taken. Nikon's new family of services to the device as they are automatically transferred to enrich your smart device now. The app is...of the wide-ranging convenience by downloading the SnapBridge app onto your image experience. You can even be uploaded effortlessly to get started! COOLPIX B500 Model Name: N1516 ii For Smart Device Users Connected Welcome to SnapBridge - For Smart Device Users Your images.

Reference Manual
Page 5
D The Nikon Download Center Visit the Nikon download center to download firmware updates, ViewNX-i and other Nikon software, and manuals for Nikon products including cameras, NIKKOR lenses, and flash units. https://downloadcenter.nikonimglib.com/ Package Contents v
D The Nikon Download Center Visit the Nikon download center to download firmware updates, ViewNX-i and other Nikon software, and manuals for Nikon products including cameras, NIKKOR lenses, and flash units. https://downloadcenter.nikonimglib.com/ Package Contents v

Reference Manual
Page 9
... 43 Removing the Battery 43 Battery Level 44 Inserting Memory Cards 45 Removing Memory Cards 46 Number of Exposures Remaining 47 Attaching a Lens 50 Detaching Lenses 51 Choose a Language and Set the Clock 52 Basic Photography and Playback 56 Taking Photographs (b Mode 56 Shooting Movies (b Mode 63 Taking Photos in Movie...
... 43 Removing the Battery 43 Battery Level 44 Inserting Memory Cards 45 Removing Memory Cards 46 Number of Exposures Remaining 47 Attaching a Lens 50 Detaching Lenses 51 Choose a Language and Set the Clock 52 Basic Photography and Playback 56 Taking Photographs (b Mode 56 Shooting Movies (b Mode 63 Taking Photos in Movie...

Reference Manual
Page 26
Alerts and Error Messages 673 Alerts 673 Error Messages 676 Technical Notes 680 Compatible Lenses and Accessories 680 The Camera Display and Control Panel 681 The Monitor 681 The Viewfinder 688 The Control Panel 692 Compatible Flash Units 693 The Nikon Creative Lighting System (CLS)......... 693 Other Compatible Accessories 701 Optional MB-N11...
Alerts and Error Messages 673 Alerts 673 Error Messages 676 Technical Notes 680 Compatible Lenses and Accessories 680 The Camera Display and Control Panel 681 The Monitor 681 The Viewfinder 688 The Control Panel 692 Compatible Flash Units 693 The Nikon Creative Lighting System (CLS)......... 693 Other Compatible Accessories 701 Optional MB-N11...

Reference Manual
Page 38
Do not transport cameras or lenses with hammers. Charge only as in an enclosed automobile or in direct sunlight. Failure to observe this precaution could result in injury or product malfunction. ...
Do not transport cameras or lenses with hammers. Charge only as in an enclosed automobile or in direct sunlight. Failure to observe this precaution could result in injury or product malfunction. ...

Reference Manual
Page 41
... are designed to the highest standards and include complex electronic circuitry. Only Nikon brand electronic accessories (including lenses, chargers, batteries, AC adapters, and flash accessories) certified by Nikon specifically for use with this electronic circuitry. The use of non-Nikon electronic accessories could interfere with the camera cannot be restricted in the batteries overheating...
... are designed to the highest standards and include complex electronic circuitry. Only Nikon brand electronic accessories (including lenses, chargers, batteries, AC adapters, and flash accessories) certified by Nikon specifically for use with this electronic circuitry. The use of non-Nikon electronic accessories could interfere with the camera cannot be restricted in the batteries overheating...

Reference Manual
Page 92
Attaching a Lens • The camera can be used in this manual for illustrative purposes is a NIKKOR Z 24-70mm f/4 S. • Be careful to prevent dust entering the camera. • Confirm that the camera is off before attaching the lens. - Do not touch the image sensor or lens contacts. 50 Attaching a Lens Align the mounting marks on the camera (t) and lens (y). Remove the camera body cap (q, w) and rear lens cap (e, r). - The lens generally used with Z mount lenses.
Attaching a Lens • The camera can be used in this manual for illustrative purposes is a NIKKOR Z 24-70mm f/4 S. • Be careful to prevent dust entering the camera. • Confirm that the camera is off before attaching the lens. - Do not touch the image sensor or lens contacts. 50 Attaching a Lens Align the mounting marks on the camera (t) and lens (y). Remove the camera body cap (q, w) and rear lens cap (e, r). - The lens generally used with Z mount lenses.

Reference Manual
Page 93
D F Mount Lenses • Be sure to the camera could damage the lens or image sensor. Detaching Lenses • After turning the camera off, press and hold the lens release button (q) while turning the lens in the direction shown (w). • After removing the lens, replace the lens caps and camera body cap. - Attaching a Lens 51 Rotate the lens as shown until it clicks into place (u). • Remove the front lens cap before using F mount lenses. • Attempting to attach F mount lenses directly to attach the FTZ mount adapter (available separately) before taking pictures.
D F Mount Lenses • Be sure to the camera could damage the lens or image sensor. Detaching Lenses • After turning the camera off, press and hold the lens release button (q) while turning the lens in the direction shown (w). • After removing the lens, replace the lens caps and camera body cap. - Attaching a Lens 51 Rotate the lens as shown until it clicks into place (u). • Remove the front lens cap before using F mount lenses. • Attempting to attach F mount lenses directly to attach the FTZ mount adapter (available separately) before taking pictures.

Reference Manual
Page 98
Rotate the lens zoom ring as shown until the lens clicks into the extended position. 1 Turn the camera on. The monitor and control panel will light. 56 Taking Photographs (b Mode) Basic Photography and Playback Taking Photographs (b Mode) Select b (auto) mode for simple "point-and-shoot" photography. D Lenses with Retractable Barrels Lenses with retractable barrels must be extended before use.
Rotate the lens zoom ring as shown until the lens clicks into the extended position. 1 Turn the camera on. The monitor and control panel will light. 56 Taking Photographs (b Mode) Basic Photography and Playback Taking Photographs (b Mode) Select b (auto) mode for simple "point-and-shoot" photography. D Lenses with Retractable Barrels Lenses with retractable barrels must be extended before use.

Reference Manual
Page 135
... than [Off] is selected for manual focus or macro photography. Use this camera, the flange-back distance is 16 mm (0.63 in the shooting display. D Lenses with Focus-Mode Selection Manual focus mode can be indicated by colored outlines that appear when focus is adjusted manually (focus peaking). • Note that...
... than [Off] is selected for manual focus or macro photography. Use this camera, the flange-back distance is 16 mm (0.63 in the shooting display. D Lenses with Focus-Mode Selection Manual focus mode can be indicated by colored outlines that appear when focus is adjusted manually (focus peaking). • Note that...

Reference Manual
Page 204
... may jiggle after the shutter is released, but this does not indicate a malfunction. • [Sport] or [On] is recommended for VR lenses may be unavailable with a vibration reduction switch is attached via an optional FTZ mount adapter, [Vibration reduction] will be grayed out and unavailable. Note... or [On] is recommended if the tripod head is unsecured or the camera is mounted on a monopod. • If an F mount lens with some lenses. • We recommend that you wait for the image in the display to stabilize before shooting. • Depending on a tripod. In [Sport], [Normal...
... may jiggle after the shutter is released, but this does not indicate a malfunction. • [Sport] or [On] is recommended for VR lenses may be unavailable with a vibration reduction switch is attached via an optional FTZ mount adapter, [Vibration reduction] will be grayed out and unavailable. Note... or [On] is recommended if the tripod head is unsecured or the camera is mounted on a monopod. • If an F mount lens with some lenses. • We recommend that you wait for the image in the display to stabilize before shooting. • Depending on a tripod. In [Sport], [Normal...

Reference Manual
Page 302
... (36×24)] a [DX (24×16)] b [5:4 (30×24)] m [1:1 (24×24)] Z [16:9 (36×20)] Description Record pictures in FX format with NIKKOR lenses for photographs. Image Quality G button U C photo shooting menu Choose a file format for 35 mm format cameras. Use this option when taking photographs with an angle...
... (36×24)] a [DX (24×16)] b [5:4 (30×24)] m [1:1 (24×24)] Z [16:9 (36×20)] Description Record pictures in FX format with NIKKOR lenses for photographs. Image Quality G button U C photo shooting menu Choose a file format for 35 mm format cameras. Use this option when taking photographs with an angle...

Reference Manual
Page 330
Auto Distortion Control G button U C photo shooting menu Select [On] as required to reduce barrel distortion when shooting with wide-angle lenses and to reduce diffraction at small apertures (high f-numbers). Diffraction Compensation G button U C photo shooting menu Select [On] to reduce pin-cushion distortion when shooting with long lenses. Note that [On] may be selected automatically with some lenses, in which case this item will be grayed out and unavailable. 288 C The Photo Shooting Menu: Shooting Options
Auto Distortion Control G button U C photo shooting menu Select [On] as required to reduce barrel distortion when shooting with wide-angle lenses and to reduce diffraction at small apertures (high f-numbers). Diffraction Compensation G button U C photo shooting menu Select [On] to reduce pin-cushion distortion when shooting with long lenses. Note that [On] may be selected automatically with some lenses, in which case this item will be grayed out and unavailable. 288 C The Photo Shooting Menu: Shooting Options

Reference Manual
Page 422
...] 436 f8 [Reverse ring for focus] 436 f9 [Assign MB-N11 buttons] 437 1 Items modified from default values are indicated by asterisks ("U"). 2 Available with compatible lenses only. D See Also "Custom Settings Menu Defaults" (0219) 380 A Custom Settings: Fine-Tuning Camera Settings
...] 436 f8 [Reverse ring for focus] 436 f9 [Assign MB-N11 buttons] 437 1 Items modified from default values are indicated by asterisks ("U"). 2 Available with compatible lenses only. D See Also "Custom Settings Menu Defaults" (0219) 380 A Custom Settings: Fine-Tuning Camera Settings

Reference Manual
Page 440
... shutter for photographs. D The Electronic Front-Curtain Shutter The fastest shutter speed available when [Electronic front-curtain shutter] is selected is not available with some lenses. P [Mechanical shutter] The camera uses the mechanical shutter for all photos.
... shutter for photographs. D The Electronic Front-Curtain Shutter The fastest shutter speed available when [Electronic front-curtain shutter] is selected is not available with some lenses. P [Mechanical shutter] The camera uses the mechanical shutter for all photos.

Reference Manual
Page 459
... lens number] Y [Same as multi selector] x [Focus point selection] X [Focus (M/A)] q [Aperture] E [Exposure compensation] 9 [ISO sensitivity] [None] wyV 7 8 z S 3 l 4 4 --- 4 -- - 4 4 --- 4 -- - 4 4 --- 4 -- - 4 4 --- 4 -- - 4 4 ------ - 4 4 ------ - 4 4 -- 4 4 -- - --- 4 ---- - --- 4 41, 2 42 42 42 4 4 4 - 4 4 4 4 42 1 Available with compatible lenses only. 2 Regardless of the option selected, in manual focus mode the control ring can only be used to adjust focus. A Custom Settings: Fine-Tuning Camera...
... lens number] Y [Same as multi selector] x [Focus point selection] X [Focus (M/A)] q [Aperture] E [Exposure compensation] 9 [ISO sensitivity] [None] wyV 7 8 z S 3 l 4 4 --- 4 -- - 4 4 --- 4 -- - 4 4 --- 4 -- - 4 4 --- 4 -- - 4 4 ------ - 4 4 ------ - 4 4 -- 4 4 -- - --- 4 ---- - --- 4 41, 2 42 42 42 4 4 4 - 4 4 4 4 42 1 Available with compatible lenses only. 2 Regardless of the option selected, in manual focus mode the control ring can only be used to adjust focus. A Custom Settings: Fine-Tuning Camera...


