
Reference Manual - English
Page 16
... Time Zone and Date ...131 Monitor Settings ...133 Date Stamp ...134 Photo VR ...135 AF Assist ...135 Digital Zoom ...136 Sound Settings...136 Auto Off...137 Format Card/Format Memory...138 Language ...138 Image Comment ...139 Copyright Information ...140 Location Data ...141 Reset All...141 Battery Type...142 Conformity Marking...142 Firmware Version...142 Technical Notes...143 Notices...144 Notes About Wireless Communication Functions 146 Caring for the Product ...149 The Camera...149 Batteries...150 Memory Cards...
... Time Zone and Date ...131 Monitor Settings ...133 Date Stamp ...134 Photo VR ...135 AF Assist ...135 Digital Zoom ...136 Sound Settings...136 Auto Off...137 Format Card/Format Memory...138 Language ...138 Image Comment ...139 Copyright Information ...140 Location Data ...141 Reset All...141 Battery Type...142 Conformity Marking...142 Firmware Version...142 Technical Notes...143 Notices...144 Notes About Wireless Communication Functions 146 Caring for the Product ...149 The Camera...149 Batteries...150 Memory Cards...

Reference Manual - English
Page 97
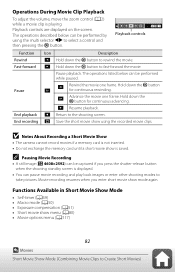
... movie recording and play back images or enter other shooting modes to fast-forward the movie. Pause E C Rewind the movie one frame. D Advance the movie one frame. The operations described below can be performed by using the recorded movie clips. Hold down the k button to take pictures. F Resume playback. Operations During Movie Clip Playback To adjust the volume, move the zoom control while a 10s movie clip is saved. Fast-forward B Hold down the k button for continuous rewinding. The operations...
... movie recording and play back images or enter other shooting modes to fast-forward the movie. Pause E C Rewind the movie one frame. D Advance the movie one frame. The operations described below can be performed by using the recorded movie clips. Hold down the k button to take pictures. F Resume playback. Operations During Movie Clip Playback To adjust the volume, move the zoom control while a 10s movie clip is saved. Fast-forward B Hold down the k button for continuous rewinding. The operations...

Reference Manual - English
Page 120
The Setup Menu Press the d button M z menu icon M k button Option A Time zone and date 131 Monitor settings 133 Date stamp 134 Photo VR 135 AF assist 135 Digital zoom 136 Sound settings 136 Auto off 137 Format card/Format memory 138 Language 138 Image comment 139 Copyright information 140 Location data 141 Reset all 141 Battery type 142 Conformity marking 142 Firmware version 142 104 Using the Menu Menu Lists
The Setup Menu Press the d button M z menu icon M k button Option A Time zone and date 131 Monitor settings 133 Date stamp 134 Photo VR 135 AF assist 135 Digital zoom 136 Sound settings 136 Auto off 137 Format card/Format memory 138 Language 138 Image comment 139 Copyright information 140 Location data 141 Reset all 141 Battery type 142 Conformity marking 142 Firmware version 142 104 Using the Menu Menu Lists
Reference Manual - English
Page 154
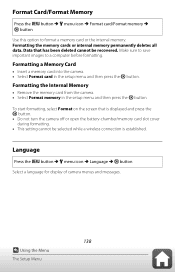
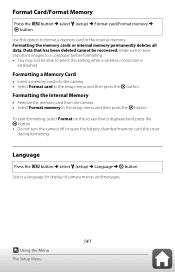
...z menu icon M Language M k button Select a language for display of camera menus and messages. 138 Using the Menu The Setup Menu Data that is established. To start formatting, select Format on the screen that has been deleted cannot be selected while a wireless connection is displayed and press the k button. • Do not turn the camera off or open the battery-chamber/memory card slot cover during formatting. • This setting cannot be recovered. Formatting the memory cards or internal memory permanently deletes all data. Make sure to save important images to format a memory card...
...z menu icon M Language M k button Select a language for display of camera menus and messages. 138 Using the Menu The Setup Menu Data that is established. To start formatting, select Format on the screen that has been deleted cannot be selected while a wireless connection is displayed and press the k button. • Do not turn the camera off or open the battery-chamber/memory card slot cover during formatting. • This setting cannot be recovered. Formatting the memory cards or internal memory permanently deletes all data. Make sure to save important images to format a memory card...

Reference Manual - English
Page 170
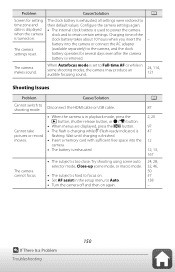
... resume printing.* - Printer error: paper jam. Printer error: check printer status. The file was not created or edited with a faster write speed. create or edit this file. All images are no images available for a slide show, etc. 125 This image cannot be viewed on . Raise the flash when shooting in the camera's internal circuitry. Turn the camera off , remove and reinsert the batteries, and turn the camera on this camera. Disable protection. 126 Raise the flash. Display Cause/Solution A Cannot record movie. File...
... resume printing.* - Printer error: paper jam. Printer error: check printer status. The file was not created or edited with a faster write speed. create or edit this file. All images are no images available for a slide show, etc. 125 This image cannot be viewed on . Raise the flash when shooting in the camera's internal circuitry. Turn the camera off , remove and reinsert the batteries, and turn the camera on this camera. Disable protection. 126 Raise the flash. Display Cause/Solution A Cannot record movie. File...
Reference Manual - English
Page 173
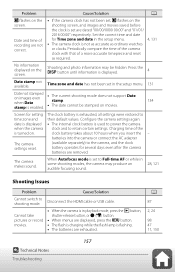
... support Date stamp. Time zone and date has not been set to Full-time AF or while in some shooting modes, the camera may be stamped on the screen. date is displayed • The internal clock battery is used to power the camera when the camera clock and to the camera, and the clock battery operates for several days even after the camera batteries are exhausted. Cannot take pictures or record movies. • When the camera is in playback mode, press the c button, shutter...
... support Date stamp. Time zone and date has not been set to Full-time AF or while in some shooting modes, the camera may be stamped on the screen. date is displayed • The internal clock battery is used to power the camera when the camera clock and to the camera, and the clock battery operates for several days even after the camera batteries are exhausted. Cannot take pictures or record movies. • When the camera is in playback mode, press the c button, shutter...
Reference Manual
Page 96
... movie. B Notes About Recording a Short Movie Show • The camera cannot record movies if a memory card is displayed. • You can be performed while paused. The operations listed below can be captured if you enter short movie show using the multi selector JK to the shooting screen. Playback controls are displayed on the screen. F Resume playback. Functions Available in Short Movie Show Mode • Self-timer (A49) • Macro mode (A50) • Exposure compensation (A51) • Short movie...
... movie. B Notes About Recording a Short Movie Show • The camera cannot record movies if a memory card is displayed. • You can be performed while paused. The operations listed below can be captured if you enter short movie show using the multi selector JK to the shooting screen. Playback controls are displayed on the screen. F Resume playback. Functions Available in Short Movie Show Mode • Self-timer (A49) • Macro mode (A50) • Exposure compensation (A51) • Short movie...

Reference Manual
Page 120
... conditions in order to use in combination with other than Auto or Flash (A19). • This function may not be available to make the colors in images match what you see with your eyes. The Shooting Menu (for A (Auto) Mode) Use when the desired result is automatically adjusted. Option a Auto (default setting) b Preset manual c Daylight d Incandescent e Fluorescent f Cloudy g Flash Description White balance is not achieved with the flash. Use under direct sunlight. Use under fluorescent lighting.
... conditions in order to use in combination with other than Auto or Flash (A19). • This function may not be available to make the colors in images match what you see with your eyes. The Shooting Menu (for A (Auto) Mode) Use when the desired result is automatically adjusted. Option a Auto (default setting) b Preset manual c Daylight d Incandescent e Fluorescent f Cloudy g Flash Description White balance is not achieved with the flash. Use under direct sunlight. Use under fluorescent lighting.
Reference Manual
Page 155
...Select Format card in the setup menu and then press the k button. Formatting the memory cards or internal memory permanently deletes all data. Data that is established. Language Press the d button M select z (setup) M Language M k button Select a language for display of camera menus and messages. 141 Using the Menu The Setup Menu Format Card/Format Memory Press the d button M select z (setup) M Format card/Format memory M k button Use this setting while a wireless connection is displayed and press the k button. • Do not turn the camera off or open the battery-chamber/memory card...
...Select Format card in the setup menu and then press the k button. Formatting the memory cards or internal memory permanently deletes all data. Data that is established. Language Press the d button M select z (setup) M Language M k button Select a language for display of camera menus and messages. 141 Using the Menu The Setup Menu Format Card/Format Memory Press the d button M select z (setup) M Format card/Format memory M k button Use this setting while a wireless connection is displayed and press the k button. • Do not turn the camera off or open the battery-chamber/memory card...
Reference Manual
Page 164
battery into the camera. • The battery is flashing. Cannot take pictures or record movies. • When the camera is in the setup menu to shooting mode. Wait until charging is finished. • Insert a memory card with sufficient free space into the camera or connect the AC adapter The camera (available separately) to power the camera when the camera is turned on. date is displayed • The internal clock battery is set to Full-time AF or while in some shooting modes, the camera may...
battery into the camera. • The battery is flashing. Cannot take pictures or record movies. • When the camera is in the setup menu to shooting mode. Wait until charging is finished. • Insert a memory card with sufficient free space into the camera or connect the AC adapter The camera (available separately) to power the camera when the camera is turned on. date is displayed • The internal clock battery is set to Full-time AF or while in some shooting modes, the camera may...
Reference Manual
Page 171
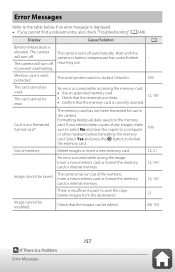
... Image cannot be saved. to format the memory card. The write-protect switch is not formatted. Error Messages Refer to the table below if an error message is insufficient space to save the copies to a computer 169 or other medium before - The camera The camera turns off . Format card? The memory card has not been formatted for use . Insert a new memory card or format the memory card or internal memory. 12, 141 There is displayed. • If you need to keep copies of any images, make...
... Image cannot be saved. to format the memory card. The write-protect switch is not formatted. Error Messages Refer to the table below if an error message is insufficient space to save the copies to a computer 169 or other medium before - The camera The camera turns off . Format card? The memory card has not been formatted for use . Insert a new memory card or format the memory card or internal memory. 12, 141 There is displayed. • If you need to keep copies of any images, make...
Reference Manual
Page 172
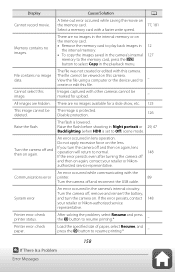
... a Problem Error Messages Disable protection. 126 Raise the flash. Raise the flash before shooting in the playback menu. Printer error: check paper. File contains no images. Images captured with a faster write speed. Do not apply excessive force on this image. System error An error occurred in lens operation. Printer error: check printer status. View the file using a computer or the device used to resume printing.* - A time-out error occurred while saving the movie on again, contact your retailer or Nikon-authorized service representative. The flash...
... a Problem Error Messages Disable protection. 126 Raise the flash. Raise the flash before shooting in the playback menu. Printer error: check paper. File contains no images. Images captured with a faster write speed. Do not apply excessive force on this image. System error An error occurred in lens operation. Printer error: check printer status. View the file using a computer or the device used to resume printing.* - A time-out error occurred while saving the movie on again, contact your retailer or Nikon-authorized service representative. The flash...
Reference Manual
Page 158
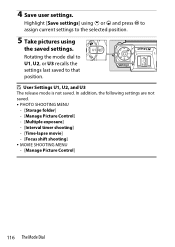
...the mode dial to U1, U2, or U3 recalls the settings last saved to the selected position. 5 Take pictures using the saved settings. D User Settings U1, U2, and U3 The release mode is not saved. Highlight [Save settings] using 1 or 3 and press J to assign current settings to that position. In addition, the following settings are not saved. • PHOTO SHOOTING MENU - [Storage folder] - [Manage Picture Control] - [Multiple exposure] - [Interval timer shooting] - [Time-lapse movie] - [Focus shift shooting] • MOVIE SHOOTING MENU - [Manage Picture Control] 116 The Mode Dial 4 Save user...
...the mode dial to U1, U2, or U3 recalls the settings last saved to the selected position. 5 Take pictures using the saved settings. D User Settings U1, U2, and U3 The release mode is not saved. Highlight [Save settings] using 1 or 3 and press J to assign current settings to that position. In addition, the following settings are not saved. • PHOTO SHOOTING MENU - [Storage folder] - [Manage Picture Control] - [Multiple exposure] - [Interval timer shooting] - [Time-lapse movie] - [Focus shift shooting] • MOVIE SHOOTING MENU - [Manage Picture Control] 116 The Mode Dial 4 Save user...

Reference Manual
Page 712
Copy pictures from the memory card to a computer using Nikon software. View NEF (RAW) images using Capture NX-D or ViewNX-i. ˔ Pictures cannot be copied to a computer: Depending on the operating system, you may display correctly if default settings are restored using the [Reset all settings] item in the setup menu. ˔ The Image Dust Off option in Capture NX-D does not have desired effect: Image sensor cleaning changes the position of NEF (RAW) images, the...
Copy pictures from the memory card to a computer using Nikon software. View NEF (RAW) images using Capture NX-D or ViewNX-i. ˔ Pictures cannot be copied to a computer: Depending on the operating system, you may display correctly if default settings are restored using the [Reset all settings] item in the setup menu. ˔ The Image Dust Off option in Capture NX-D does not have desired effect: Image sensor cleaning changes the position of NEF (RAW) images, the...
Reference Guide PDF Edition
Page 52
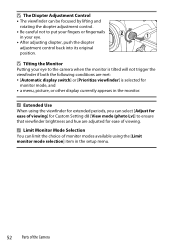
... Adjustment Control • The viewfinder can be focused by lifting and rotating the diopter adjustment control. • Be careful not to put your fingers or fingernails in your eye to ensure that viewfinder brightness and hue are met: • [Automatic display switch] or [Prioritize viewfinder] is selected for monitor mode, and • a menu, picture, or other display currently appears in the setup menu. 52 Parts...
... Adjustment Control • The viewfinder can be focused by lifting and rotating the diopter adjustment control. • Be careful not to put your fingers or fingernails in your eye to ensure that viewfinder brightness and hue are met: • [Automatic display switch] or [Prioritize viewfinder] is selected for monitor mode, and • a menu, picture, or other display currently appears in the setup menu. 52 Parts...

Reference Guide PDF Edition
Page 397
Problem Solution • The camera displays Connection settings require adjustment. Check a wireless error. see the utility's online help. settings for information on errors involving wireless LAN and Ethernet connections. • For information on the Wireless Transmitter Utility, see "Error Codes" (0399). display. "Connecting to some common issues are listed below. Troubleshooting Wireless LAN and Ethernet Connections 397 The camera displays the message, "Ethernet cable is not connected". For more information, an FTP error. Troubleshooting Wireless LAN and...
Problem Solution • The camera displays Connection settings require adjustment. Check a wireless error. see the utility's online help. settings for information on errors involving wireless LAN and Ethernet connections. • For information on the Wireless Transmitter Utility, see "Error Codes" (0399). display. "Connecting to some common issues are listed below. Troubleshooting Wireless LAN and Ethernet Connections 397 The camera displays the message, "Ethernet cable is not connected". For more information, an FTP error. Troubleshooting Wireless LAN and...

Reference Guide PDF Edition
Page 667
... the right. F mount lenses connected via an FTZ II/FTZ mount adapter. certain Z mount lenses that can only be focused manually, or - A Custom Settings: Fine-Tuning Camera Settings 667 f8: Reverse Ring for Focus G button U A Custom Settings menu Select [ON] to reverse the direction of rotation for the focus or control rings on the right. Option V W Description The indicator is displayed with positive values on the...
... the right. F mount lenses connected via an FTZ II/FTZ mount adapter. certain Z mount lenses that can only be focused manually, or - A Custom Settings: Fine-Tuning Camera Settings 667 f8: Reverse Ring for Focus G button U A Custom Settings menu Select [ON] to reverse the direction of rotation for the focus or control rings on the right. Option V W Description The indicator is displayed with positive values on the...

Reference Guide PDF Edition
Page 791
... function as expected: • Confirm that an HDMI cable is correctly connected. • Is [ON] selected for [External rec. ˔ Pictures are not displayed on the operating system, you may display correctly if default settings are restored using the [Reset all settings] item in the setup menu. ˔ The Image Dust Off option in the video recording menu? • Pictures may be unable to upload pictures when the camera is connected to a computer using a card...
... function as expected: • Confirm that an HDMI cable is correctly connected. • Is [ON] selected for [External rec. ˔ Pictures are not displayed on the operating system, you may display correctly if default settings are restored using the [Reset all settings] item in the setup menu. ˔ The Image Dust Off option in the video recording menu? • Pictures may be unable to upload pictures when the camera is connected to a computer using a card...

Reference Guide PDF Edition
Page 913
... USB cable 4 USB connection priority 737 USB power delivery 744 Z Zebra pattern 686 V Vibration reduction 526 Video file type 214 Video flicker reduction 585 Video recording menu 576 Video-record button 93 View all in continuous mode ....... 629 View assist 685 View mode (photo Lv 624 Viewfinder brightness 711 Viewfinder color balance 712 Vignette control 516, 584 Virtual horizon type 631 Vivid (Set Picture Control 193 Voice memo 295 Voice memo options 732 W Warm display colors 626 WB bracketing 183 U button 158 White balance...
... USB cable 4 USB connection priority 737 USB power delivery 744 Z Zebra pattern 686 V Vibration reduction 526 Video file type 214 Video flicker reduction 585 Video recording menu 576 Video-record button 93 View all in continuous mode ....... 629 View assist 685 View mode (photo Lv 624 Viewfinder brightness 711 Viewfinder color balance 712 Vignette control 516, 584 Virtual horizon type 631 Vivid (Set Picture Control 193 Voice memo 295 Voice memo options 732 W Warm display colors 626 WB bracketing 183 U button 158 White balance...

Setting Guide Video Edition
Page 4
... camera controls and insert a battery and memory card. ● The supplied EH-7P charging AC adapter or an optional AC adapter is now ready to start recording. ● You can also start recording via the video microphone. The shoot- Video recording time ing display also shows the time remaining, or in the shooting display. The camera is recommended for extended recording. The camera can be powered via USB. Adjust recording settings as desired. 3 Press the video-record button to start recording. ● Press the video-record button...
... camera controls and insert a battery and memory card. ● The supplied EH-7P charging AC adapter or an optional AC adapter is now ready to start recording. ● You can also start recording via the video microphone. The shoot- Video recording time ing display also shows the time remaining, or in the shooting display. The camera is recommended for extended recording. The camera can be powered via USB. Adjust recording settings as desired. 3 Press the video-record button to start recording. ● Press the video-record button...


