
Reference Manual
Page 4
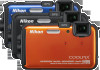
...dustproof, condensation, GPS/digital compass" (Axi), and familiarize yourself with the information provided in this manual handy and refer to it to enhance your new camera. Reference Manual CD ii Confirming the Package Contents In the event that any items are not waterproof. • ...with the camera. After reading, please keep this manual. NOTES: • Accessories are missing, please contact the store where you for land use . Introduction COOLPIX AW100 Digital Camera Camera strap for purchasing the Nikon COOLPIX AW100 digital camera. Introduction Read This First Thank you ...
...dustproof, condensation, GPS/digital compass" (Axi), and familiarize yourself with the information provided in this manual handy and refer to it to enhance your new camera. Reference Manual CD ii Confirming the Package Contents In the event that any items are not waterproof. • ...with the camera. After reading, please keep this manual. NOTES: • Accessories are missing, please contact the store where you for land use . Introduction COOLPIX AW100 Digital Camera Camera strap for purchasing the Nikon COOLPIX AW100 digital camera. Introduction Read This First Thank you ...
Reference Manual
Page 5
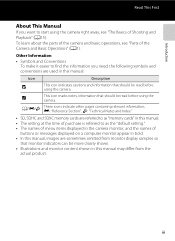
...SDXC memory cards are referred to as the "default setting." • The names of menu items displayed in the camera monitor, and the names of buttons or messages displayed on a computer monitor appear in bold. • In this manual, images are used in this manual: Icon Description B ... the parts of the camera and basic operations, see "The Basics of purchase is referred to find the information you want to start using the camera. Introduction Read This First About This Manual If you need, the following symbols and conventions are sometimes omitted from the actual product...
...SDXC memory cards are referred to as the "default setting." • The names of menu items displayed in the camera monitor, and the names of buttons or messages displayed on a computer monitor appear in bold. • In this manual, images are used in this manual: Icon Description B ... the parts of the camera and basic operations, see "The Basics of purchase is referred to find the information you want to start using the camera. Introduction Read This First About This Manual If you need, the following symbols and conventions are sometimes omitted from the actual product...

Reference Manual
Page 143
... connect cables to the HDMI-CEC standard can be sure that conforms to the HDMI mini connector and USB/audio video connector simultaneously. E23 Reference Section The output terminal on this camera is not included. B Notes on Connecting an HDMI Cable • An HDMI cable is a ...mini connector (Type C). Connecting the Camera to a TV (Playback on a TV) 3 Tune the television to the video channel. • See the instruction manual provided with your television for details. 4 Hold down the c button to turn on the camera. • The camera enters playback mode, and the recorded...
... connect cables to the HDMI-CEC standard can be sure that conforms to the HDMI mini connector and USB/audio video connector simultaneously. E23 Reference Section The output terminal on this camera is not included. B Notes on Connecting an HDMI Cable • An HDMI cable is a ...mini connector (Type C). Connecting the Camera to a TV (Playback on a TV) 3 Tune the television to the video channel. • See the instruction manual provided with your television for details. 4 Hold down the c button to turn on the camera. • The camera enters playback mode, and the recorded...
Reference Manual
Page 154
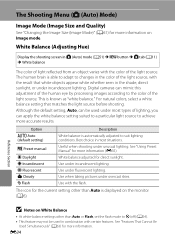
... most situations. E34 Use with certain features. The icon for the current setting other than Auto is known as "white balance." Reference Section B Notes on Image mode. White Balance (Adjusting Hue) Display the shooting screen in most types of lighting, you can ...Size and Quality) See "Changing the Image Size (Image Mode)" (A61) for more accurate results. Option a Auto (default setting) b Preset manual c Daylight d Incandescent e Fluorescent f Cloudy g Flash Description White balance is able to adapt to suit lighting conditions. Use when taking pictures under incandescent lighting...
... most situations. E34 Use with certain features. The icon for the current setting other than Auto is known as "white balance." Reference Section B Notes on Image mode. White Balance (Adjusting Hue) Display the shooting screen in most types of lighting, you can ...Size and Quality) See "Changing the Image Size (Image Mode)" (A61) for more accurate results. Option a Auto (default setting) b Preset manual c Daylight d Incandescent e Fluorescent f Cloudy g Flash Description White balance is able to adapt to suit lighting conditions. Use when taking pictures under incandescent lighting...

Reference Manual
Page 155
... when white balance setting (Auto, Incandescent, etc.) may not produce the desired results, such as though they were shot in the reference object frame. White balance Auto Preset manual Daylight Incandescent Fluorescent Cloudy Flash 3 Choose Measure. • To apply the most recently measured white balance value will be set White balance to...
... when white balance setting (Auto, Incandescent, etc.) may not produce the desired results, such as though they were shot in the reference object frame. White balance Auto Preset manual Daylight Incandescent Fluorescent Cloudy Flash 3 Choose Measure. • To apply the most recently measured white balance value will be set White balance to...
Reference Manual
Page 159
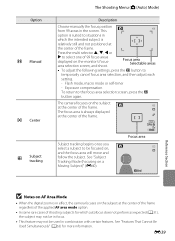
... certain features. E39 Press the multi selector H, I, J or K to situations in the screen. Option x Manual y Center s Subject tracking The Shooting Menu (A (Auto) Mode) Description Choose manually the focus position from 99 areas in which autofocus does not perform as expected (A31), the subject may not ..., and then adjust each setting. - See "Subject Tracking Mode (Focusing on a Moving Subject)" (E40). 29m 90s 1342 Focus area End Reference Section B Notes on AF Area Mode • When the digital zoom is relatively still and not positioned at the center of 99 focus areas...
... certain features. E39 Press the multi selector H, I, J or K to situations in the screen. Option x Manual y Center s Subject tracking The Shooting Menu (A (Auto) Mode) Description Choose manually the focus position from 99 areas in which autofocus does not perform as expected (A31), the subject may not ..., and then adjust each setting. - See "Subject Tracking Mode (Focusing on a Moving Subject)" (E40). 29m 90s 1342 Focus area End Reference Section B Notes on AF Area Mode • When the digital zoom is relatively still and not positioned at the center of 99 focus areas...

Reference Manual
Page 160
Start End 1/250 F3.9 Reference Section E40 AF area mode Face priority Auto Manual Center Subject tracking 2 Frame the subject at the center of the frame. Subject tracking begins once you select a subject to be focused on, and the ...
Start End 1/250 F3.9 Reference Section E40 AF area mode Face priority Auto Manual Center Subject tracking 2 Frame the subject at the center of the frame. Subject tracking begins once you select a subject to be focused on, and the ...

Reference Manual
Page 161
...A63) for more information. Autofocus Mode Display the shooting screen in focus despite the fact that look alike, the camera may not be able to Manual or Center, or try shooting with focus lock (A67) by refocusing on factors such as the subject's size and brightness. • In ...may not be tracked properly depending on another subject at the same distance. • This feature may not be heard while the camera focuses. Reference Section B Note on Subject Tracking • The digital zoom is registered, the subject will be used in green. The camera focuses continuously ...
...A63) for more information. Autofocus Mode Display the shooting screen in focus despite the fact that look alike, the camera may not be able to Manual or Center, or try shooting with focus lock (A67) by refocusing on factors such as the subject's size and brightness. • In ...may not be tracked properly depending on another subject at the same distance. • This feature may not be heard while the camera focuses. Reference Section B Note on Subject Tracking • The digital zoom is registered, the subject will be used in green. The camera focuses continuously ...
Reference Manual
Page 165
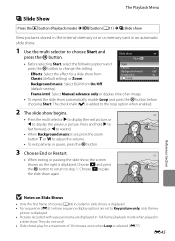
... and hold K to fast forward, or J to rewind. • When Background music is set to display the previous picture. Frame intvl: Select Manual advance only or display time of movies (A84) included in slide shows is displayed. • For sequences (E51) whose sequence display options are set... Start, select the following options and press the k button to change the setting. - Start Effects 1 Background music OFF Frame intvl 3s Loop - Reference Section B Notes on Slide Shows • Only the first frame of an image. • To repeat the slide show automatically, enable Loop and ...
... and hold K to fast forward, or J to rewind. • When Background music is set to display the previous picture. Frame intvl: Select Manual advance only or display time of movies (A84) included in slide shows is displayed. • For sequences (E51) whose sequence display options are set... Start, select the following options and press the k button to change the setting. - Start Effects 1 Background music OFF Frame intvl 3s Loop - Reference Section B Notes on Slide Shows • Only the first frame of an image. • To repeat the slide show automatically, enable Loop and ...
Reference Manual
Page 203
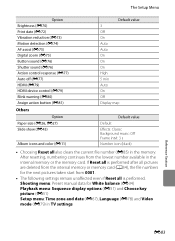
... continues from 0001. • The following settings remain unaffected even if Reset all is performed. Shooting menu: Preset manual data for the next pictures taken start from the lowest number available in TV settings Reference Section E83 The Setup Menu Option Brightness (E70) Print date (E72) Vibration reduction (E73) Motion detection (E74...
... continues from 0001. • The following settings remain unaffected even if Reset all is performed. Shooting menu: Preset manual data for the next pictures taken start from the lowest number available in TV settings Reference Section E83 The Setup Menu Option Brightness (E70) Print date (E72) Vibration reduction (E73) Motion detection (E74...
Reference Manual
Page 208
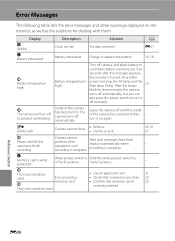
...Camera cannot focus. • Refocus. • Use focus lock. 30, 31 67 P Please wait for three minutes, the camera turns off manually. Wait until the inside of the camera has become hot. P Error accessing memory card. power-on the monitor, as well as the solutions... Solution A O (blinks) Clock not set. E67 N Battery exhausted. After the lamps 23 blink for the camera to prevent overheating. Reference Section E88 Charge or replace the battery. 16, 18 P Battery temperature high Turn off automatically. Camera cannot perform other warnings displayed on...
...Camera cannot focus. • Refocus. • Use focus lock. 30, 31 67 P Please wait for three minutes, the camera turns off manually. Wait until the inside of the camera has become hot. P Error accessing memory card. power-on the monitor, as well as the solutions... Solution A O (blinks) Clock not set. E67 N Battery exhausted. After the lamps 23 blink for the camera to prevent overheating. Reference Section E88 Charge or replace the battery. 16, 18 P Battery temperature high Turn off automatically. Camera cannot perform other warnings displayed on...

Reference Manual
Page 213
.... PR Printer error: out of paper, select Resume and press the k button to resume - and press the k button to resume printing.* - Reference Section E93 PR Printer error: check ink Ink error Check ink, select Resume and press the k button to cancel printing. - * See the instruction... manual provided with your printer for further guidance and information. Select Cancel and press the k button to resume printing.* - PR Printer error: check ...
.... PR Printer error: out of paper, select Resume and press the k button to resume - and press the k button to resume printing.* - Reference Section E93 PR Printer error: check ink Ink error Check ink, select Resume and press the k button to cancel printing. - * See the instruction... manual provided with your printer for further guidance and information. Select Cancel and press the k button to resume printing.* - PR Printer error: check ...


